Birds and Giraffes

Hello again. I haven’t posted for a few days as I was in a little slump. Whatever I tried didn’t work and left me feeling quite frustrated. Then I received a few challenge recognition badges and top picks – and boy did that get the mojo flowing!

This first card is inspired from the current Color Throwdown challenge and the sketch from AAA cards. I was Featured Stamper for the last Color Throwdown, and will be Guest Star Stamper for the challenge beginning 12th September. Wow! I hope you can join us for that challenge. The colours we will be using this coming week are fab-u-lous!

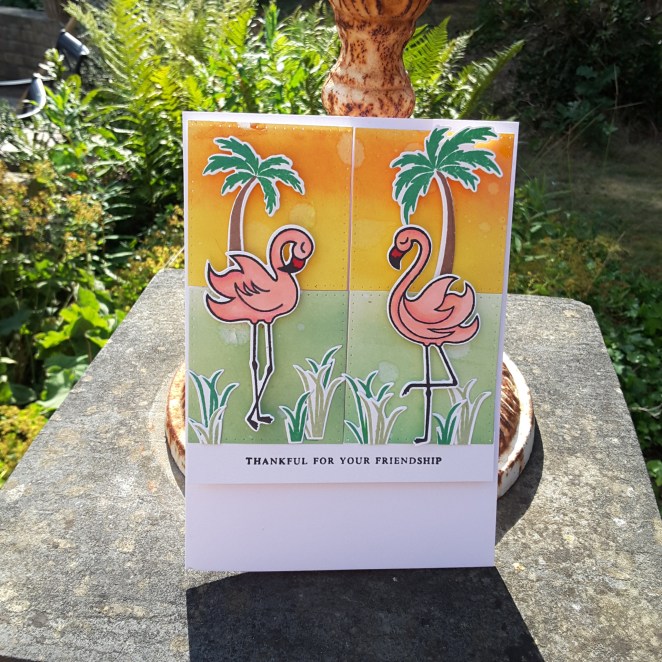
The card below was really fun stamping and adding the little bits and pieces for the birds and leaves, so they matched the colours (orange, blue, red):

20180908_08030220180908_080310

I used Catherine Pooler red, orange, and blue, and of course I used to use the red and orange for the blended background, and I even did some water-splatters too – these inks are very, very versatile.

The stamp set is MFT ‘Mod Birds’ and is such a fun set to play with. I like how the filling stamps don’t fully match and complete the image, giving a quirky and modern look and feel to them.

The speech bubble die is from Altenew and I just embossed it into the background instead of cutting it, in such a position that it looks like it’s coming out of one of the mouths of one of the birds – does it work? I even outlined it a  little with a white gel pen – I wasn’t brave enough to use the black pen!

The sentiment is from Heffy Doodle ‘Wing Man‘ stamp set – another set I’ll be playing with soon. This card will also be entered into the current Simon Says Stamp Monday Challenge – ‘stamps – no digital’.

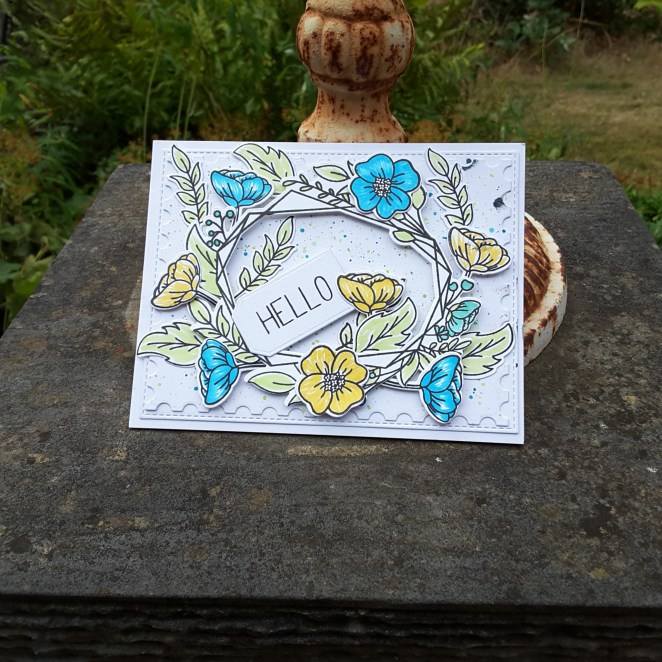
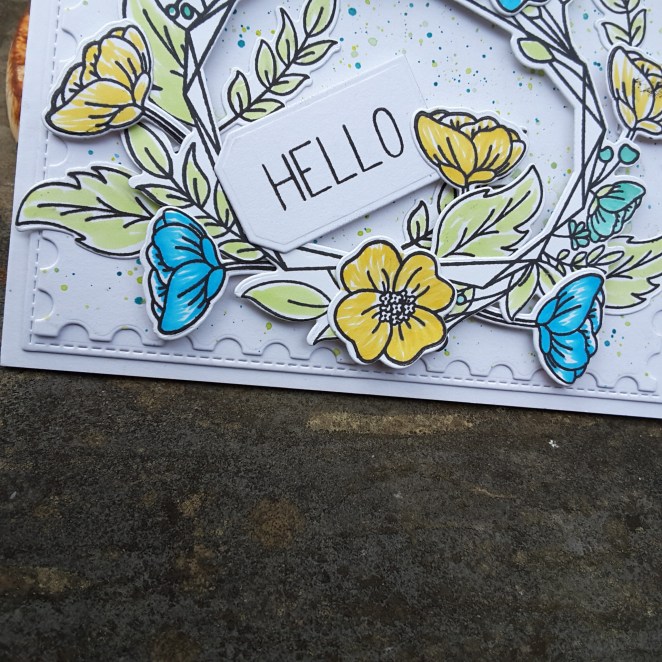
This second card is inspired from the current challenge at CASology with the theme of ‘FLIP‘, and Simply Less Is More, with the challenge to use black, white, and one colour:

20180908_080236

20180908_080242

I used the MFT ‘Playful Giraffes‘ for this card – aren’t they cute? I stamped the giraffes in Versafine black onyx – made sure it was completely dry, then coloured with an Altenew Artist Marker. Guess how I found out to make sure the black ink was dry before colouring?

I used a sentiment from the same stamp set, and again used a speech bubble.

Have a good day, and I hope you can join me again soon. 🙂


Shadow layering

Hello again. I haven;t been able to sit to craft for the past few days, but have been able to take some time today. I have been trying a new technique from the Altenew Academy and One Layer Wonders. I have learnt so much just from the first lesson, and thought I’d give it a go……(there are ooopsy photos here too)….

This is the end result:

20180831_130852

I like how the shadowing comes across this one layer piece of card, giving dimension, and I used the colours from the current Color Throwdown Challenge to ‘flicky’ colour it in. I think I’ll be practicing the shadowing more in the future.

Now for the ooopsies…..

20180831_092603

This first attempt I was using little post-it tabs, and drew the dark grey line when they were still in place, and even used the other greys to colour and shadow with them still in place. So – note to self – remove the post-it notes before doing more colouring, ‘cos it smudges and runs!

Here is where I tried to correct it:

20180831_093418

I removed the post-it tabs, drew a thicker grey line, and shaded outwards again……I think this will have a separate sentiment banner across the middle to cover it up!

Now – I have some proper masking tape, as used by Kelly Latevola in the lesson – if I used it correctly – then it worked!! Who knew????

I shall – obviously – be entering the completed project into the following challenges:

Color Throwdownpurple, green, yellow, red

Watercooler Challengesanything goes

Addicted to Stamps and Moremake your mark

Crafty Sentiments Designsanything goes


Floral Frame

Hi there. I have been stamping and die-cutting AND colouring for this card:

20180822_153514

Here is a close-up of the way I coloured the flowers and leaves:

20180822_153522

Not solid colouring, just flicked from the bottom of the petal, then flicked from the top and left some white in the middle to try to create some dimension. I thought I;d give it a go, and I must say I like this technique. I am a novice when it comes to colouring and blending, but I am certainly enjoying my journey.

This card has been created for the current Just Us Girls Challenge – to use light green, aqua, and pale yellow.

I knew I wanted to use this new stamp set – Seven Hills Crafts yet again! – and set to it! It is the Neat and Tangled ‘Floral Frames‘ and I bought the matching die-set too – much as I usually do! I am not a fussy-cutter-outer kinda person!

I stamped many of the flowers and leaves, and even several of the main frame – just in case! I made sure the Versafine black onyx was well and truly dry before I went anywhere near it with the alcohol markers. I used one of the blues which I felt more closely represented aqua.

Once die-cut, I arranged as you see – tucking the additional flowers and leaves under – and even on top of – the main frame. The postage shaped background is a Catherine Pooler die I have used before, ink splattered with the same three colours, and then layered onto another piece of white card, then layered again onto a card base.

The sentiment is from the same stamp set, and die cut from an MDT Die-namics ‘Trad Tags Stax‘ which is the first time I’ve used them. I didn’t want a huge sentiment, and I didn’t want a die-cut sentiment, so a small tag tucked into the centre seemed right to me.

See you again soon…….. 🙂


Get Well Soon

Hello everyone. I have been crafting some cards as an escape from doing my mum’s Ebay stuff.

I was inspired by the current challenge at Twofer Card Challenge, and also using the sketch from Crazy 4 Challenges for one of the cards:

20180819_142414

The ‘feel better soon’ card is another one layer card, with no smudges again – maybe I’m getting the hang of it? We shall see………

I took the Altenew ‘Get Well Soon’ stamp set and stamped the main image onto a card base. I then stamped again onto a post-it note and masked it off, stamping the honeycomb images over and around it, lining up the hexagons  as it was several different hexagon shaped stamps I used.

The main image I coloured with Altenew Artist Markers.:

20180819_135608

I have no idea what is supposed to be in the bottle behind the mug and honey, but I just coloured it a matching colour…..maybe maple syrup…..who knows!

The second floral card is using the same honeycomb stamp, but this time I stamped and heat embossed it in a random pattern, and used my Distress Oxides over the top for an emboss-resist. It’s quite dull here in the UK at the moment, but the honeycomb is white and shiny:

20180819_135626.jpg

I used Altenew inks to stamp the main flower and the leaves, but coloured the two little sprigs of flowers with the Altenew Artist Markers, then using the matching dies to cut them all out.

The die cut frame is from Sue Wilson – Noble dies – for the main background, die-cutting the middle and inserting the ink-resist panel into it. I knew the flowers and leaves would adding dimension, so I stuck this flat to the base card.

I arranged as you see for another vibrant card – but a totally different feel.

The sentiment is a cobbling together of three stamps from Concord and 9th ‘Wonderful Floral‘ stamp set – lined up using my Misti corner set…………..invaluable when there are different stamps you want lined up to ink and stamp together.

I shall be entering the following challenges:

Twofer Card Challenge geometric (honeycomb stamps)

Crazy 4 Challengessketch

QKR Stampede anything goes

Aud Sentiments Challengeanything goes with a sentiment

Have a good day, and I’ll hopefully see you next time. 🙂


Butterfly and flowers

Hello again. I’ve had a busy few days……mum has decided not to craft again 😦 and so she wants me to sell all her stuff on Ebay. When I say all her stuff…..I mean absolutely everything. There is a lot of stuff, and many of them haven’t even been opened or used. It reminds me to use my own stash!

Over 500 photos later, and I still haven’t scratched the surface…..guess what I’m going to be doing for the next few months….

I did manage to find time to craft today, and even played around a little.

This first card is for the current challenge at Color Throwdown, to use the colours aqua, peach, light grey, and white:

20180817_144354.jpg

I played around with these colours for a few stamping moments. I tried several variations on the theme, but still using the same Altenew ‘Build a flower: Cattleya‘ stamp and die set.

This card was doing a sort of fast water-colouring – as per Jennifer McGuire – using Catherine Pooler ‘Aquatini‘ ink – one of my all-time favourite colours, after heat embossing with clear embossing powder on white water-colour card.

I then took a piece of water-colour card and added some Altenew grey ink –  I forget which one – and did a smooshing technique – wet water-colour card onto the wet ink. I did the smooshing several times, drying between each layer – I didn’t know until I tried this that the Altenew inks layer quite nicely.

I then used the Altenew ‘Leaf Frame Cover Die‘, die cut it, but left all the pieces in. I didn’t mean to do this, but when I took the die off the card, they all stayed put – so I went with it instead of pressing each piece out.

I stuck and layered as you see, and the sentiment is stamped in Stampin Up ‘Peekaboo Peach‘ – though it actually looks quite orange to me here…..supposed to be peach!

I had a play making some other variations:


The first image is using the three colours and the layering stamps – grey for the base, then the peach, then the Aquatini – kinda liking that look and effect. The top right is using the Peekaboo Peach for each layer, giving a little dimension, and the third card I used my Altenew Artist Markers to add more definition once stamped.

This second card is for the current challenge at CAS on Friday with the theme of butterflies, and also the current challenge at AAA Cards, with the theme of friendship.

20180817_144328.jpg

I used Altenew Artist Markers and scribbled onto some Neenah card, then die-cut the butterfly itself, then took a spare piece of the grey water-colour card and die cut the butterfly outline. I only stuck down the middle of the butterfly, so the wings have dimension:

20180817_144332.jpg

I then embossed the MFT ‘Rectangle Peekaboo Window’ die onto the card base – not cutting, just embossing – and stuck my butterfly down. Hey presto! Sounds easy…..but it took me a while to figure out what to do!

The sentiment is cobbled together from Altenew ‘Folksy Florals’ stamp set. There is a great variety of sentiments with that stamp set, and you can make virtually any kind of sentiment for anyone.

Phew – this turned out to be a longer post than I planned – you let me waffle on a bit – so I did!

Have a good one – catch you later.

🙂

Card for hubby’s birthday

Hello everyone. I have made this card for hubby’s birthday, which is today – and just given it to him five minutes before his mates came for him to go out…..so he still has three hours left to celebrate……Does anyone else do things like that? When the card is for a particular family member, I go by the skin of my teeth!

20180811_203430 (2)

As it’s so late here in the UK, I had to take the photo inside, with a little lamp at the side. So I apologise for the lighting, but I went with what I had…..

I recently received this stamp set from Seven Hills Crafts – Hero Arts ‘Country Fair Pig’ – and knew it would fit in perfectly for hubby’s birthday. I also used the colours from the current challenge at Color Throwdown – pink, teal, grey.

I also used my Altenew Artist Markers to colour the piggies and tried to concentrate on the shading on each of them.

The background circles is a die from Avery Elle, and behind the circles I added some grey ink through a stencil from The Crafters Workshop – ‘Mini Microbial‘. The sentiment is from Concord and 9th ‘Laurel Frame‘ stamp set.

My thought on the balloon piggie – the balloons are carrying him away from his circle! Just a little added fun.

I also added some clear sparkle pen to the balloons:

20180811_203440

I shall be entering the following challenges:

Color Throwdowngrey, teal, pink

The Male Room Challengemale birthday

Addicted to CAS CAS masculine

Addicted to Stamps and More CAS


Tropical Friendship

20180805_165600

Hi again. I have been playing with my newest Catherine Pooler ‘Stamp of Approval’ box. I took the opportunity to use the Altenew Artist Markers, too, as I have recently received them. I used three colours for the flamingos, after first stamping the outline with black ink.

The trees and grass are also from that same Catherine Pooler box, and stamped using the same greens as I used to  blend the background, with the brown trunk on the trees a Catherine Pooler ink.

I did find stamping the tree tops, then die-cutting, then stamping the trunks made it easier to ensure correct placement and angle as the tree and trunk comes in one die. It could be possible to stamp at the wrong angle, but I found this way easy.

I shall be entering the following challenges:

Freshly Made Sketchessketch

Give a Crafter a Cookie –  photo inspiration

Crafty Gals CornerTropical Colours