sweet machine

20180225_165829Hi there. After attending the Uniko stamping retreat yesterday (Saturday) in Stockton-On-Tees, I was a little inked and stamped out. I had so many thoughts and ideas going through my head using their new release stamps and stencils – I just didn’t know where to being to play today.
So – I didn’t. I went with die-cutting to give my little brain a rest……or so I thought! This card is inspired by the current challenge from Pinspirational. I used some of the inspiration from the photo, but you can see I went my own way.

The Candy Machine is from a Sue Wilson die I have had for ages – and not used. I didn’t want to do the full dimensional working candy machine, at this point, and went for a flatter look.

Once I had die cut the candy machine, and die cut it out of the centre of the light blue background – which is inspired from the light blue background of the inspiration photo – I embossed the blue card with Sue Wilson’s ‘Checkboard’ embossing folder, which is a ‘pin point’ folder, meaning different embossing levels, and faux pierced effects.

I thought white card behind the machine was a little too stark, so I die cut the candy machine outline out of vellum, and stuck that down. I then stamped the sentiment on a circular piece of vellum, heat embossed with black, and stuck that down.

My original candy machine was out of the blue shiny card, if you remember, but it all looked a little…….well, boring. So – out came some vibrant red card, which tied even further into the inspiration photo, and stuck that down. The two glimmer card pieces are for little extra.

I started by thinking this was going to be easier to do than playing with my Uniko new stash – but in fact it created a whole load of issues itself. It wasn’t easier – just different.

I shall be entering the following challenges:

Pinspirationalinspiration photo

QKR Stampedeanything goes


Christmas in February??

20180221_212446 Last evening had been one for die-cutting, as you can see. The previous card gave me the inspiration to try something more adventurous and I thought a Christmas card would be an ideal way to go a little over-the-top, a little more dramatic.

I started with a base card from Sue Wilson, embossed with a Heart Lattice embossing folder, with a layer of black behind it. The poinsettias were stamped with the Heartfelt Creations stamp, and heat embossed with black embossing powder. After these were die cut, I layered a couple of the together, and shaped the leaves a little. I like rounded shapes on leaves as I feel you can get some reflection of the embossing powder and the card better from any angle.

The sprigs of holly etc were die cut from the same gold card, and from some black card, all arranged on the base layers with 3D glue – to give me some time for moving things around. I also like to leave some of the finishing touches free – I don’t stick everything down completely, as I like the movement of them when the card is opened.

I thought about a Christmas sentiment, and where to put it, but I didn’t want to cover any of the elements up at this point, so I will ensure I put a relevant Christmas verse on the inside.

I shall be entering the following challenges:

Crafty Hazelnut’s Christmas Challenge Christmas with option green (option not used)

Winter Wonderland Challengeanything goes Christmas

Christmas at Sweet Stampin’anything goes Christmas


CAS die cuts

20180219_090438

Good morning everyone. I have had a couple of hours this morning before I do my hospital run today, so I took inspiration from several challenges for this card.

I used the layout from the current sketch at CAS Colours and Sketches, used dry embossing for the tag for the challenges at Less Is More, and used only die cuts for the current challenge at AAA cards.

The black stripes were a challenge initially, but I remembered I had a vertical Stripes plate die from Reverse Confetti. I cut that out from black card, and used the cut-out stripes – usually the waste – to lay down on the card.

I then took a tag die from Stamps By Me, and after cutting it out, I embossed it with a Sue Wilson folder called ‘Twinkle Twinkle’, and stuck down the sentiment from the same tag die set, die cut with a piece of double-sided sticky sheet.

The three hearts are from a Catherine Pooler Stamp of Approval set.

A short posting today, but I hope you like it.


Friends

20180218_203048Hi everyone. I have moved away from the florals for a little while….for this card, anyway. I was inspired by the current challenge fro CASology, and as I had a delivery from Clearly Besotted this week, which included these cheeky monkeys…….off I went.

I know that many people are thinking Valentines at the moment, but I tend to buck the trend and think of other ways of ‘together’. This card is an homage to my best friend, and the sentiment taken from an Altenew stamp set just fits the bill nicely.

We are crazy when we are together, yet professional and somewhat calmer during our work time. In fact we hardly see each other at work, even when we worked within the same department. Which made it all the more special when we went away for a night or two. We are going away for the Uniko retreat this coming Saturday (24th), as we had so much lovely crafting time last time, we just had to! (Even though my bestie isn’t really a crafty card maker……..she just comes with me for the craic!)

So, this card….the images stamped in Versafine black onyx and heat embossed with clear embossing powder. I actually stamped quite a few of them, as I didn’t know which of the images I wanted to use, and I didn’t know which colouring medium I would prefer.

I coloured some with my Zigs – the ones I used – and some with my Polychromos, then some with some Crafters Companion pencils. I then die cut them, arranged them on the card – fiddling several times – then added with 3D foam.

20180218_203102_001The sentiment is stamped in Versafine black onyx again, but not heat embossed. One thing I always seem to do – add the sentiment last, even when the card is complete except for the sentiment. How about if it stamped wrong?! I do like to live on the edge…..


Lilac Roses

Hello everyone. It’s been a week since I last posted, as I have been busy with family and hospital issues. I had a couple of hours this morning before going out again, so I gave myself permission to have a little crafty time.

This colours of this card were inspired by the current challenge from Color Throwdown, and I turned to a more clean and simple look.

The base card is Narwhal from Lawn Fawn, the white piece is cut with a Catherine Pooler die, and again embossed with a We R Memory Keepers embossing folder to give a really good 3D impression. The flowers are from Clearly Besotted and I used Altenew inks for each of the two layers for the roses, with a green Altenew ink for the leaves.

I die cut them, and arranged onto the white card, sticking them down with foam squares. As previously, I have not put a sentiment on it, but I may do in the future, though I quite like the look of the card as it is.

I will be entering the following challenges:

Color Throwdownlilac, green, grey, white

Addicted to Stamps and MoreCAS

Simon Says Stamp add a die cut

Clean and Simple on SundayCAS with dies


Butterflies

20180207_110000

I apologise now – I’ve been using a splattered piece of card again. This is the off-cut from a piece of water-colour card I used yesterday with the splattering. I saw this off-cut, which is quite a decent size, and decided to make a card for the current CASology challenge – Butterfly.

I had a hunt through my stash, and went for these two butterfly stamps from Catherine Pooler, along with a swirl which is also from Catherine Pooler.

I used my Misti to position the swirl, and stamped it a couple of times with a green Altenew ink, then stamped the butterflies with Altenew grey ink. The sentiment is from Catherine Pooler again, stamped using darker green Altenew ink.

The water-colour card is die cut using Lawn Fawn stitched rectangles, and the base card is Narwhal from Lawn Fawn – just to tie-in the colour of the butterflies.

I’ll try to steer away from splattering for a couple of days – but I can’t promise! 🙂

Hearty Love

Hi everyone. I’ve been splattering…..and have had to restrain myself from going too far. I made several cards this evening, a variety on a theme, and just couldn’t resist using a new splattering tool from Stamps By Me.

20180206_212626


I’ve had this little thing for a little while now, and it’s only when I was making this card that I remembered it. It makes it so easy to splatter colours – as you can see.


I used water-colour card and stamped the Stamps By Me heart in Versafine black onyx, then heat embossed with clear. I took my Spectrum Noir markers – not used them for absolutely ages – and coloured using just the one red colour. I then took some colours of inks, put them on an acrylic block, sprayed with water, grabbed by splatter tool thingy – and off I went!

I really like the look of this, and I even think it remains quite clean and simple – probably, anyway!

Then I turned to a Stamps By Me die for the sentiment, cut it out four times using black card, stacked them up, and added to the card. Here comes the boo boo! I then die cut the square…..yep….you guessed it! The layers of die cut sentiment spread out, came away from each other and made a right old mess!

Can you imagine? What a silly billy! But – I managed to remove all of the layers of the sentiment except one, so I then die cut them all again – another four times – and layered them on top of each other……gosh. I think I managed to save the day. My advice? Do NOT die cut anything once you have added stacked layers!!!!

I shall be entering the following challenges:

CAS on SundayCAS markers or pens

Just Add InkRomance

Just Us Girls Love

Simon Says Stamp Monday challengeLove is in the air

Aud Sentiments Challengevalentine or love sentiment


die cutting colours

20180204_114458

Hi everyone. It looks like today has been the day for lots of die cutting, embossing, paper piecing, and generally concocting a scene.

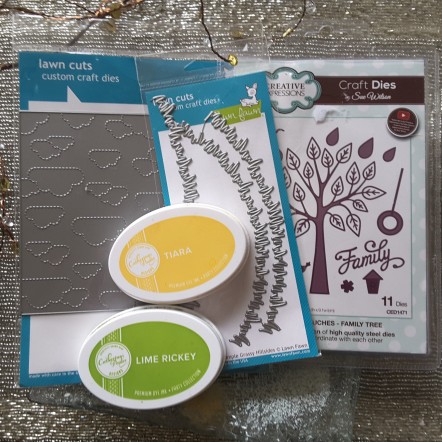
I was inspired by the colours from the current Color Throwdown challenge, to use hot pink, lime green, yellow, pale blue. I have also taken a picture of some of the dies I used, as I played with many sets!

20180204_114620The blue card is from Creative Expressions, and you can see I used the Lawn Fawn ‘Stitched Cloud Backdrop’. The green card is actually white card I smooshed Catherine Pooler’s ‘Lime Rickey’ down, blended it a little, but as I wanted quite a rough blending for the grass, I wasn’t too bothered about marks.

I then die cut the two together using one of the Lawn Fawn ‘Simple Grassy Hillsides’. I stuck the two together on the back, placing the green inset into the blue, then ran the green part through again to emboss more grassy detail using the same die set. I then cut the two together with the Lawn Fawn stitched rectangles.

Once the base was done, I turned to my scene items. I die cut the tree from Kraft card, then turned to the leaves and flowers.

As I didn’t have any hot pink card stock, I took my Stampin Up ‘Melon Mambo’, smooshed it onto my craft mat, added water, and moved some water-colour paper through it. Once dry, I die cut the flowers and butterfly, ready to be put onto the scene.

For the yellow, I took the Catherine Pooler ‘Tiara‘ ink pad, and smooshed the same way, then once dry, I die cut the leaves of the tree. Then I had to stick each individual leaf down separately. Fine tip glue certainly comes in handy for that.

Once I had die cut the two black birds, I placed everything on the scene, moved things around until I was happy, then glued everything in place.

I kept the tree hanging off the edge, and cut off the overhang, and added some small pink pearls to the middle of the flowers, and used my clear glitter pen for the butterfly.

I must say this card took quite a bit of planning, and certainly took longer than a stamped card would do, but I really enjoyed playing. Scenes aren’t really my style, but with the colours from this challenge, I straight away pictured grass and blue sky, then searched through my stash to see what dies spoke to me!

As for a sentiment – well, I don’t really think it needs one. I thought about ‘just for you’ and ‘thinking of you’ but I kept it just the way it is. The inside of the card is certainly where thoughts and wishes can be written.

Challenges to be entered:

Color Throwdownhot pink, lime green, yellow, pale blue

Watercooler Wednesday challenge anything goes

Simon Says Stamp Wednesday challengeanything goes


Inspired by Love


20180201_202618

I have another card here which is romantic, and all lovey-dovey, and I am sure I have mentioned a couple of times I don’t ‘do’ Valentines Day…….yet I seem to be following that love theme recently…..I’m definitely having a change in personality happening at the moment.

I used a base card of green, then added a layer of pink card embossed with Spellbinders M’Bossabilities folder ‘Regal‘. I haven’t used this for as long time, and have forgotten how deep the embossing is with these.

The flowers and leaves are from MFT ‘More Rustic Flowers’ stamped in Altenew inks, and die cut with the matching dies.

I arranged them in the shape of a heart – lovey-dovey – with a cute little sentiment in the centre. I didn’t want a large sentiment, and I didn’t want to cover any of the heart up, and this fits perfectly in the centre. The sentiment is from the Stampin Up ‘Jar of Love’ which is still on my desk from the card a few days ago. (That’s why I only tidy away once in a while, as I can still use things unexpectedly)

I shall be entering the following challenges:

Inspired by all the little things

Watercooler Wednesday Challenge 155 – Anything Goes

Moving Along with the Timeslove