Just A Note…..

Hello there. Here is a card I created using a new stamp, stencil, and die set from Pinkfresh Studio:

I first stamped the image using Gina K Amalgam ink, then used the matching stencil to colour with green and orange. The matching die cuts all of the images – and separates them – in one pass, so I set them aside and worked on the background.

On a separate panel I stamped the image again, but didn’t use the stencil or die, and coloured the images in a Copic light brown – no shading, only one colour.

I then stamped the sentiment and heat embossed in brass onto vellum, then die cut using a circle die.

The brown floral panel was adhered to a card base, then the vellum circle was glued down – but only using dots of glue behind the letters – then edges were left unglued to enable me to place some of the floral die cuts around, underneath, and on top of the vellum. I snipped some of the images between the leaves to make this easier on some of the images.

I still have more than half of the floral images from the die cut left over to make another card – maybe two.

I shall be entering the following challenges:

Color Throwdown orange, tan, green

Trimmies Craft Challengeanything goes

Crafty Catz weekly challenge anything goes

Tuesday Taggers Challenge flowers

Cut It Up Challengespring project including die cuts

My Time To Craft Challenge three or more layers (base panel, vellum, flowers)

Shiny Thank You

Another card created some new products to me:

This gold sheet is from Sizzix, and is adhesive backed – I attached it to a piece of card, then used the ‘Doily’ 3D’ embossing folder to create this detailed and shiny piece, which I then fussy-cut around the edges.

I embossed it again onto a white piece of card, turned it arund, and placed it as you see.

The gold piece is attached using 3D foam to create some shadow and dimension.

The heart sentiment is from the ‘Crop and Create delivered’ class in October 2021, with an off-cut from the piece I had embossed placed behind to make it the smoother look rather then embossed.

These Sizzix sheets are fabulously shiny and easy to use -I can see I will be playing with them more in the future.

I shall be entering the following challenges:

CYHTP embossing folder – option of ‘Spring’ not taken

Crafty Gals Corner Add a heart

Shopping Our Stashanything metallic or metal

Beyond The Blue texture

Lil Patch Of Crafty Friends – anything goes

Embossing, Freebie, and Gold

Hello – a new challenge is beginning at ABC Christmas Challenge, and this time the letters are – can you guess? – E for Embossing, F for Freebie, G for Gold. The Freebie might be a little confusing, but we want to see anything you received as a free gift – that could be a free digital image, a free stamp from a magazine, a free embossing folder – anything you received that was a free gift. Here is my take on the themes:

I stamped the image in Gina K Amalgam ink, then did some simple Copic colouring, colouring only part of the small images. The hanging heart is added from the same collection of free stamps and actually comes joined to another stamp – but I did some stamp surgery and cut them apart.

I liked how the image looked, I made another card which incorporated all three themes at once:

And this time I changed the hanging heart to the hanging star – just because I could!

I hope you can come and join us in this challenge. The Design Team has come up with some amazing inspiration – I hope you can go and check them out.

I shall be entering the following challenges:

Crafty Cardmakersembossing

A Bit More Time To Craft anything goes

AAA Cards – CAS, max white space – option metallic

Merry Little Christmas Challengeanything goes Christmas

Are you having a Giraffe….?

Hello there. I’m managing to craft a little, but when you have builders in it’s a little challenging to maintain the concentration, I find. However, I had chance to play with a stamp set I bought from the Doncaster Crafting Live show at the weekend:

I bought several of the stamp sets from Pink Ink designs, and this one caught me eye first.

I used the colours for the current challenge at Color Throwdown, and stamped the giraffe in Catherine Pooler ‘Be Mine‘ pink ink, used a little masking around the ears of the giraffe for the leaves and flowers, silver embossed the sentiment then ink smooshed the same pink ink so the sentiment card piece matched the giraffe – an emboss resist effect.

The glasses I embossed with silver, fussy-cut, then applied glossy accents for some dimension and sheen.

Overall, I think the card is quite feminine, and I know some of my girl friends would love the sentiment and image………..

I shall be entering the following challenges:

Color Throwdownpink, grey, white, silver

Simon Says Stamp Monday Challenge – animal magic

2 sisters on the blogmake a card for a lady

Rainbow hello and colours

Hi everyone. It’s been a few days since I last made a card – never mind posted anything to my blog or Instagram. It has been busy at work, and we have had painters in doing my downstairs rooms – still ongoing – but they have stored many things upstairs. Even in my craft room!! Well – that had to change quickly……

I made a couple of cards yesterday, which I had been thinking about for a few days. The first is for the current challenge at AAA Cards – rainbow theme, and Inkspirational – make a card in less than 10 minutes.

Here is the card:

20180803_170022

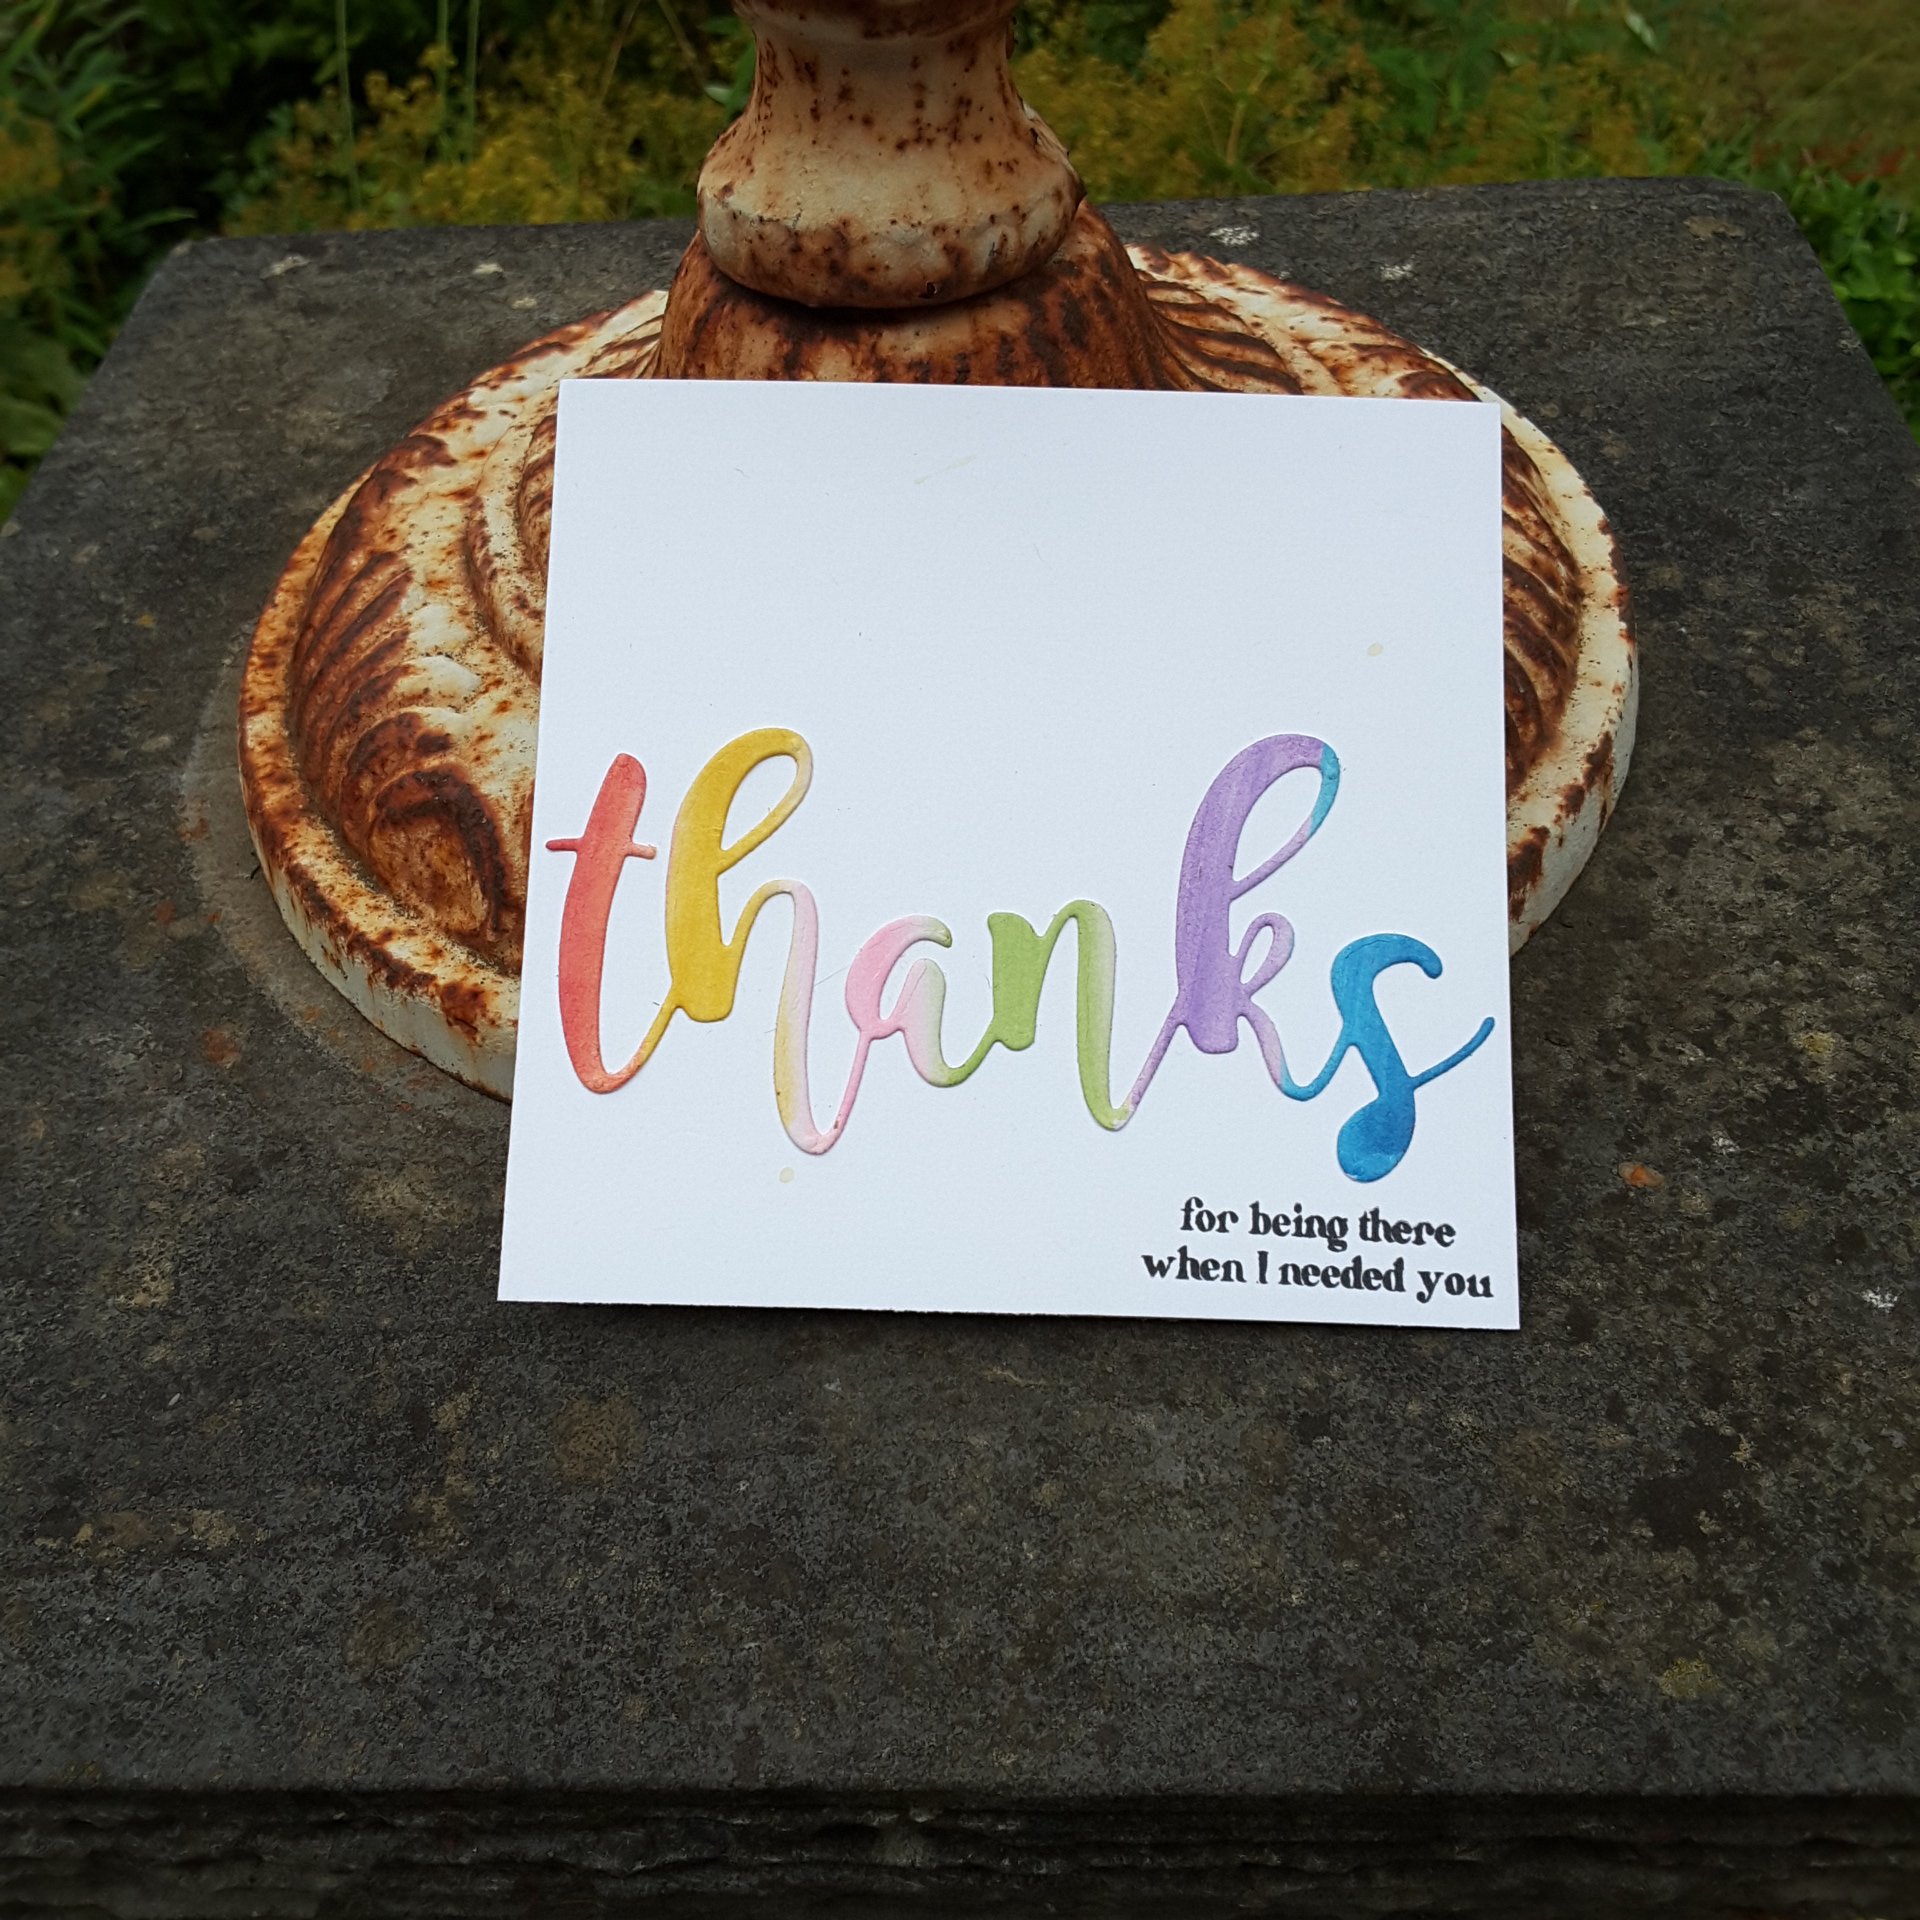
My sister came over from Canada with my Altenew markers earlier this week – I picked her up from London and arrived home at 3.30 am!! – but I made the colours of this sentiment with the markers. In my head I was singing…..wait for it…..red and yellow and pink and green and orange and purple and blue…..so that’s the order I did the colours.

I put them down on a piece of card, backed the card with double sided sticky tape, die cut the sentiment  and adhered it to the card base. The added small sentiment stamped straight onto the card base.

All-in-all, this card took me 7 minutes and 40 seconds to make, so quite a quick card. All the thinking about what to do was made beforehand and I made sure I had everything ready and nearby.

I’m going to try and colour properly with these markers over the weekend – I’ll let you know how it goes. I am a complete novice when it comes to using alcohol markers, so I am excited to be able to play with them.

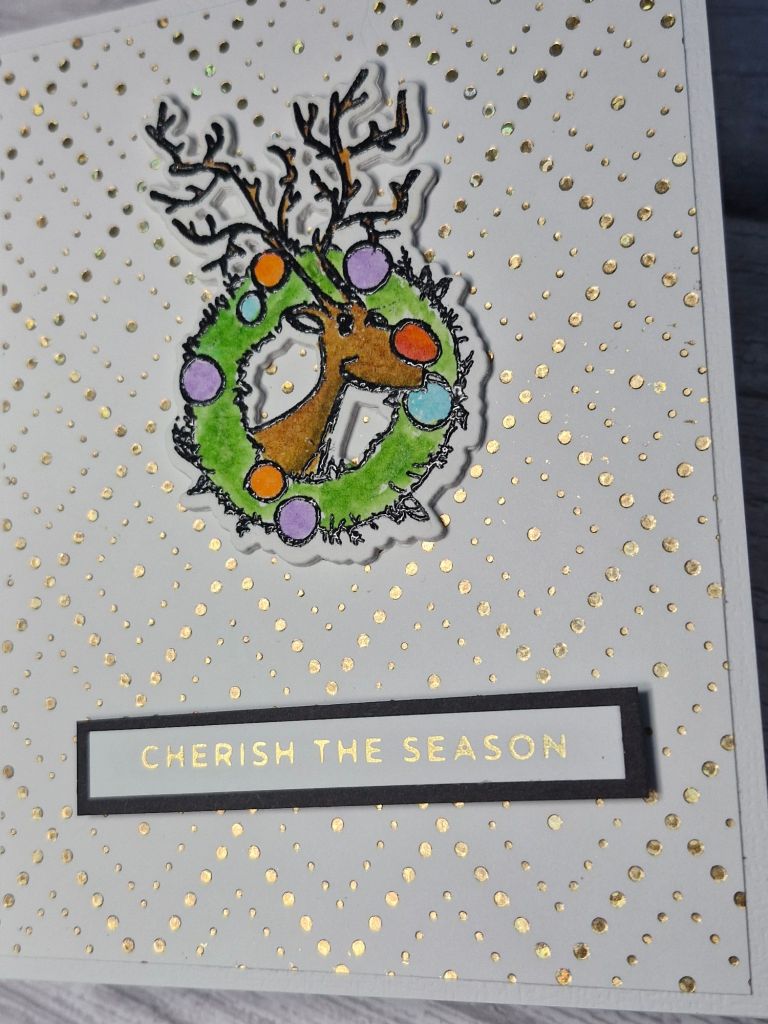
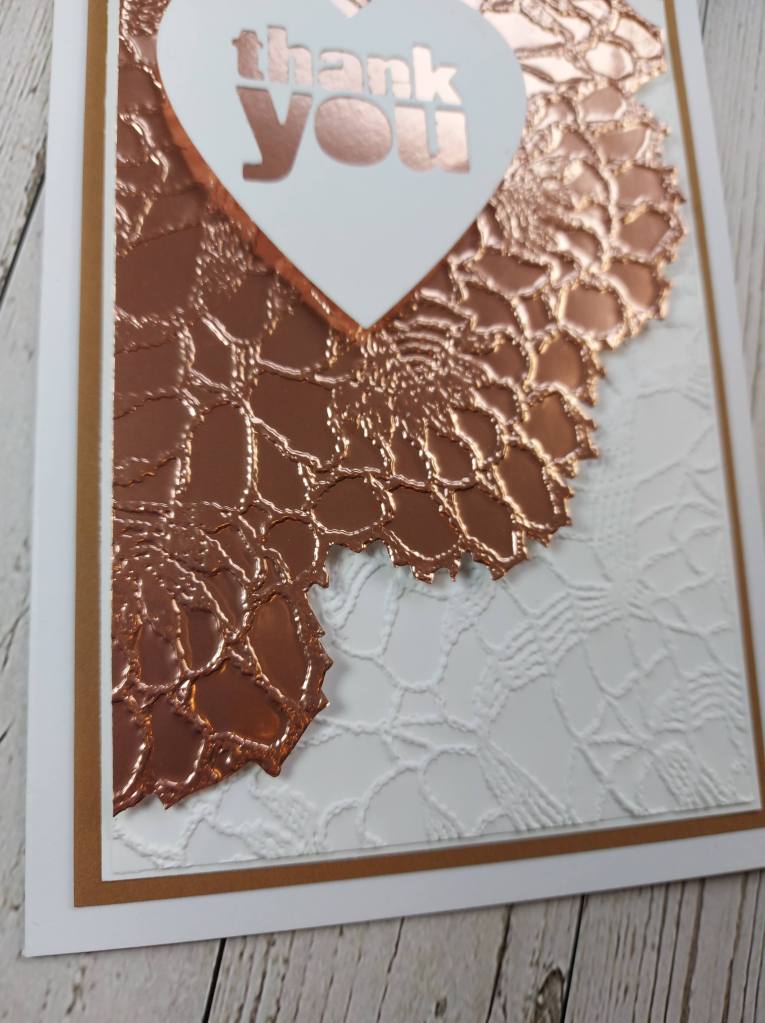
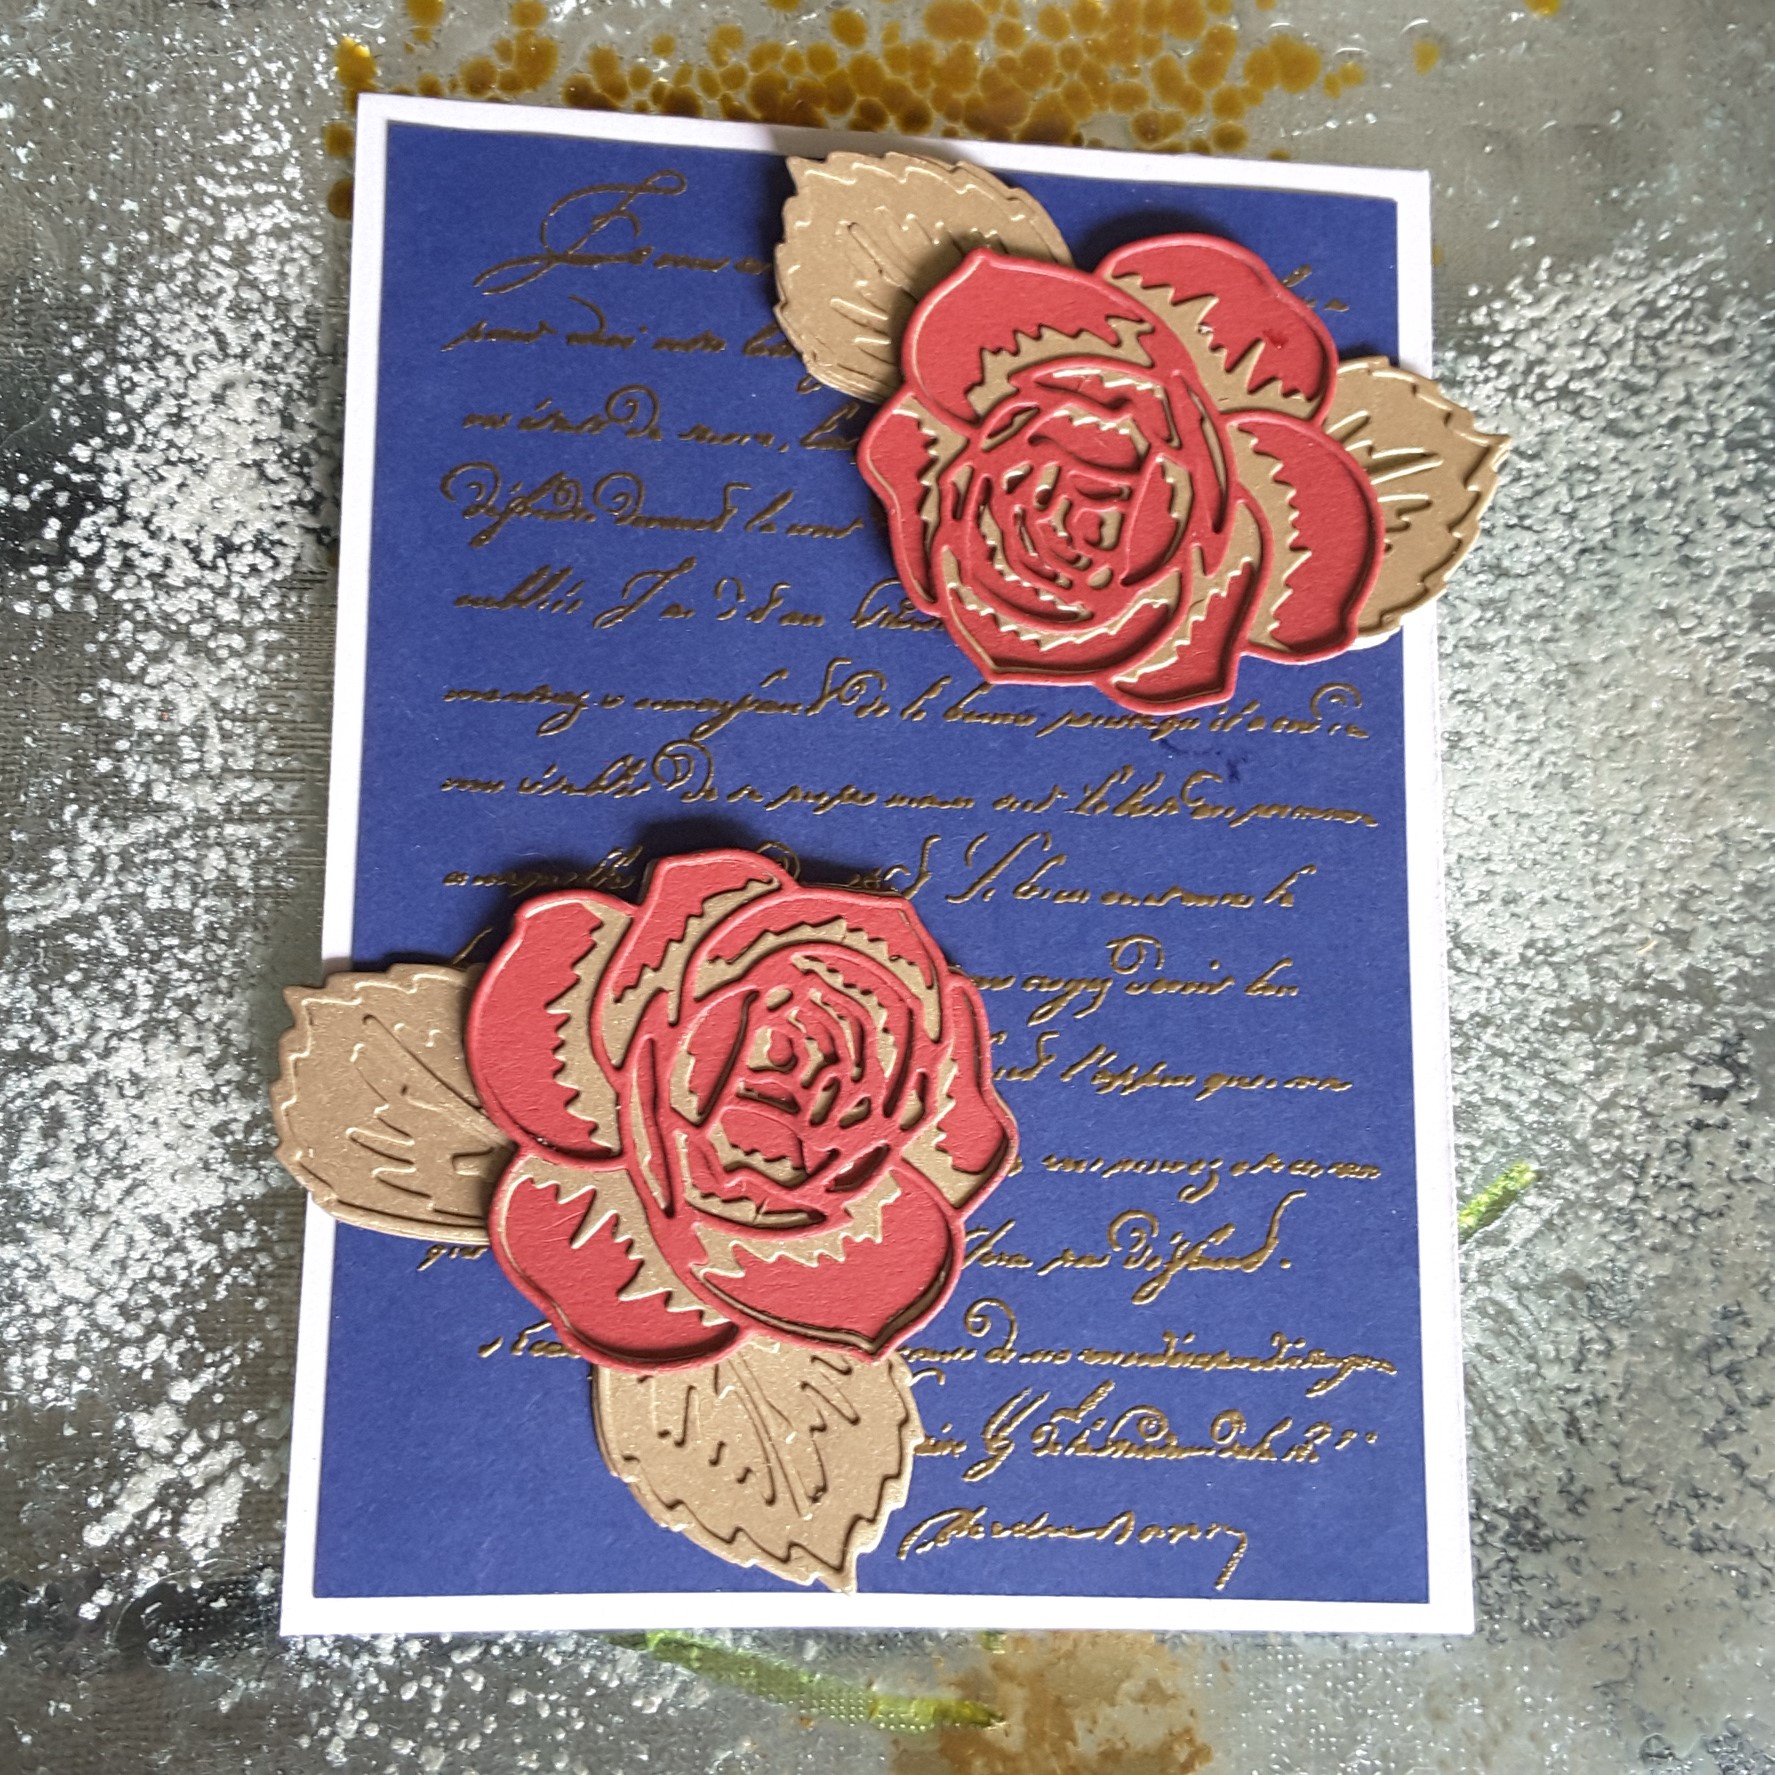
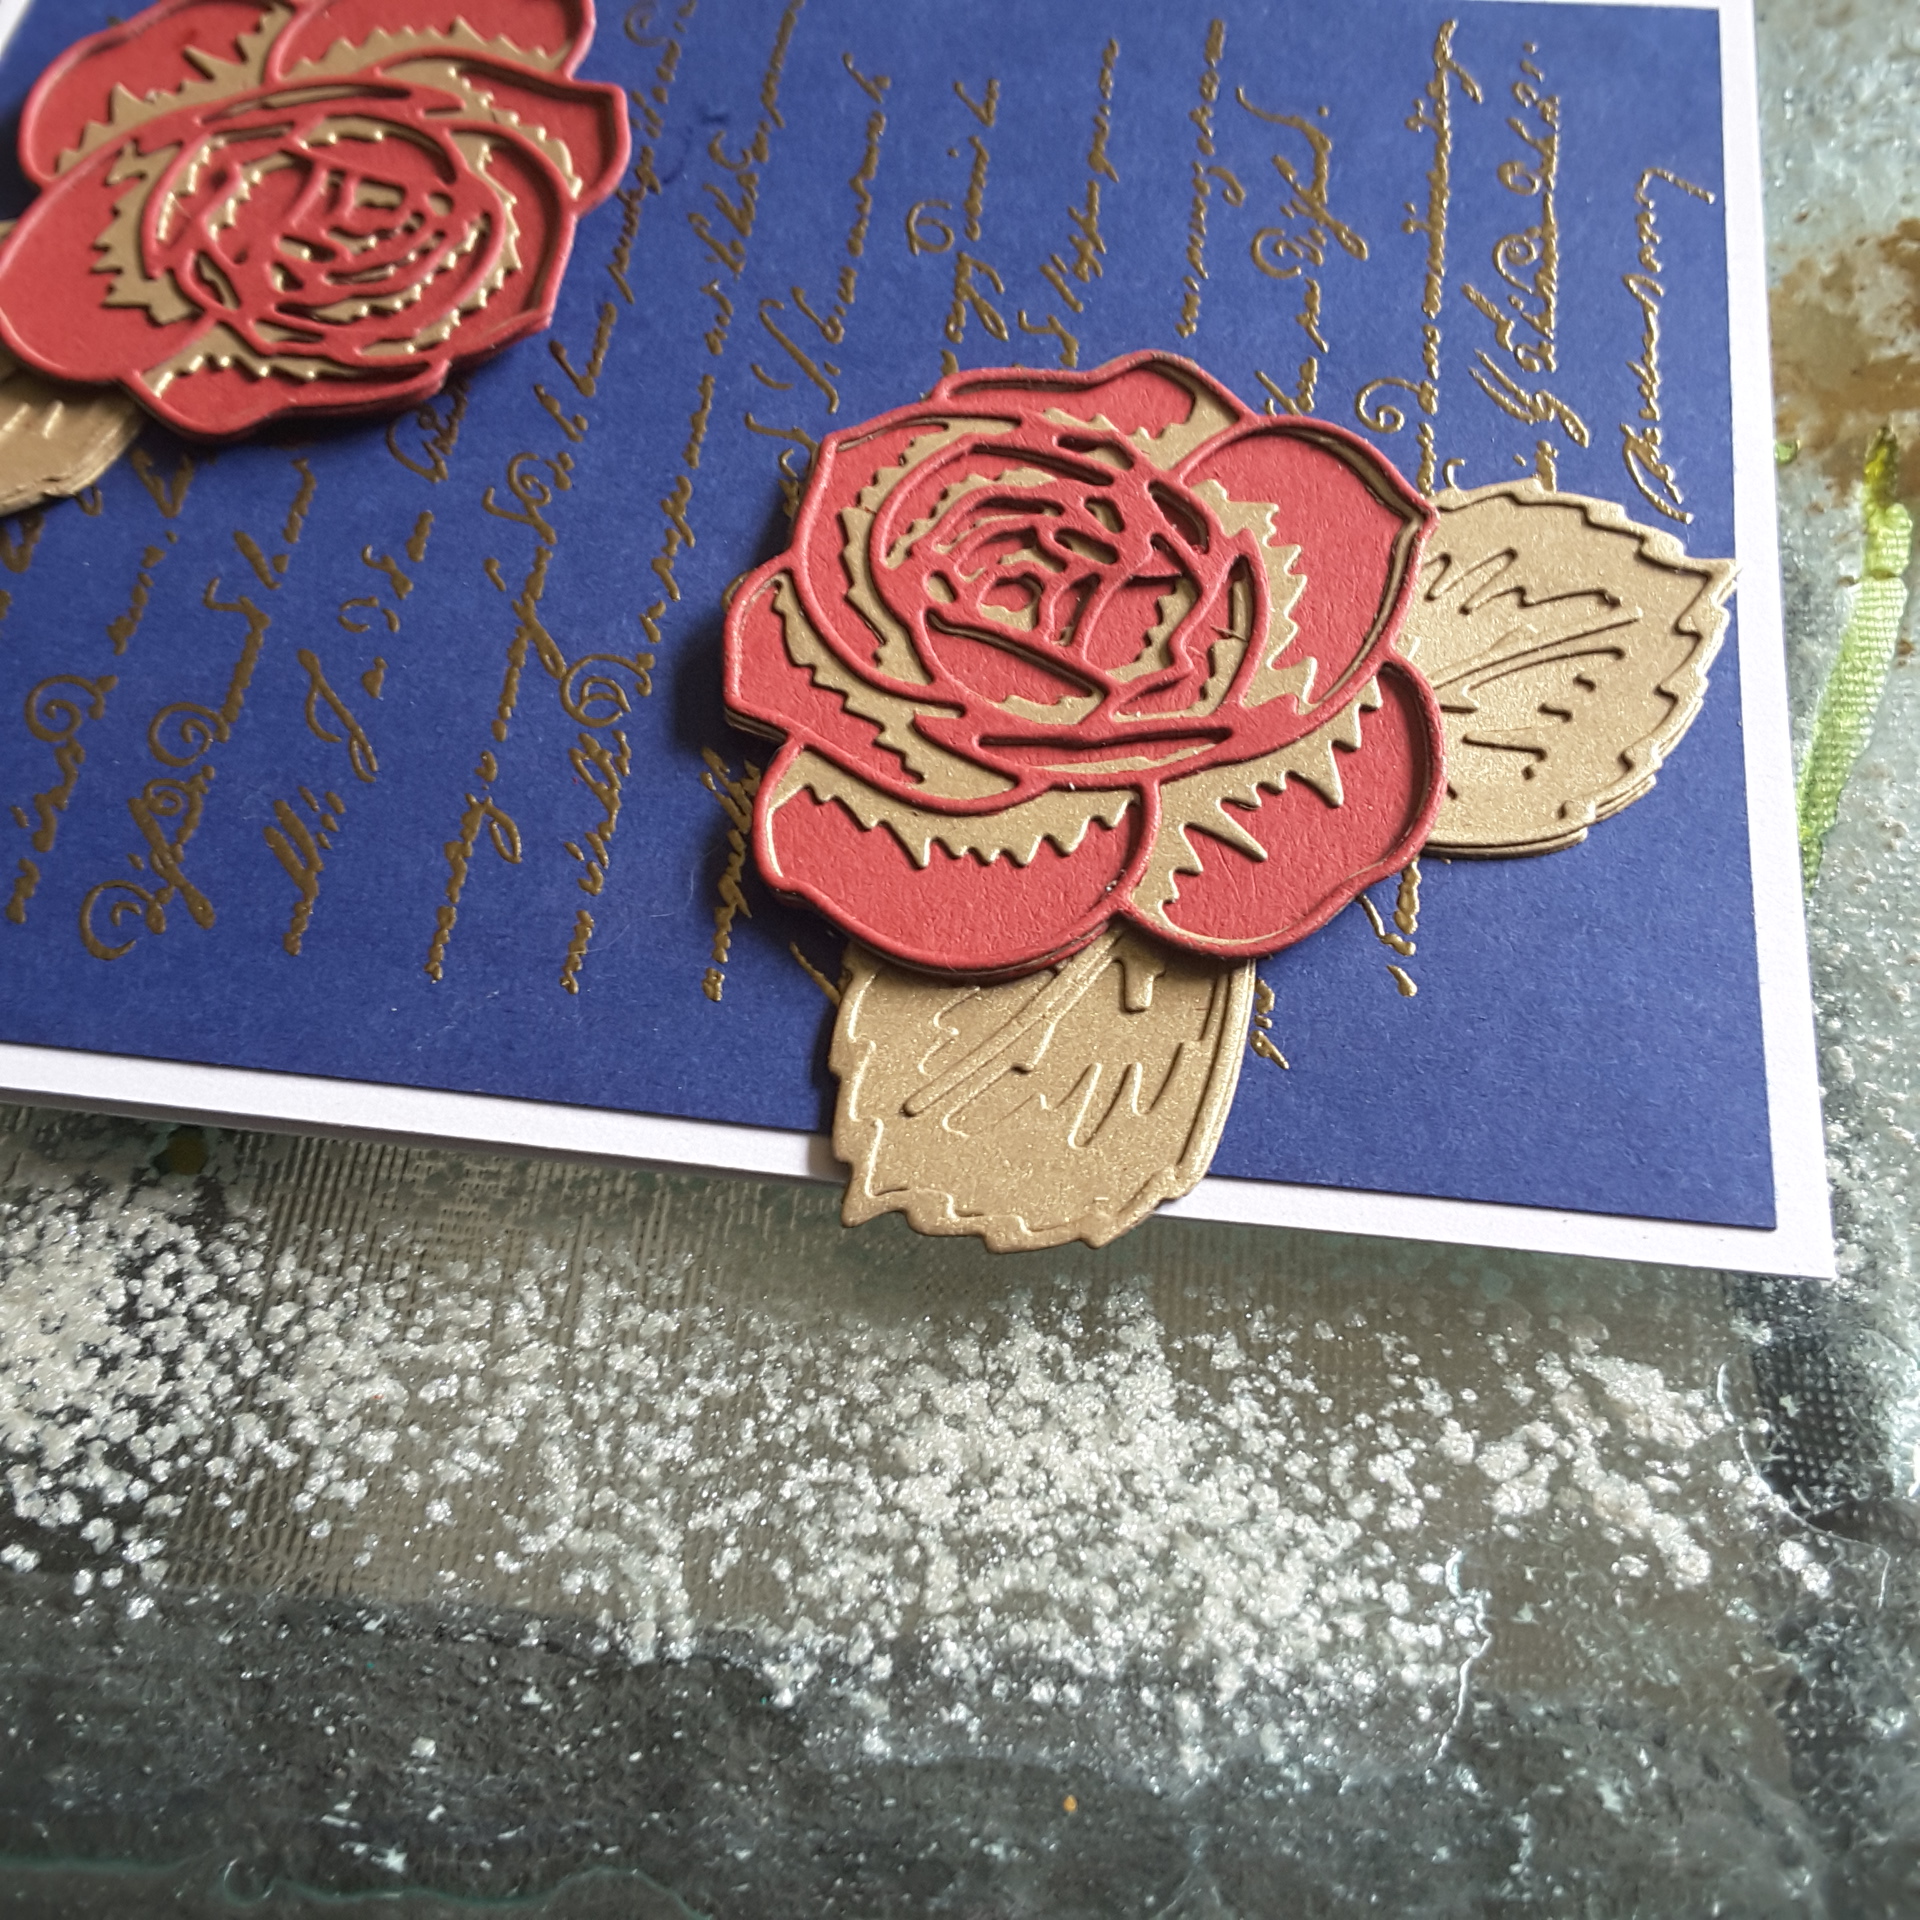
The second card is made using the colours from Color Throwdownblack, white, copper – and also using die cutting as the theme for the current challenge at Die Cutting Divas:

20180803_170036

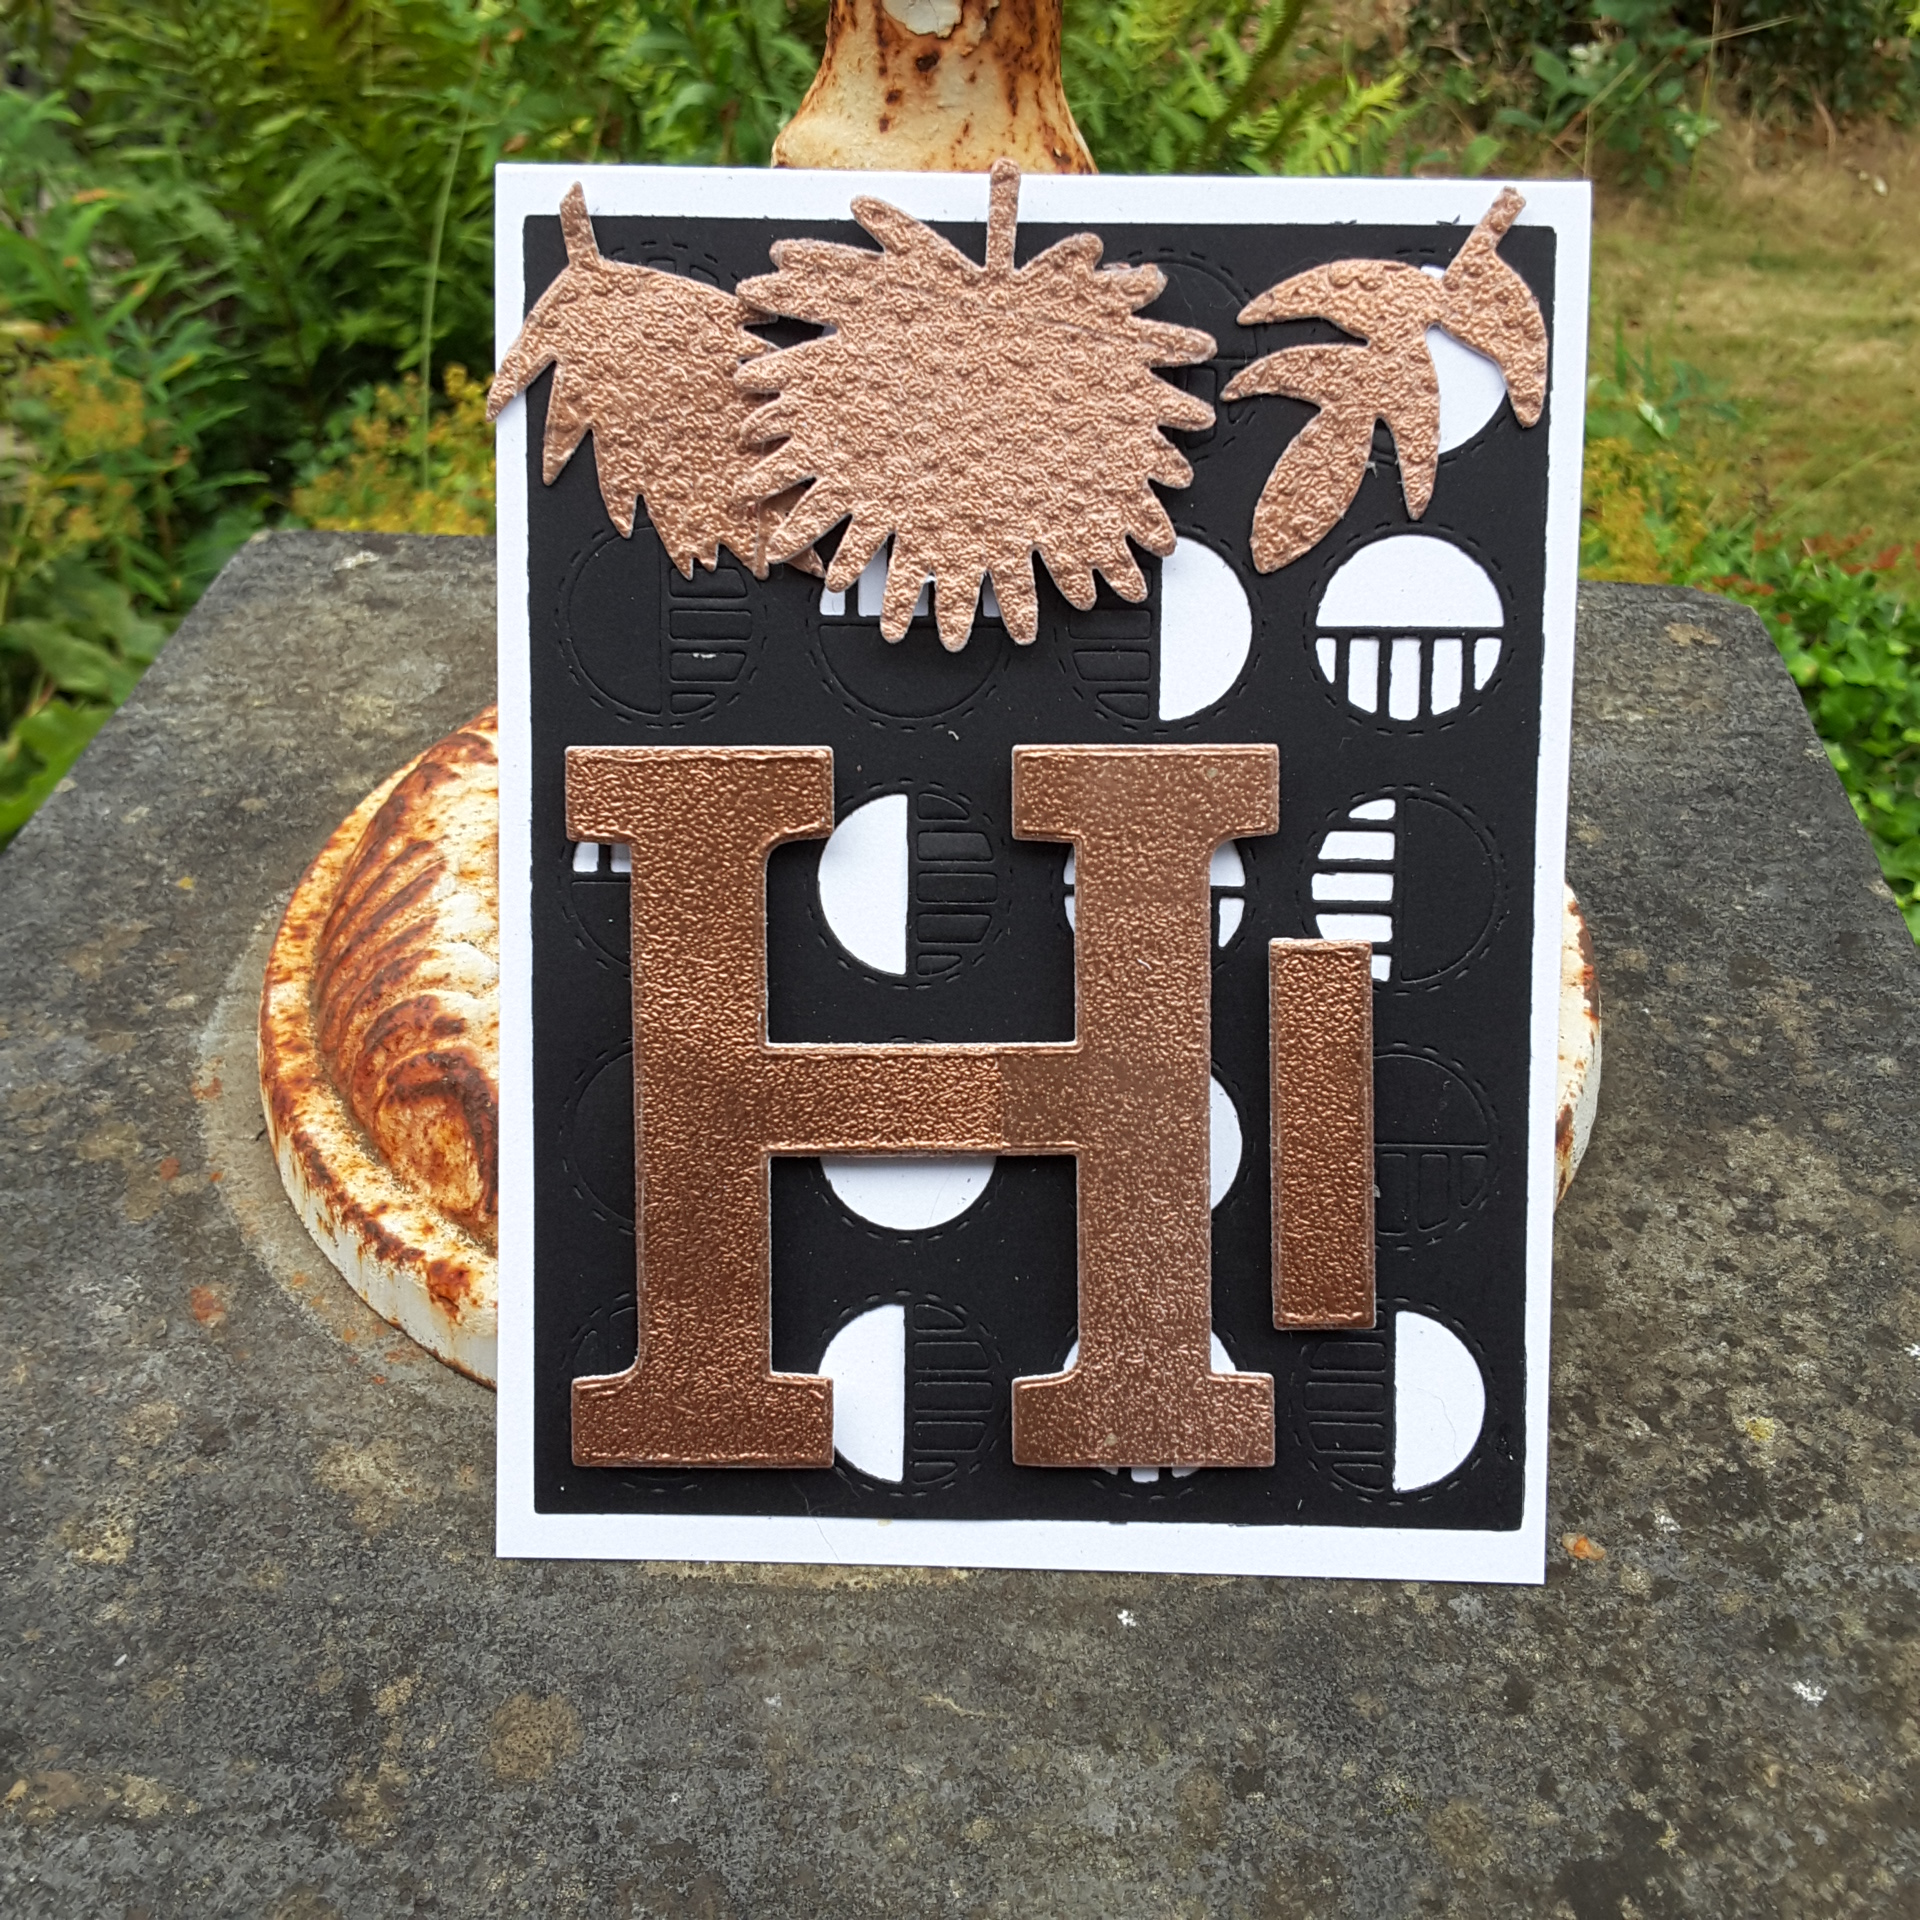
I used black card and die cut the Reverse Confetti ‘Striped Circles die‘, but tried to leave a few of the bits in. I put double sided sticky tape over the back of the areas left inside the die cut, then stuck that down to a white card base.

I then took some white card, put down some double-sided sticky tape, added copper embossing powder, and heat set it. I die cut some of the new Catherine Pooler leaf dies from this, and once those were die cut, I put them through a little floral embossing folder to give them some pattern and dimension.

20180803_170053

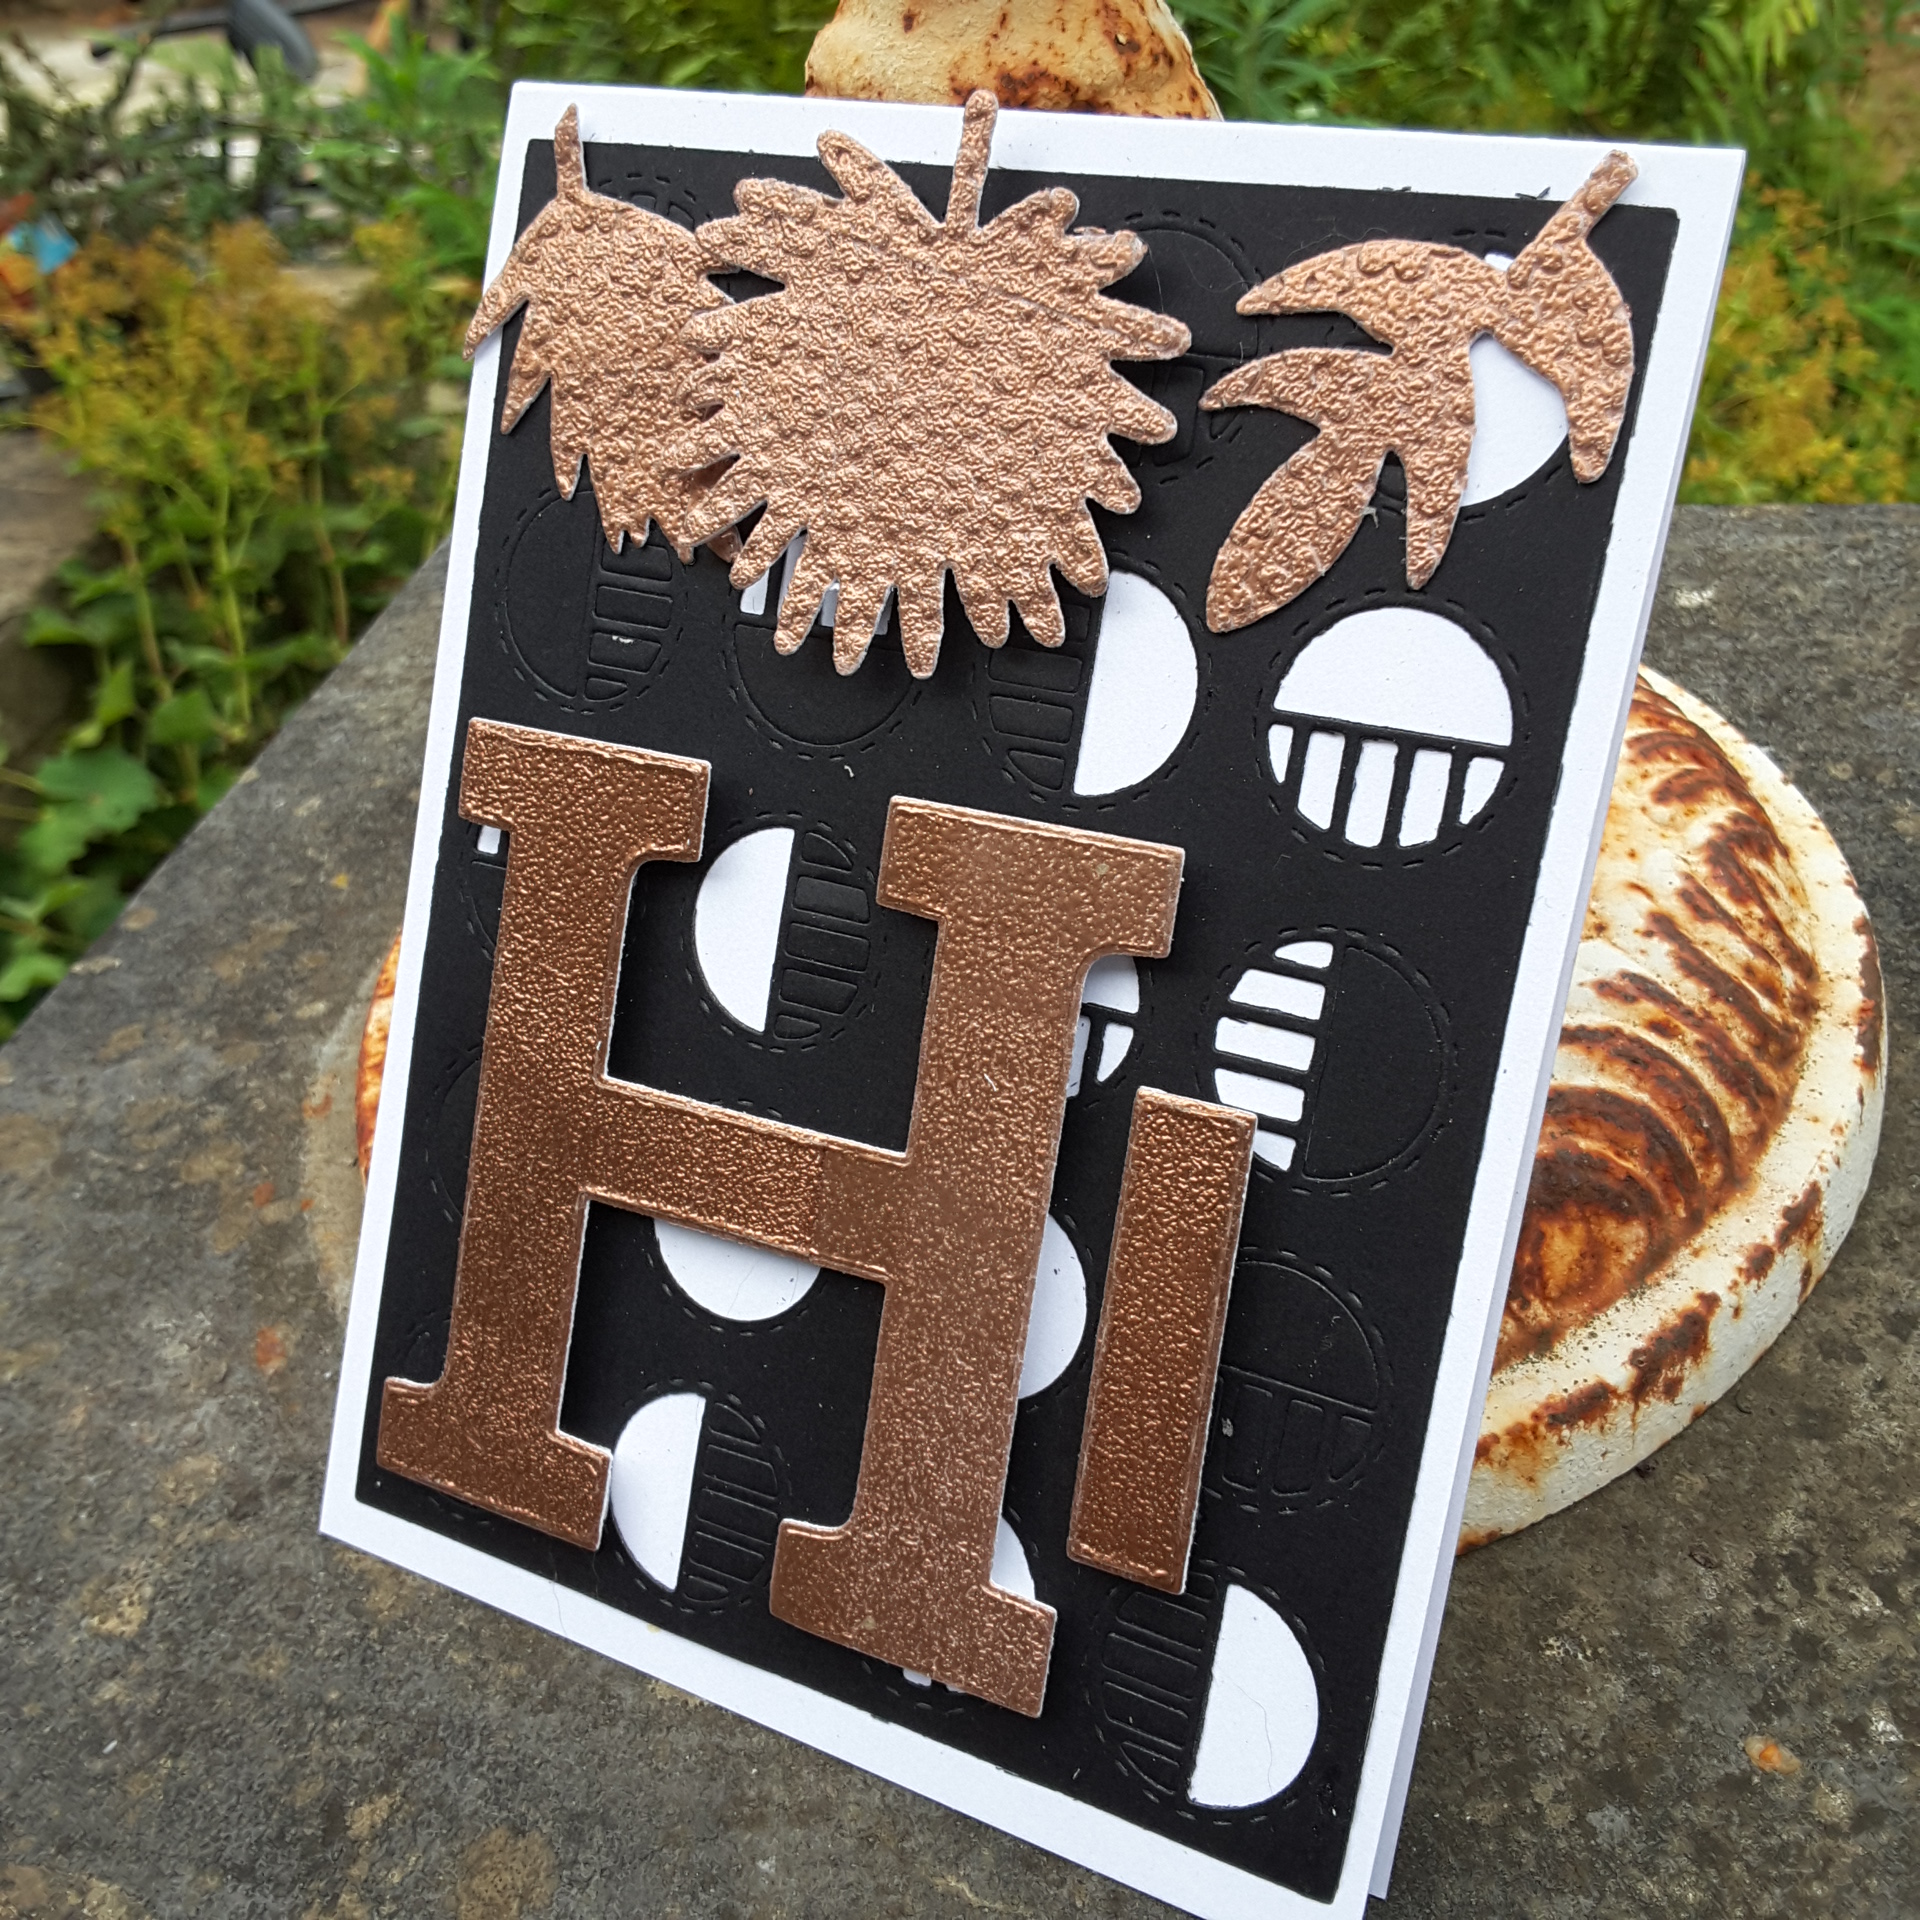
I then took the capital ‘H’ from the Altenew ‘Mega alphabet dies‘, and the ‘I’ from another alphabet die set, cut it from another piece of copper heat embossed card, and stuck down as you see.

As I have been out of the loop for a few days, I’m looking forward to crafting more. My sister is also a card maker, and whilst she is here in the UK, I think she wants to try my Catherine Pooler inks……and I’ve recently acquired even more colours……I can’t wait to try them. I am thinking at least a colour swatch…..that’ll be fun too.

🙂

Layered Rose and Garden Silhouette

20180602_111723

Hello there. I have been doing some more die-cutting, finally utilising my 3D dies from Altenew. This set is the Layered Rose, and I teamed it up with a gold embossed background script stamp from Uniko.

The colours are inspired from the latest colour challenge from Color Throwdown. Here is a little close-up of it, where I tried to capture the embossing shine, and the shine from the gold card: (It’s a very murky and rainy day here at the moment)

20180602_111729

I shall be entering the following challenges with this card:

Color ThrowdownNavy, Burgundy, Gold

4 Crafty Chicksanything goes

Pause, Dream Enjoy ChallengesFlowers

The next couple of cards I used my new stamp set from Altenew – the Garden Silhouette:

20180602_101430

20180602_101445

This stamp set has quite a few images on it – not layering – but I am liking the patchy vase images.

I kept this card clean and simple, but used the colours and the sketch from the current challenge at CAS Colours and Sketches. I ink blended the Tangelo Twist and the Hello Honey for the background. I also heat embossed the grey vase with clear embossing powder twice, and heat embossed the flowers just the once.

20180602_101518

I shall be entering this second card into the following challenges:

CAS Colours and Sketchessketch and Hello Honey, Going Grey, Tangelo Twist

Addicted to Stamps and MoreClean and simple


Umbrellas and rain drops


Hello again. Here is a card which appears a little darker than my usual, but it is actually quite sparkly if you turn it a little. I’ve tried to capture the effect, but it does look better in ‘real life’.

20180413_165701_00120180413_165737

I used a Clearly Besotted stamp set, and heat embossed onto black card with silver detail embossing powder. I then used my Polychromos to colour the images in, using 2-3 reds and 2-3 yellows. The black rain drops are from the matching dies for the stamp set, which are cut from Stampin Up black glimmer card, and individually stuck down.

I heat embossed the sentiments from the same stamp set, and added the whole thing to a white base card.

To try and get the glimmer from the rain drops, I had to prop the card against one of my perfume bottle – only because it had a nice image on the lid. Can you tell which perfume it is?

I shall be entering the following challenges:

4 Crafty Chicks anything goes with twist raining cats and dogs

Inkspirationalphoto inspiration

Pinspirationalanything goes


Floral abstract

20180307_105917

Hello again. I have had some new deliveries  – more in one day as the snow has gone and the delivery man could get in – so have took some time to create a card this morning.

I used the stamp set ‘Hope‘ from Altenew and some Altenew inks to make the flower and leaves. Some masking was involved, too, and I also used my new Misti creative corners. I can see I’ll be using those a lot in the future, even if it’s for lining the sentiments up – great for that.

I then used Lawn Fawn wonky stitched squares to cut it out, and embossed with an abstract die from Neat and Tangled – Modern Triangle Cover Plate die. I thought this design fit perfectly for the current challenge at CASology – cue word being ‘Abstract’. I didn’t think it took anything from the flower design, but also added a little interest.

The sentiment is a mix of words from the same Altenew ‘Hope‘ stamp set, and ‘mom’ is from The Ton ‘Fresh Cut Tulips’ – a stamp set I’ll be playing with very, very soon.

I know we don’t use ‘mom’ very much in the UK, but I really liked how it is quite quirky for us – I hope my mother-in-law agrees!

I shall be entering the following challenges:

CASology – cue word Abstract

Try It On Tuesday – mum/mothers day

Crafty Cardmakers – Floral Delight


sweet machine

20180225_165829
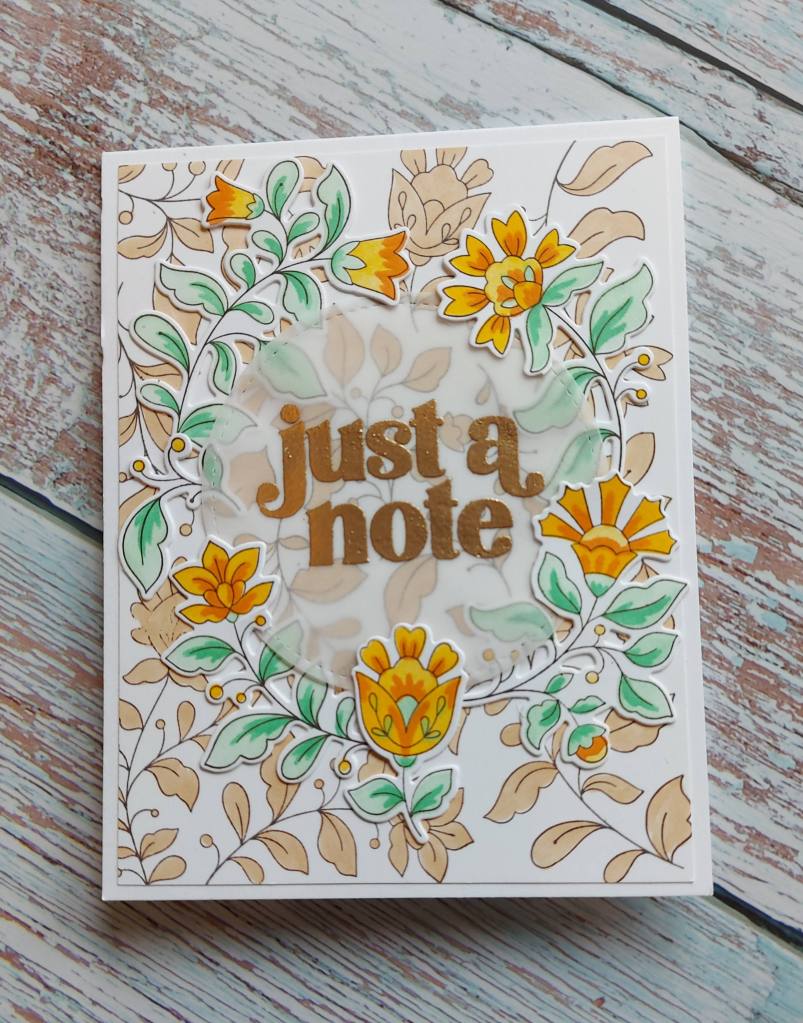
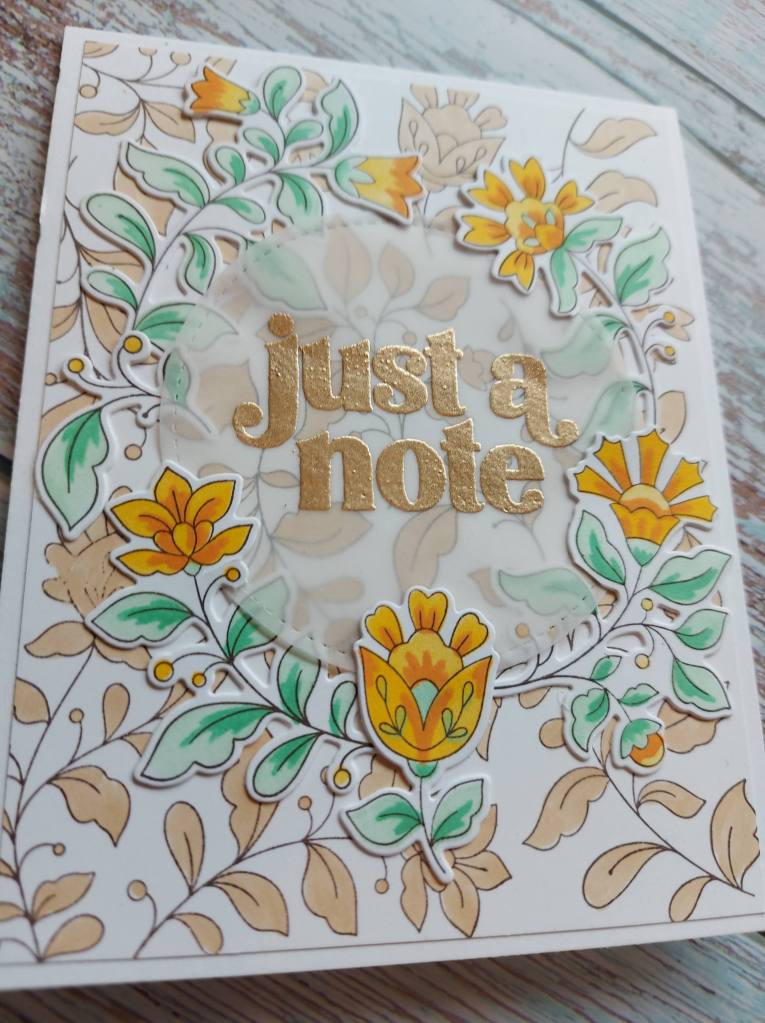
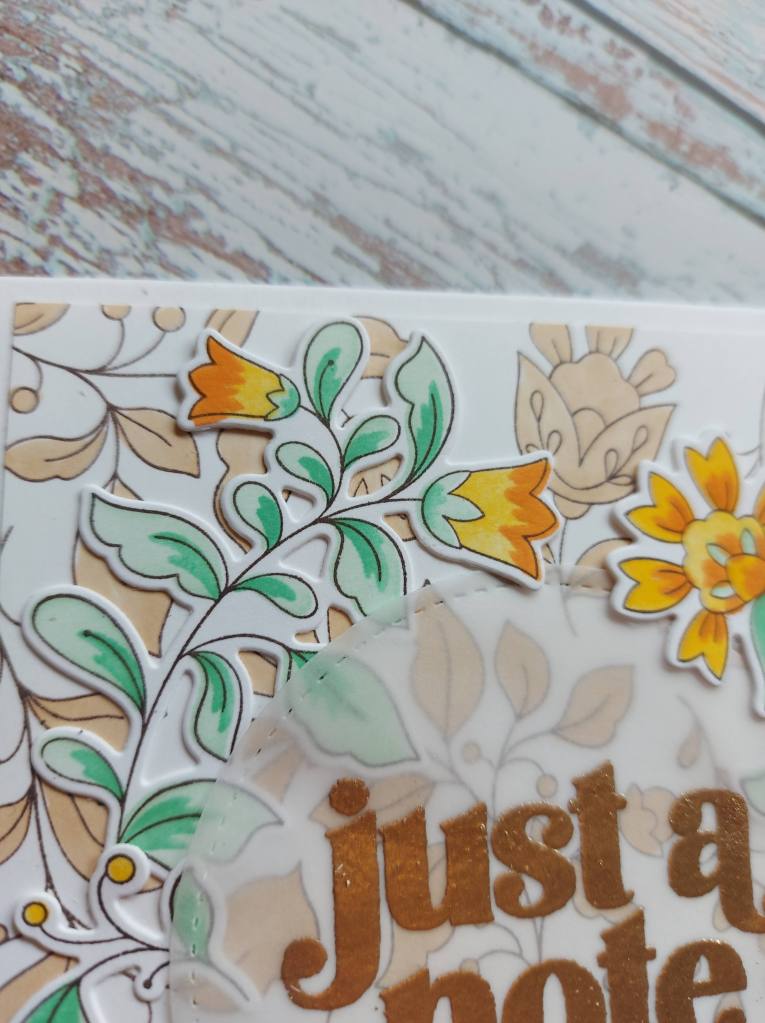
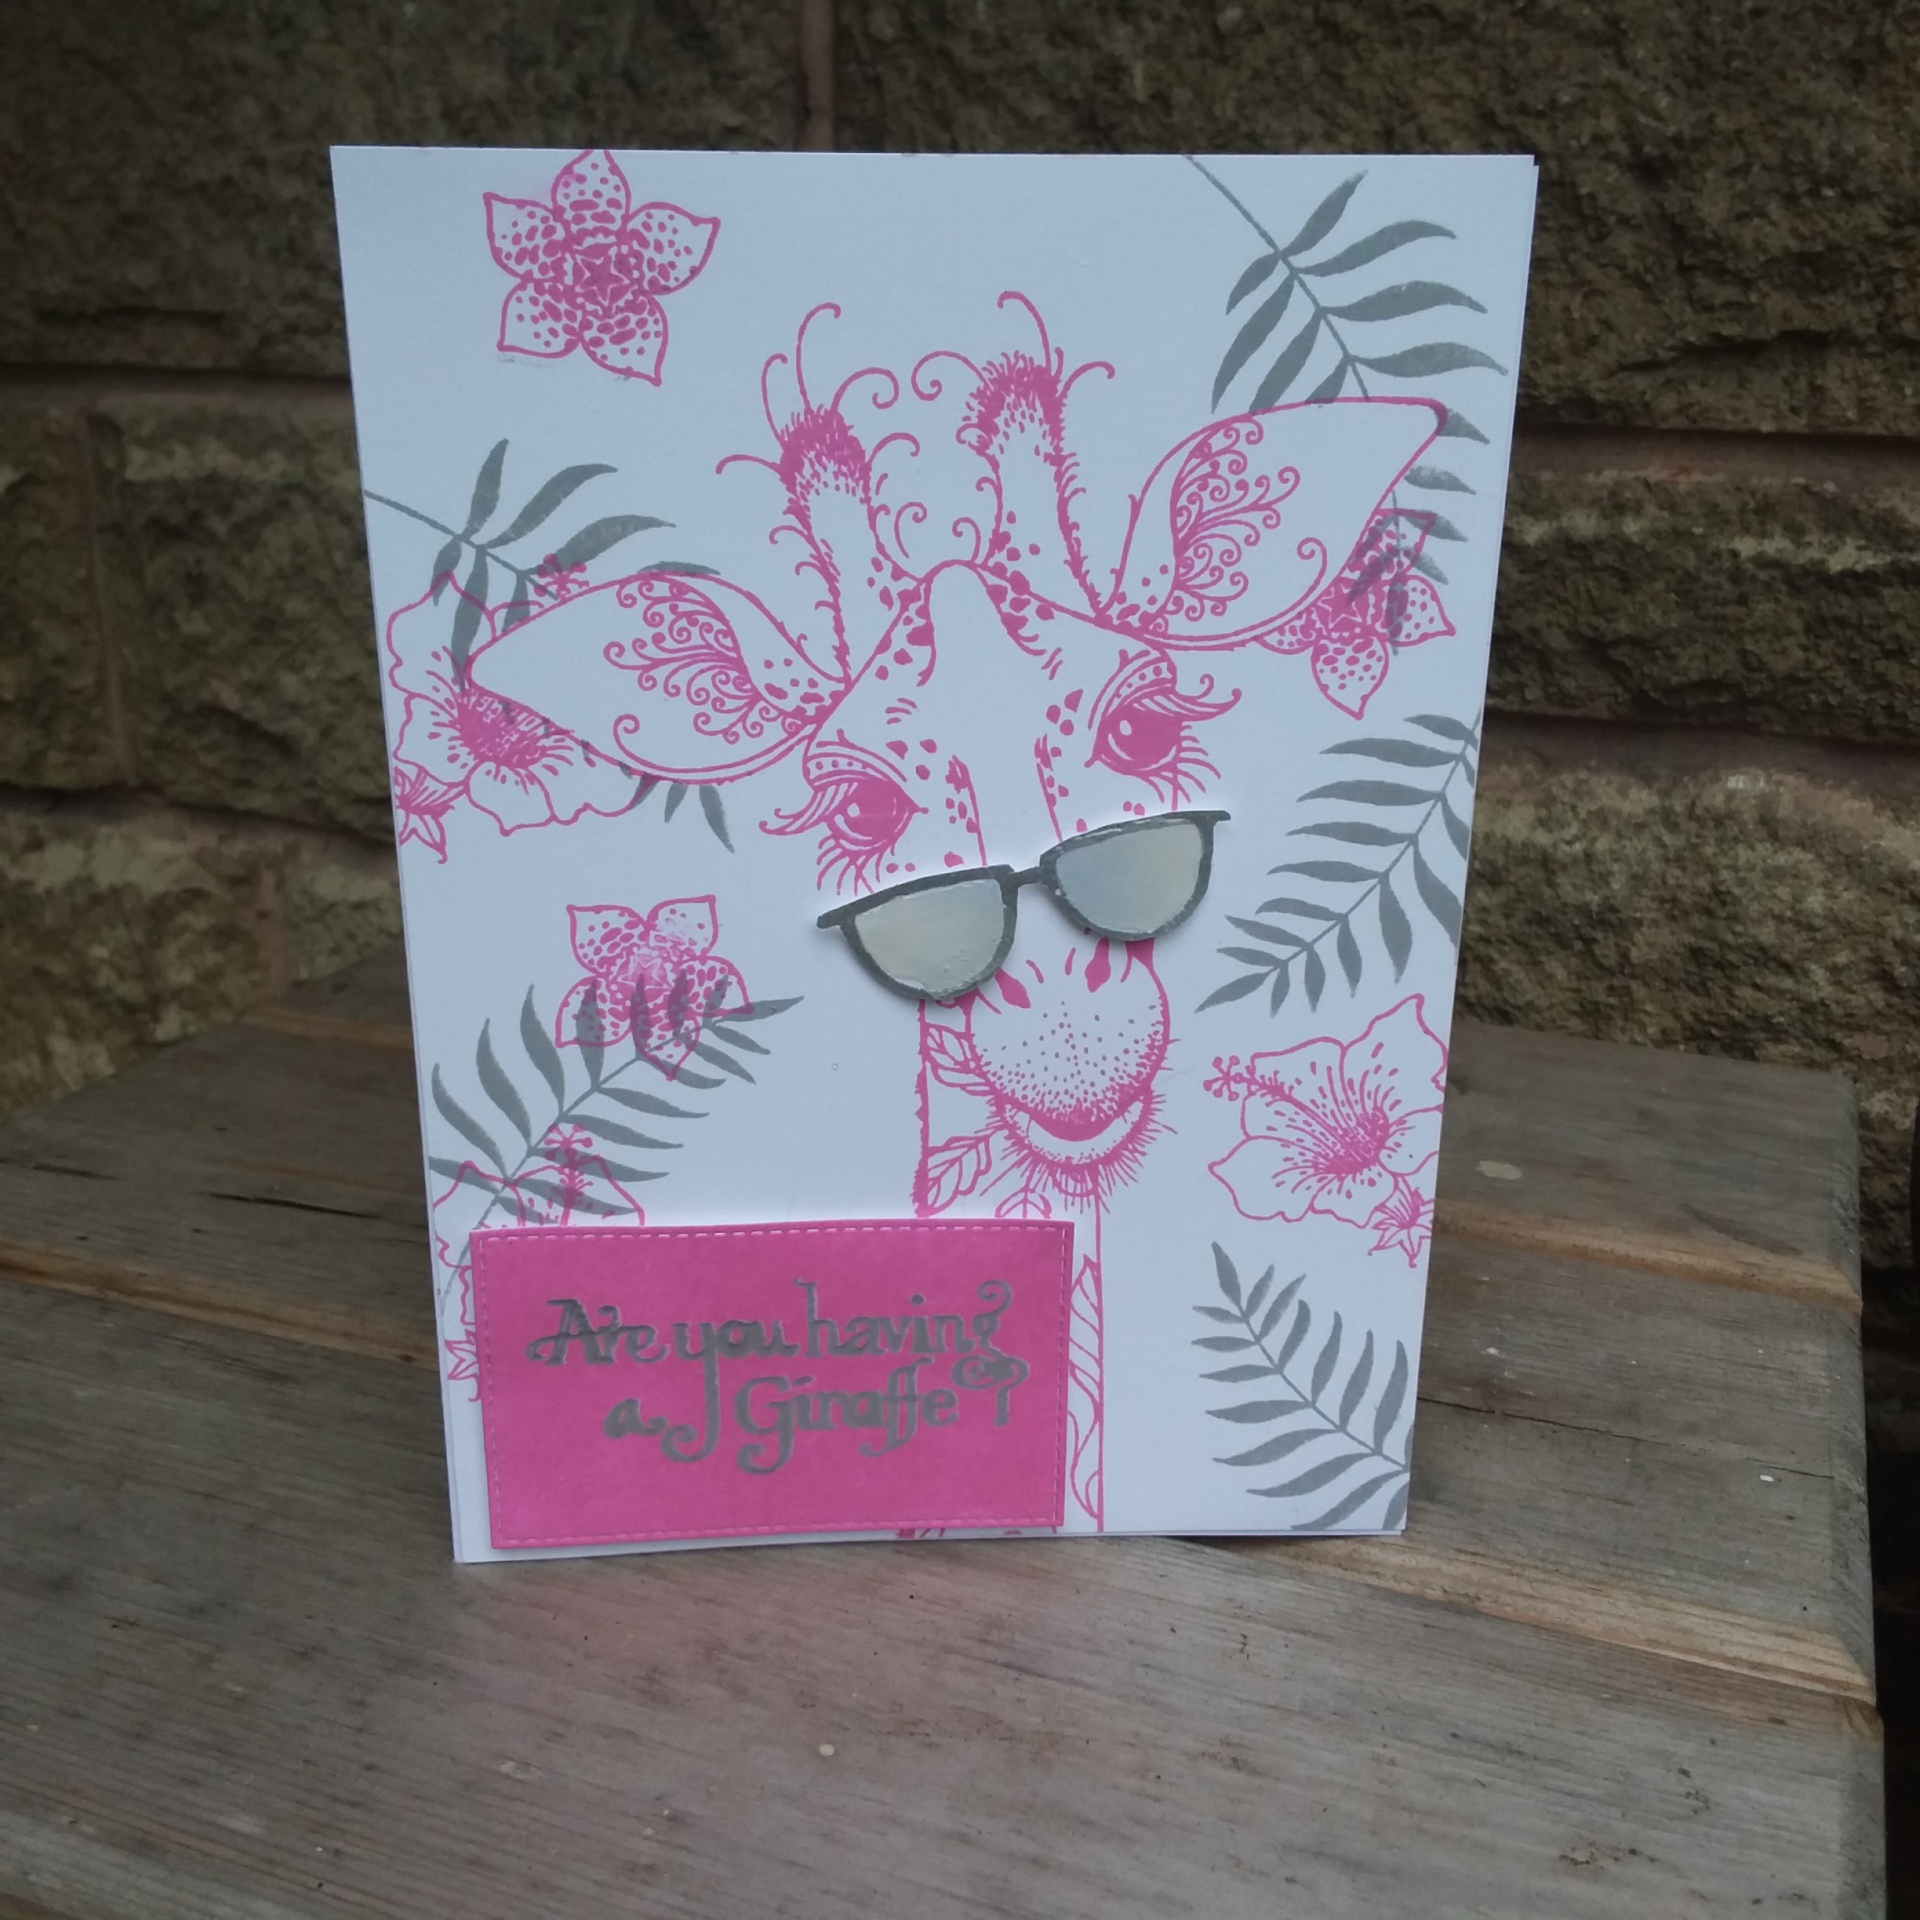
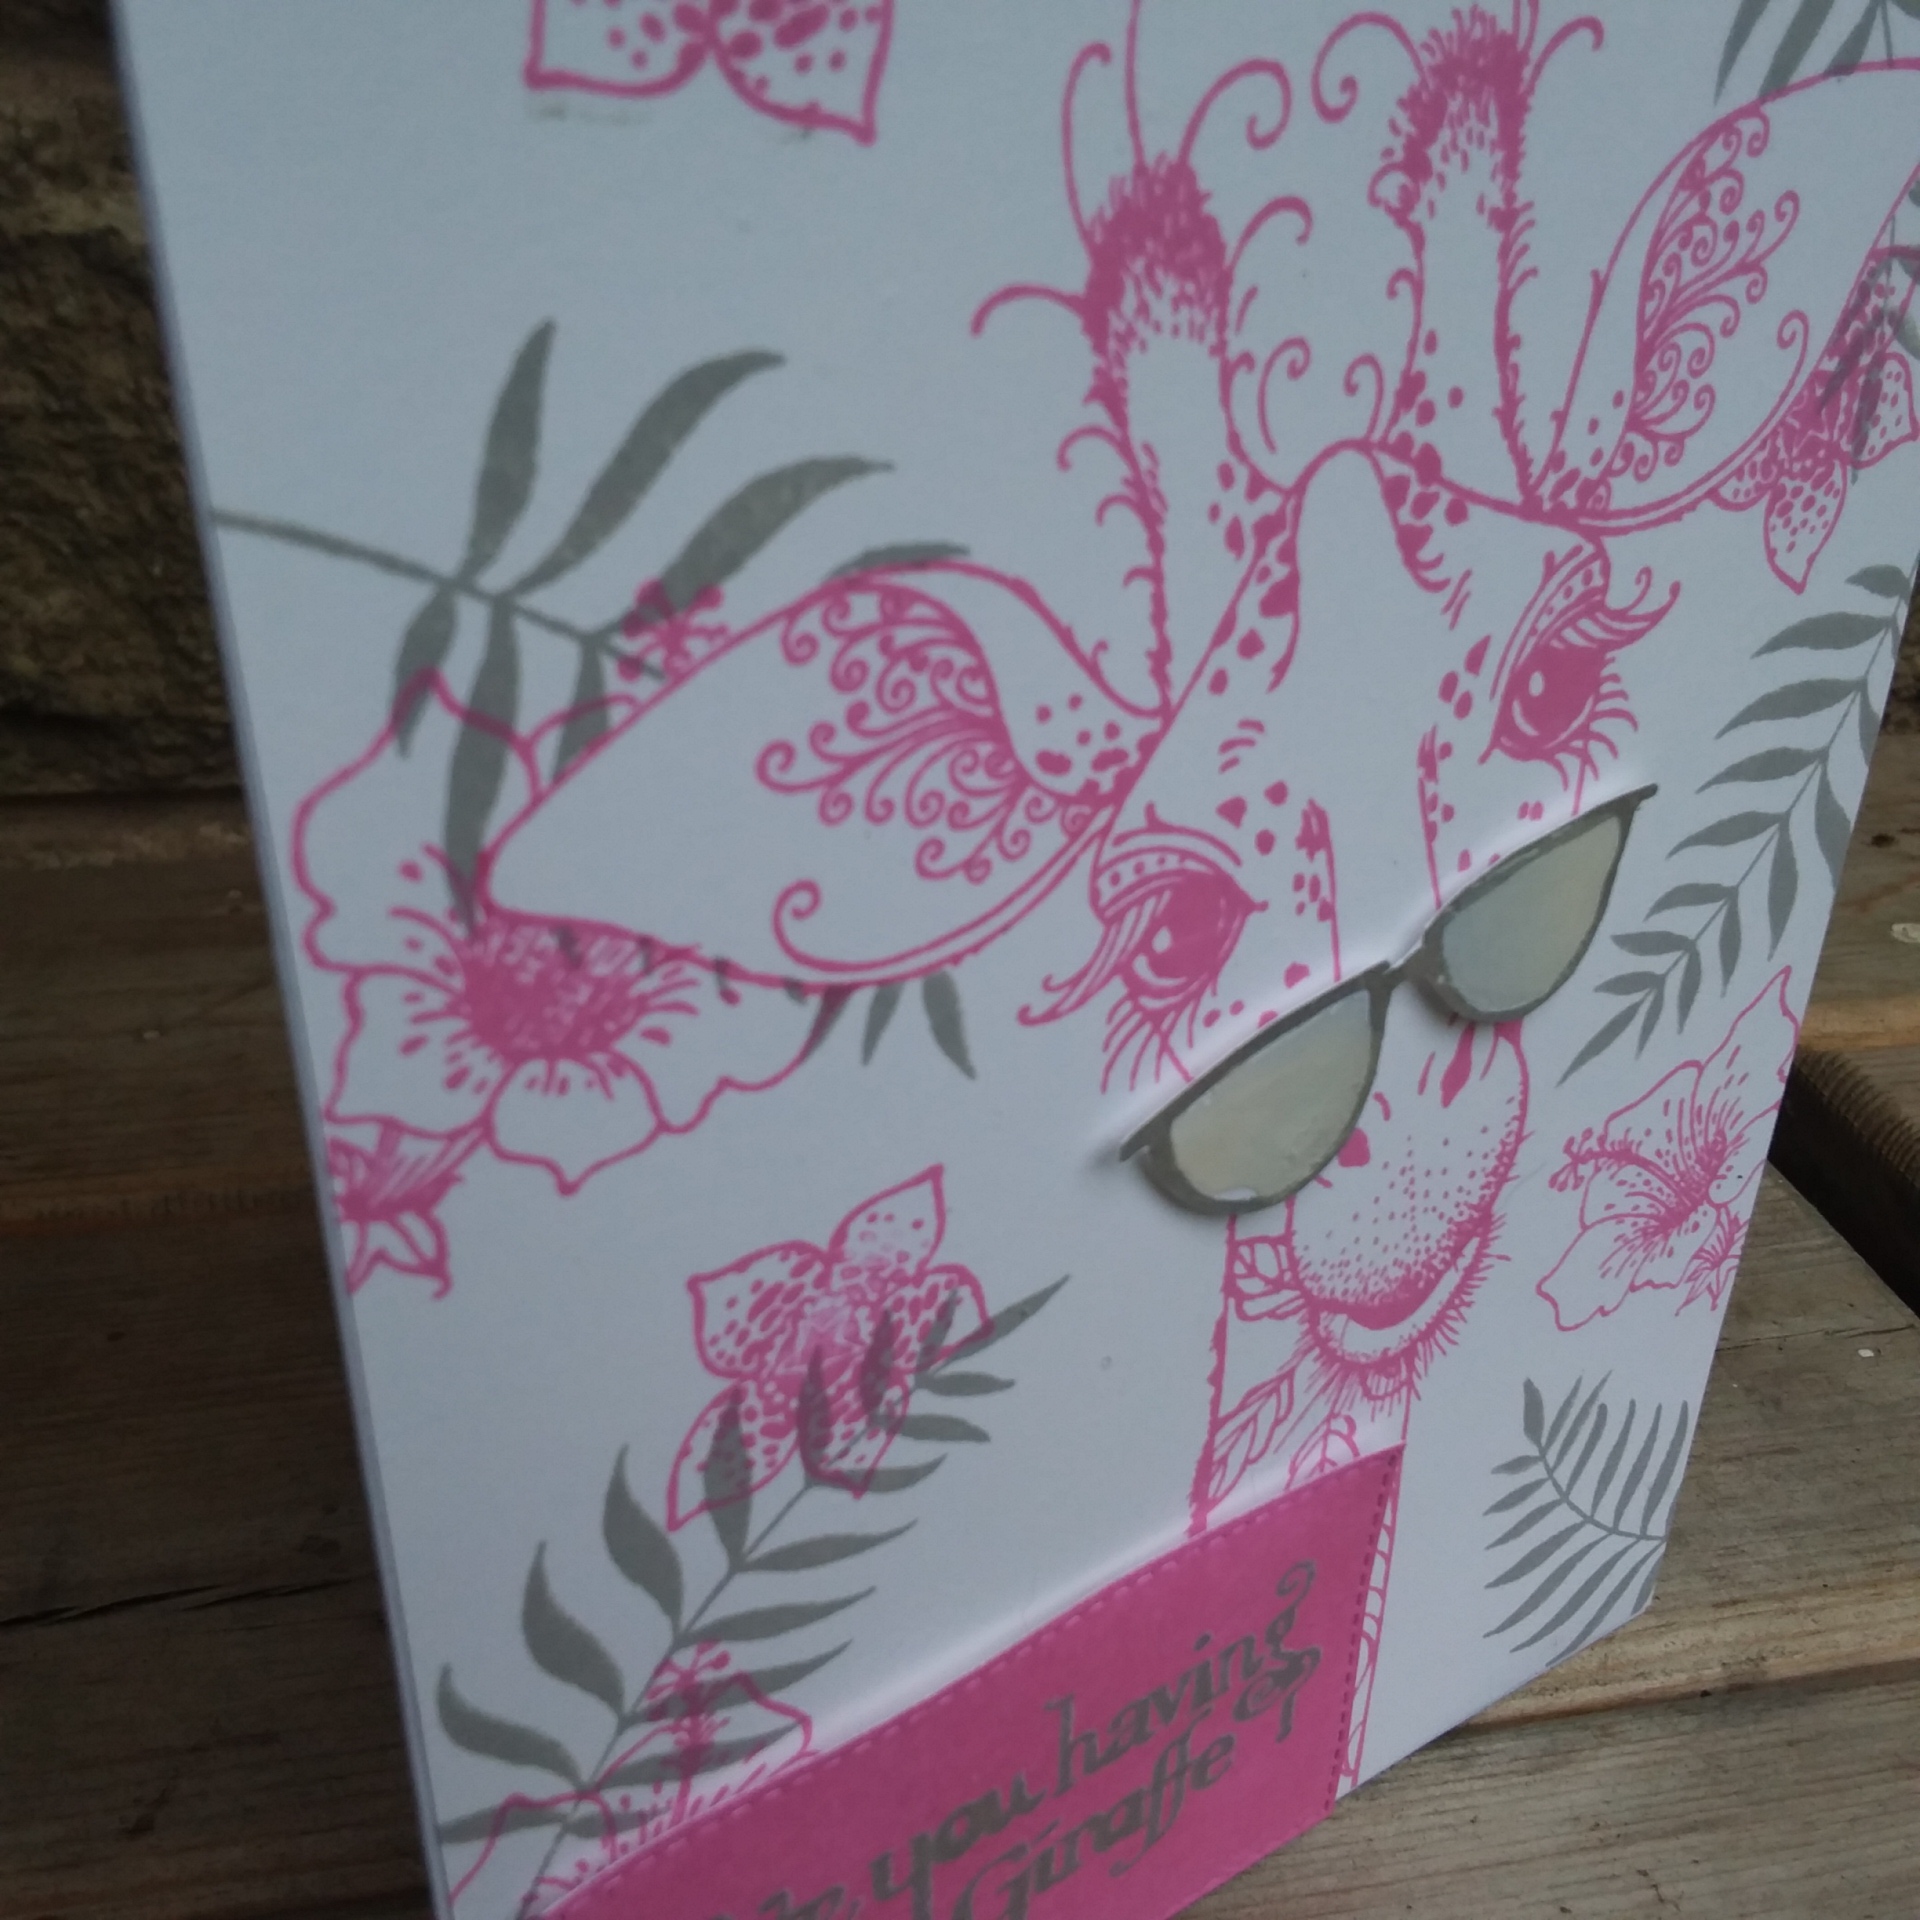
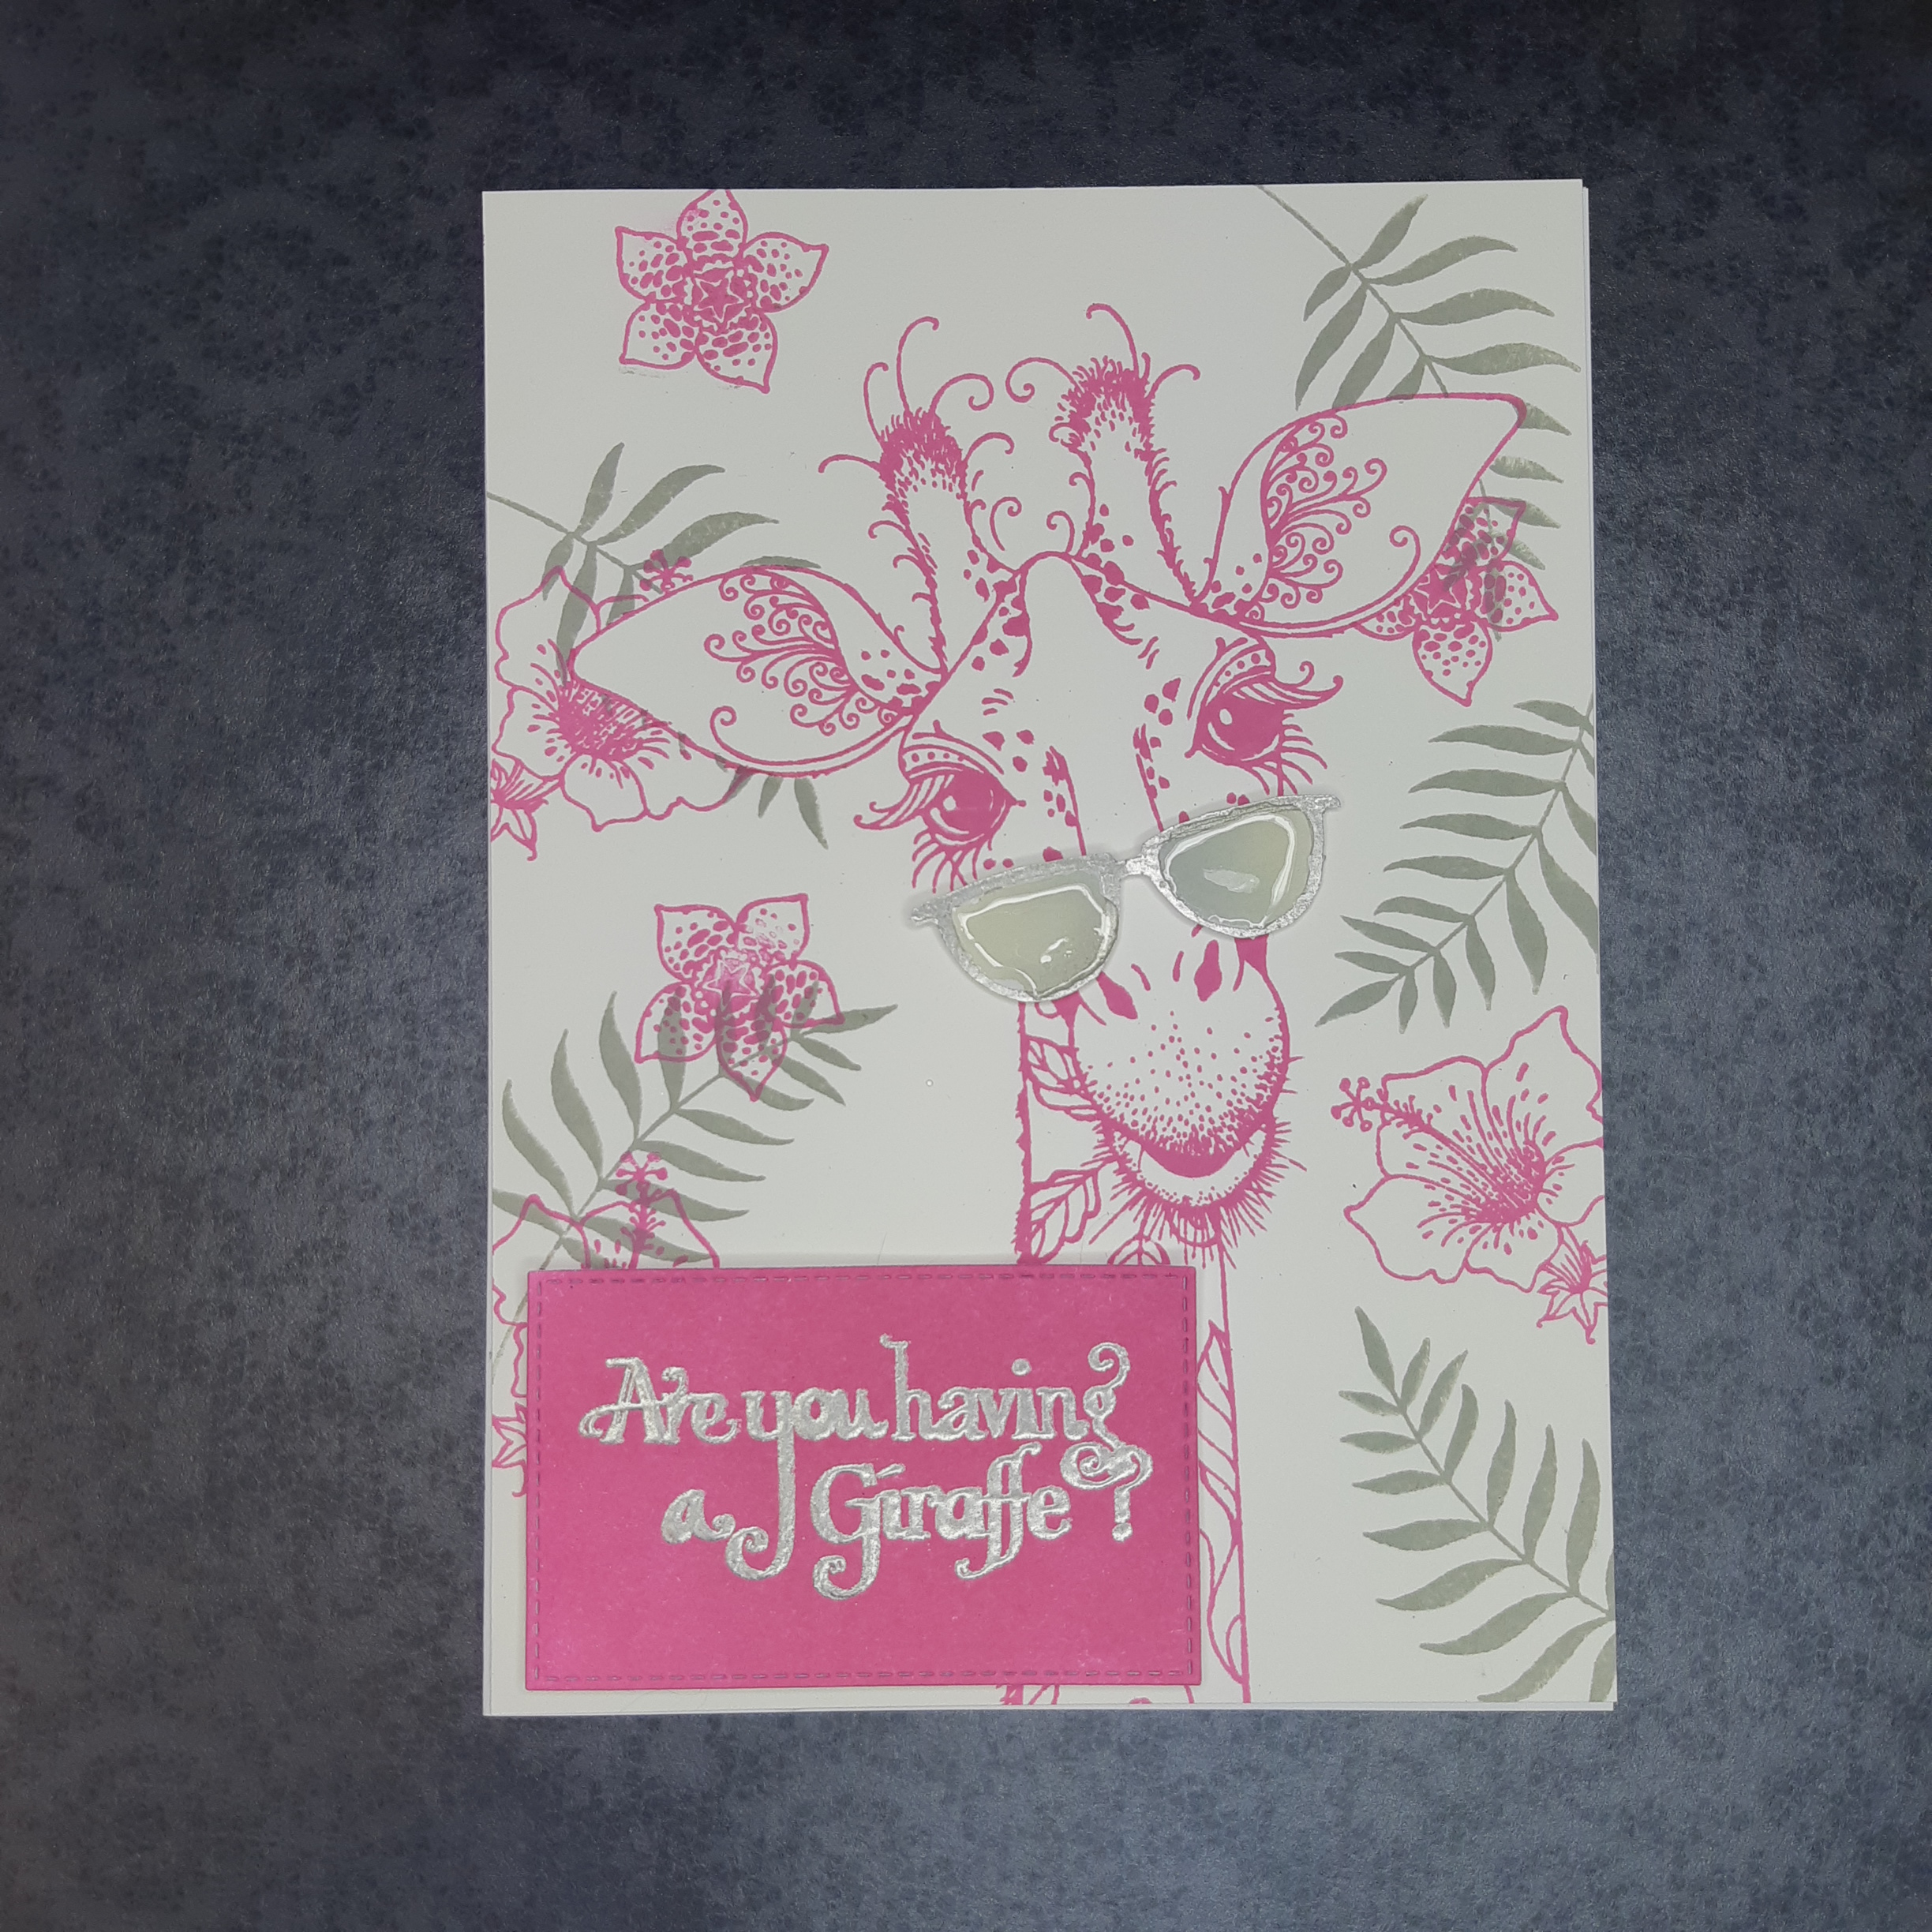
Hi there. After attending the Uniko stamping retreat yesterday (Saturday) in Stockton-On-Tees, I was a little inked and stamped out. I had so many thoughts and ideas going through my head using their new release stamps and stencils – I just didn’t know where to being to play today.
So – I didn’t. I went with die-cutting to give my little brain a rest……or so I thought! This card is inspired by the current challenge from Pinspirational. I used some of the inspiration from the photo, but you can see I went my own way.

The Candy Machine is from a Sue Wilson die I have had for ages – and not used. I didn’t want to do the full dimensional working candy machine, at this point, and went for a flatter look.

Once I had die cut the candy machine, and die cut it out of the centre of the light blue background – which is inspired from the light blue background of the inspiration photo – I embossed the blue card with Sue Wilson’s ‘Checkboard’ embossing folder, which is a ‘pin point’ folder, meaning different embossing levels, and faux pierced effects.

I thought white card behind the machine was a little too stark, so I die cut the candy machine outline out of vellum, and stuck that down. I then stamped the sentiment on a circular piece of vellum, heat embossed with black, and stuck that down.

My original candy machine was out of the blue shiny card, if you remember, but it all looked a little…….well, boring. So – out came some vibrant red card, which tied even further into the inspiration photo, and stuck that down. The two glimmer card pieces are for little extra.

I started by thinking this was going to be easier to do than playing with my Uniko new stash – but in fact it created a whole load of issues itself. It wasn’t easier – just different.

I shall be entering the following challenges:

Pinspirationalinspiration photo

QKR Stampedeanything goes


Christmas in February??

20180221_212446 Last evening had been one for die-cutting, as you can see. The previous card gave me the inspiration to try something more adventurous and I thought a Christmas card would be an ideal way to go a little over-the-top, a little more dramatic.

I started with a base card from Sue Wilson, embossed with a Heart Lattice embossing folder, with a layer of black behind it. The poinsettias were stamped with the Heartfelt Creations stamp, and heat embossed with black embossing powder. After these were die cut, I layered a couple of the together, and shaped the leaves a little. I like rounded shapes on leaves as I feel you can get some reflection of the embossing powder and the card better from any angle.

The sprigs of holly etc were die cut from the same gold card, and from some black card, all arranged on the base layers with 3D glue – to give me some time for moving things around. I also like to leave some of the finishing touches free – I don’t stick everything down completely, as I like the movement of them when the card is opened.

I thought about a Christmas sentiment, and where to put it, but I didn’t want to cover any of the elements up at this point, so I will ensure I put a relevant Christmas verse on the inside.

I shall be entering the following challenges:

Crafty Hazelnut’s Christmas Challenge Christmas with option green (option not used)

Winter Wonderland Challengeanything goes Christmas

Christmas at Sweet Stampin’anything goes Christmas