sweet machine

20180225_165829Hi there. After attending the Uniko stamping retreat yesterday (Saturday) in Stockton-On-Tees, I was a little inked and stamped out. I had so many thoughts and ideas going through my head using their new release stamps and stencils – I just didn’t know where to being to play today.
So – I didn’t. I went with die-cutting to give my little brain a rest……or so I thought! This card is inspired by the current challenge from Pinspirational. I used some of the inspiration from the photo, but you can see I went my own way.

The Candy Machine is from a Sue Wilson die I have had for ages – and not used. I didn’t want to do the full dimensional working candy machine, at this point, and went for a flatter look.

Once I had die cut the candy machine, and die cut it out of the centre of the light blue background – which is inspired from the light blue background of the inspiration photo – I embossed the blue card with Sue Wilson’s ‘Checkboard’ embossing folder, which is a ‘pin point’ folder, meaning different embossing levels, and faux pierced effects.

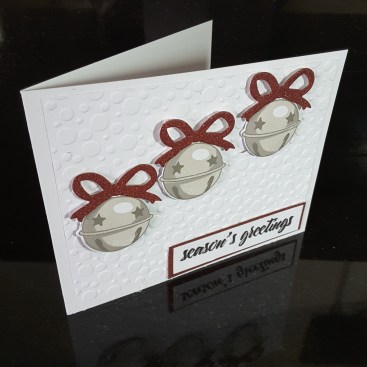
I thought white card behind the machine was a little too stark, so I die cut the candy machine outline out of vellum, and stuck that down. I then stamped the sentiment on a circular piece of vellum, heat embossed with black, and stuck that down.

My original candy machine was out of the blue shiny card, if you remember, but it all looked a little…….well, boring. So – out came some vibrant red card, which tied even further into the inspiration photo, and stuck that down. The two glimmer card pieces are for little extra.

I started by thinking this was going to be easier to do than playing with my Uniko new stash – but in fact it created a whole load of issues itself. It wasn’t easier – just different.

I shall be entering the following challenges:

Pinspirationalinspiration photo

QKR Stampedeanything goes


Another two-fer

20171217_124010

Hello everyone. I hope you are all well, and enjoying this time of year. I have had time to play and make some last-minute cards, so I will be posting a couple today, and probably a couple tomorrow.

The first card is basically a red and white card, with a pop of green, and all glittery. I love doing glittery cards when it is Christmas, and you can see I really went to town on this one!

The card is 8 inches square, with a white glitter card as base – from Crafters Companion – with a red glitter card frame. The trees are from a Sue Wilson set I have had for a few years, again cut out of glittery card, this time in green.

The red poinsettias are from an x-cut die – again I have had this for many years and is my go-to die for poinsettias. This time cut out of a shiny red card instead of glitter. I layered a couple of the die-cuts together, giving some dimension to each leaf, adding a small gem to the centre.

The flowers were stuck down with 3D glue, and I also inserted some holly branches – Sue Wilson again – just underneath the petals.

The sentiment is die cut in green glitter – I know, lots of glitter – and stuck down after passing the words through my Xyron machine.

I shall be entering this card into the following challenges:

Double D challengesred and white Christmas with optional pop of green

City Crafter ChallengeChristmas Tree

Try it on TuesdayTwinkle, twinkle – lots of shiny things

Watercooler Wednesdayall about occasions

Time Out Challenges photo inspiration – used colours and tree

QKR Stampedeanything goes with twist Christmas

The Holly and Ivy Christmas challengeanything goes Christmas

The second card for today is a much more simple and flatter card:

20171217_124010

I used the Altenew layering Bells and Bows stamp set, as I am entering this card into the current Cards in Envy challenge – to use bells. I have the matching die set, and cut out the bells, and also cut some red bows out of red glitter card.

I stuck them down onto a polka dot embossed panel, for some interest in the background, and added the sentiment as you can see.

So – a couple of cards, each one different to the other. I hope you can call back tomorrow when I post another couple of cards……

Pink and Sparkly Congratulations

20171125_155648

What a busy few days I’ve had, with no time to post to my blog. I  have been making up for it today with Christmas cards, and this sparkly little number. Here are some more photos of the sparklyness…..

There are several reasons for making this card, the main one being that a couple of friends of ours are coming round this evening for a Chinese Take-away, and bringing their new daughter. Well, I say new daughter – would September 1st baby still be classed as new? I think so……..

I couldn’t very well not make a card for them, when I make cards all the time, but I was wondering about which style to use. If it is something like Christmas and celebrations, then I tend to turn to my Sue Wilson dies, and my glittery card stock, and have at it! I also tend to do bigger cards, and add loads of die cuts, which means I have to put them in a box, as they won’t fit in an envelope.

I can make my own boxes, but when I have pre-cut cards, then I use pre-cut boxes. Saves a lot of time, especially when you don’t want to do anything much to the outside of the box.

So – this card . Colours – pink and sparkly – was inspired by the current Card Concept challenge. I know that many people are making Christmas cards, but I went with the new baby card for my friends, but inspired by the colour scheme from this challenge.

The glittery card stock is from Stampin Up – and boy does that shed glitter!!!! – and the other pink card is Foundations Card from Creative Expressions.

The main larger layers I just measured and cut with my Cutterpillar, but used Sue Wilson dies for all the die cutting – debossed square, frilly oval, two inner ovals, and even the three beaded swirl additions.

The sentiment is actually from the Altenew stamp set – ‘Baby Zoo – a recent and long-awaited purchase from Seven Hills Crafts. I don’t really make ‘baby’ cards, and tend to make do with what I have but when I saw what my sister did with this stamp set, I waited for the stock to be replenished at Seven Hills so I could order it.

Challenges I will be entering:

The Card Conceptphoto inspiration

Time Out Challenges –  word inspiration (used a twist on celebrate)

Try it on Tuesday colourful – no or little white areas

Crafty Gals Corneruse your dies


Neutral Christmas

20171118_172047_003

Hello. I am sharing one of my Christmas card makes with you today,  made with neutral colours – and a little bit of bling!

The base card is an 8 inch square Kraft card, to which I added some square layers cut with Sue Wilson stitched squares. I also cut out a frame using two of the squares together. On one of the layers, I die cut the Sue Wilson trees, and stuck that down with a double-sided sticky sheet, so that I could add some Tim Holtz Distress Glitter to the open spaces. I have several colours of distress glitter, and find it gives a shine – but not over the top.

I then die cut Sue Wilson Deer Family, inking through the die with some distress ink to give some interest. Putting it all together, I stuck the deer down with a combination of foam pads and glue, depending on which part of the deer was inside the frame or on it.

The sentiment is from Altenew, and so are the little stars I added to each side.

I shall be entering this card into the following challenges:

Inkspirational Christmas card using neutral colours

The Merry Christmas Challengeanything goes + Christmas

Simon Says Stamp Wednesday challengefurry friends

Allsorts Challenge bloguse glitter


White on white

20171113_200456

20171113_200506
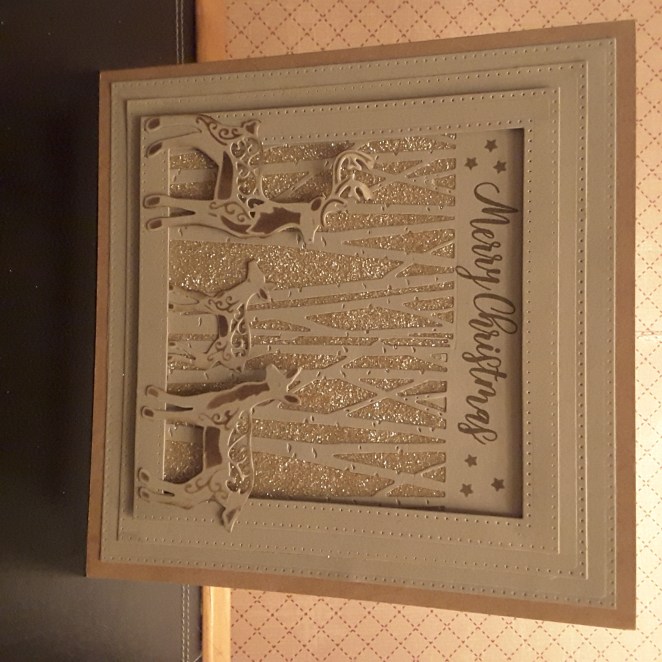
Hello everyone. Well, isn’t this card different to my recent past cards? This card is all about die-cutting, and not using colours.

I made this card for the challenges which were for white on white, and as I am trying to make Christmas cards, I turned to my trusty and always useable Sue Wilson dies.

I have always been a fan of hers, and this particular angel is my bestest and most favourite ever – she is the 2014 angel. I have another couple of Sue Wilson’s Christmas angels, but this is certainly my favourite. She always looks beautiful and effective, whatever you cut her with, and whatever you put around her – well, I think so, anyway.

I used Centura Pearl for this card, and whilst the card is white, there is a hint of silver in there. I must admit that I had to run her through my die-cutting machine several times to get everything cut well, as Centura Pearl is quite a thick and coated card. As I was using my electronic Big Shot – not a problem. Unless you count moving your finger from one side of the button to the other for reversing direction a particularly arduous task!!!!

For the rectangular layers I used another Sue Wilson die set – Shadow Box Collection – Stitched Lattice Frames. Only using the frames, and not the lattice. I did try the lattice, but my angel got lost when I put her on it, so I kept the card behind her plain.

After I had cut her out, I removed her from the die, to realise that all of the little pieces in her skirt had stayed in place. Realising what a great look this was – I am quick sometimes, you know – I removed the small pieces from her wings, then quickly sprayed the back of her with glue and stuck her down. Phew. Once I decided to do that I was quite nervous every time I had to pick her up, in case some of them dropped out.

The greeting is an X-cut die cut, and the little dove – from the same Sue Wilson 2014 Angel set – is raised on a foam piece for some more interest and dimension.

I shall be entering this into the following challenges:

Simon Says Stamp Wednesday ChallengeSnow White

The Paper Players White on White

Crimbo Crackersanything goes Christmas


Coloured Birthday

20171007_122532

Hello everyone. I hope everyone is doing well, and enjoying the day…..

This card was made in a larger format, to leave some clean space on the card. The colours are from the current challenge from CAS Colours and Sketches – Pumpkin Pie, Crumb Cake, Pear Pizzazz. I first stamped the flowers from Stamps By Me, in Crumb Cake, then again – using my Misti – stamped over the top of the colour with Ranger Perfect Medium, and embossed with clear embossing powder.

I coloured the flowers with Pumpkin Pie, and the leaves with Pear Pizzazz, before using my Lawn Fawn ‘Wonky Rectangles’ to cut the panel. I then used the Sue Wilson ‘Shadow Box Collection – Stitched Lattice Frames’ to emboss the grid pattern into that panel. I also used the three rectangles from that same die set to cut a thin frame out of Crumb Cake Card, and another layer to go underneath the white panel. That way, I had stitching on all the layers.

The bottom thinner frame is stuck directly onto the base card, with the flower panel and it’s Crumb Cake layer being raised on 3D foam pads.

The sentiment is from Stamps By Me, stamped in Versafine Black Onyx.

As it is very, very windy outside today, I photographed inside again. I probably spent as much time hunting for a suitable photo situation as I did putting the card together…..

I shall be entering the following challenges:

CAS Colours and SketchesPumpkin Pie, Pear Pizzazz, Crumb Cake

CASologygrid

Seize the Birthdayanything goes birthday (not using optional theme)


Guest Designer sketch

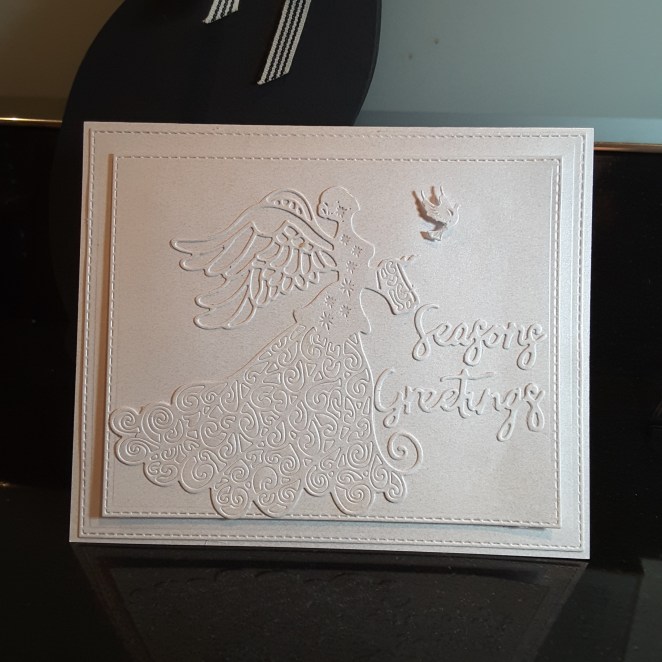
Hello again everyone. This card is based on the sketch for the second challenge I am guest designer for as CAS Colours and Sketches. For some reason my mind turned to Christmas. I have no idea why, but that’s the way I went.

I wanted a shape hanging over the edge of the card, as per the sketch, and looked at my dies for snowflakes and baubles. I went with snowflakes from Stampin Up ‘Starlight Thinlits’, and cut the shape out of glimmer card, also from Stampin Up.

I used a dark blue card from Creative expressions as a base card, and a second layer which I embossed with my Sue Wilson ‘Twinkle Twinkle’ embossing folder. I did toy with the idea of insetting the snowflake, but decided to stick it on top, so I then had to cut another one out with some double sided sticky tape on the back as I didn’t want glue everywhere.

Once attached, I looked at what dies I had for a Christmas sentiment, and again used a Stampin Up set ‘Christmas Stocking’ thinlits, the same glimmer card, and cutting down the original die cut to leave just the word.

I tried to photograph the background of the stars, which I think came out well, but I just couldn’t get the picture right for the glimmer card. This really is a twinkly card, and the photograph just doesn’t do it justice.

I hope you can play along, and I look forward to seeing what you create with this wonderfully simple sketch. 🙂

I shall also be entering this card into the Crafty Friends ChallengeChristmas in July.


Poppy stamp set

Hi everyone. So – I went to the craft show yesterday. The bank balance took a hit, and I have been playing with some of my new buys. I have found a new stamp maker – ‘Stamps by me’. I bought three sets and let me tell you – lovely, brilliant, fabulously designed. Gorgeous. And – found out that their store is only an hour away from home – could be dangerous!

This particular stamp set is called ‘Beautiful’ due to the sentiments in the set, but the flowers are simply stunning, no matter what colour you use.

You have the outline, then the water-colour effect for the colour. As you can see I used several colours from my Catherine Pooler collection, and tried different techniques. Some I just stamped the colour, others I water-coloured, and one of them I did both – water-coloured then stamped on top. I didn’t even use my Misti as the Catherine Pooler inks seem to stamp well first time. (I am sure I’ve mentioned that before!)

The four I have not added a sentiment to, will probably be packed together for a cute little notelet set, after adding some plain white paper as an insert. The last card I played with a different background, embossed with a Sue Wilson ‘Rope Chain’ I bought yesterday at a bargain price.

I particularly like the orange cards, as they are different to what one would expect. I’ll be playing with these a little more over the next few days, as not working all week, and will be adding bits and pieces to them, maybe some water-colouring backgrounds…..the choice is endless.

I shall be entering the following challenges with one of these cards:

Paper Craft Crewshare a project using something new

Crafty Catzanything goes (option ice cream – not used)

QKR Stampedeanything goes (option seaside not used)

Crafty Friends Challengefloral

Stamping Sensationsstamping and flowers

clean and simple butterfly

Hello everyone. Sunday here is turning out to be a glorious warm and sunny day – and yet I have been making this card. Well, with my wedding anniversary today, and hubby off golfing – what’s a girl to do?

This card was inspired initially by the current Casology challenge – the cue card being ‘fly’. So, how many items do I have that could be used for this card? I am sure we all have butterflies, and birds, and feathers, and loads more stuff. I initially thought about the Tim Holtz ‘crazy birds’, then went to my Altenew ‘feathers’, then went to some butterfly stamps – then – found this Brusho piece of card from when I was playing with my new colours a few weeks ago. Just laying there on my desk, calling me, asking me to use it for this card………..

Immediately, I went to my butterfly die from Sue Wilson – ‘Majestic Monarch’. This is such a gorgeous die, very delicate, so it wouldn’t take over too much from the background, but quite large. Therefore, I went to a 6 inch square card as a base.

I placed my die cut butterfly on the card, and tried several positions until I was happy, then looked for a sentiment. This sentiment actually comes from the Altenew ‘Faithful Feather’ stamp set, and I love the script, and also that it fit just perfectly rightly in the bottom right of the card.

I used my Misti to stamp the sentiment a couple of times with my Versafine Black Onyx, then stuck down the butterfly using the body only, as I wanted the wings to move around a little, to give some movement to the card.

I hope you are all having a fabulous day, and will be crafting at some point……

I shall be entering this card into the following challenges:

Casologyfly

Simon Says Stamp Wednesday challengeanything goes

Crafting with Dragonfliespunches or dies

Colour Crazy Craft Challengeanything goes

Bright resist

Happy Saturday everyone. Today’s card is quite bright for me, and I have put together this card based on a sketch from Paper Craft Crew, and a technique of resist from AAA cards .

Now, I played with the resist technique a few times, before I decided on the central image above. I used the same image, from Circa Design called ‘Fuchsia’, but tried different ways of ‘resisting’. I tried using water colour card, stamping and embossing the image, then using my Zig markers to colours parts if it – turned out a mess! I then tried stamping and embossing and putting my Brushos over it – turned out another mess! I tried stamping and embossing, covering the flower part of the image in masking fluid, colouring the rest of it with green, rubbed off the masking fluid, added some pink for the flowers – yep – another mess!

So – this is my fourth attempt. I stamped and embossed the image in white, then just ran my Catherine Pooler ‘Lime Rickey’ ink pad over the whole image. Worked very well, I think. I actually then went in with my water brush and removed some of the ink from the embossing to make that clearer, and liked it even more.

I die cut the image with my Sue Wilson Noble Dies ‘Double Pierced Circles’, and moved on to the rest of the sketch.

The card base is 7 inches square, so I cut another layer slightly smaller, and used my Tim Holtz/Sizzix thinlits ‘Mixed Media’ circle die cut to cut into that second layer. I then splashed some Lime Rickey ink around that layer – I don’t have lime green dots or perfect pearls – and then turned my thoughts to the twine and washi tape.

I added a green tape, then another red (ish) tape for a little bit of a different colour, and the twine was from a selection I have from We R Memory Keepers. As I can’t tie a bow to save anyone’s life, I used my Tattered Lace ‘Bow Maker’ and stuck the bow down at the front, and the ends down at the back.

To complete the card I added the main die cut image with foam pads.

I seem to be turning to my Catherine Pooler inks more and more for my projects. I like how they can be used for almost everything. They ink stamps well, they blend well together, they water-colour well – I haven’t really found anything they won’t do when I want them to do it. They are definitely one of my most favourite buys – even with the customs and postage cost.

I shall be entering this card into the following challenges:

Paper Craft Crew challengesketch

AAA cards resist technique

QKR Stampedeanything goes