Diorama Shaker

Hello once again. The Alphabet Challenge has started a new challenge with a new theme. We have reached the letter ‘X’, and Debbie has chosen the theme as ‘Xtra Folds’. Here is my card:

This card took quite a lot of work to put together, but I am pleased with the outcome.

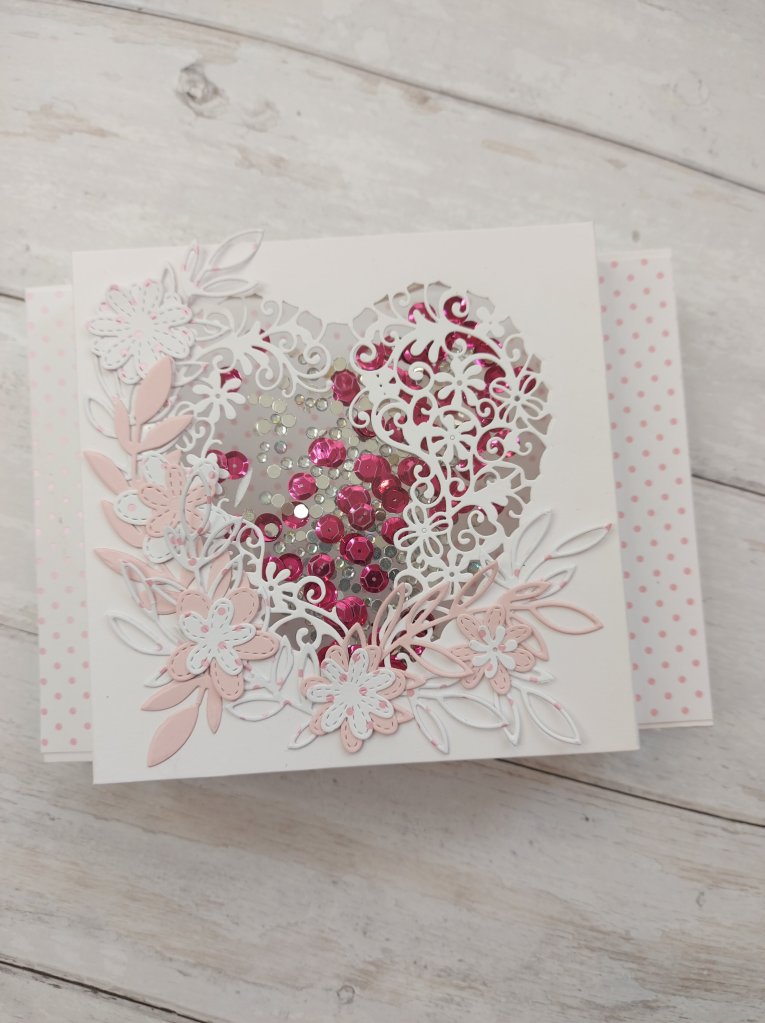
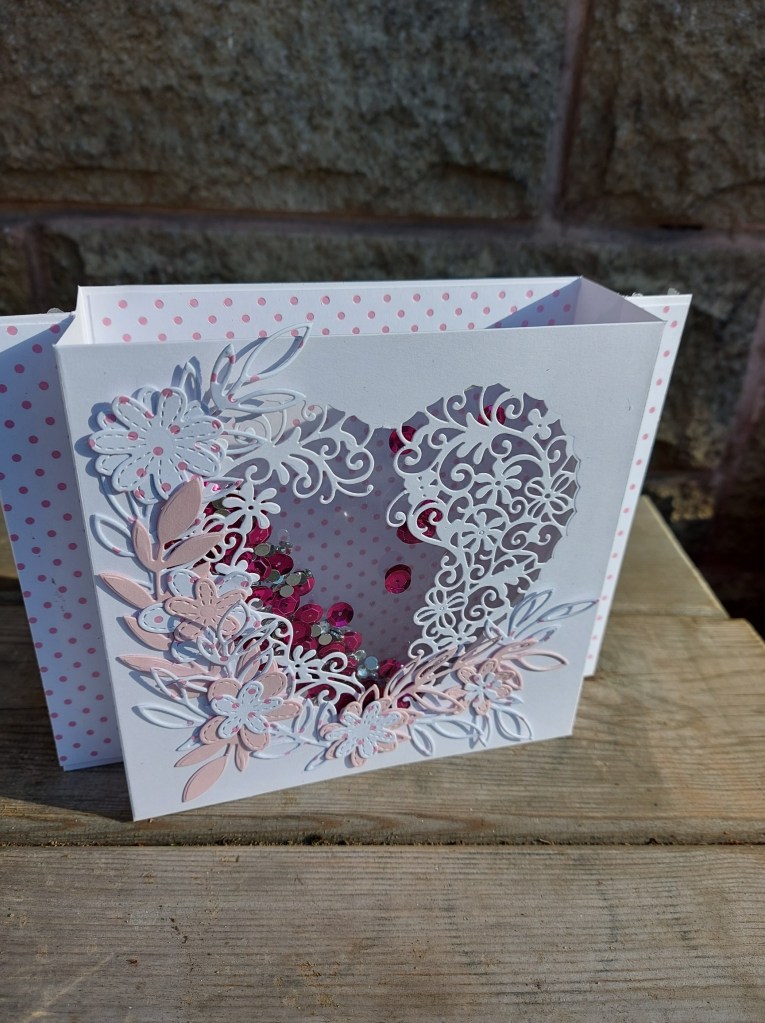
I used a diorama card base, and from the front panel I die cut a floral heart. This die set is from Crafters Companion I have had for absolutely ages, and ‘found’ it when I was once again sorting through some of my stash.

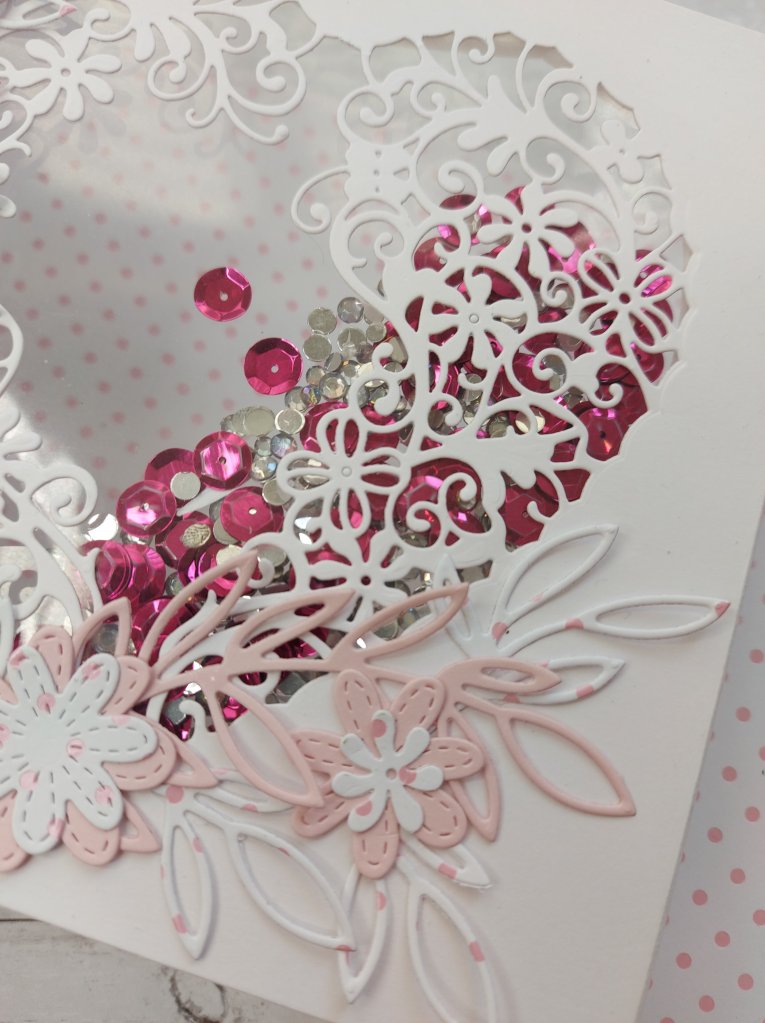
The leaves and flowers are from MFT, some die cut from the same pink floral dotty background card, and some from a light pink card stock from Concord & 9th.

I added some acetate to the back of the floral heart so they would be supported, and at this point I decided to make it into a shaker card – me, making a shaker card…………wonders never cease!

I used another of the layering heart dies form the same set, cut another piece of acetate, used Heffy Doodle foam tape, some pink and clear sparkly thingies, and there we have it – a diorama shaker card.

For the sentiment, I think I’ll add something to the back of the card – or maybe write something special for mum-in-law for Mother’s Day next month.

I hope you can come and join us for our ‘Xtra Folds’ challenge – I look forward to seeing what Xtra folds you create. xx

I shall be entering the following challenges:

Mix It Up Challenge anything goes with option of fancy fold

Crafty Creations Challenge anything goes

Simon Says Stamp Wednesday Challenge anything goes

The House That Stamps Builtanything goes

Creative Moments Challenge anything goes

SPREAD THE MIXED UP LOVE - grab a badge
Creative Moment Blog Badge

Simple sparkle

Hello again everyone. I have some time this weekend to do some crafting, and have put together these cards. I started to make these earlier in the week, and finally managed to complete them this morning.

The stamp set is from Uniko, one of their new stamp sets, and this time I have used the bud images from that set. After stamping with Versafine black onyx, I went in with my Polychromos to colour them, and even though they are quite small images, I still managed to give some dimension and blending to the flowers themselves.

I stamped the sentiment in black onyx too, as I like bold sentiments which stand out.

I then took a small piece of green glitter card from Crafters Companion, and die cut a strip from a Catherine Pooler collection I have, adding that for some added extra for a clean and simple piece of sparkle.

I am playing around with ways to photograph my cards, and these images came about as I have been putting my Christmas decorations on my table, and saw that this gorgeous plate – a Christmas present from a very dear friend – was just sat there, with some twig lights around it, looking all pretty……so I placed the cards on it.

I like how these turned out, and may have to keep the set-up for future cards.

I shall be entering the following challenges:

AAA Cards CAS sparkle

Use Your Stuffanything goes

QKR Stampede anything goes

As You Like It anything goes

Moving along with the times flowers


Another two-fer

20171217_124010

Hello everyone. I hope you are all well, and enjoying this time of year. I have had time to play and make some last-minute cards, so I will be posting a couple today, and probably a couple tomorrow.

The first card is basically a red and white card, with a pop of green, and all glittery. I love doing glittery cards when it is Christmas, and you can see I really went to town on this one!

The card is 8 inches square, with a white glitter card as base – from Crafters Companion – with a red glitter card frame. The trees are from a Sue Wilson set I have had for a few years, again cut out of glittery card, this time in green.

The red poinsettias are from an x-cut die – again I have had this for many years and is my go-to die for poinsettias. This time cut out of a shiny red card instead of glitter. I layered a couple of the die-cuts together, giving some dimension to each leaf, adding a small gem to the centre.

The flowers were stuck down with 3D glue, and I also inserted some holly branches – Sue Wilson again – just underneath the petals.

The sentiment is die cut in green glitter – I know, lots of glitter – and stuck down after passing the words through my Xyron machine.

I shall be entering this card into the following challenges:

Double D challengesred and white Christmas with optional pop of green

City Crafter ChallengeChristmas Tree

Try it on TuesdayTwinkle, twinkle – lots of shiny things

Watercooler Wednesdayall about occasions

Time Out Challenges photo inspiration – used colours and tree

QKR Stampedeanything goes with twist Christmas

The Holly and Ivy Christmas challengeanything goes Christmas

The second card for today is a much more simple and flatter card:

20171217_124010

I used the Altenew layering Bells and Bows stamp set, as I am entering this card into the current Cards in Envy challenge – to use bells. I have the matching die set, and cut out the bells, and also cut some red bows out of red glitter card.

I stuck them down onto a polka dot embossed panel, for some interest in the background, and added the sentiment as you can see.

So – a couple of cards, each one different to the other. I hope you can call back tomorrow when I post another couple of cards……

Brusho leaves

20171024_212553 v2

Hi again. I have a simple card for you today. I was inspired by several challenges to use Autumn and Fall colours, and a clean and simple design, as well as using water-colours.

I started by using three of my Brushos to create a background on water-colour card. First I sprayed the card with water, then dropped on the orange, brown, and gamboge colours from Brusho. I moved the card around a little to create a mix of the colours, then let the piece dry a little, but then became impatient so took my heat gun to it!

I then die cut two leaves from an X-Cut set I have had for absolutely ages, and then embossed that with a Crafters Companion embossing folder with a leaf print on it.

The embossed piece was stuck down onto the Brusho card, then cut down to slightly smaller than the base card, and adhered with double sided tape.

The sentiment is from the Altenew Pattern Play Circles – yes, still on my craft table for further playing – and stamped directly onto the card base, using Versafine black onyx. (Brave of me, don’t you think?) I didn’t want a large sentiment, as I didn’t want any of the embossing or colour detail to be lost.

I shall be entering the following challenges:

CAS Watercolour Card ChallengeFall Leaves

Time Out Challengesphoto inspiration (used orange and white)

Inspired By All The Little Thingsphoto inspiration (used orange and white)

Double D Challengesuse leaves on your project


Red flowers

Happy Sunday everyone. Craft day again – well, hubby is golfing, so I am playing too.

This card was composed from the background called ‘Squared Off Cover Panel’ from Reverse Confetti. This is a new buy from Seven Hills Crafts – ordered one day, and delivered the next. Always fabulous service.

Anyway, I knew I wanted to use this cover panel, and cut it twice – once in white, and once in a browny/goldy card from Creative Expressions. I then placed a piece of double sided sticky sheet on the back of the white panel, and placed the browny squares back into the white die cut. I stuck this down onto a plain white card base.

Now to the flowers – back to my old favourite from Altenew, the ‘Adore You’ stamp and die set. Love ’em, love ’em! I took some Crafters Companion satin red and satin green card, stamped using my Ranger Perfect Medium, and embossed with detail bright gold embossing powder. Now, you have to be quick with this embossing, as I have found the coating on this particular card isn’t exactly heat proof! (Trust me, I found out the hard way) So, I heat embossed from the back of the card……wish I’d thought of that first!

Anyhoo, I then cut out the flowers and leaves, and arranged them around the cover plate, took a photo so I could place them back again, and glued down with Pinflair glue gel. This gel gives some time to move things around a little, and you can then even stick the leaves underneath.

The sentiment is from that same stamp set.

I shall be entering this into the following challenges:

Altenew July 2017 inspirationphoto inspiration (colours and flowers)

Time Out ChallengesInspirational words

Just Us Girlssomething old +/- something new

Allsorts Challengephoto inspiration (colours and flowers)


Magnolia Colours

20170726_213334

Hello everyone. I hope you are all well. It looks like a late evening posting for me today. I have been playing with colours and different stamps in my craft room, and forgot what time it was. Time flying and having fun comes to mind…..

This card is inspired by the colours from Color Throwdown – raspberry pink, yellow, and green. I wanted to use the Magnolia stamp set from Altenew, but didn’t know if magnolia’s come in these colours…..I did an internet search, and they do come in yellow, but I couldn’t find any with a raspberry heart or dark shading. So – I did it anyway! You know me, throwing away the rules…..

I stamped the flower in Versafine black onyx – as always – then stamped the base main magnolia layer in ‘Tiara’ from Catherine Pooler, adding some raspberry colour to the base, and slightly drawing it out with my watercolour brush. The green is ‘Grass Skirt’ from Catherine Pooler, drawing out the base green for a lighter touch, then adding directly to the image for the darker shading.

The branch is coloured with an Inktense brown pencil – one of the ‘allowed’ neutral colours – then used the matching dies to cut the image out.

I then stamped a third generation of the raspberry colour using the Altenew Hexagon stamp for a very, very light background, (I promise it is there and the raspberry colour)stuck my flower to it, then used my wonky rectangles from MFT.

The sentiment stamped in the same green, as opposed to my usual black, for a more muted look, so that it didn’t take away from the main image too much.

I shall be entering this card into the following challenges:

Color Throwdownraspberry pink, yellow, green

Crafty Sentiments Designsanything goes

Simon Says Stamp Wednesday Challengeanything goes

Pencil colouring


Hi everyone. I’ve tried another technique with this card. As hubby says – ‘you’re always trying new techniques‘……as if that’s a bad thing! I like to challenge myself, and sometimes it turns out alright.

The reason there are three different photos, is because I couldn’t decide which one I liked best. The outside one I thought was a bit stark, the smaller inside photo a bit dark, and the third one…….maybe ok!

I was inspired by several challenges, including Simply Less is More and AAA Cards, who have a joint challenge running for two weeks. Yes – I am almost out of time, hence this later post.

The challenge is for one layer, using a coloured card base, and clean and simple. Right. Who knew that would be so difficult to plan? Do you emboss, colour, water-colour, stamp……..the possibilities are actually endless, but knuckling down and doing it? That was my challenge for the past two weeks.

I used a Kraft card base, and stamped the outline flower from Altenew ‘Build a Flower Magnolia’ with my Ranger Perfect Medium, then set to colouring it in. I didn’t emboss the outline, I just used the guide from stamping it. I have never used the Crafters Companion pencils before. This set is not for water-colouring, but they are supposed to be good for blending. Perhaps better with a white card base, but I really like how this turned out.

It isn’t professionally perfect, but I like the effect, and may well try this out with a white card base, too. I followed the shading for the flower on the back of the stamp pack and ‘went for it’.

I used three pinks, three greens, three browns, and added an extra purple (ish) colour to get a darker impression at the base of some of the leaves.

The sentiment is also from that same stamp set, and I am liking mixing fonts when stamping, and used Versafine black onyx for this – clean and crisp.

I shall be entering the following challenges:

Less is Moreone layer, coloured card base, CAS

AAA Cardsone layer, coloured card base, CAS

City Crafter Challengeuse Kraft

Crafty SentimentsCAS or fussy and fancy – (CAS)

Addicted to Stampsanything goes

Owl be seeing you

Good morning. A short but sweet posting for today.

This card’s main focus is an owl stamp from Hobby Art ‘Orla Owl’. Yes – another recent purchase from a craft show a few weeks ago, and I’ve been waiting for the opportunity to play with him. I don’t know why it’s a ‘him’, but there we are.

I decided to go with a more masculine feel for the card, and wanted the back layer to be quite dark, like the night sky, but not too plain. I embossed the black card with a Die’sire embossing folder ‘clouds’ from Crafters Companion.

The owl is stamped and embossed with a bronze mica embossing powder. I did think about doing some water colouring, but decided the image was intricate enough to withstand being just plain.

The sentiment is from another stamp set from Woodware – ‘Mosaic Owl’. I also embossed this with the same embossing powder, but this time added to a piece of white card. I rounded the edges of both the base layer and the sentiment.

So – nothing complicated or intricate, though the owl stamp makes it seem so, doesn’t it?

I shall be entering this card into the following challenges:

Watercooler Wednesdayanything goes masculine

CAS Sunday animals


Colourful inspiration

Good evening all. For today’s card I have been playing with loads and loads of inks. Can you tell? I have been ink blending and creating Brusho backgrounds, and die cutting. Quite a bit of playing and fun I had.

For the base card, I used a piece of Crafters Companion water-colour card, and blended colours from Lawn Fawn. These inks are wonderful and blend very, very nicely. I will definitely use them again for this technique. I also did some water splashes to create some added interest to the background.

I actually tried to emulate the colours from the Daring Cardmakers challenge with the middle bottom image being of what I saw as sea and sun-setting sky.

You had to use three elements from these pictures, so I continued to create another ink-blending background, from which I cut small strips – to match the top middle picture, and laid those down in a criss-cross pattern just off to one side.

The third element I used were the flowers. Well, I couldn’t just put one or two on, could I? I started by creating a Brusho background with one of the blue colours, added some yellow, added some purple. I just kept adding until I liked the colours.

I then stamped the flowers from the Altenew ‘Adore You’ stamp set onto that background with Versafine Black Onyx and die cut them with the matching stamp set.

I glued everything down flat, and I used a glue I haven’t used before but bought at Doncaster Dome craft show this past weekend – Tombow multipurpose liquid glue. My goodness that stuff is strong, isn’t it? It may take over from my usual favourite glue from Creative Expressions – Cosmic Shimmer. I really like the Tombow….

I will be entering this card into the following challenges:

Daring CardmakersJune Elemental challenge

Crazy 4 Challenges – at least three of something (strips, flowers)


Happy Birthday

Good morning everyone. I am not at work until this afternoon, so I thought I would finish the card I started yesterday. As always, I gain inspiration from challenges, and – as always – I leave it to the last minute on many of them.

I have had the colours from Color Throwdown and the sketch from Freshly Made Sketches in my head since they went live……and yesterday got down to making the card. Well, after I had spent a good few hours at a craft show in Doncaster Dome, and bought even more goodies.

I started with a 6 inch square white card base, and added a slightly smaller navy layer, which I embossed with my Crafters Companion Textures folder ‘Rain’. I then die cut some pale pink card from Creative Expressions with  a Sara Davies Signature Collection die – an edger die from the ‘Together Forever’ range, which added the curved intricate edge.

After sticking that down to the top of the blue embossed layer, I added another blue layer which I had die cut the ‘Happy Birthday’ panel. Again – from Crafters Companion Create-a-card range. I think the light pink makes the sentiment stand out quite nicely.

I was thinking of gold for under the sentiment, but then I bought the Altenew stamp and die set yesterday – ‘Extra Special’ – and decided to heat emboss the main flower onto blue card with gold embossing powder, to act as the downward tag part of the sketch.

I then added some gold speckle dots – couldn’t resist – and stuck them all down on the card base. I stuck them all flat, with very little dimension, apart from the layers themselves.

So different from the most recent card of mine, as very little stamping – just the main flower element.

I photographed the card outside again – in-between rain and rain and rain – but still natural light. I’m not sure if the card came out very effectively, but I wanted to ensure you could see the shine of the gold embossing.

I was Skyping my sister in Quebec yesterday, and we were talking about backgrounds and natural light, and as it is summer (apparently) and natural light is here for longer in a day, I may try more techniques in the future. Perhaps adding some extra interest with dinner plates, or pieces of wood………or some of the items I have used to make the card.

I will be entering into the following challenges:

Freshly Made Sketchessketch

Color Throwdownnavy, light pink, white, gold,

4 Crafty ChicksBirthday

Just Us GirlsDie-cuts