Take Time To Smell The Flowers

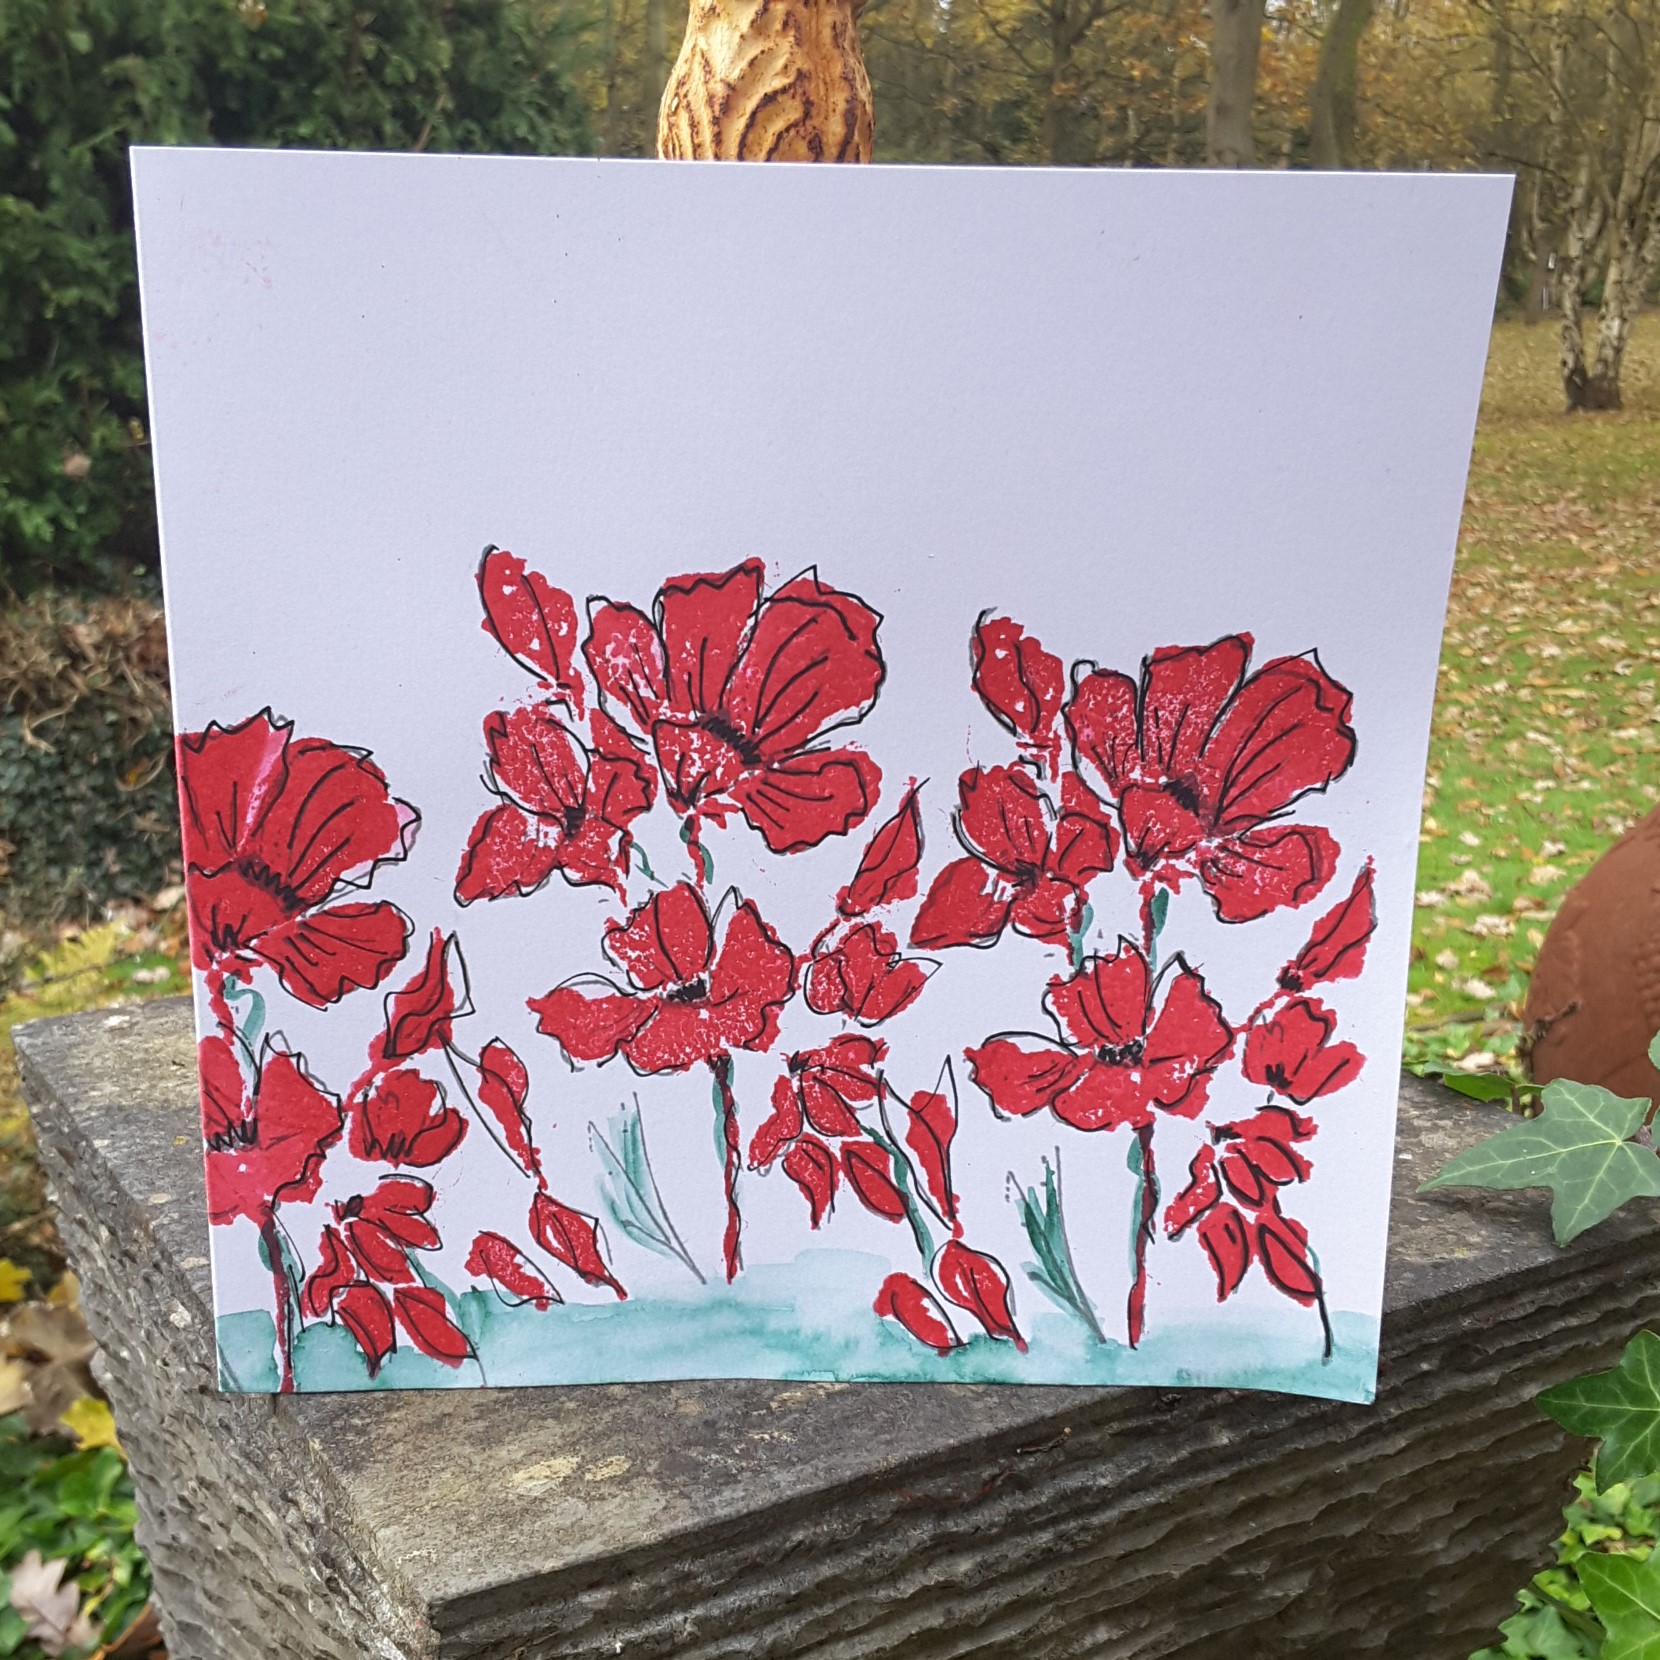
Hello. I have a card to share in which a water-coloured the main floral image – something I haven’t done for absolutely ages:

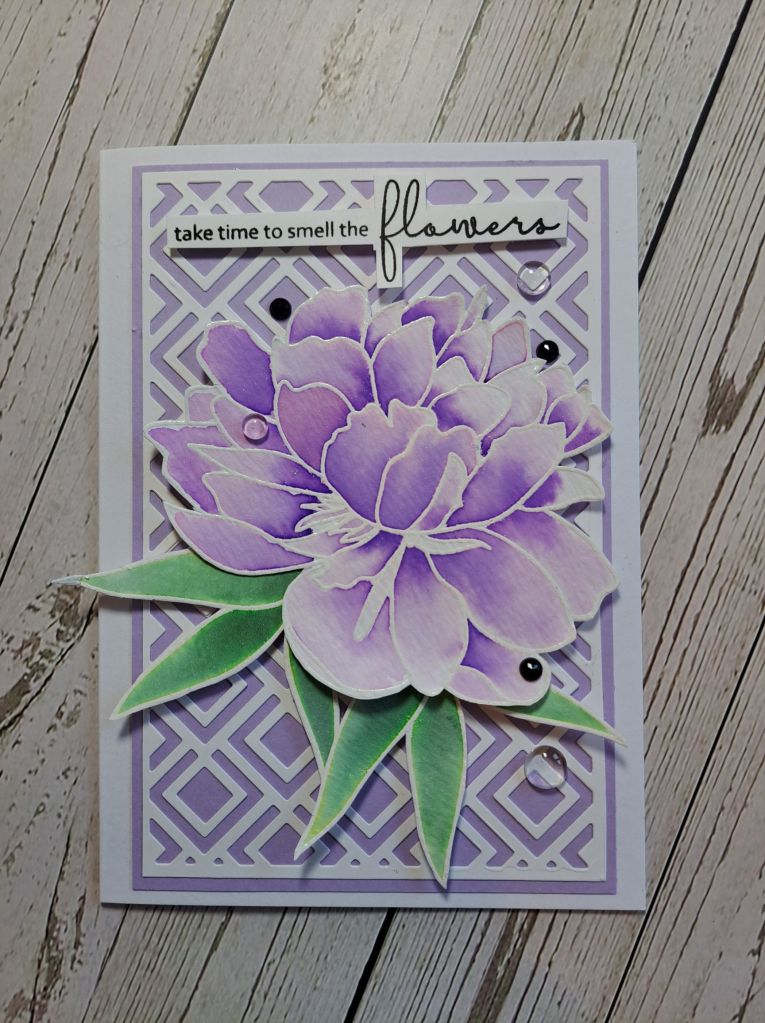
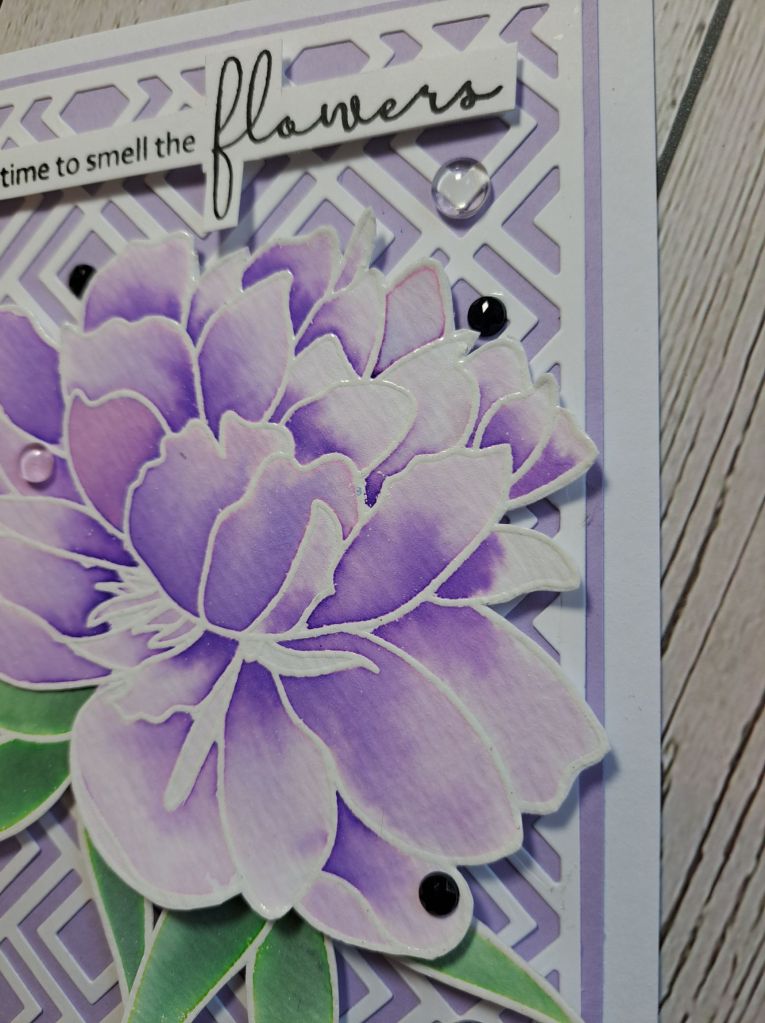
The flower is from a collaboration stamp set with Altenew and Hero Arts. I stamped the flower and the two leaves onto a piece of white water-colour card, then heat embossed in white.

I then sprayed water onto the images and used Distress Inks to colour – well – I dabbed the colour onto my glass mat, picked it up with my wet brush and kinda just let it go and flow……I ‘helped’ the flow a little to reach the ends of the petals and leaves, but generally let the water and the inks do their thing…..my idea of water-colouring!

Once dry, I fussy-cut – my least favourite crafty job – and I think the white heat embossing helped cover a few little flaws with the scissors – but it also helped to guide the scissors somewhat.

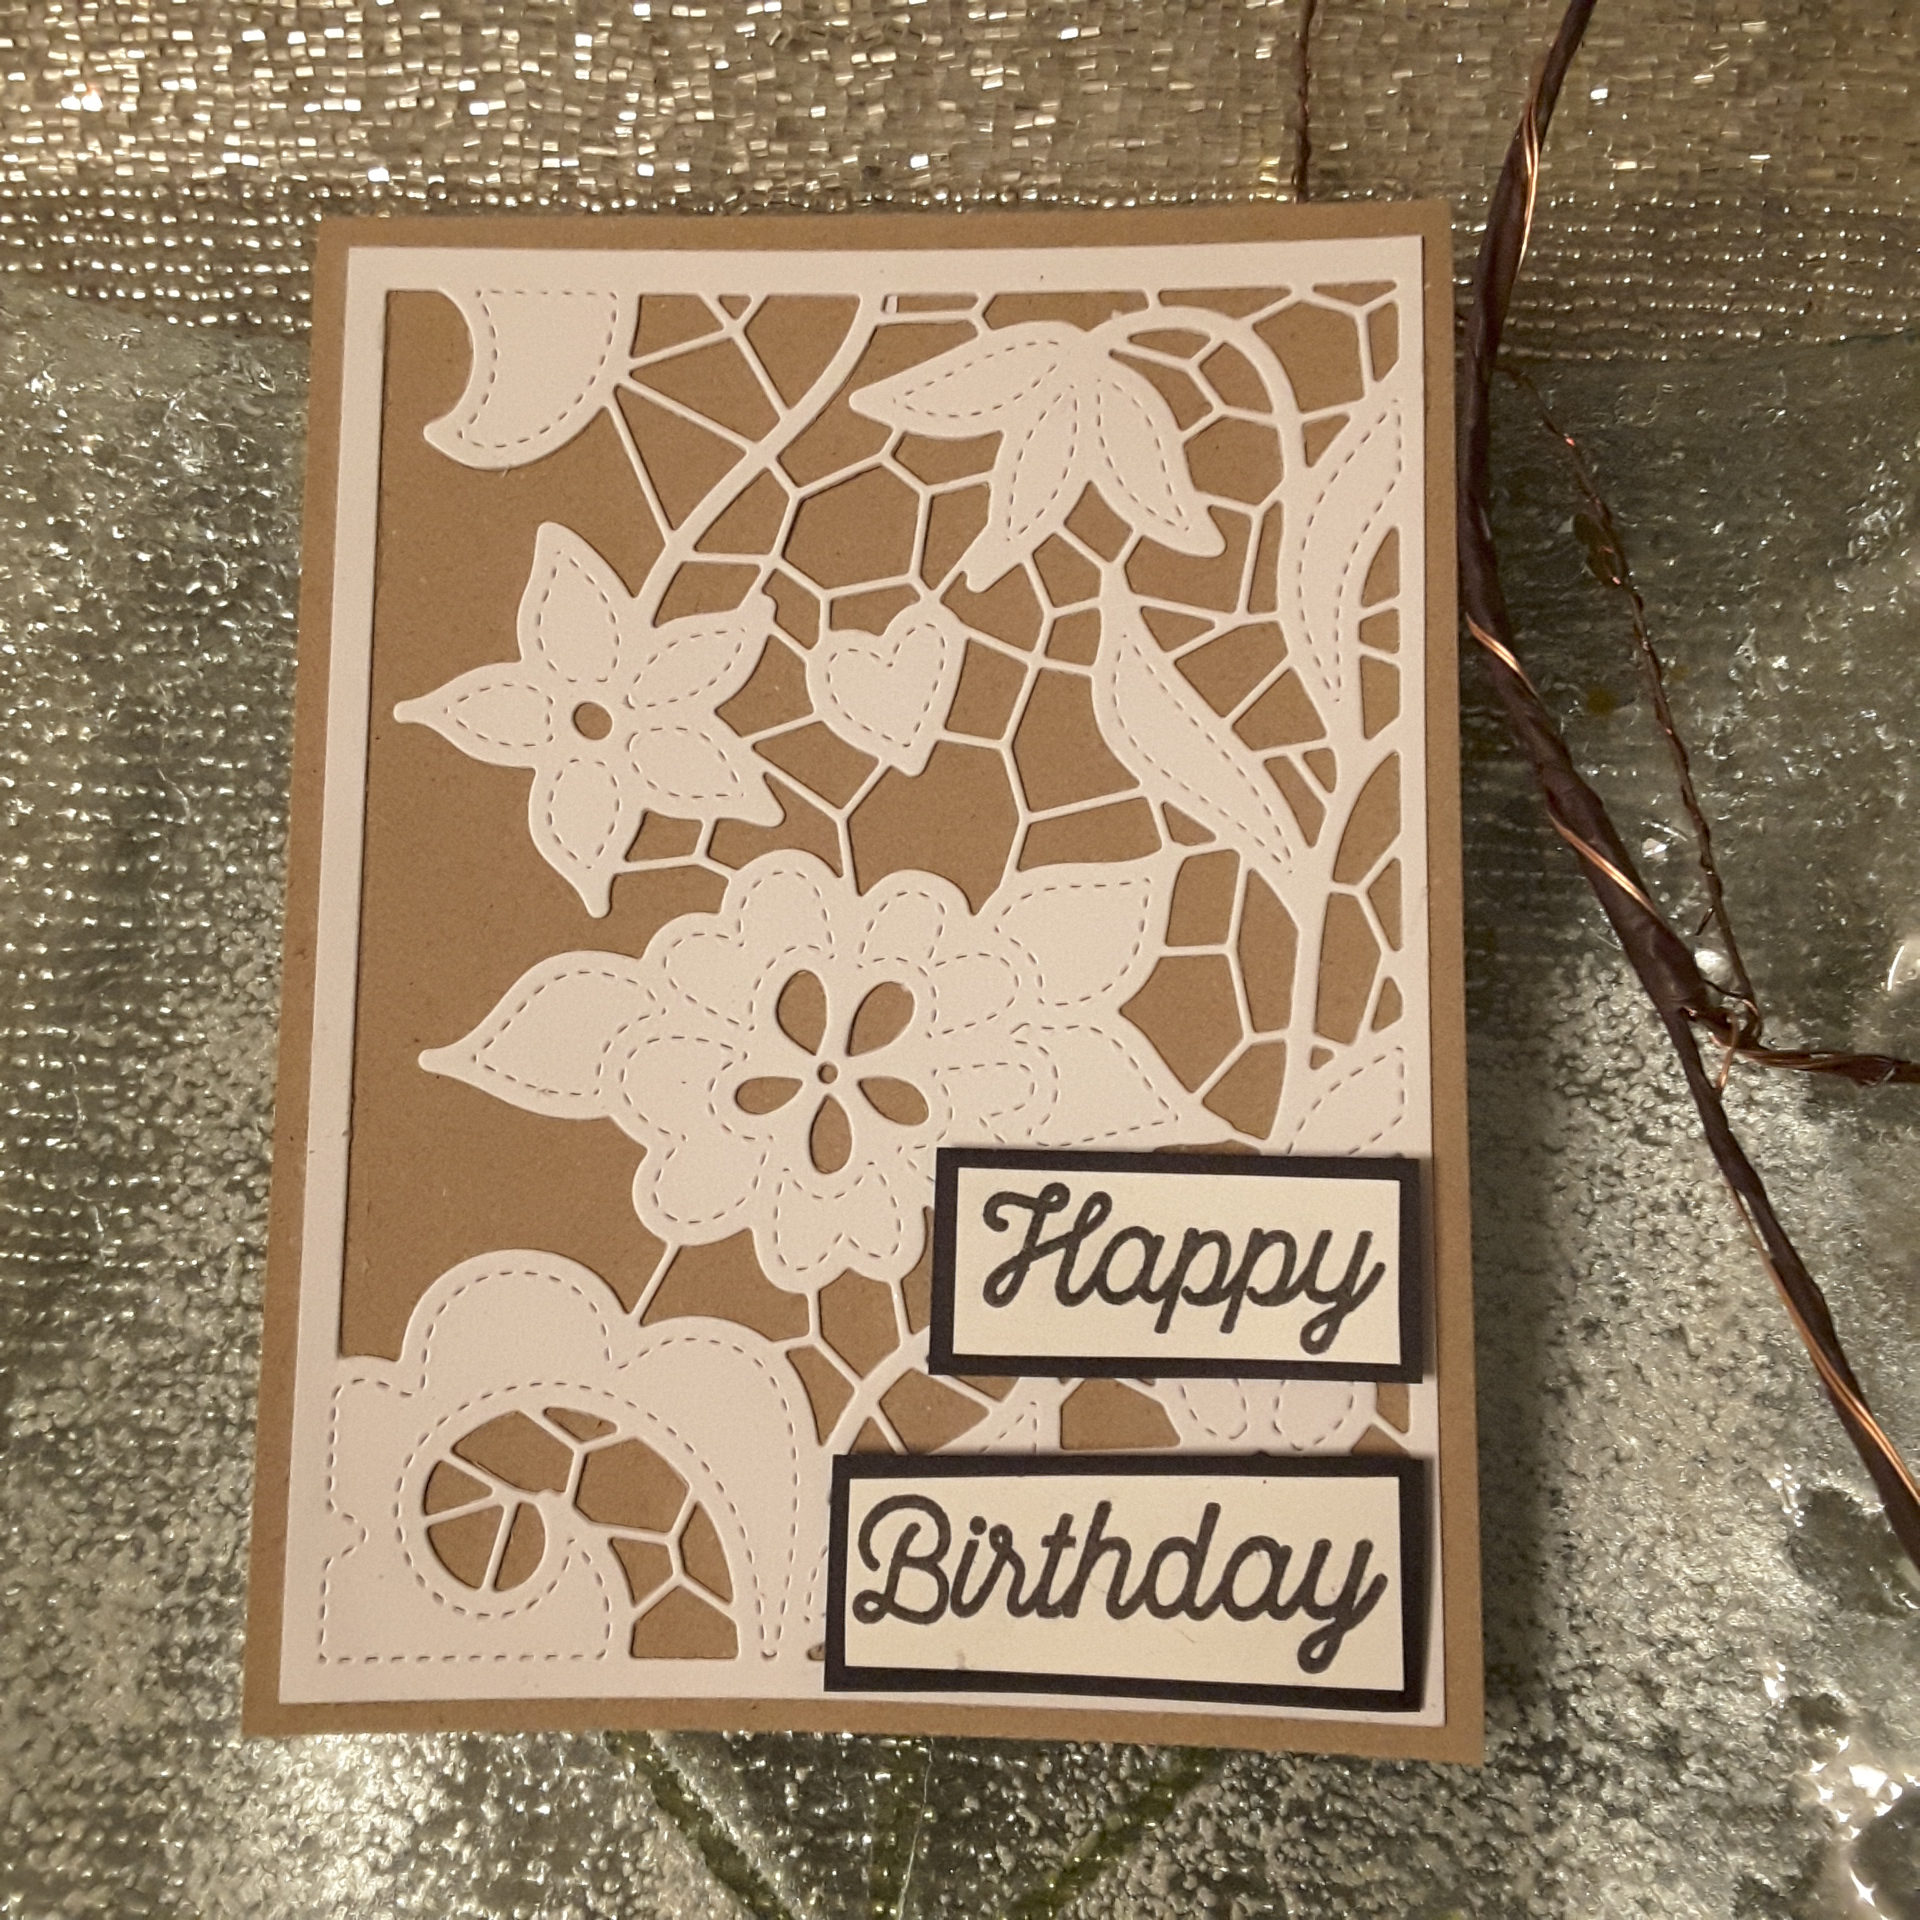
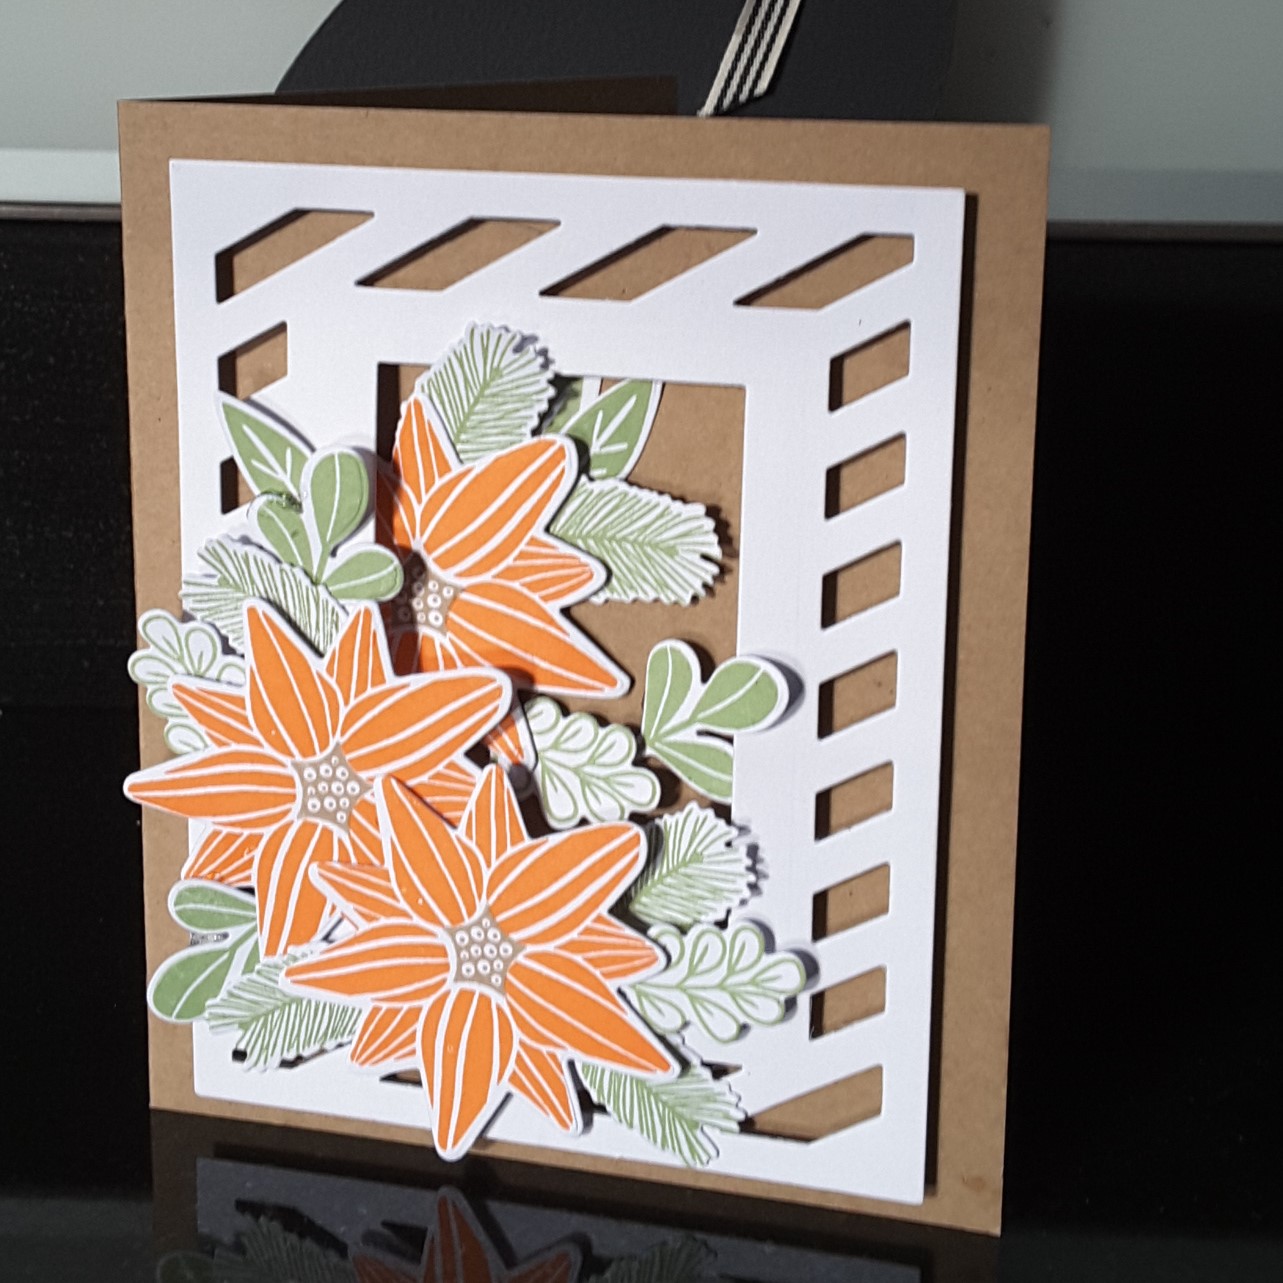
I found some matching lilac/purple card stock, and then layered the WPlus9 trellis onto the top. I did have to cut the trellis twice and layer it to make it longer, trimming off the bottom of one and the top of the other – the flower and leaves cover the join quite nicely.

I placed the flower and leaves as you see, and then the sentiment, all added to the card with 3D foam.

I added some clear cabochons, and as I had stamped the sentiment in black I also added some black gems too.

I shall be entering the following challenges:

Crafty Catz anything goes – option to say it with flowers

Allsortsflora or fauna or anything goes

The Paper Playersgreen thumbs – plants/flowers/foliage

Colour Crazyweek 26 – anything goes with colouring (any medium)

Lil Patch Of Crafty Friendsanything goes

colours, sketch, birthday

Hi there. I have been creating a birthday card again, and really had fun with the colours and the die cutting.

I used the sketch from Sketch Saturday, but where the left hand side of the sketch looks like twine, I have done three embossed lines, well, debossed lines!

20180119_143238However, I soon realised that the more I added the flowers, then the more these lines would be covered….I hope it still counts…..

The flowers are from Altenew Hello Sunshine, which is one of my favourite stamp sets, but then anything from Altenew could be included in that list of favourite things!

I stamped the flowers using Tranquil Tide and Dapper Denim, then die cut them with the matching set, and then started to play with the layout and the base colours. I didn’t think I was going to lay the flowers all around the white rectangle – but it just happened, and I liked it.

I also thought about colouring the flowers with the same colours, but I tried on a couple of extra ones I had stamped, and didn’t like it. I like this effect – even though the card could be considered busy, I still think it’s quite clean, lots of open space. I find I am tending towards that genre more and more – though I also like to ‘chuck’ everything at a card every now and again.

Here are the challenges which inspired this card:

Sketch Saturdaysketch

The Paper PlayersDapper Denim, Lemon Lime Twist, Tranquil Tide + one other colour )white)

Try It On Tuesday my favourite things (Altenew stamp set)

Seize The Birthday Birthday – optional twist one layer (not used)

(Last but not least – a huge thanks and best wishes for Bev from UNIKO, who sent me a  ‘Hugs’ card after hearing I had one of my cats put to sleep last week. XXX)


Doodled Lace Cover Die

20180115_212607

Hello again, everyone. It’s been snowing around here, but not settled – just cold, and windy, but actually quite crisp and clear at the moment. I will be driving north up the M1 shortly, hopefully not coming across too much bad weather!

This selection of cards were made using a new die from Altenew – the Doodled Lace cover die. Now, I have quite simple here, using only three colours of card, but I changed each card – using the same three colours – into a different card each time. I changed where the sentiment went, and one card I cut off one edge of the die-cut to see how that looked.

I am going to be playing with this die a little more – colouring, paper-piecing etc – but these cards quite simple, quite easy – and dare I say – quite elegant?

I don’t think the lace detail comes out very well in the pictures, and I may add some gilding wax to the black die-cut…..

I shall be entering the following challenges:

Alphabet challenge blog – ‘U’ for use 3 of anything (3 colours)

A Gem of a ChallengeHappy anything

Brown Sugar Challenge Birthday

Neutral Christmas

20171118_172047_003

Hello. I am sharing one of my Christmas card makes with you today,  made with neutral colours – and a little bit of bling!

The base card is an 8 inch square Kraft card, to which I added some square layers cut with Sue Wilson stitched squares. I also cut out a frame using two of the squares together. On one of the layers, I die cut the Sue Wilson trees, and stuck that down with a double-sided sticky sheet, so that I could add some Tim Holtz Distress Glitter to the open spaces. I have several colours of distress glitter, and find it gives a shine – but not over the top.

I then die cut Sue Wilson Deer Family, inking through the die with some distress ink to give some interest. Putting it all together, I stuck the deer down with a combination of foam pads and glue, depending on which part of the deer was inside the frame or on it.

The sentiment is from Altenew, and so are the little stars I added to each side.

I shall be entering this card into the following challenges:

Inkspirational Christmas card using neutral colours

The Merry Christmas Challengeanything goes + Christmas

Simon Says Stamp Wednesday challengefurry friends

Allsorts Challenge bloguse glitter


Poppies

20171117_131332

Hello again. A short posting with a fairly simple card for you today. A couple of colours, a little stamping.

I used a stamp set from Stamps By Me, and the Altenew Crimson ink. Using my Misti, I inked the stamp then spritzed the inked stamp with water, before then stamping it. I wanted a water-colour effect, and not a solid block of colour on the flowers. I did this twice with each position.

The card is an 8 inch square card, and therefore I used the same stamp three times across the width of the card. I used the outline stamp in Stampin Up Basic Grey, but I didn’t actually like the muted effect of the grey outline, so I then went in with a black gel pen and kinda scribbled around the same outline. I added some extra lines myself, to get a more hap-hazard effect.

I used some green ink and my water brush, to create a ‘floor’ underneath the flowers, and added some green to some of the stems.

I did contemplate using a sentiment, but I actually like the card as it is. In this way, it can be used for any occasion.

I shall be entering the following challenges:

Crazy 4 Challengescard including poppies

Pause Dream Enjoy – CAS


Orange Poinsettias

20171112_141838

Hello there. Welcome. I had some good news the past couple of days – I was a winner in the Uniko challenge for October, and also a chosen winner for Happy Little Stampers October CAS challenge – one layer card. Yay! Talk about being inspired. It certainly got my creative juices flowing this weekend.

I have also been having a look through the Inkspirational challenge cards where I am still Guest designer – another few days to go still – and there are amazing creations on there. I am still going through and visiting people and looking at their cards and their process…….

Onto the card for today……I had so much fun putting this card together, and I am definitely going to make more of this style and theme. I just wanted to share with you straight away.

I took inspiration from several challenges, but the colours were from Color Throwdown, and the theme/topic was from The Card Concept. I knew I wanted to do a card with poinsettias on it, and decided to go with an orange poinsettia. I know there are some out there, as I did a Google search, but have never actually seen on in real life.

The base card is Kraft card, and I die cut Avery Elle ‘Diagonal Stripes’ leaving out the centre rectangle, but inserting a smaller rectangle from another die set. I wanted the Kraft card to show through the die cut so it looked almost like a trellis against wood.

I used Stampin Up adhesive strips around the edge of the die cut, and added some to the centre rectangular piece – but I didn’t take the sticky off the inner rectangle. Why not? Well, I knew I wanted to place the flowers and leaves in, under and around the white die cut, so having that inner rectangle stuck down wouldn’t work. Lateral thinking, huh?

I then stamped the poinsettia with Catherine Pooler orange ink, and the leaves with Altenew green ink. The centre of the poinsettia is where the brown comes into the card. The stamps themselves are also from Catherine Pooler. I die cut them, and then started to play with the positioning. Once I had it sorted – kinda – I then used 3D glue gel to put the flowers down first, then the leaves, as this glue gel gives me time to move things around until I am happy.

I think you can see the dimension on the die cuts from one of the photos. Sticking down the leaves half in and half on the white die cut, underneath the flowers, generally creating a positive cornucopia of foliage. 🙂

I didn’t add a sentiment, for several reasons. Firstly – I couldn’t find one which would suit or match the card, secondly I couldn’t find anywhere to put one where it wouldn’t look out of place, and thirdly – I didn’t want one!

I shall be entering the following challenges:

Color ThrowdownBrown, Orange, Green, Kraft

The Card ConceptPhoto inspirationPoinsettia and leaves

Crafty Hazelnuts Christmas Challengeanything goes (option reindeer)

Allsorts Challenge blogAutumn colours

Crafty Friends ChallengeChristmas


Christmas and Pines

20171108_112321

20171108_112355

Hello everyone. A quick posting for today, as I made some Christmas cards last night. I was inspired by the Paper Players ‘Holiday Pines’ photograph, and hunted out my pine boughs and pine cone stamps.

The pine branches are from Catherine Pooler, and the pine cones are from Card-io/Majestix. I kept the feel quite vintage, and used a Stampin Up green for the branches, first and second generation stamping to create some dimension.

I then waited for the ink to dry, and stamped the pine cones in Ranger Perfect Medium, heat embossed with Creative Expressions gold embossing powder. I used the same embossing powder on the Altenew sentiment. I think I have captured some of the shine on the pine cones, but it really does look much better in ‘real life’.

I was so engrossed in making this card, and liked how it turned out, that I went on to make several of them. I may make some more changing it to silver embossing powder, but I don’t think it’ll turn out as effective – we shall see.

I shall be entering the following challenges:

The Paper Players photo inspiration Holiday Pines

Crafty Hazelnuts Christmas Challengeanything goes Christmas

The Holly and Ivy Christmas Challengeanything goes Christmas

Daring Cardmakers3 elements – foliage, green, gold

I hope you are taking part in the current Inkspirational challenge with me as Guest Designer – I look forward to seeing you there.


Christmas Tree and WOW! powder

20171102_203608

A quick posting for today, showing different ways – using same colours – to stamp the same layering image. I used the Altenew Sketched Evergreen as I love this tree, and the three layers are easy enough to line up, but if you miss slightly – it doesn’t matter.

I used Altenew inks also, and used some WOW! embossing powder for the final layer on two of the cards. I have tried to photograph them, but we all know how notoriously hard it is to get the sparkle and shine easily seen.

The embossing powder actually comes out with a whiteness and sparkle to it, which I liked on the darker tree image, as it gives the impression of snow, I think. DO you?

The sentiment is stamped and embossed with clear embossing powder. On the lighter tree, I stamped in green, then went over it with Ranger Perfect Medium and used the WOW! powder again, but I must have moved the card – even though using my Misti. The embossing came out slightly off-set……..but I actually like it. It created a shadow effect which I tried to reproduce on another card – failed mightily(!!) – but will definitely keep trying to do it again. Happy accident’s, huh?

I did think about a star on top of the tree, or presents underneath the tree, or baubles, but keep it very simple. The embossing powder doesn’t need much else – and is much more effective in ‘real life’.

I shall be entering the following challenges:

Less Is MoreStamp Layering

Crafty Hazelnut’s Christmas Challengeanything goes Christmas (didn’t use the option)

The Merry Christmas Challenge anything goes Christmas

Crimbo CrackersChristmas related quick and easy


Hold on to each other

20171028_113608

Hello everyone, just one card for today, though I am playing with other cards during the weekend, and I am sure you will be seeing them at some point this week.

This card was quite a simple idea, though it took a little planning – and constant washing of my hands so I didn’t smudge anything!

I used a sentiment stamp from a Sheena Douglass set I have had for years, then a silhouette couple from an Altenew set, and a street light from a Card-io stamp set. Then I spent some time placing them on a card base to see where I wanted them to go. This actually took quite a bit of time, trial and error, in deciding the size and shape of card, too. I went with a 6 inch square card, and stamped just to one side, leaving a lot of open space.

I also added a yellow aura around the streetlight, and took some guidance from a recent craft show I watched from Card-io. I took a dry baby wipe, and some yellow Altenew ink, and first tried it on a scrap piece of paper – just rubbing around in a circle.

Then – I Took the plunge. Yellow aura stamped first – just in case – then used my Misti to stamp the other elements direct to the card base in Versafine Black Onyx. Then left it to dry before I touched it again. It is at this point that I usually pick the card up to have a close look at it – and smudge!

Not this time!

I left it alone for a good 15 minutes…….

I shall be entering this card into the following challenges:

CASologyCherish

The Card Conceptinspired by the lovey dovey two little birds

Hand Stamped Sentimentsinspired by black and the silhouettes

Simon Says Stamp Wednesday challengeanything goes


Brusho leaves

20171024_212553 v2

Hi again. I have a simple card for you today. I was inspired by several challenges to use Autumn and Fall colours, and a clean and simple design, as well as using water-colours.

I started by using three of my Brushos to create a background on water-colour card. First I sprayed the card with water, then dropped on the orange, brown, and gamboge colours from Brusho. I moved the card around a little to create a mix of the colours, then let the piece dry a little, but then became impatient so took my heat gun to it!

I then die cut two leaves from an X-Cut set I have had for absolutely ages, and then embossed that with a Crafters Companion embossing folder with a leaf print on it.

The embossed piece was stuck down onto the Brusho card, then cut down to slightly smaller than the base card, and adhered with double sided tape.

The sentiment is from the Altenew Pattern Play Circles – yes, still on my craft table for further playing – and stamped directly onto the card base, using Versafine black onyx. (Brave of me, don’t you think?) I didn’t want a large sentiment, as I didn’t want any of the embossing or colour detail to be lost.

I shall be entering the following challenges:

CAS Watercolour Card ChallengeFall Leaves

Time Out Challengesphoto inspiration (used orange and white)

Inspired By All The Little Thingsphoto inspiration (used orange and white)

Double D Challengesuse leaves on your project