3 colours sketch

20180406_101117

Hi everyone. I have a card inspired by a sketch challenge and a colour challenge today. I turned to my stash from Stamps By Me and then thought about the colours and layout. I knew I had some long stamps I could use, so I took the Stampin Up ‘Old Olive’ and stamped the long strip twice, even though it looks like one stamp……

I then took some card in Calypso Coral and Rich Razzleberry and used one of the Stamps By Me dies to cut this leafy image several times, with double-sided sticky sheet on the back to make it easier.

As you can see, I off-set the two die cuts as I thought one of each colour looked a little plain. I then layered it onto a base card with the Calypso Coral behind it, and took a sentiment and stamped in Rich Razzleberry.

Stamps By Me has some lovely sentiment stamps, and I have several of them. A lot of them are quite large, and would be great for the centre-point of a card – maybe I’ll turn to that next. I’ll how the mojo takes me.

Challenges I shall be entering:

CAS Colours and SketchesCalypso Coral, Rich Razzleberry, Old Olive

Freshly Made Sketchessketch


Pink and Sparkly Congratulations

20171125_155648

What a busy few days I’ve had, with no time to post to my blog. I  have been making up for it today with Christmas cards, and this sparkly little number. Here are some more photos of the sparklyness…..

There are several reasons for making this card, the main one being that a couple of friends of ours are coming round this evening for a Chinese Take-away, and bringing their new daughter. Well, I say new daughter – would September 1st baby still be classed as new? I think so……..

I couldn’t very well not make a card for them, when I make cards all the time, but I was wondering about which style to use. If it is something like Christmas and celebrations, then I tend to turn to my Sue Wilson dies, and my glittery card stock, and have at it! I also tend to do bigger cards, and add loads of die cuts, which means I have to put them in a box, as they won’t fit in an envelope.

I can make my own boxes, but when I have pre-cut cards, then I use pre-cut boxes. Saves a lot of time, especially when you don’t want to do anything much to the outside of the box.

So – this card . Colours – pink and sparkly – was inspired by the current Card Concept challenge. I know that many people are making Christmas cards, but I went with the new baby card for my friends, but inspired by the colour scheme from this challenge.

The glittery card stock is from Stampin Up – and boy does that shed glitter!!!! – and the other pink card is Foundations Card from Creative Expressions.

The main larger layers I just measured and cut with my Cutterpillar, but used Sue Wilson dies for all the die cutting – debossed square, frilly oval, two inner ovals, and even the three beaded swirl additions.

The sentiment is actually from the Altenew stamp set – ‘Baby Zoo – a recent and long-awaited purchase from Seven Hills Crafts. I don’t really make ‘baby’ cards, and tend to make do with what I have but when I saw what my sister did with this stamp set, I waited for the stock to be replenished at Seven Hills so I could order it.

Challenges I will be entering:

The Card Conceptphoto inspiration

Time Out Challenges –  word inspiration (used a twist on celebrate)

Try it on Tuesday colourful – no or little white areas

Crafty Gals Corneruse your dies


Poppies

20171117_131332

Hello again. A short posting with a fairly simple card for you today. A couple of colours, a little stamping.

I used a stamp set from Stamps By Me, and the Altenew Crimson ink. Using my Misti, I inked the stamp then spritzed the inked stamp with water, before then stamping it. I wanted a water-colour effect, and not a solid block of colour on the flowers. I did this twice with each position.

The card is an 8 inch square card, and therefore I used the same stamp three times across the width of the card. I used the outline stamp in Stampin Up Basic Grey, but I didn’t actually like the muted effect of the grey outline, so I then went in with a black gel pen and kinda scribbled around the same outline. I added some extra lines myself, to get a more hap-hazard effect.

I used some green ink and my water brush, to create a ‘floor’ underneath the flowers, and added some green to some of the stems.

I did contemplate using a sentiment, but I actually like the card as it is. In this way, it can be used for any occasion.

I shall be entering the following challenges:

Crazy 4 Challengescard including poppies

Pause Dream Enjoy – CAS


Orange Poinsettias

20171112_141838

Hello there. Welcome. I had some good news the past couple of days – I was a winner in the Uniko challenge for October, and also a chosen winner for Happy Little Stampers October CAS challenge – one layer card. Yay! Talk about being inspired. It certainly got my creative juices flowing this weekend.

I have also been having a look through the Inkspirational challenge cards where I am still Guest designer – another few days to go still – and there are amazing creations on there. I am still going through and visiting people and looking at their cards and their process…….

Onto the card for today……I had so much fun putting this card together, and I am definitely going to make more of this style and theme. I just wanted to share with you straight away.

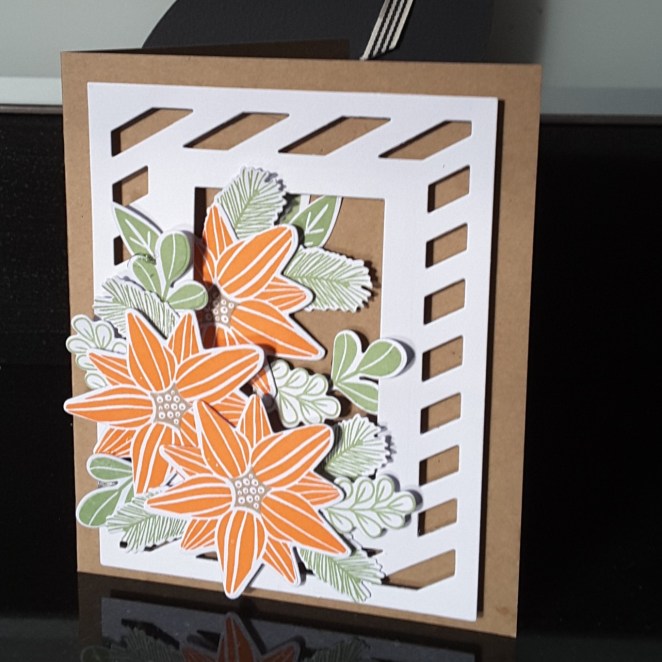
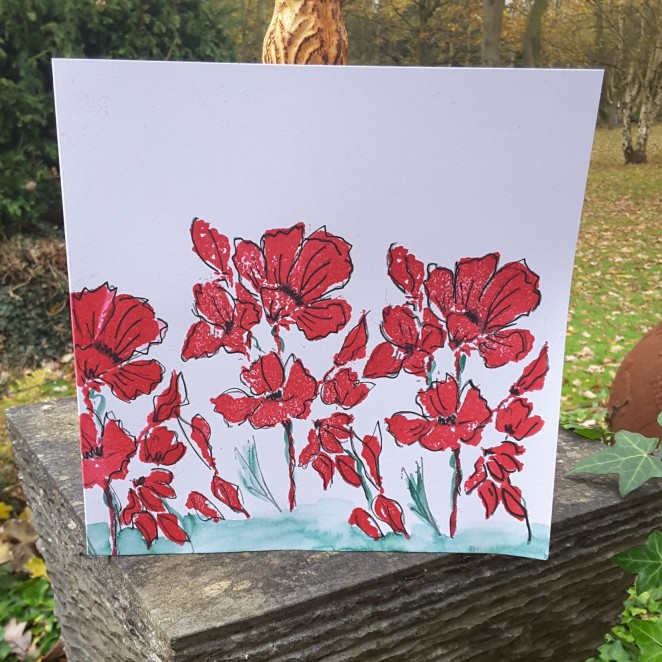
I took inspiration from several challenges, but the colours were from Color Throwdown, and the theme/topic was from The Card Concept. I knew I wanted to do a card with poinsettias on it, and decided to go with an orange poinsettia. I know there are some out there, as I did a Google search, but have never actually seen on in real life.

The base card is Kraft card, and I die cut Avery Elle ‘Diagonal Stripes’ leaving out the centre rectangle, but inserting a smaller rectangle from another die set. I wanted the Kraft card to show through the die cut so it looked almost like a trellis against wood.

I used Stampin Up adhesive strips around the edge of the die cut, and added some to the centre rectangular piece – but I didn’t take the sticky off the inner rectangle. Why not? Well, I knew I wanted to place the flowers and leaves in, under and around the white die cut, so having that inner rectangle stuck down wouldn’t work. Lateral thinking, huh?

I then stamped the poinsettia with Catherine Pooler orange ink, and the leaves with Altenew green ink. The centre of the poinsettia is where the brown comes into the card. The stamps themselves are also from Catherine Pooler. I die cut them, and then started to play with the positioning. Once I had it sorted – kinda – I then used 3D glue gel to put the flowers down first, then the leaves, as this glue gel gives me time to move things around until I am happy.

I think you can see the dimension on the die cuts from one of the photos. Sticking down the leaves half in and half on the white die cut, underneath the flowers, generally creating a positive cornucopia of foliage. 🙂

I didn’t add a sentiment, for several reasons. Firstly – I couldn’t find one which would suit or match the card, secondly I couldn’t find anywhere to put one where it wouldn’t look out of place, and thirdly – I didn’t want one!

I shall be entering the following challenges:

Color ThrowdownBrown, Orange, Green, Kraft

The Card ConceptPhoto inspirationPoinsettia and leaves

Crafty Hazelnuts Christmas Challengeanything goes (option reindeer)

Allsorts Challenge blogAutumn colours

Crafty Friends ChallengeChristmas


CAS colours

20171111_135142

20171111_135209Hello everyone. I made this card today to ether the CAS Colours and Sketches challenge of using the three colours Emerald Envy, Metallic Silver, and Tranquil Tide.

I am in a Christmas card making mode at the moment, so I took the opportunity to continue along that theme with these colours.

The card base is pre-scored and embossed with a Crafters Companion embossing folder called Nordic Christmas ‘Jumper’. I stamped the sentiment in Tranquil Tide onto an Emerald Envy piece of card, then stamped some snowflakes from Concord and 9th ‘Christmas Cheer turnabout’. I haven’t used this stamp set yet as a turnabout yet, but it comes with many small stamps ideal for adding to other projects.

I embossed those two different snowflake stamps with silver embossing powder and then cut the card making it look like a banner, deciding to make it a little dimensional – adding some 3D foam pads under the middle. I am not sure I still like it, and will be making another card with it added flat – at some point – but at the time it seemed like a good idea.

There is still time to join the Inkspirational challenge where I am Guest designer, with the theme of ‘Trend’. It looks like there are some gorgeous projects there at the moment, and I’m going to nip on over and have a closer look.


Christmas and Pines

20171108_112321

20171108_112355

Hello everyone. A quick posting for today, as I made some Christmas cards last night. I was inspired by the Paper Players ‘Holiday Pines’ photograph, and hunted out my pine boughs and pine cone stamps.

The pine branches are from Catherine Pooler, and the pine cones are from Card-io/Majestix. I kept the feel quite vintage, and used a Stampin Up green for the branches, first and second generation stamping to create some dimension.

I then waited for the ink to dry, and stamped the pine cones in Ranger Perfect Medium, heat embossed with Creative Expressions gold embossing powder. I used the same embossing powder on the Altenew sentiment. I think I have captured some of the shine on the pine cones, but it really does look much better in ‘real life’.

I was so engrossed in making this card, and liked how it turned out, that I went on to make several of them. I may make some more changing it to silver embossing powder, but I don’t think it’ll turn out as effective – we shall see.

I shall be entering the following challenges:

The Paper Players photo inspiration Holiday Pines

Crafty Hazelnuts Christmas Challengeanything goes Christmas

The Holly and Ivy Christmas Challengeanything goes Christmas

Daring Cardmakers3 elements – foliage, green, gold

I hope you are taking part in the current Inkspirational challenge with me as Guest Designer – I look forward to seeing you there.


Coloured Birthday

20171007_122532

Hello everyone. I hope everyone is doing well, and enjoying the day…..

This card was made in a larger format, to leave some clean space on the card. The colours are from the current challenge from CAS Colours and Sketches – Pumpkin Pie, Crumb Cake, Pear Pizzazz. I first stamped the flowers from Stamps By Me, in Crumb Cake, then again – using my Misti – stamped over the top of the colour with Ranger Perfect Medium, and embossed with clear embossing powder.

I coloured the flowers with Pumpkin Pie, and the leaves with Pear Pizzazz, before using my Lawn Fawn ‘Wonky Rectangles’ to cut the panel. I then used the Sue Wilson ‘Shadow Box Collection – Stitched Lattice Frames’ to emboss the grid pattern into that panel. I also used the three rectangles from that same die set to cut a thin frame out of Crumb Cake Card, and another layer to go underneath the white panel. That way, I had stitching on all the layers.

The bottom thinner frame is stuck directly onto the base card, with the flower panel and it’s Crumb Cake layer being raised on 3D foam pads.

The sentiment is from Stamps By Me, stamped in Versafine Black Onyx.

As it is very, very windy outside today, I photographed inside again. I probably spent as much time hunting for a suitable photo situation as I did putting the card together…..

I shall be entering the following challenges:

CAS Colours and SketchesPumpkin Pie, Pear Pizzazz, Crumb Cake

CASologygrid

Seize the Birthdayanything goes birthday (not using optional theme)


3 colours water-coloured

20171001_135218

Hi all. I’m afraid it’s another indoor photo today, as it’s very grey, miserable, windy, and rainy outside. I am more of an Autumn and Winter person, and like watch rain and snow etc. – when I’m inside near a wood fire, of course!

The colours for this card was from the current challenge from Hand Stamped Sentiments – So Saffron, Always Artichoke, and Night of Navy. I first stamped some of my Altenew Tulips onto water-colour card, then coloured them with my water-brush. As I only have the markers for the tulip colours, I scribbled them onto an acrylic block, then took my water-brush and coloured in the flowers. After the first layer had dried, I went back in to add some shading – in the same colours – but a second layer gave some added dimension. I also use the matching dies to cut them out.

For the Night of Navy background, I took some water-colour paper this time. I sprayed the paper liberally with water, then dropped in the Night Of Navy with the water-brush – from an acrylic block again – and moved it around a little. I find the Stampin Up inks are actually very good when it comes to water-colouring, and it didn’t take long at all. (Well – I did use by heat gun a little!)

I cut the rectangle out as I didn’t want a lot of blue on the card, and stuck everything down as you see.

The sentiment is from Stamps By Me, stamped in Versafine black onyx.

I have also been playing with my Derwent Inktense pencils today, and will be using them on another project. I must have watched quite a few YouTube videos on these pencils, as well as going onto the Derwent website. What you can do with these seems to be endless, if you are an artist – which I definitely am not! I do, however, like the intensity which comes from these pencils, and that you can touch a water-brush to the nib itself to pull some colour off. I’ll be trying some layering, some shading – all new to me. What a challenge I have set myself……….I may have to search for some classes near to me…..

I will be entering the following challenges with this card:

Hand Stamped SentimentsSo Saffron, Always Artichoke, Night of Navy

Simon Says Stamp Wednesday challenge anything goes

CAS on Sundayuse a die cut

QKR Stampede anything goes with twist of cutting it up


Backgrounds and colours

Hi everyone. I have had  a little break from posting on here, but not from crafting. I have been asked by my work colleagues to make some simple Christmas cards for them, so I have been doping that for the past couple of days.

Today I wanted to make anything other than Christmas cards, so took inspiration from several challenges – all listed below.

The first card is using the colours Tranquil Tide, Dapper Denim, and instead of Perfect Plum, I had to use Sweet Sugarplum. The background is stamped using Waffle Flower ‘Layering Marble’…which took me ages to decide where to stamp the layers….then decided it actually didn’t matter that much! I did have a look on their web site, and the instructions are there – but went my own way in the end.

I only stamped two layers of the marble, using Sweet Sugarplum and Tranquil Tide, with Dapper Denim being used for the sentiment, stamped in that colour, then stamped again with perfect medium and heat embossed with clear powder. I obviously used my Misti so I could stamp twice – once with the colour, and once with the perfect medium.

The sentiment is from Stamps By Me, a current favourite of mine, and I think it is a lovely sentiment which can be used for masculine and feminine cards.

As I loved those three colours so much, I stamped another background with the ‘Waves’ background stamp from Hero Arts, in Sweet Sugarplum, again with Ranger Perfect Medium to heat emboss, and added the sentiment in Dapper Denim, the base card being tranquil tide (I think!).

The colour combination came from CAS Colours and Sketches this week, and it was only after I had finished the card that I realised it may not be as clean and simple as they would like…..but…..as their colours gave me inspiration, I am entering the challenge anyway:

Oh – an update on the gorgeous oak tree: Boo Hoo! 😦


CAS Colours and SketchesTranquil Tide, Perfect Plum, Dapper Denim

QKR Stampede – embossing or anything goes

Addicted To Stampsstamp a background

Double D challengesfocus on sentiments or quotes

House Of cards add text and/or colours


one layer, three colours

20170906_102047

Hi everyone. I have made a quick card today, as I am just about to go to work for the afternoon, and back reasonably late this evening. I wanted to play with the colours for the current challenge from CAS Colours and Sketches – Always Artichoke, Fresh Fig, and Tangerine Tango. I think those colours are absolutely gorgeous on their own, but when put together – love it.

I had a delivery from Stampin Up yesterday – well, I say delivery…….UPS sometimes struggle to find me, and I don’t realise I have a package until I check my tracking through my Stampin Up demonstrator to find they have tried 4 or 5 days……and still can’t find me. I mean – I live on the only road in the middle of a wood with 30 houses – how difficult can that be? Anyway, I had to go to the local depot to pick it up yesterday, so I just had to make time to play.

I liked the look of this stamp, but didn’t realise that the word is actually quite a solid image. I wanted to colour the word, but when I realised it was solid I decided to stamp it in Fresh Fig, quickly put some clear embossing powder on it, and then heat embossed. Even though I used water-colour card, I think it came out quite nicely.

I then coloured the roses in Tangerine Tango, and the leaves in Always Artichoke and there we have it. However, after I had photographed it – thank goodness afterwards – the card blew down into some wet leaves, and of course I swiped my fingers over it to clean the water…………..and I now have a nicely smudged water-colour image now!!!20170906_111231

I am sure I can still save the card, but will have to think about what I do with it. Trust me!!!! Well, as least you can see the Fresh Fig colour coming out of the words.


I shall be entering the original non-smudged card into the following challenges:

CAS Colours and SketchesAlways Artichoke, Fresh Fig, Tangerine Tango

CAS on SundayOne Layer Wonder

Simon Says Stamp Monday Challenge stamp it, no digital images