You octopi my heart….

20170102_181314

I am back from my travels, and started to do a little crafting again. I’ve been to Tenerife for a week – quite cool, but enough sun for a bit of colour – then had a couple of days in Cardiff at a work conference. Always good meet up with friends and colleagues, with educational issues and discussions thrown into the mix. I always find them quite heavy going – but well worth it. The drive wasn’t particularly bad, either, 3 hours door-to-door…..

Whilst I was in Tenerife I had a lovely delivery from my favourite on-line store – Seven Hills Crafts. This store manages to obtain all the American stamps and dies with a large selection of products – at great prices. I am not stuck with an import bill – and also a Royal Mail bill as they handle the delivery.

There are a few American stores I wish I could shop from, but find the taxes and delivery extortionate. I ordered from an American site a few weeks ago. The items cost me $72, with shipping their end of $22, so total cost of $94. Converting that to GBP = £75, and add another £22 once it arrives in UK!!!!! That is for eight ink pads and refills. Initially a good buy, not so much at the receiving end.

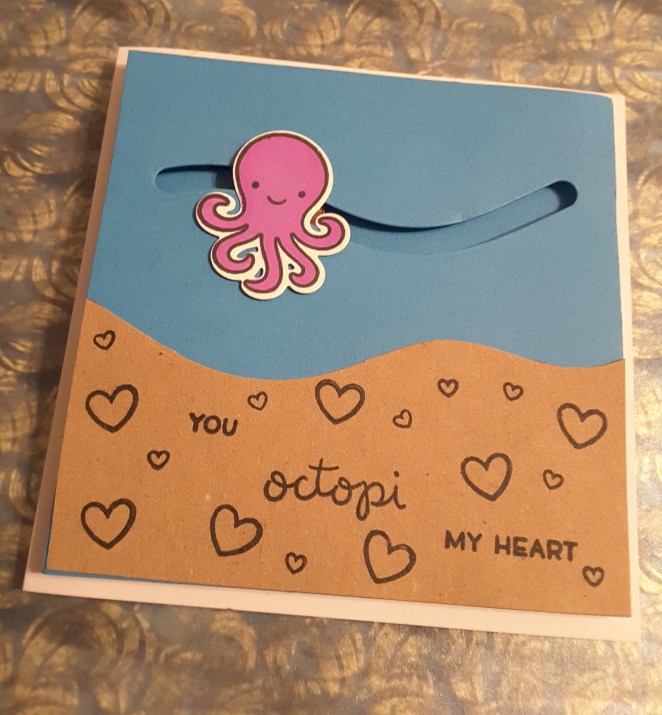
On to my card. I was wanting quite a simple card, and have had this set from Lawn Fawn for a while now, and it includes the octopus some hearts, bubbles, and there is also a matching die set. very cute – the kind of cards I don’t usually do, but thought I could play around with it. The octopus has movement to it, with a groove cut into the blue base cards, a penny attached to the back – called a slider card. So when you tip the card from side to side, the octopus moves along the groove. I love movement cards, and have some shaker sets I am trying out at the moment, and shall post them when I’ve managed to do them.

Looking at the card now, I may have to add some additional elements – thinking of some bubbles in the sea, probably add some sequins, and possibly have the octopus holding an actual small heart.

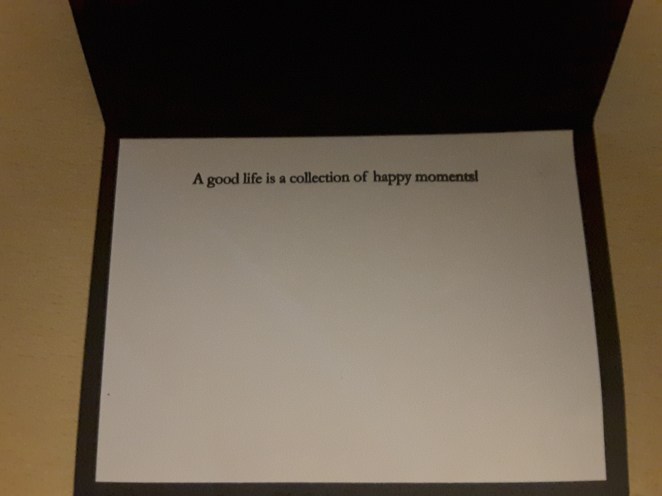
I may have to give my hubby this cute little card when I’m done, Valentines Day approaching – don’t tell him!!


Funny sayings

Here I’ve posted some funny sayings from ranger Dylusions. I love the sayings, and find them very amusing – but wonder who on earth you would send these cards to without causing offence….

You would certainly have to send them to close friends, and obviously people who know your sense of humour, and wouldn’t take things personally. My favourite is ‘who left the bag of idiots open…’. If you say it with a certain tone – almost a condescending tone – seems to work really well.

The cards were edged with ‘Timeless Textures’ from Stampin up, which I find add a frame which you stamp as little or as much as you like. I certainly had to stop myself from stamping – it is so addictive with this stamp set.

The frog and elephant are from another Stampin Up set ‘Love you lots’, which add a quirkiness to them.

I can’t remember which make the stamps of the tree and grasses are, or which make the sentiment is from, but I do like them. I thought I’d add a little sanity, and a pause for contemplation….

Anyway, I won’t be posting for a week, as off to sunnier climes than good old England. I won’t be taking any crafting stuff with me – have too many shoes to take – but I’ll get right back into the swing of things on my return. I have a couple of days off when I get back, so plan to craft my little heart out, so I can show you what has inspired me during my holiday. Perhaps look forward to bright and sunny colours, instead of plain and monochrome? You never know……catch up with you all soon. :)


Happy Birthday


Here I have made a card for my best friend’s birthday. Her favourite colour is green…..so….I made it in purple!! (I am sure there is some psychology in there somewhere!)

I am having a purple phase, and loving using the Creative Expressions range of card, with many of their packages being tone on tone, varying degrees of the same colour.

The card is a base of 8 inches square, with several layers on top, and a square frame placed and raised over the main centre segment. The squares are from Tattered Lace, and have a stitched effect around the edges, which I think add a great small detail to each layer. I used two of the sizes together to create the raised purple frame, adding sticky foam to the back of it.

The centre white is a ‘Spellbinders’ Geo die – two cut and stuck together for the background. The stamp is a large ‘Honey Doo’ stamp, stamped in purple and with clear embossing powder added for extra shine and dimension. A Creative expressions/Sue Wilson die for stamping the main sentiment on, and cutting two of the same in purple, cutting them in half, and shadowing the main white one. I inked around the edges slightly and adds some extra interest, as I thought the white was a little too ‘white’.

The two daisy’s and scribble flowers again from Sue Wilson/Creative Expressions for some interest in the bottom corner, with 3D glue so I had time to place them where I wanted them. I like that they are not solid, and I leave the top part of the daisy unstuck, to create some movement. I also added some jewels which were purple and glittery, though I had to stop myself adding more……..a girl needs some sparkle!

All-in-all another card I am pleased with, and I hope my friend feels the same. Definitely gone back to my two colour Sue Wilson cards on this one.


I am adding this card into the challenge set by ‘Simon Says Stamp’

Layering dies

So my sister – who lives in Quebec, Canada – sent me these layering dies from ‘Birch Press’. Having looked at them on YouTube and Pinterest, and Jennifer McGuire’s blog – the both of us decided we just HAD to have them. Fortunately, my sister bought me these for Christmas – they are quite expensive for the three dies – so I didn’t have to pay for them myself.

She received them on 4th January, posted to me that day – and I received them on 7th January! All the way from Quebec City!! Canada!!!

So, as soon as they arrived, I had a little play – and this is my first trial. I even left the photo on which showed my double sided sticky sheet backing, and my pricking tool and other bits of card on – I’ll be trying this is variations of orange and purple – I’ll post some pictures when I’ve done them.

Anyway, these dies can be used individually, but altogether it’s a completely different ball game. There are other patterns available, but I think this one is quite generic, and depending on what colours are used, or what sentiments are attached – can be for any occasion.

Having first cut the three layers in white card, which I had stuck double-sided sticky sheets to – I found it was a lot easier to layer them up – though if I keep playing with them then this could be an expensive way of doing it. Maybe spray glue? Hmmmm – will try that later. I have some Crafters Companion spray glue I can try.

Sorry – I was rambling a little. Does anyone else do that – go off on tangents and keep writing their thoughts?

So – backed the three layers onto craft card, as I really didn’t know in which direction I was going – male or female; celebratory; just because – and ended up with a generic ‘just because’ card. The sentiments are from Altenew, half-tone-smile – including a die for the main sentiment. The main sentiment I also cut out of black craft foam, giving dimension to the word ‘smile’ and staggered it a little to give some shadow.

All-in-all I am very pleased with these dies, and they cut beautifully. The left-over pieces are varying sizes of stars/flower shapes, and I can imagine using those to put in envelopes as a confetti when the cards are opened (how annoying is that), or even to be used in shaker cards, well, the smaller ones at least. Perhaps they cut be cut from other colours of card and placed back into the holes, to make a rainbow effect? Something else I can try, when I am feeling patient.

I have a feeling I may needing some of the other patterns that Birch press do – watch this space.

I will be entering this card into the ‘Craft for the Craic‘ challenge, with the theme of ‘pick me up’, as I thought the sentiments I used would do just that.


A friendly hello…..

20170105_21065720170105_210706

I love this stamp set from ‘Altenew’ Spring Daisy. When the image is stamped, it looks like a water colour effect. I tried stamping it in black, but the image was too severe, so I stamped it in grey, and I think it looks better that way. When the centre part is stamped – as it’s a two layer stamp – I found the image was a little too much like a water colour, so I took my water brush to it and added the colour separately.  I like the water colour effect after I have blended the colours a little more. I think it’s softer, especially around the leaves.

I used a masking effect, to make it look like the flowers are in two layers, and the same masking with the leaves I stamped, to look like the leaves are underneath the flowers, again using a little water colouring effect.

The sentiment on the front, and the phrase on the inside, are from another Altenew stamp set.

I sent this card to a couple of friends we had spent New Year’s Eve with, and wrote inside ‘thank you for adding to our collection’……(of happy moments).

I usually don’t do very ‘sweet’ cards, but am finding more and more that a simple card, sent just because you can, for no specific reason, is a great opportunity to make cards, and to send a personal and friendly ‘hello there’ instead of using text messages etc.

I have used this card to enter into the ‘Altenew’ inspiration challenge for January 2017, as the inspiration picture reminded me of spring, with the white and yellow colours, a darker background, and using the Daisy stamp just all seemed to fit.


Just because cards…..

I was playing around with some dies and found this one again. From ‘Stampin up’, a very cute ‘detailed floral’ thinlit dies. They are so cute, and don’t really need anything doing with them – other than a contrasting background card.

There are two dies, with one edger die which I used to cut the detail at the bottom of the floral design. I made them in bright red, and a deep purple colour, and to add some detail I taped some ribbon to the top wider white area.

It still looked a little plain at the top, so added a sentiment from a Christmas stamp set, which I think works quite well as a ‘just because’ card. Of course, I just had to stamp that with my ‘Misti’ tool, just in case I didn’t stamp it properly the first time, or I wanted a deeper colour. I tend to use my ‘Misti’ a lot, so I don’t waste cards. great tool – I do so recommend it….

On the card with the dazzle gem attached – I made a little boo boo! I smudged some ink – so – one had to cover that up, didn’t one? Dazzler attached. All good.

As a small bunch of everyday cards, just to send someone because you want to, for no specific reason other than to get in touch with them, I think they work quite well…..

Christmas cards for next year

I can’t believe it’s been so long since I last published anything on here. How does time go so fast? I have been making cards for the charity ‘Neurocare’ to sell, and had a bunch to make for a ‘Ladies Night’ they hosted – so much so that I was running behind making my own Christmas cards for my family and friends.

I was on such a roll making them, that I have some left over that I will save for next year. I have expanded my card making repertoire……I now stamp and colour as much as die cut and mat and layer. I have found I quite like using colour, in particular around Christmas time, but I also play with colour and other stamp sets too.

You can see my original style above – the monochromatic cards with the angel and Christmas tree on them, and then alongside them are the colourful cards using a lot of stamping, but very few layers.

I am glad I have found I can diversify – we can always do with trying something different……I usually see a card I like on Pinterest or YouTube. That gets my creative juices flowing. Sometimes I start by doing what is shown, but I always seem to veer off in my own direction. Generally it’s a different colour, or different layers. Sometimes it is the shape and size of the card, as I like to make larger cards for my family and friends, and smaller cards for Neurocare to sell. The smaller cards are easier and cheaper to post, so I generally don’t put too many layers on them, and therefore it keeps the postage weight down.

All-in-all I have been enjoying playing with different ideas, and different card making techniques. Hopefully, I will be able to share them regularly…..that is one of my New Year resolutions, anyway.


Charity Christmas Cards

I have been playing and making cards for the charity to sell, and have some friends at work wanting simple cards for Christmas. I played with Stampin Up products I have, as well as Crafters Companion, and an Altenew sentiment stamp.

The monochrome reindeer cards are from a Stampin Up set, which includes the punch to cut the reindeers out, making the cards so quick and easy to make. The other red reindeer card I added a printed Christmas vellum to the back, and a sentiment from Creative Expressions own Phill martin.

The Santa card is also a Stampin Up die, to which I added a glittery background using double sided sticky sheets, and a sentiment from an Altenew set I recently bought.

The Christmas Tree is a ‘Create a Card’ die from Crafters Companion, one complete die, which I added to a basic card blank for a simple and quick card.

Some very quick and simple cards, which hopefully people will find they can use for Christmas.

Anniversary card

20161001_112250

I have been having a fun-filled card making couple of days, and this is the first card I made. It is for my mother-in-law and her husband, married now for 20 years. She always enjoys seeing what card I make for them, and what techniques I come up with. I tend to stick to the die cutting cards when it comes to family, a little more involved than the cards I make for the charity to sell.

This card is a 8” x 8” base, with a layer of card I adhered double-sided sticky sheet to, added the first layer which I had die cut the top of with a Crafters Companion border die, then stuck glitter to the sticky areas which were left.

The top layer I also used the border die, for a matching accent, stamped a bride and groom in black embossing powder, then added a sentiment, which I also embossed. I had been bought a roll of silver sparkle twine, which I added for additional sparkle.

All-in-all, I think is a simple card, but I feel it is quite elegant, especially with the monochrome appearance of it.

I have entered this card into the ‘Crafty Friends Challenge Blog’ for the theme of Special Occasions, and Robyns Fetish challenge blog with the theme of ‘Square Cards’.


Cute Christmas

20160921_191142

I am definitely in the card making frame of mind, and Christmas cards in particular. I am still making cards for the charity – Neurocare – and also have been asked by some of my work colleagues for some of the more simple range of cards.

Unfortunately for my bank balance, Crafters Companion have just opened a brand new store within 15 minutes of me! I was there last Saturday – spending has never been so easy – and picked up this little stamp by Stampendous. This is from the House Mouse series – aren’t they cute? There is a whole range of stamps, but for some reason this took my fancy.

I stamped it and embossed in black, and coloured with my Zig Clean Colour Water brush pens. I love the way the pens made it so easy to colour, and the fact that it doesn’t need to be too neat and tidy!

I shall be adding some more cards I made, a variety of occasions, as I have been having a lot of fun stamping and playing.

I hope you enjoy looking at this cute little card, that I have also entered into Crafty Hazelnuts Christmas Challenge and Christmas challenge extra.