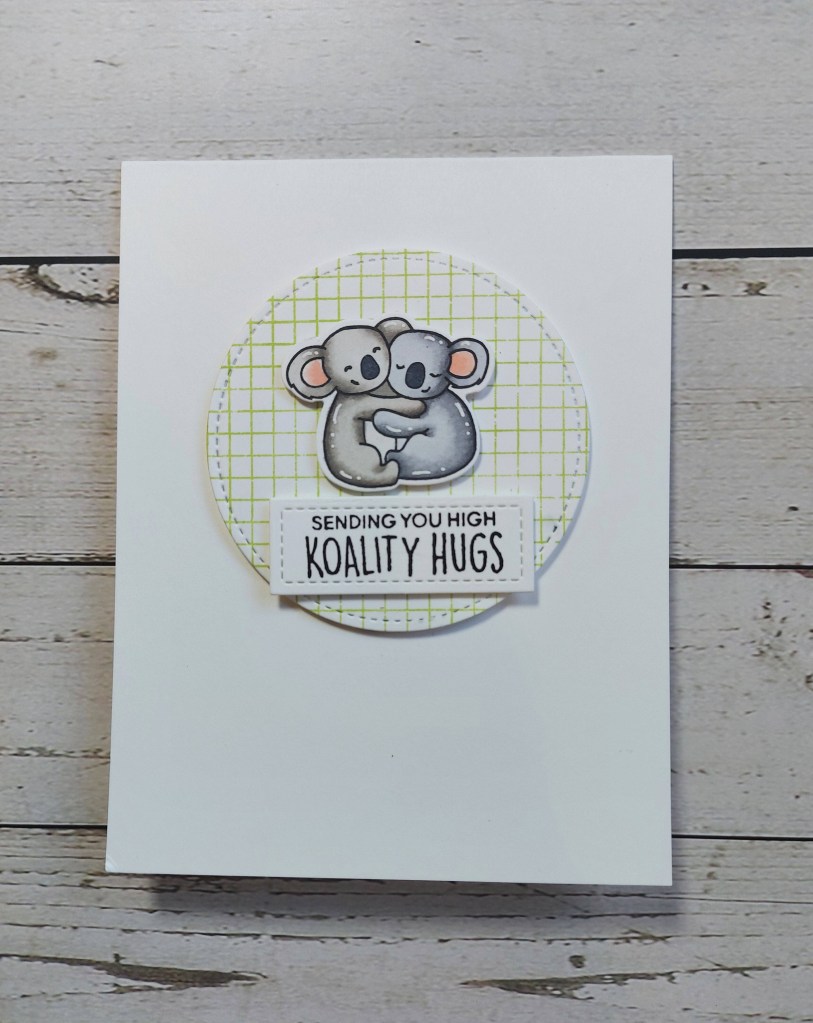
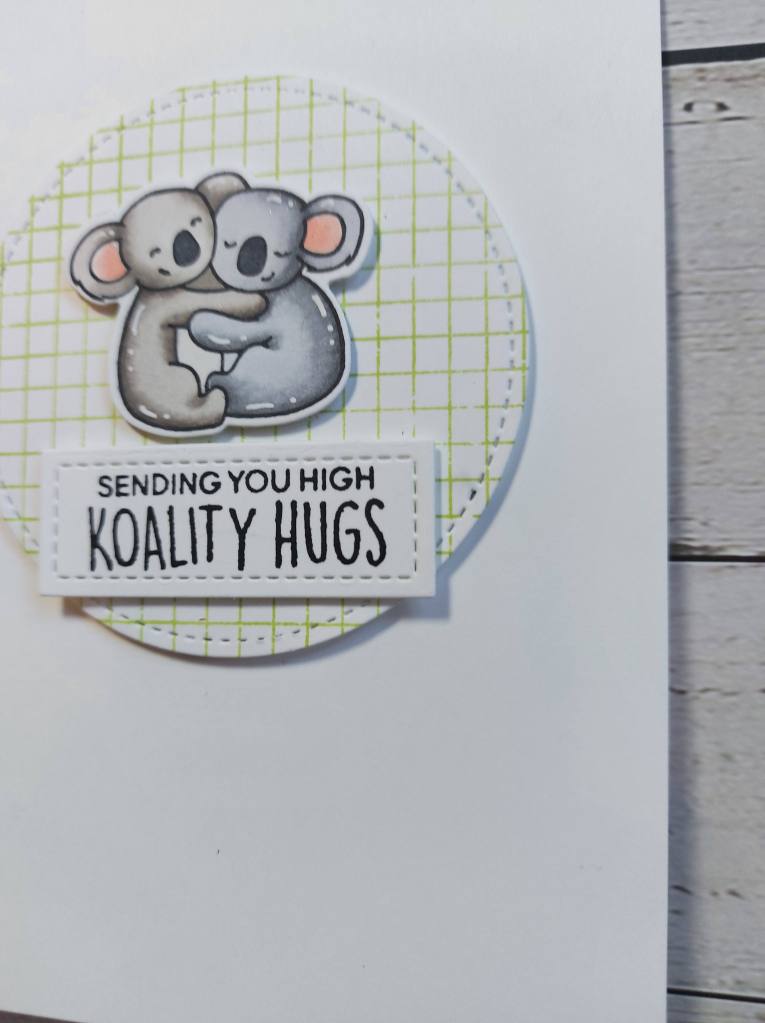
Hello once again. Happy Little Stampers CAS challenge has started a new CAS themed challenge. This time we want to see ‘HUGS’. Here is my card:
This cute hugging pair of koala’s is a stamp from Heffy Doodle. I coloured them with Copics – first having a little internet search for the colouring of koala’s – grey’s and brown’s – so I coloured each differently – warm grey and cool grey, with some white gel pen for interest.
The sentiment if from the same stamp set.
The background circle is a Concord & 9th stamp and using a lighter green, then a stitched circle die.
I hope you can come and join us with your CAS ‘HUGS’ themed cards. xx
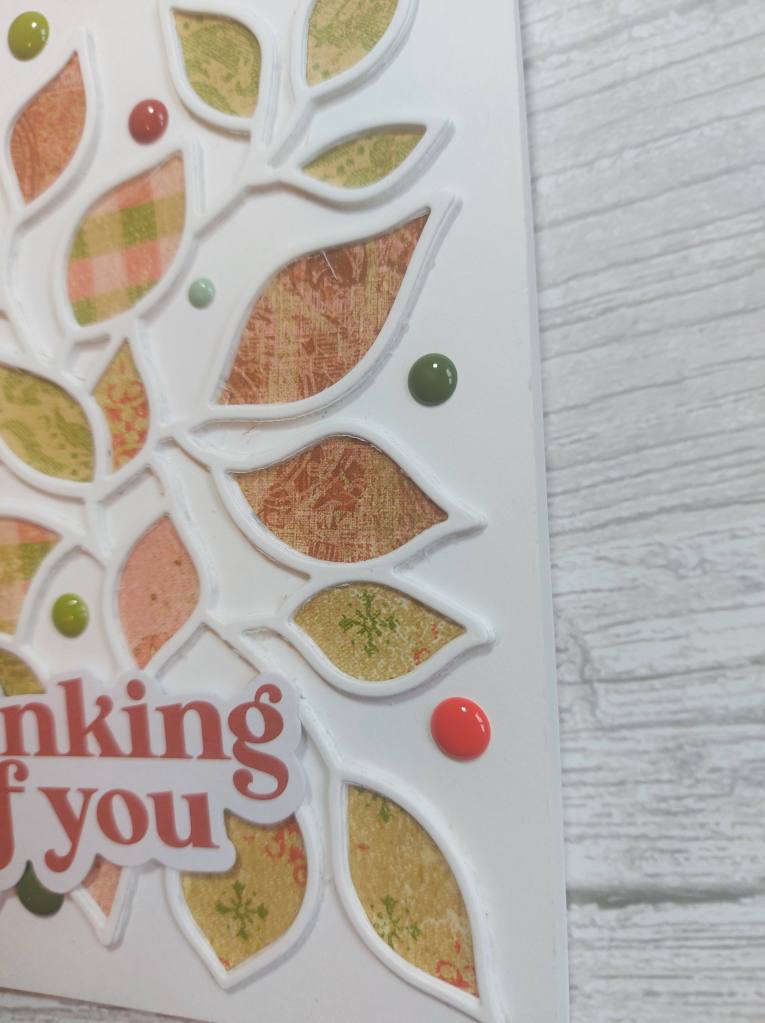
Cardz 4 Galz has started a new challenge. Billie A has chosen the theme of ‘two or more patterned papers‘. Here is my card:
I began by die cutting the Simon Says Stamp ‘Vine Background‘ three times in white, and then once with four different patterned papers.
I laid the first white die cut down, then placed a different piece from the patterned paper die cuts in the leaves, and then added the next two white layers on top – just in case I had some glue where I didn’t want it on the edges.
I then chose a pre-made sentiment – I think from Pinkfresh Studies but not exactly sure – and then dotted around some gems in the more open spaces.
I hope you can come and join us with your patterned paper creations. xx
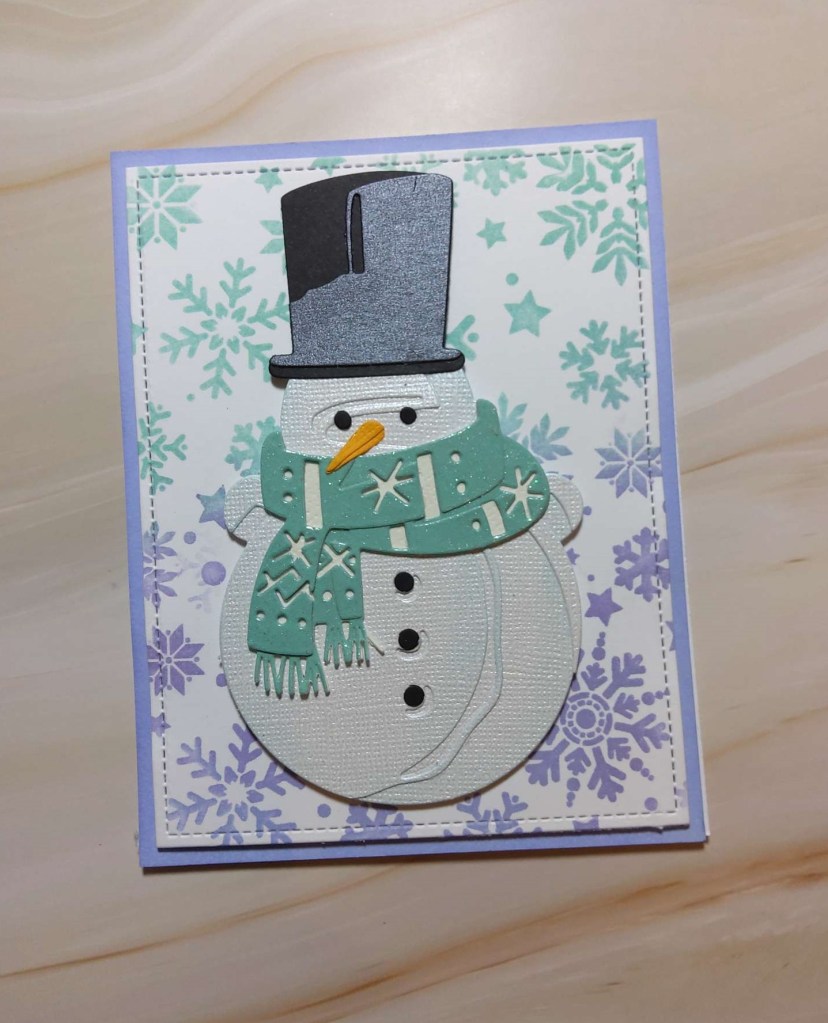
I chose to use yet another background created during an online class, layered onto a matching panel.
The snowman is a Tim Holtz die, and die cut using one white textured shiny card, and with part of the layers ink blended with some teal ink – to tone the white down a little and to add more dimension. All three layers of the scarf I die cut with one colour, and the hat was two black card pieces.
I hope you can come and join us and increase your stash ready for the end of the year. xx
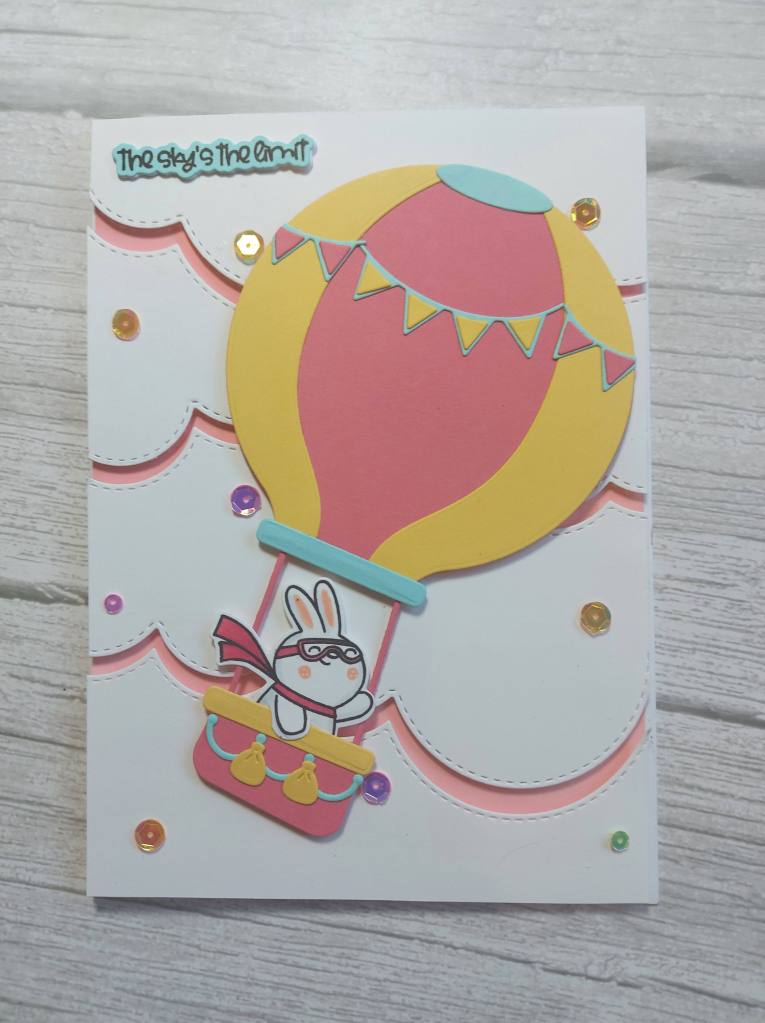
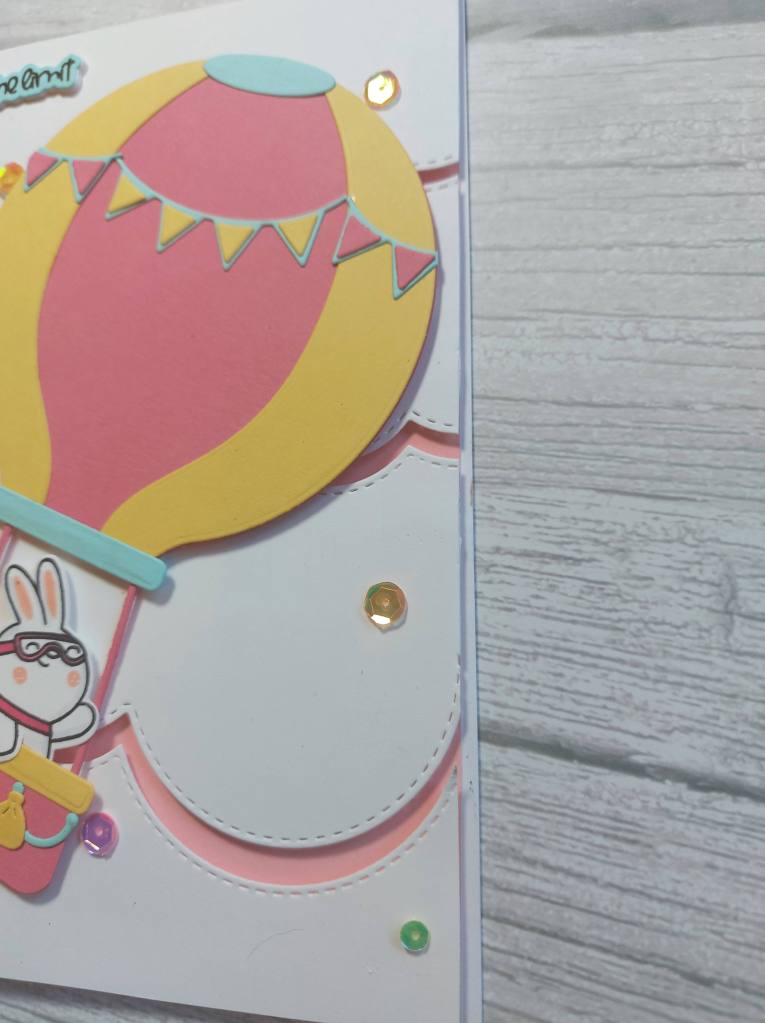
Hello. I have a card to share which took a lot of die cutting and layering – but I am pleased it turned out so bright and cheerful:
The card base is 5×7 inches so I could get all the elements on comfortably.
The white panel was die cut with the three cloud dies from Heffy Doodle, and placed onto a Distress Oxide panel (Saltwater Taffy) with foam tape, creating some gaps between each cloud bank.
The balloon was die cut – watching the Heffy Doodle video to see what goes where – and the little rabbit from Time For Tea designs added. I had to cut round his arm a little as I wanted it hanging over the edge of the basket.
I added the sentiment, then some sequins from my stash which seemed to go with the colours I had used on the balloon.
Hello there. It’s my time to host at The Alphabet Challenge. Having reached the letter ‘D’, I chose the theme of ‘die cuts‘. Any occasion, any creation -as long as there are die cuts involved – then you’re good to go.
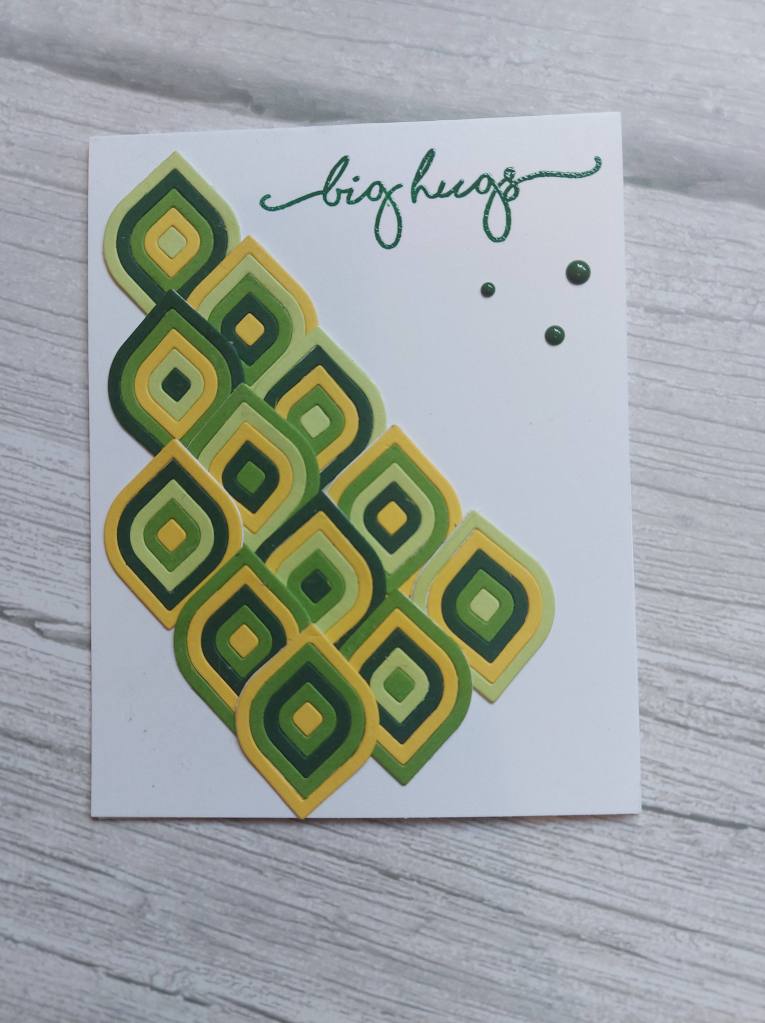
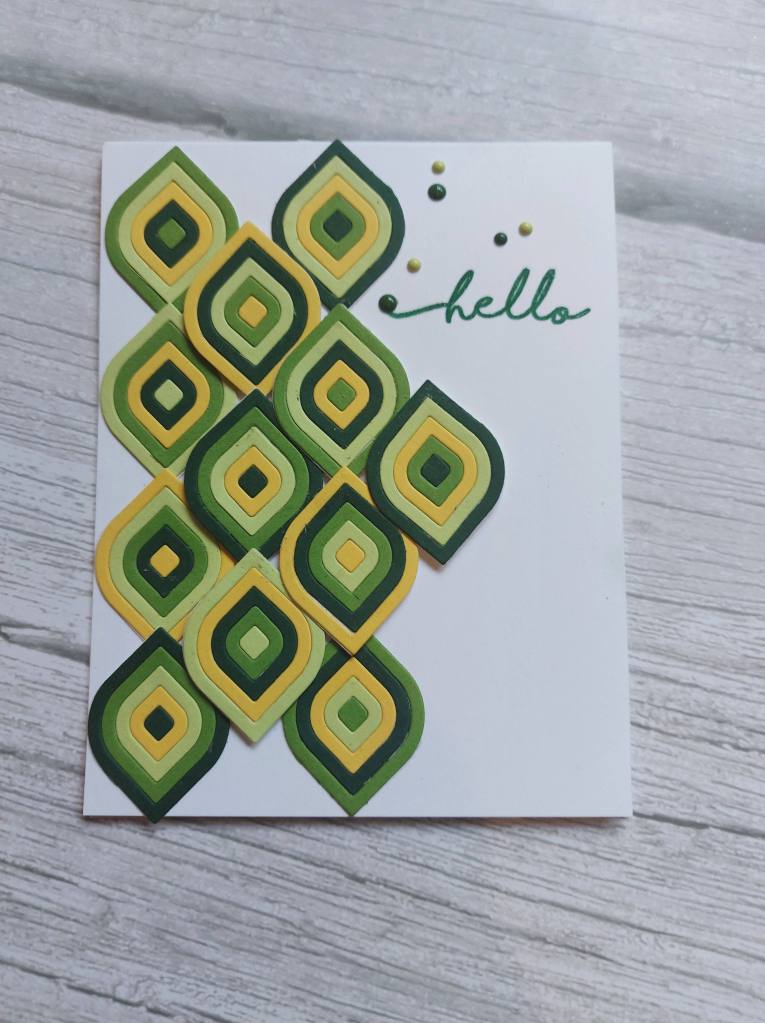
I die cut sooooo many of these little layering dies from Spellbinders – I had so many left over that I created two cards:
This die set from Spellbinders ‘Color Block Mini Petals‘ only has two dies to it – a very small set. However, I think it certainly packs a punch. There is a background petal shaped die, then the other die cuts out the layers. I decided to go with a fairly simple colour scheme – but as you can see I placed each of the four colours in different order on each petal.
It’s time consuming, it’s fiddly – but I actually quite enjoyed it. I sometimes get my ‘fiddly’ head on – though rarely! – and I knew I had to just be patient, go with it, and see what happened.
I used Concord & 9th card stock – three greens and a yellow – and I knew the card stock would die cut perfectly so it was just a case of using my little Heffy Doodle mini die cutting machine over and over and over again…….
Putting the layout together also took a bit of time – which petal and which colour-way to go where. Again, time consuming….
I chose a matching green for the sentiments and heat embossed them with clear embossing powder, and even found some Concord & 9th gems in the same colours to ‘sprinkle’ down. I can’t remember ordering them – but ‘found’ them so used them.
I hope you can come and join us with your ‘die cuts’ creations – I look forward to seeing all your creations. xx
Hello once again. Cardz 4 Galz has started a new challenge – and we have 3 new DT members – I’m so excited to seeing more creations on our themes. Dawn has chosen the theme for this challenge – ‘Sentiment as the focal point‘. Here is my card:
Once again I used one of ink smooshed backgrounds but in a bright and colourful palette, as a background to this old sentiment die panel from MFT stamps.
I layered them by using the stitched rectangle dies, and opted not to put the ‘innards’ back into the words. You can still see what it says, and I think the ‘innards’ would cover more of the colourful panel than I wanted.
I hope you can come and join us in this challenge – I look forward to seeing all your sentiments in our gallery. xx
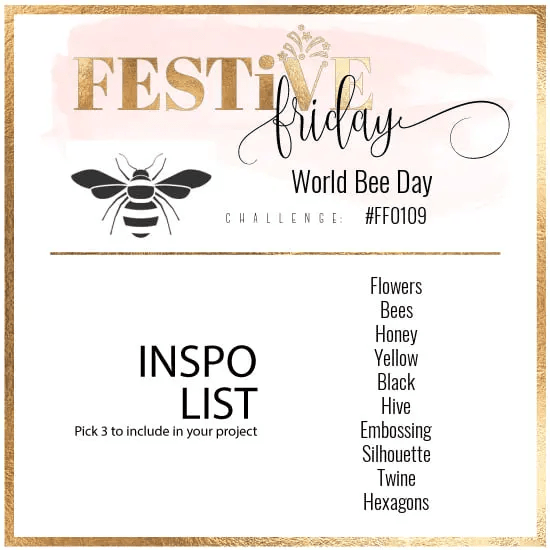
Hello. Popping in to share a card using a new stamp set from Claire Manning Creative for the current challenge at Festive Friday. When I saw Claire demonstrate this on her YouTube channel – I just had to have it:
This is a layering stamp set called ‘Buzzing‘, and I thought it would go perfectly with one of previously made Distress Ink smooshed backgrounds – and I like how it turned out – all that rich yellow and that stark black….
The body of the bee is stamped in Versafine Black Onyx to get that deep and dark black, and then the wings were stamped. Usually, you stamp the yellow, then the black – but as I had yellow on the background panel – I didn’t need to do that.
And as we all could do with some encouraging words every now and again – then this sentiment from Clearly Besotted fitted the bill nicely – from one of their bee stamp sets.
I may have to play with this the way Claire did on her YouTube video – using a spray of water on the layers to give a water-colour effect – watch this space!
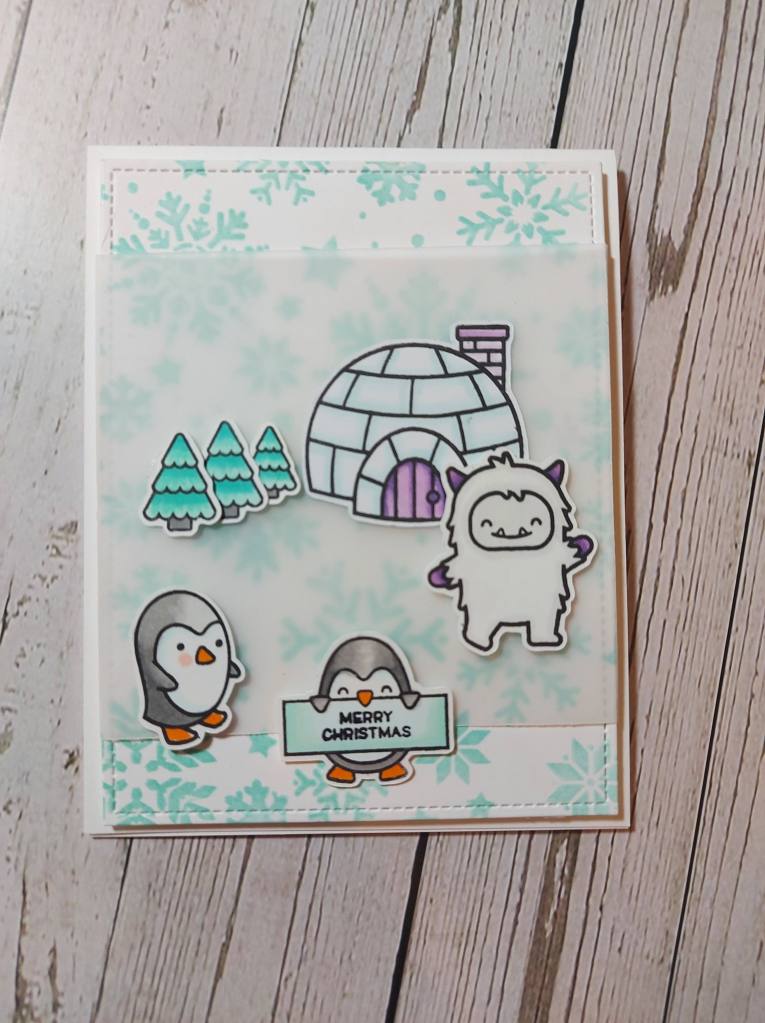
All of these elements were created during an online event with Jenn Shurkus – I just didn’t put the cards together during the class – or since. I have an envelope full of the coloured images, so I decided to use some of them to create this card.
The background panel is stamped with snowflakes and onto that I adhered some vellum. I felt this would enable the images to stand out a little more.
As the images were already coloured and die cut, I played with the layout and used either glue or 3D foam to stick them down.
I hope you can come and join us with you Christmas creations. xx
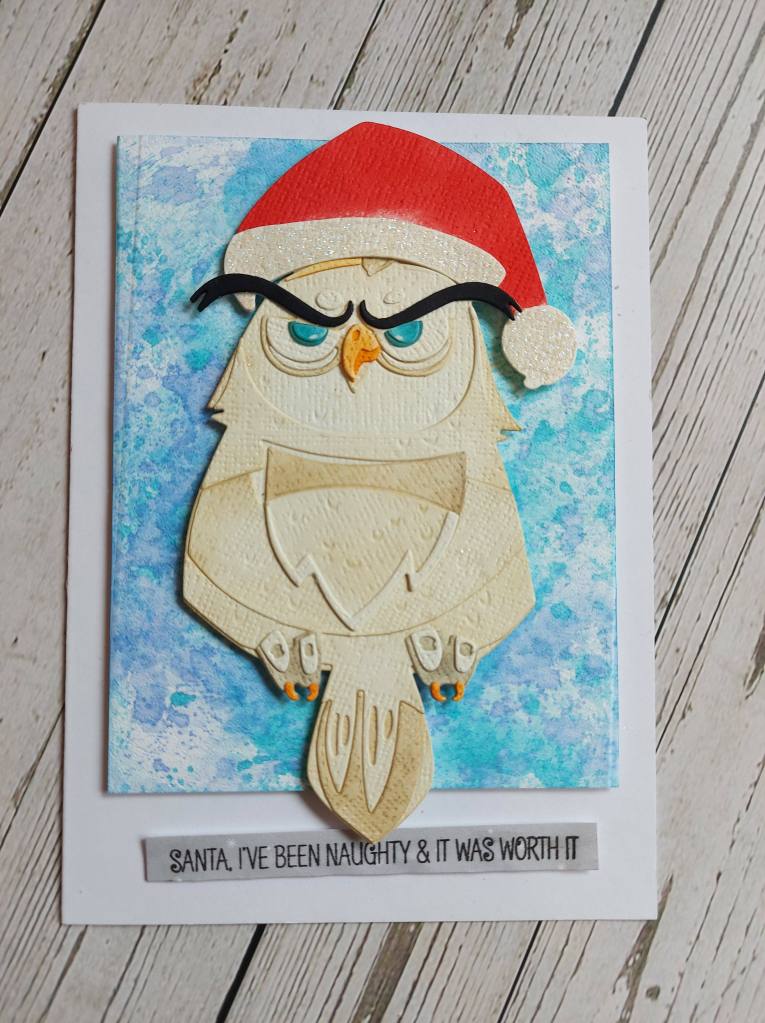
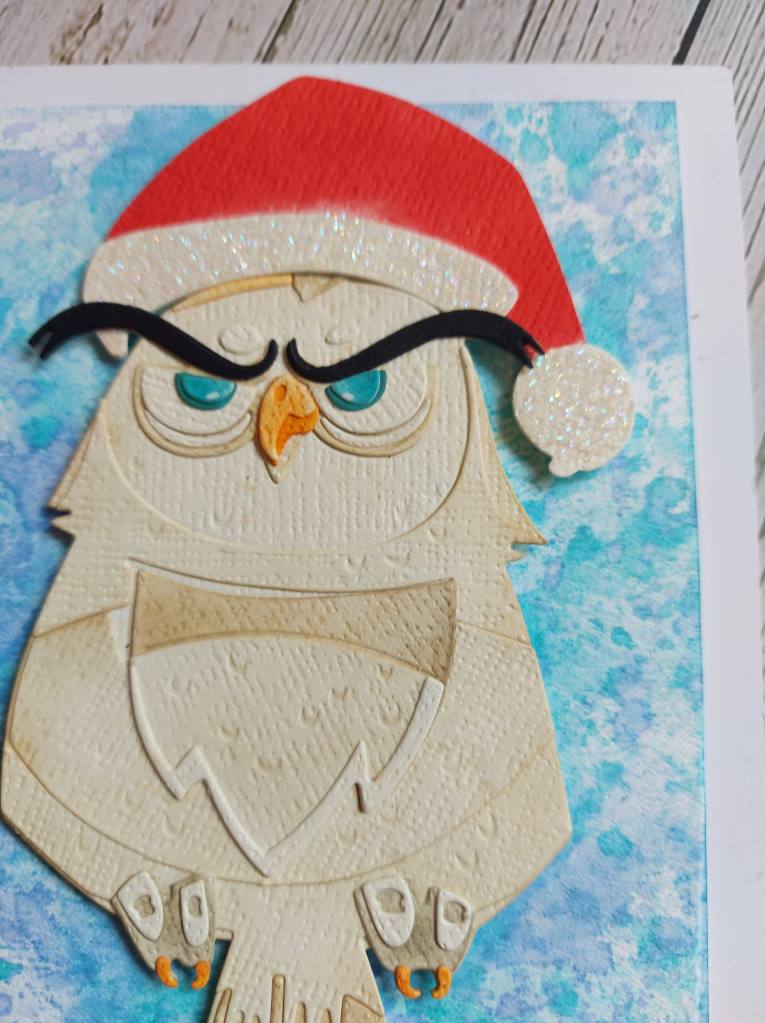
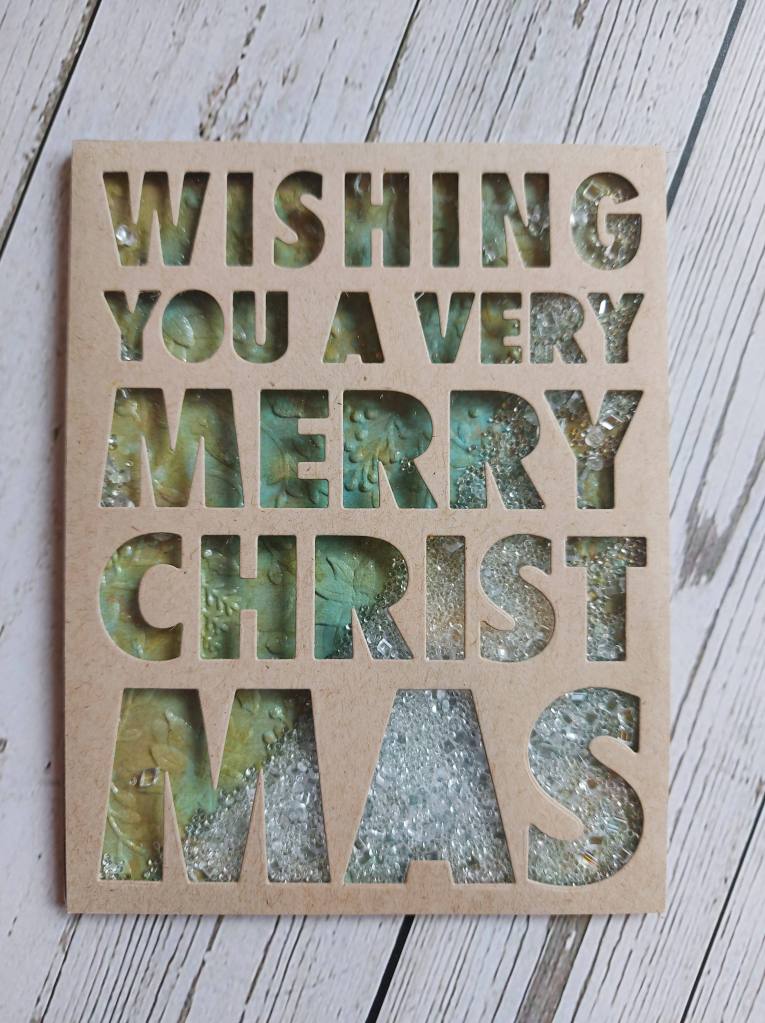
Hello there. ABC Christmas Challenge has reached the letters J and K. Wei is hosting, and this time we want to see your Christmas themed creations with ‘J for Joke and/or K for Kraft‘. I was inspired to make a card for each theme:
J for Joke
K for Kraft
For the first card I used the Tim Holtz die ‘Arthur’ and created him with a cream textured card stock with some brown ink blending around the edges. The hat is from a Simon Says Stamp die set – with some glitter applied to the white parts. The background is an ink smooshed background from my stash. The joke sentiment stamped onto some patterned paper and placed using 3D foam squares.
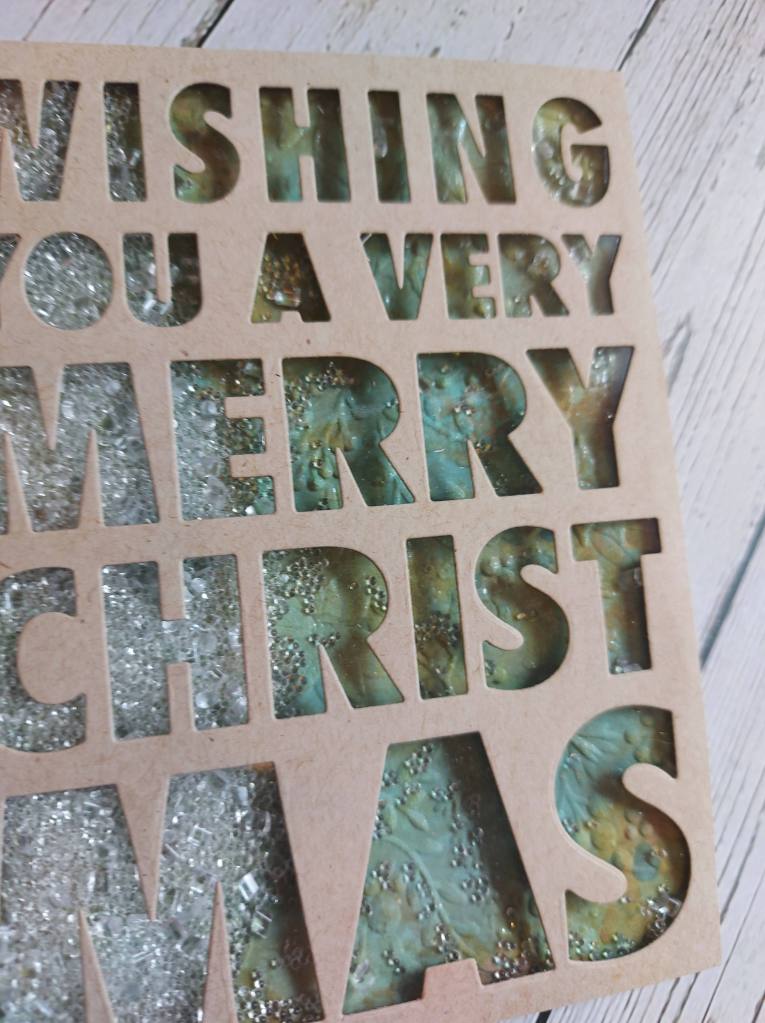
For the second card I created a shaker card using an ink smooshed background which I embossed using a Simon Says Stamp embossing folder, then applied Sizzix lustre wax. I placed this into a shaker creator from Tonic Studios, added glass beads and some thicker glitter and sealed it.
I die cut a Hero Arts Christmas cover panel out of Kraft, and stuck that down onto the front.
I hope you can come and join us with your Christmas creations – following one or both of our two themes. xx
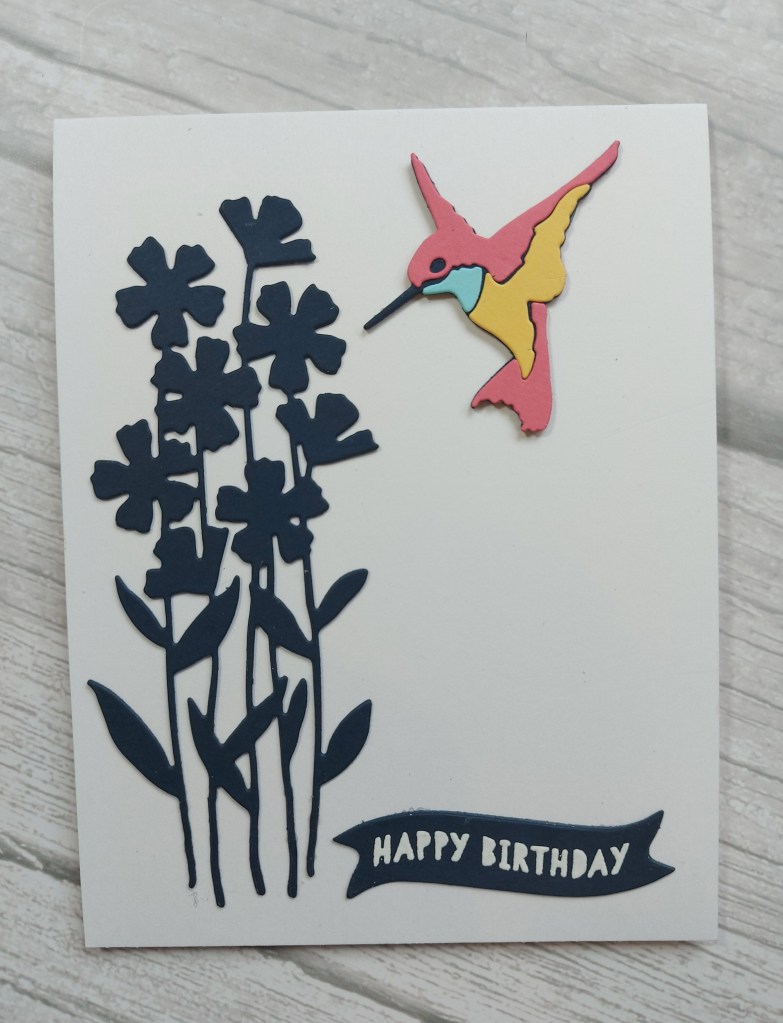
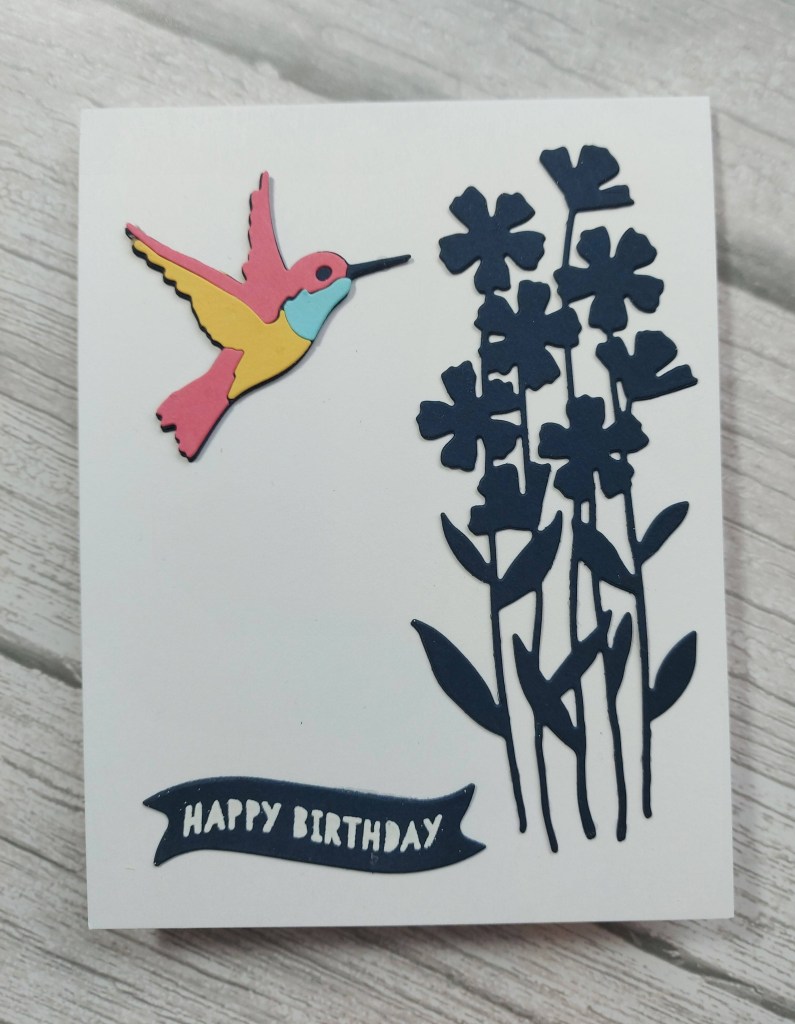
I have a card – two actually – to share today following a couple of days in my craft room:
I chose to use the Concord & 9th bundle and create two cards, as I couldn’t decide which of the hummingbirds to use.
I used a dark blue base layer for the birds, and other colours as you see. I also added another base layer for the bird to create another layer and thickness so I didn’t have to use 3D foam squares.
The floral arrangement I kept one colour – dark blue – to ensure the hummingbird was the star of the show, and also layered that twice – those little stems are a trifle challenging – but I managed!
The sentiment is from another C9 stamp set, white heat embossed and die cut with a banner die.