Hello there. I have a busy day ahead – crafting and house stuff. I’ve already been out for my third mini-bike ride…….I’ve just started to cycle, and currently only going out for 15-20 minutes. The second time I went out I fell off – that seat was just too high and I couldn’t put my feet down when I stopped……gravel rash in hand and knee – but now all good.
So, now I feel all proud that I’ve already done some exercise – I feel craftiness coming on. I have to make a card for the next Holly and Ivy Christmas Challenge – due to start on the 26th March; it is Mother’s Day here in the UK next Sunday – 31st March; it is my mum’s birthday on Thursday 28th March………..and on the 3rd of April the next ABC Christmas Challenge begins………I’d better get to it, hadn’t I?
The card for posting this morning was a little fiddly, but I enjoyed creating it:

I stamped the Mama Elephant ‘Little Cat Agenda‘ and coloured with Copics. All the same colour, and only used red and yellow for the items the cats were holding, as I knew I was going to do a vibrant and colourful background.
I then used Distress Oxides in rainbow colours to create the background, and cut it out with my newly purchased MFT ‘Puzzle Cover-Up Die-Dynamic’. I toyed with the idea of putting the puzzle pieces back together correctly, then thought about them all back crooked, but went with this way – some gaps between each piece.
It also took me a bit of time arranging these little puddy tats – I didn’t want yellow additions on the yellow piece, and wanted to ensure some contrast between the cats and the background.
The sentiment is also from MFT – a freebie from Seven Hills Crafts ages ago, but a great range of birthday sentiments in different fonts – I usually go to that stamp set time and again.

I shall be entering the following challenges:
Always Fun Challenges – dogs or cats
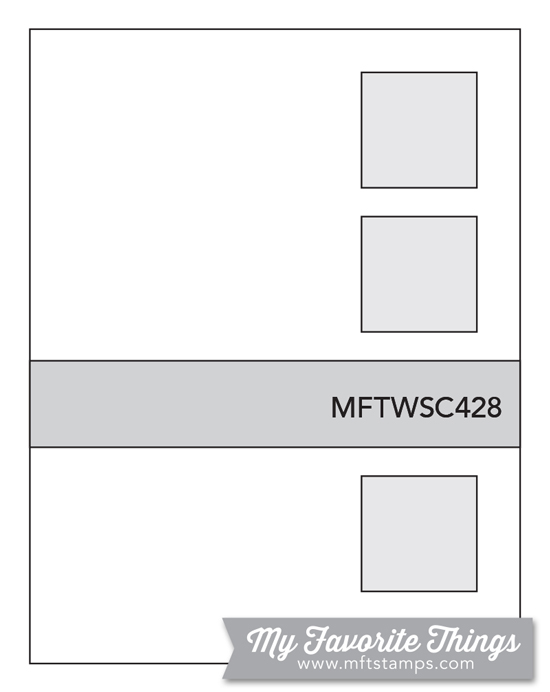
Freshly Made Sketches – sketch
Seize the Birthday – Birthday with option dots and stripes (not used)
MFT Birthday Project – birthday and rainbow colours