Bit Box items

Hi there. I am joining the current challenge at Simply Less Is More. The challenge is to use items you have ‘saved’ for another time and have yet to use. Here is one of my bit boxes. I say one of them – I also have one with larger items like embossed card, and larger die cut shapes.

20180701_100438

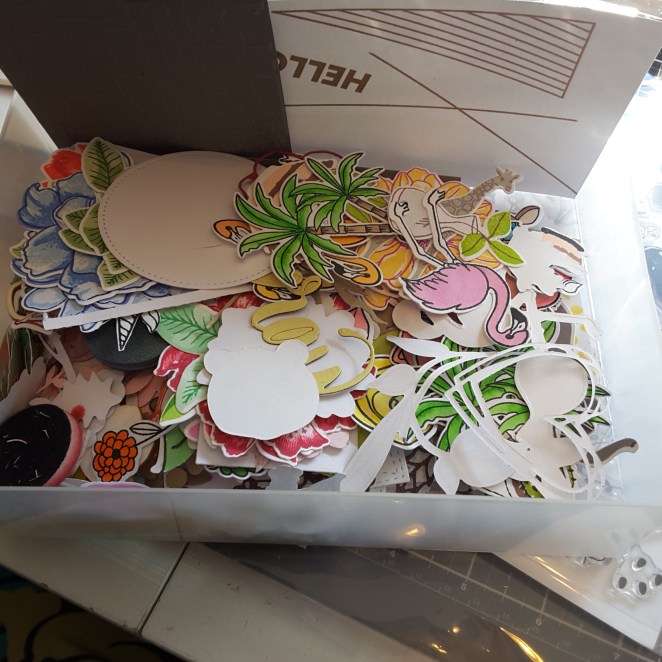
So I delved through this box – goodness, there was loads of stuff for a small box. Even an ink blending sponge or two!

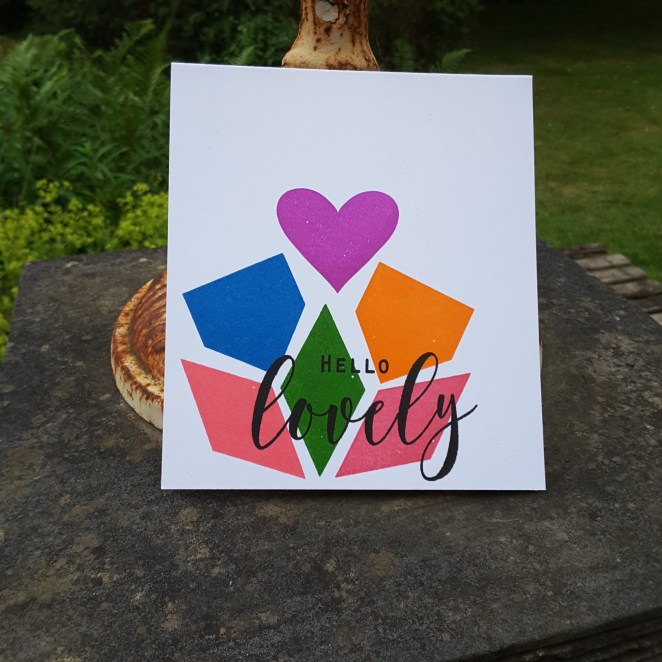
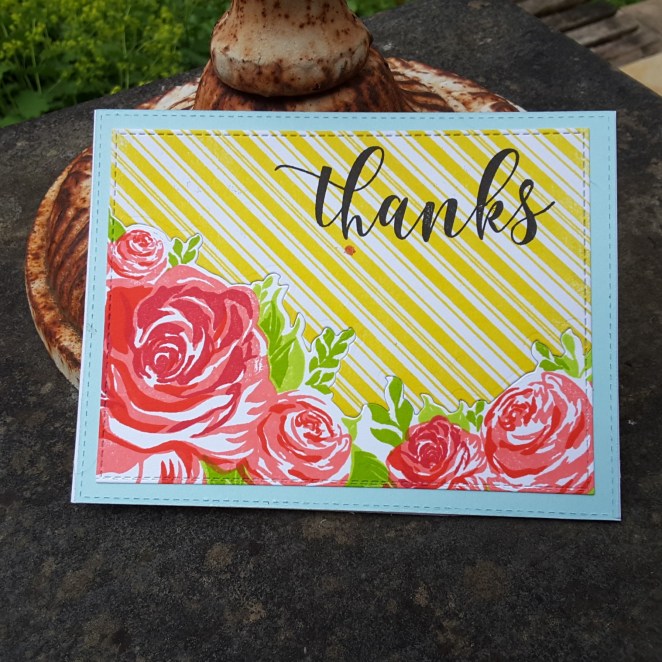
This is what I created:

20180701_182954

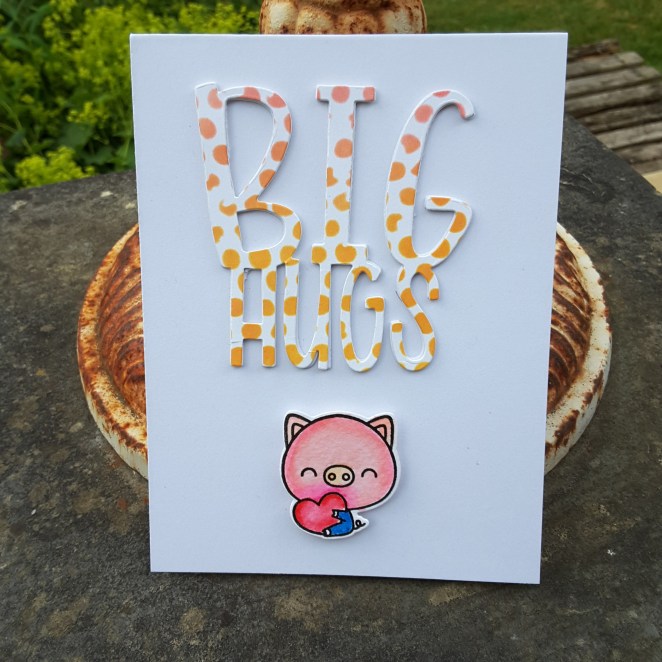
I took the piece of card I had stenciled onto with my Distress Oxides, and die cut the ‘Big Hugs‘ from Neat and Tangled. I die cut it several times and stacked the sentiment up for just a little dimension.

I then found one of my ‘Lovely Piggies’ from Mama Elephant. When I created the ‘Lovely Piggies‘ card at the beginning of June, I actually stamped, water-coloured, and die cut the whole set – twice!

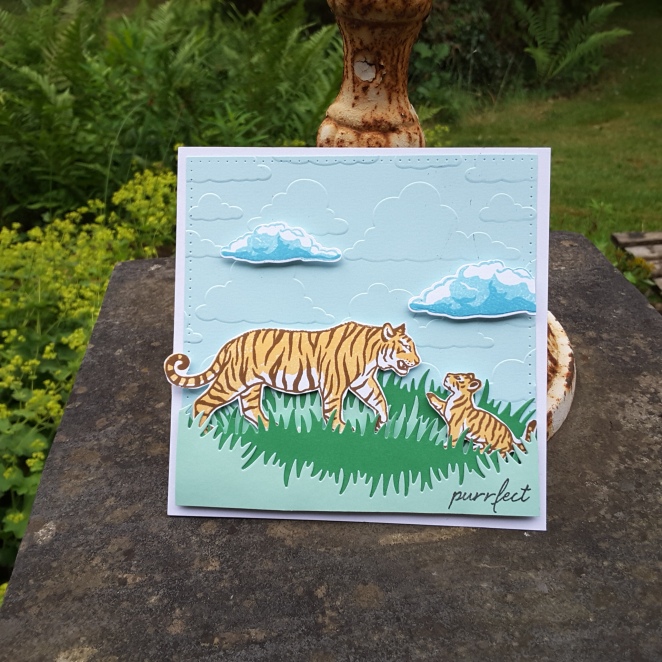
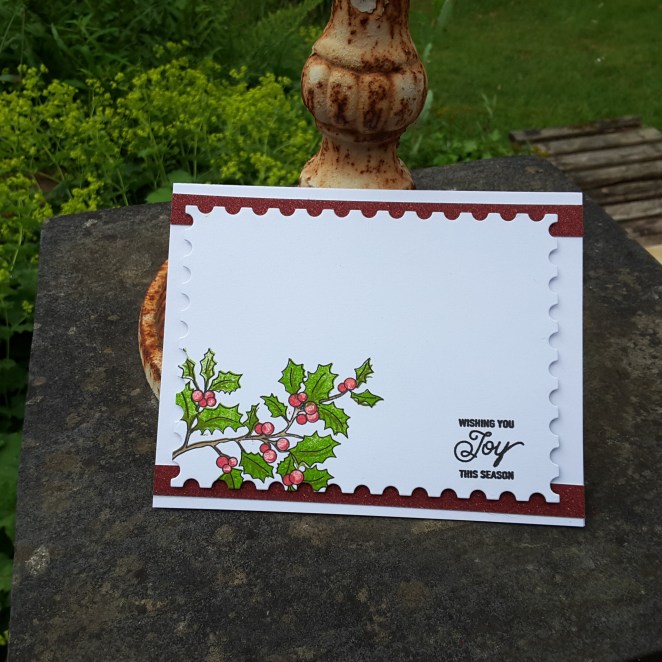
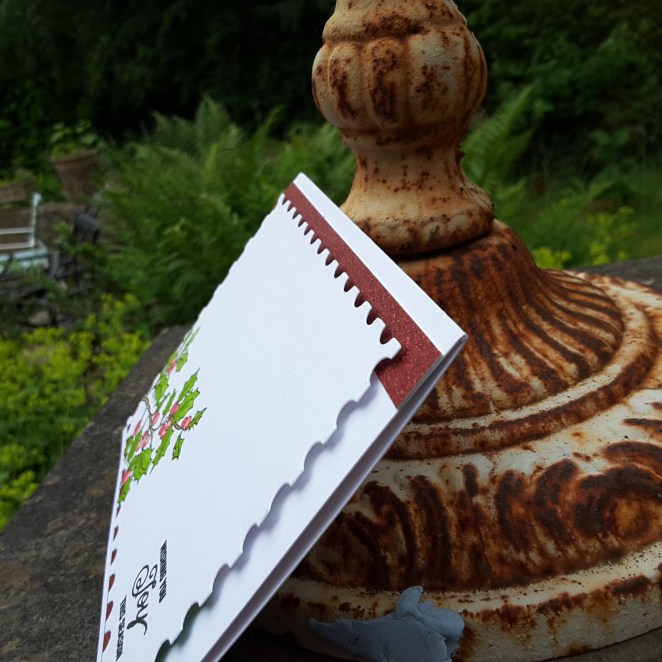
Here are some of the other items I found in that box – I shall be making some more cards with these.

thumbnail

A good idea from Less Is More, as I certainly didn’t realise how much good stuff I had put to one side.

I shall also be entering this into the Simon Says Stamp Wednesday Challenge – anything goes.


Majestic Blooms and a Bear

Hello again. I have found time to craft again. Once I start, I seem to keep going – and going – and going!

The first card is inspired by the current challenge at CASology and AAA cards:

20180701_124947

I used the MFT Safari Party, and coloured the bear using my zigs. I framed him in the MFT stitched wonky squares – cutting two squares closely together for the frame – and raised everything with foam pads.

The second card is completely different:

20180701_124958

I wanted this card to be quite large, as the Majestic Bloom flowers are large, and I wanted to put three of them on. To save a little on the white space, I used the not yet released Needlework Motif stamp (yes – freebie from the Altenew Daventry crafting day) and heat embossed in clear on the white card.

20180701_125014

I then took the cover plate die – yet another freebie on the day – cut it out in white card and used that almost like a trellis to put my flowers onto.

After stamping the flowers using the colours from the current challenge at Color Throwdown, I arranged them as you see.

This card will also be entered into the Moving Along With the Times challenge – flowers as main focus – and June Inspiration at Altenew.


Furry Friends

20180630_101400

Hello everyone. I did some more tidying and sorting in my craft room yesterday, and came across a whole stack of Stampin Up designer Series paper – goodness knows how long I’ve had this!

I decided to use some of it as background for this card, which was inspired by the sketch from Hand Stamped Sentiments. This is quite a large card – an A4 folded into two, just so I could get four of my little animals in there.

I used the Concord and 9th ‘Furry Friends’, and actually stamped and die cut them all out, in all their various forms, and decided to go with the ‘friends’ I have here.

The circle die is also from Stampin Up, with the sentiment being from MFT – my usual ‘go to’ sentiment set.

I shall be crafting again later, but I am going to see my mum and dad – he is 80 years of age today. I’ve got to go ans give him the card I made and posted on my blog yesterday. They only live 20-30 minutes away, so a mere jaunt in the grand scheme of things.

I shall be entering the following challenges with this card:

Hand Stamped Sentimentssketch

Just Us Girls anything goes


Birthday card for dad

20180629_161220

Hello everyone. It’s been a week since I last posted, as I have been busy, busy, busy. You know I went to the Altenew day in Daventry last Saturday, especially if you follow me on Instagram – I sent a couple of photos of that day. Absolutely brilliant, and great meeting at the team and fellow enthusiasts.

When I arrived home, I still had my Ikea purchases to put together, and then sort out my craft room – I’m nearly there – but then I was at work the rest of the week. As most of the stuff I had to sort out was on my craft table, it wasn’t until today that I had even a little smidgen of space to be able to create…….that table is still a work in progress – but I had to put this card together for my dad.

He is 80 tomorrow……80……which means I am getting older too……time flies…..! He had some health issues this year, but he is brilliant at the moment.

I thought I would add a little quirkiness with the elephant, and a little glitter with the embossing powder, just because I can.

I followed the current sketch challenge from CAS Colours and Sketches for the layout, though I did flip and rotate the sketch.

The little red balloon was attached to the elephant with a drawn blue string. The word ‘dad’ is die cut several times using the Altenew bold alphabet die (my capitals set is with my sister in Canada until she arrives here with them……goodness knows when!!!), then  stacked together for some dimension, with the top letters embossed with glittery white from WOW!.

Hopefully, I can continue to sort out my craft room, and craft at the same time, as there is a lot of inspiration out there I am wanting to use for cards.

Challenges I shall be entering with this card:

CAS Colours and Sketchessketch

Seize The Birthdayanything goes birthday

Aud Sentiments Challenge – anything goes with sentiment


Hello Lovely…

20180619_202221

Hello everyone. I have one card to share with you today – and at the end of the post a photograph of my car boot after an Ikea shopping trip……!!!!!!

This card is the first one layer card I created without any smudges, without trying to get it done at least twice, so I just had to post it.

I used Altenew ‘Simple Shapes XL‘ stamp set, and Catherine Pooler inks. These stamps are quite large solid images, and Catherine Pooler inks just make life so much easier for this kind of stamping. I didn’t stamp any of the shapes more than once – and I hadn’t even used most of them before, so they were brand new. I have had them for ages, but never used them!

I did use my Misti – just in case – which again makes life easier, and just played with the different shapes. I didn’t have a plan for them, I just knew I wanted a rainbow effect with the colours. I arranged the inks around my mat, started with the pink at the bottom left, and just went with it.

As the colours are bold, I used a bold and black sentiment from The Ton ‘Peony Notes‘ as that was on my desk from the other day. A large sentiment, and I used Catherine Pooler ‘Midnight‘ ink to get a dark black and crisp image. I did need to stamp that a couple of times with my Misti, but I think it’s because I didn’t let the other inks dry enough.

I shall be entering the following challenges:

AAA cardsCAS geometric

Addicted to CASCAS rainbow

Now – for the Ikea shop. Ikea opened in Sheffield last year, and this is the first time I’ve been. I’m trying to organise and sort out my craft room. It’s a fairly small room, and at the moment there is stuff everywhere – in boxes, disorganised on shelves…….this shopping trip should help!!! :) Thank goodness it all fit. I don’t think I’ve put the back seats down before. Maybe I should have taken the Transit van……but perhaps that would have too dangerous! (not that this wasn’t bad enough!) I’ll let you know what hubby says…….

IMG-20180620-WA0000


Oh My Stars!

20180619_202236

Hi there. A quick card for you today, without any die cutting. I know – after the past couple of postings, I was kinda all die cut out……so I made this card with stamping only. I was going for a clean and simple look – which I believe I achieved.

I used the small three star stamp from Concord and 9th ‘Shine On‘ stamp set, stamping the outline in Catherine Pooler ‘Midnight’ ink, then filling-in with an Altenew orange ink.

The sentiment is from a Uniko stamp set, again stamped in ‘Midnight’ ink.

There’s not much more to say about the card, so I’ll leave it at that – except to say I will be entering the following challenges:

CAS(E) This Sketchsketch

Inkspirational Challengesuse small stamps

Addicted to Stamps Challengeblack and white and one colour

Our banner for your blog

Bengal Tigers scene

20180618_190904

Hi there. This card you see here took me absolutely ages to put together. There must be easier ways of creating a scene than the process I went through. I have making this for a couple of days as I didn’t know quite how I was going to place the grassy die cuts, nor where I was going to place the tigers. I must have moved them around half a dozen times, walked away to think about it, went back to it…….it’s easier going to work!

These Bengal Tigers from Hero Arts were the easiest part of the card, even the fact I had to fussy-cut them as I don’t have the matching dies. I did stamp them in a couple of colours, bit preferred these colours the best.

I took the blue background card and embossed clouds onto it, as that much blank blue looked too much, and I didn’t want to start ink blending as I liked this lighter blue. The clouds were added from The Ton Golf Course stamps and dies, just for a little more dimension up there.

I don;t do these layered scene cards very often – I now remember why not!! – but I will certainly have a search for tips and tricks when it comes to putting them together.

I shall be entering the following challenges:

City CrafterSafari Style

Crafty Cardmakerswet or dry embossing

The Library Craft Challengewhere the wild things are


The Ton purchases

Hello everyone. I have a couple of cards to share with you today. Both of these cards are from new purchases which arrived yesterday – and I couldn’t wait to get stamping. This first card is using the ‘Holly Branch‘ stamp set:

20180617_14002020180617_140030

I took the layout from CAS Colours and Sketches and created a simple Christmas card, using the stamps and sentiment from this set. I also added some red glitter card to the top and bottom, and die cut the main piece with a Catherine Pooler die.

I shall be entering the following challenges with this card:

CAS Colours and Sketchessketch

Watercooler ChallengesOccasions

Time Out ChallengesHolidays

This second card:20180617_140048

is using the colours from Color Throwdown and the newly purchased ‘Peony Notes‘ from The Ton. I also used a Catherine Pooler background stamp for the lines as a back-drop to my flowers. To make the pieces fit together, as opposed to putting one on top of the other, I just turned the die around. Almost like a paper piecing kind of thing.

These flowers are stunning, and I tried them in different colours – and probably made smudges and mistakes on most of them!!

This card will be entered into the following challenges:

Color ThrowdownCoral, Aqua, Yellow Green

4 Craft Chicks anything goes

Daring Cardmakersanything but white

Here is one of those smudgy mistakes – I’m still trying to figure out how I can save it! You see the green smudges on the yellow flower? How do I fix that? I may just have to bin this one and start again………….

20180617_140101


Totally Tropical

20180614_175353

Hello everyone. I don’t think this card can in any way be called clean and simple….It combines ink blending, stamping, die-cutting, splattering – yet not embossing.

I put this together for the current challenge at Daring Cardmakers. I liked the idea to use bold and bright colours and took my Altenew ‘Totally Tropical‘ stamp and die set. I arranged all my Catherine Pooler inks at the side of me, and stamped like crazy. I then took my Distress oxides and blended like crazy, too.

For the background, I blended, then splashed with water, then splashed with the Gansai Tambi Pearl colours. Whilst that was drying, I stamped most of the flower images, playing with the combination of colours for each flower. I stamped the leaves using different green inks, and then die cut the whole bunch of them.

The sentiment is a die from the same stamp set, which I die-cut four times using black card and double-sided sticky sheets, so I could layer that up for dimension.

Now the background was dry, I played with the layout, wanting some sense and uniformity – yet not too much…..using my 3D glue – to give me movement and placement time – I then stuck them to the blended and splattered ink panel. I wanted the sentiment to be framed by the flowers, and still stand out from all the colour.

Here is a close-up of the shimmer:

thumbnail


Sketch and Tulips

20180613_162841

Hello again. I have one card for you today. This card took a bit of figuring out, but I managed without too much hassle – but there certainly was hassle!

I used the current sketch from CAS(E) This Sketch, and started by die cutting the circle. Then I wanted a flower, and looked at all my layering flowers, and decided to go with this stamp set from The Ton – ‘Fresh Cut Tulips‘. Then the fun began…..

I wanted the flower to be on the outside of the circle, as well as the inside, and didn’t want to cut around it. I placed both pieces of card into my Misti, decided where I wanted to stamp, and began by stamping the flower and leaves onto the bottom piece. I then took the top piece and laid it down, removed the bottom piece, and stamped again.

I didn’t layer the leaves, I just stamped them in one colour green, but I did layer the tulip itself. I managed to keep each piece of card straight, no moving – this sometimes still happens with the Misti – and I liked how this turned out.

I then took the top piece of card and embossed it with a Spellbinders embossing folder, to add more interest. I didn’t want another colour, and the white looked too plain for me.

I then wanted a sentiment which matched the flower, and I thought this was ideal. This was stamped with Versafine black onyx and stuck down with 3D foam pads.

I shall be entering the following challenges:

CAS(E) This Sketchsketch

Addicted To Stamps and Moreanything goes