Clean and Simple Sketch

20170401_214152

A quick and easy blog post for today – working all week again, so not sure how much time I’ll have in the evenings – depends on what time I get home and what hubby wants for tea……..!

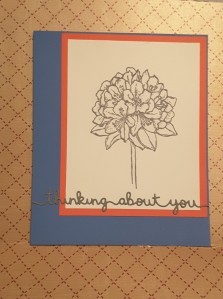
I’m having a go at the sketch challenges at the moment, and am struggling with keeping them clean and simple – and think I’ve been a little too clean and simple with this card. I thought I’d post it anyway, as I actually do like how it turned out. I like the simplicity of the flower and sentiment, and the contrasting colours of the two base layers.

This sketch was from CAS Colours and Sketches and I think I’ve achieved what was asked……we shall see.

The base card is from Create and Craft – a Topsy Turvy card I have a stock of, with the inside of the card being a lighter blue. The next layer is almost like a burnt orange, with a lighter reverse side, but that lighter side on this piece is a little ‘wishy washy’. I think it’s a pink – but quite bland. Anyway, didn’t use it so it doesn’t really matter.

The white card is from Stampin Up, and I stamped the ‘Best Thoughts’ flower in basic grey, also from Stampin Up. The sentiment was cut out of Lawn Fawn Narwhal card, after I had attached some double-sided sticky sheet to the back of it. I was thinking of using my Xyron again – but the sentiment is quite long – almost 6 inches, so thought it would be a waste. The double-sided sticky sheet worked very well.

I admit this is a very simple card, but I will probably do it again, using different colours for the base card, just to see what effects I can create – some pastel colours, some maybe black and white cards. I may even try colouring – you never know……


Cute Sketch card


20170401_204528

It seems I am having a cute and colourful card making weekend. After yesterday, I was thinking of all my card stock which was bright and colourful – and I have a lot. I am trying lots of new styles and techniques at the moment, and as well as messy crafting or mixed media, I am starting to use some dies and stamps which are more cute and fun, which means I can use any colour card I want to represent anything at all.

Today, I have taken inspiration from a sketch challenge from Atlantic Hearts Sketch Challenge, and had a play with coloured card. I recently purchased a set of dies from Hochanda, a UK craft channel. I believe it can be watched around the world, but really not sure.

This bundle is designed by Katie Skilton for Sizzix, and includes the dies I have used for this card. This set is called ‘Under the Sea’ – I am sure you can see why! I have also used the sentiments which came in the bundle ‘Tribal Words’.

The base card is 7 inches square, and again used my Sue Wilson Noble Stitched Squares to cut a slightly smaller square out of light blue. I again embossed this with the ‘Rain’ embossing folder from Crafters Companion. I think the rain could represent anything, and this time, for me, it represents bubbles in the sea.

I die cut the whales out of some Create and Craft card stock, which has a toning colour on the opposite side, so I could match the colours without thinking too much about it, and added several other elements from the same die set – the fish and the heart.

The circles, as per the sketch, I used the Lawn fawn ‘Slide on over’ circles. These were designed for slider cards, as the dies cut the circle itself, and cuts out the channel which makes the slider card. This is how I managed to get circles which matched each other, and outer circle rim shapes for the other components required to meet the sketch challenge.

The two solid circles I also embossed with the same embossing folder. I layered the outer circles flat to the card, but raised the other elements on Stampin Up dimensionals. I die cut the sentiments and ran them through my Xyron sticker maker so I didn’t have to fiddle with glue on all the letters. This little machine is great for sentiments and other fiddly elements as it is only 1.5 inches wide, whilst the bigger 5 inch and 9 inch machines are good for the more intricate and elaborate dies for layering.

Deciding where to put each element was a challenge but I like the fun and vibrant end result.

I will also be entering this card into the Just Us Girls challenge with the theme ‘Sea’, and Catch the Bug challenge blog ‘Anything goes’.

Up, Up, and Away

20170401_154412

I wanted to do quite a bright and cheerful card today, and didn’t want to get messy – for a change! The inspiration from this card came from The Colour Throwdown with the challenge to use the colours light yellow, blue, and green. I started thinking about water-colouring and a scenic card, but then also thought that I could use blue for the sky, and take the opportunity to use my Stampin Up ‘ Up and away’ thinlits dies. I have had them for a while, but not used them yet.

I took a 7 inch square white base card, and used my Sue Wilson ‘Ornate Pierced Squares’ to cut a layer slightly smaller. I then hunted through my embossing folders, as I thought I had one which had clouds on it. If I have – it is safely filed away somewhere – I couldn’t find it. So, I then took my Crafters Companion Textures Elements ‘Rain’ embossing folder, and ran the blue card through my Big Shot Pro.

I love the Big Shot Pro, as I can use all my A4 folders, my 12 inch square card/paper, and basically haven’t found any size of die out there on the market I can’t cut with it. I do, however, feel it is not so good when cutting smaller intricate dies – that’s what I have my Big Shot express for!

After embossing the blue card, I then took my ‘Up and Away’ thinlits and cut the intricate hot air balloon twice, then cut the different layers in green and yellow, and then used all those layers and stuck them behind with some detail glue. I then took the cloud shapes in the same die set, and cut several out of white card, and cut a smaller hot air balloon out of white card for my sentiment. The sentiment is from a set from Card-io called ‘Up, Up and Away’.

Card-io do a huge – and I mean huge – variety of smaller stamps ideal for creating your own background, for creating scenes by using each small stamp and building-up the project. They have tiny bugs, larger bugs, clouds, sentiments, trees, bushes, birds, alphabets…..the list is almost endless. Their web site has a lot of inspiration, ideas, and hints and tips. A great range of stamps…….mmmm….now I have found mine again I may have to have a go for another challenge!

Anyway, back to the card itself. The clouds were glued directly onto the blue card, but my balloons were attached with Stampin Up dimensionals.

This card actually didn’t take me very long. The longest time was spent deciding where I wanted everything to go, and which tone of blue and green worked well together. Compared to my last few cards I think this is quite a simple and clean card. I may have to do some more to take for the charity to sell.

I will also be entering this card into the Aud Sentiments Challenge, and 4 Crafty Chicks Challenge.


‘L’ for Lady

So what on earth is a girl to do when home from long day at work, hubby still away? Yep – make another card!. I had a look through the Paper Playful challenge web site, and came across three I could enter with the same card.

The first inspiration was from Just Add Ink, with the theme of using an element which began with the letter ‘L’. The second was from Seize the Birthday with the theme of black and white, and the third from Cards in Envy with the theme of black and white and one other colour.

The use of black and white to me, was to create a silhouette, and what better die set to use than that of the Tonic ‘Chepstow Bonnet’ die set. This die set has a couple of bonnets with the lady die, including a fascinator hat, but I liked the look the bonnet gave with the lace around the head.

I used an 8 inch square white card base, and added a slightly smaller layer black layer, cutting it with my Sue Wilson pierced squares die, and then cutting one slightly smaller in white card. Even though the white card had some pattern to it anyway, I embossed it with the Crafters Companion background script embossing folder for extra interest.

I die cut the lady and bonnet in black adding her to the card with one layer of mounting foam, and added the bonnet on top of her head. The sentiment is from another set of Crafters Companion dies, cut in black, and attached with the Stick and Stay spray – also from Crafters Companion.

I thought I had finished there, then remembered that I had to add one colour for the Cards In Envy challenge, but I didn’t want too much colour. I hunted through my ‘bling’ drawer, which has brads, and sequins, and gems, and came across these. They are red, but such a deep red, they almost shine black. I thought they would be a good addition to the card, and also thought they would enhance the bottom right corner – which seemed a little empty.

That’s it. Card done. Today’s playtime over………but there is always tomorrow!!


Using a stencil for vintage

I’ve just a fun and quick time making this card. The inspiration is from 2 challenge sites that I have entered this card into –  ‘Just Us Girls’ with a challenge to use stencils, and ‘Creates and Makes’ to have an optional vintage theme. My initial thoughts were that I had so many stencils, where do I start? I also have stencils I have never used before. I viewed the examples from the design teams, and the one made by Chris on ‘Just Us Girls’ caught me eye. It brought to mind my Tim Holtz stencils, as Chris had made some tags, and Tim is famous for his tags.

So I went to my stencil drawer, looked through my Tim Holtz stencils, and found the ‘Doily’ stencil. This is a lovely lacy/floral design, which I thought would add some great detail to the background. I was going to use a texture paste, but thought the design was so cute and floral that I just went with my distress inks.

I wanted to create a vintage and aged look so went through my stencil with Frayed Burlap and Walnut Stain, moving the stencil about three times around my 7×7 inch piece of card. I liked that you can’t see where I moved it each time, which shows how detailed and delicate the design is.

I wasn’t quite sure how I was going to put something on top. I was thinking some flowers, a sentiment, how would I matt and layer it without losing the stencil detail on the back. Again, looking around my craft table, (my table is never tidy and neat) and my eyes fell upon my IndigoBlu stamp set – Word Block #1 – and decided to use that set. My only decision here was which words to use out of the 6 available in the set.

I went with ‘Faith, Hope, Love, Thanks’ as you can see, leaving out ‘Celebrate’ and ‘Beauty’. For these, I stamped them in my Ranger Perfect Medium, and used a Cosmic Shimmer Dark Bronze Lustre embossing powder. Once they were embossed, I thought the colour wouldn’t really match, and was ready to try another colour, when I decided to shade the squares with the same two distress inks I had used on the background.

These two inks took away the glare of the white card and matched the background well, but I still inked the edge of these with the darker ink – Walnut stain – so they stood out as little more from the background. This meant I also didn’t have to use a piece of card as another layer.

Then how to add them so they were even and square in the card base…..I used a square Sue Wilson stitched edge die that was 6 inches square, stuck it to the background centrally, and then just stuck the squares in the corners…..talk about thinking outside the box!

I added this onto a brown/Kraft 8 inch square card, and liked the whole monochrome and vintage effect it gave. I was thinking of adding some embellishments of some sort, but decided to leave it as it was. To say the card quite quick and easy to make, I do like the overall effect it has given. Even using the brown inks doesn’t make it drab at all, and I have tried to take a photograph showing how shiny the embossing powder is.

JUGS Blinkie

Blog badge

Ink and sketch


I have waited a few weeks to play with the new additions to my crafty stash. I like Lawn Fawn, and I also like the way a lot of their dies co-ordinate with each other – the same curves, same width of die, and the possibilities for using them individually or together.

My usual crafting style has changed – I don’t have a ‘usual’ style now. I’ll have a go at anything – as you can see from my previous posts.

On this particular card, I saw the sketch from ‘Just add ink’ and immediately thought of my Lawn Fawn sets which included the houses and the road. I was going to add some trees behind the houses, but decided against it.

I used a base of the water colour card from Crafters Companion, and inked my sky and my grass. I added some water to the card to make the ink spread a little easier – I don’t have the patience to wait and wait and ink and ink. I found adding just a little water made the inks spread easier and faster. I used Tim Holtz distress inks – three blues, and three greens for the grass from Altenew. Both of those inks are an absolute pleasure to work with – whatever the crafting you are doing. They blend well, and are very forgiving. I splashed some water onto the background for a more mottle defect, but found the water colour card had a texture to it which I also liked, so left it possible to see that texture through the inks.

The houses were from Lawn fawn ‘Little Town Border’ and the road was a ‘Road Border’ lawn cut. This die has the middle holes cut into it, and I added some yellow card hind it from the accompanying die to create a more dimensional road with a middle line. Thinking on it now – why did I use yellow? Our middle lines are white…….oh well! Creative license!

The sentiment was stamped combining two sentiments from Altenew ‘Birch Land’ stamp set, curving it slightly as I didn’t want any straight lines. I inked that piece up with some distress inks, but in hindsight, I’m not sure it that works or not……

I added the water colour card to a green layer, then a white top folding base card.


Lotus layering

20170308_180601

On arriving home from work I thought I would have a little focused play with a set of layering dies. I have used them before, but decided to play a little more. The inspiration for this card came from another challenge – Make my Monday weekly craft challenge.  The challenge is to use at least three of the colours of the rainbow listed – red, orange, yellow, green, blue indigo, violet.

I decided to go with blue flowers, and only used two layers of the lotus stamps, along with green for the leaves. I wanted them to hang over the edge of the white card, as some flowers do seem to go wild (not lotus flowers, I know, but here is my creative license). I was wondering what to do with the other colours, as I didn’t want to create a lot to go with the flowers, and was considering stamping the sentiment in one of the other colours, then my eyes fell upon a little bee that I had stamped and coloured for another project. I thought the little bee could add the yellow, and add a little quirkiness to the card. Therefore, I have used blue, green and yellow. Hey presto. Sorted.

Then to decide what sentiment, in what colour. Should I try another of the colours? How do I tie it all in? Again – as I don’t really clear my crafting desk away completely (who does?) –  I saw this sentiment from the Altenew set of the same name. I decided to use it as the challenge had inspired me to create the card, and decided to stamp it in blue. The blue I used was actually a mix of two blues, both from Catherine pooler – Something Borrowed and Fiesta Blue. Each of them didn’t work alone, but when I inked with one, then the other it seemed to tie in quite nicely, I thought. Then a blue base card.

Compared to my previous couple of days crafting with mixed media, very little adrenaline, no fear, just all seemed to work.


Photo challenge

I have been having another play with layering stamps. Yet again. Trying to get my layers right, trying to get the colours right. Deciding if I want to use all the layers available, or only some of them. Do use black as an outline? Do I use a stronger toning colour? All the choices – which is probably why I struggle with them so much.

For this card, the inspiration was from another challenge blog. This one is called ‘Just Us Girls’ challenge 382. A photo challenge, with a gorgeous growth of red tulips, snow, and some green grass.

I decided to use my Altenew Lotus stamp set and matching die set. I used the die to cut some masking shapes so I could stamp the leaves as though they were coming out from under the flower. I only used two of the layers, when there are three for the two variations of the lotus, as I couldn’t match the reds so well with all three layers. The base colour is from Altenew ‘Red Cosmos’ collection, with the second deeper red is actually from Catherine Pooler inks – ‘Rocking Red’. Even though the flower isn’t a strong deep red, it certainly is stronger in real life than the photos depict.

The main flower I stamped and cut out separately, and layered it onto the small smaller flowers with 3D glue, inserting some of the leaves underneath it. I like the layered effect, though the card is still quite simple.

The sentiment is from another of my Altenew stamp sets, and I am certainly liking the painted effect these word stamps give, and I added a few sequins for some added effect, but did resist using my Spectrum sparkle pen this time!!

The card itself didn’t take long to make, but it did take me at least an hour to play with different colours, the different red inks I have, and having a search on YouTube and Pinterest – and I went my own way in the end. I get frustrated quite easily with layering stamps if I don’t manage to crack to code I mentioned on a previous blog post – and yet I carry on, and on, and on……


JUGS Blinkie

Adore you and smile

After a fairly decent day at work, I wanted to craft and play with some of my starry and shiny water colours.

Once again I have turned to the Altenew stamp set ‘I Adore you’ for a variation on a background. Again I stamped one image several times in Ranger Perfect Medium, and embossed the outline of the flowers with a copper embossing powder. I felt this particular flower had a lot of detail in it, and I liked the way it looked when stamped in different directions.

I also stamped some of the smaller flower/bud images in a couple of places where I felt it needed something extra, or there was too much white space. The flowers themselves I coloured in my Gansai Tambi starry colours to add some depth and sheen, using the white gold shade for  a lighter look which didn’t detract from the copper embossing on the flowers. I decided to change from colouring the background, and instead wanted the flowers themselves to be the centre of attention.

The sentiment is Altenew ‘Half Tone Smile’, stamped and embossed in copper, and cut out using the matching die, and added some sequins which seemed to match the colour tone, and one black jewel for the dot above the ‘i’.

I seem to be enjoying stamping and embossing at the moment, especially creating my own backgrounds, with a simple sentiment. Sometimes a card doesn’t have to say a lot to mean a lot. If you know what I mean.

I’ll be entering this card into the Simon Says Stamp Wednesday challenge, with a theme of Anything Goes.

Hunkydory Layering Flowers

I am a great fan of layering stamps, but it takes me a lot of time to think of which colours, and which tones to use with them. I try to search through You Tube and Pinterest, but my efforts never seem to be anywhere near as good as anyone else seems to be able to do. I use the same stamps, the same inks, try water colour card, try stamping card – never turns out brilliant – only ‘OK’. And yet I persevere…………or is that being obstinate? Pig headed? Stubborn? I think it’s that I will one day crack the code. Until that time, I use the images in a variety of different ways.

This card came from a Hunkydory stamp set a bought a few weeks ago. It’s called ‘Layering Flowers’. The set comprises of two different size of flowers, with three layers for each flower, along with some leaves, and ferns. A lovely set from the ‘For the love of…stamps’ range.

I started by stamping the smaller outline to cover most of the background, and instead of using all three layers for the flowers, I used a very light ink from Altenew, called Buttercream on the base layer only. My thought on this card was for a very simple card, not many layers, and only a hint of colour.

I then looked for ways to fill-in the white spaces, and looked for smaller shapes I could insert quite easily, and therefore turning to my Catherine Pooler sets. She has quite a few stamp sets, and many of them have a lot of smaller elements, ideal for filling spaces in with. I chose this little flower, and stamped it all over the white spaces in the same Buttercream shade. I didn’t want them to show up, really, but just wanted them to add something extra.

For an additional point of interest for the flowers – yes, you guessed it – I used my clear Spectrum sparkly pen. I ‘found’ them again, and now I can’t put them down! The sentiment was stamped onto a piece of white card, and then attached to the card base, and I also added a few small gems in a toning colour.

I like the apparent simplicity of this card, even though there is a lot of detail when it is broken down into the steps taken to make it, and may make a bunch of similar cards for Neurocare, as they have asked me recently for more everyday cards to sell.