Hug Me!

20180122_221422

Good evening everyone. I have a little card for you today which I have been thinking about for a couple of days, and just this evening have gotten down to doin’ it.

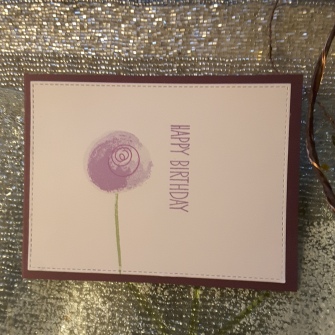
I was inspired by several challenges again. I die cut the main image in a post-it note, stuck it to the card base, placed the Stampin Up stencil over the top, and used the three red/pink colours from one of the challenges below. I then moved the stencil a little, and inked the same three colours again. I did this to create a kind of ombre look……

After stamping the main image, I coloured him in using my Faber Castell pencils, again in three different red/pink colours. I tried a little blending, but I don’t think the card base was that suitable for this technique – but it doesn’t look toooooo bad, I don’t think!

I then stamped three individual hearts along the right hand side, in the three different coloured inks I used. No reason why I did that, just thought I would as I saw them sitting there in the same stamp set.

As I was going down the clean and simple route again, I judged my card as finished at that point – it would have been so easy to add bits here and there.

Anyhoo – here are the challenges I will be entering:

Paper Craft Crew Challengedeep red, light pink, reddish pink, neutrals white and black

Moving Along With The Times Clean and Simple

Simply Less Is More Clean and Simple and cute, one layer card

Addicted to CASombre


Multi-cards

Hello everyone. I have been in my craft room all day, to try and get away from the fact we had to put one of our beautiful cats to sleep last night…..it has been quite therapeutic, and it managed to let me recover – somewhat – for the odd few minutes.

As I have made multiple cards, I have entered them into different challenges, so please bear with me for the organisation of it all….

20180114_155428

This card was made using the Lawn Fawn stitched wood grain backdrop, blending two blue distress oxides, then cutting the backdrop and layering this with the mountains from the Get Yeti stamp set.

Challenges entered into:

Cards In Envywinter chills

Simon Says Stamp Monday challengeuse some blue

20180114_155504
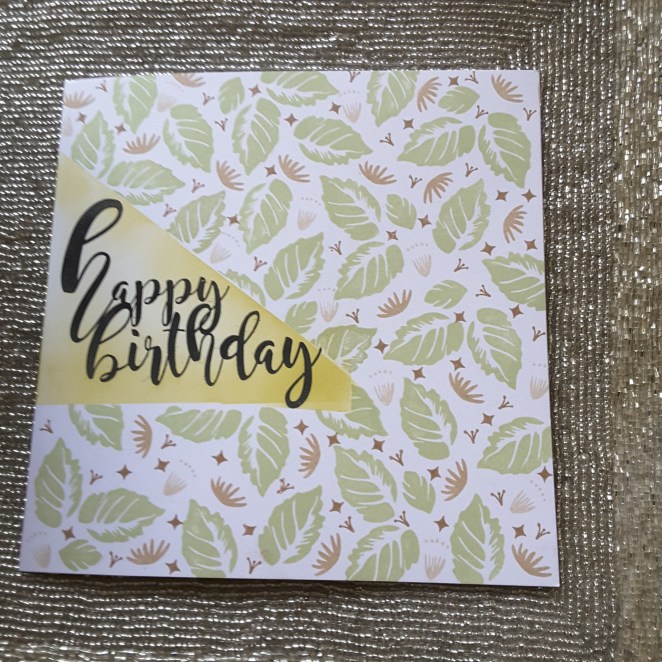
This second card was made using MFT Painted Flowers, and Altenew inks, and will be entered into:

Watercooler challengesoccasions

CAS Colours and Sketches sketch (flipped onto it’s side)

Seize The Birthdayanything goes birthday

20180114_162212
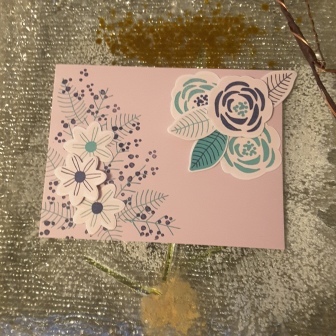
Third card made using MFT More Rustic Flowers and the matching die set. Catherine Pooler Aquatini, Stampin Up Night of Navy, and Altenew pink ink.

Challenges entered:

Color Throwdownnavy, aqua, pink

Fourth and last card:

20180114_155442

MFT More Monsters stamp and matching die set, Altenew inks.

Challenges entered:

Addicted to Stamps and more CAS

CASologyhug

Simply Less is MorePurples

4 Crafty Chicksno blue colour


Only stamping

20171231_120711

Hello again, and a Happy New Year to everyone. I hope the year is off to a good start for you.

I have been in my craft room for a couple of hours, and playing again with stamping and blending. This card was inspired by the current challenge at Inkspirational, with the challenge to use stamping only, and Time Out, with the theme of ‘New beginnings’. I have translated this loosely – a new beginning for someone whose birthday is today……a mixture of a new year for them, as well as a new year for all of us.

I still had my Uniko and Stamps By Me collection on my craft table, along with my Distress Oxides, and this is what I came up with.

The base card is 8 inches square, and the first thing I did was to stamp the ‘Happy Birthday’ sentiment. The same sentiment as yesterday, quite large, and I wanted it to be the focal point of the card.

After stamping in Versafine Black Onyx, and heat setting it in clear embossing powder, I then set about stamping my leaves etc for the back ground. I did set off originally with only stamping around the sentiment, masking it off with some ‘post it’ notes, but I carried on stamping and stamping until I had covered most of the background – large leaves first, using an Altenew green ink, and the leaves from the new Uniko ‘Pure Florals: Rose’.

I then took some smaller stamps from Uniko ‘Originally Organic’ and a small star from ‘Reach for the Stars’ – also Uniko – to fill in the spaces. For this I also used some brown Altenew inks.

Once I had completed the background, I felt the sentiment was a little too open and stark, so I masked the area around it and went in with my Distress Oxides, blending to leave the centre of the word a little brighter. I think I used Twisted Citron – or it could have been Fossilised Amber……! Hmmmm – does anyone else forget what they used when they are all on your craft table? :)


Masculine?

20171231_120701
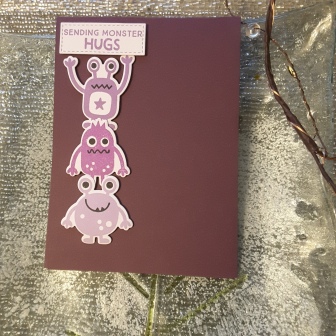
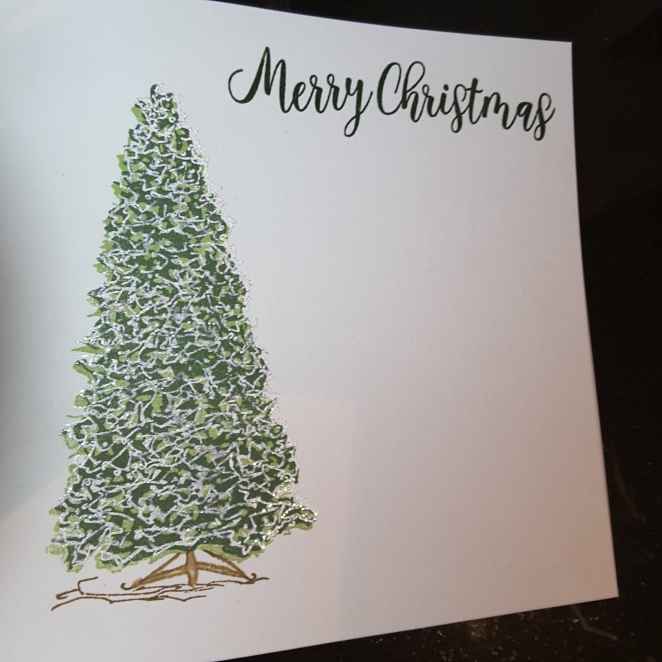
Hi there. I’ve managed to sneak some card making into today – whilst hubby out golfing! I concentrated on stamping instead of die-cutting, using a couple of Stamps By Me sets, and Altenew inks.
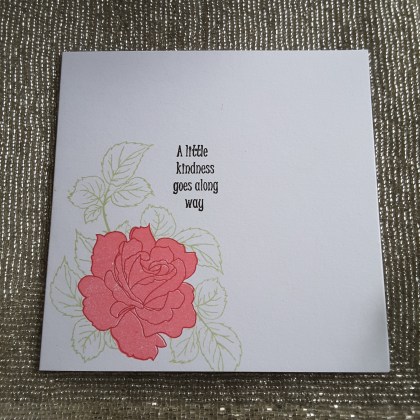
This is a one layer card, and meant to be more masculine. I stamped the ‘Watercolour Flower’ in Versafine black onyx, and heat embossed in clear. I then used the smaller ‘blotch’ in the stamp set to cover the individual flowers, and even the same blotch to cover the leaves. I was going for a rough and rugged look, not necessarily water-coloured, but definitely outside the lines.

I then stamped the larger blotch, once in brown and then again – on the top – in the green. I did this basically as the first stamp didn’t really cover well – a large solid stamp, so I went back in the with same green I had used on the flowers. I like how the big blotch turned out, actually, and I think it brings the card together.

The sentiment is from Stamps By Me – a big and bold sentiment – required for such a large card.

The inks were from Altenew, using a combination from their green and their brown colours, working and toning well, and not being careful about the placement of the blotches on the flowers. I used a couple of the brown colours, but only one green colour.

The hardest part? Placement. Does anyone else agree that is difficult? When you are filling a card, it is a little easier, but when I’m trying to leave a lot of space – well – those stamps are placed everywhere before I make a decision. Sometimes I don’t make a decision, and make several cards with the same kinda layout, different sized cards, even different colours – as I did yesterday.

I hope you all have a fabulous evening, and I hope to see and hear from you next year! :)

I shall be entering the following challenges:

Altenew December challengeusing challenge from August 2017 as inspiration

Stamplorations December CAS challenge

Watercooler challenges – anything goes masculine


Uniko Rose

20171230_132448 (1)

Hello everyone. I hope you have had a good few days celebrating, and taking some time for yourself. This is the first time I’ve had time to craft since before Christmas. A busy time for us all, I know.

This card is for the current CASology challenge, and Simon Says Stamp challenge. A simple layout – but it did take me a while to settle on the size and shape of the card, and where to stamp each element.

Here are some of the other examples I made:

This stamp set is one bought from when I attended the Uniko craft retreat earlier in December. The stamp set is quite large, and comes with two different size roses – outline and infill, with buds and leaves, and even sentiments.

I used Altenew inks and stamped the rose, then masked it off to stamp the leaves, so it looks like they are underneath. I did think of colouring the leaves, but I like the effect of leaving them with just the outline, as it gives a more open feel to the card.

The sentiments are from a ‘Stamps By Me’ set I have had for a while, and suited the CASology challenge cue card – ‘kindness’.

I know it’s a short and quick posting today, but at least I’ve managed to do some crafting.

I wish everyone the best for the New Year. Best wishes – Lynda :)

Uniko Christmas Tree

20171211_110934

Hello everyone. I can’t believe it’s been two weeks since I posted to my blog. My goodness – time flies! I cut down my working days from 5 days to 4 days, and I seem to be even busier. Maybe it’s the time of year, and social occasions going strong.

I have been crafting and making some complicated Sue Wilson-type cards for family and then decided I needed some simpler cards as I seem to be falling way behind in making them.

I also went to the Uniko retreat in Stockton-On-Tees last Saturday. It was a great day, spending at least five hours playing with Uniko stamps, plenty of inking plenty of playing, and plenty of chat and coffee – my ideal day. Thanks Bev. :) :)

This tree stamp set is one I bought that day. I love the simplicity of the tree, and I find it is quite elegant.

I started by stamping the front tree in a red Altenew ink, masked it and stamped the green trees. I then added the sentiment from another Uniko set, stamping it in black, then heat embossing it with clear embossing powder.

I thought I’d photograph it with the snow in the background. It may not be a lot of snow compared to other places around the world, but it does seem to impact on travel in the UK quite quickly.

I shall be entering the following challenges:

Aud sentiments challengeChristmas and sentiment

Hand stamped sentiments photo inspiration (trees and colours)

CAS on SundayCAS Christmas

Alphabet challenge‘T’ for trees

Uniko challenge Christmas


The blue’s and silver


20171118_171838

Hello again. I have been having a little more play with my marbling layering stamp set from Waffle Flower. I really like messing with the positioning of the stamps, and trying to follow the guide from their web site…….but it doesn’t really matter of you get it out of alignment. Well, I don’t think so, anyway.

I took the colour inspiration from Color Throwdown – dark blue, light blue, and silver – to create this version. I think it looks quite ‘icy’ and clean with these colours. Both of the blue colours are from Altenew, and stamped fairly neatly together, then I went in with some of the smaller stamps in the set – not the stand-alone ones, either – and filled in the gaps.

The darker blue I lined-up with their own base set, but also stamped them in the gaps left over. The silver is an embossed silver – some of them the third layer on the stamps, some stamped haphazardly on top of the dark blue, and ………even took three little leaves stamp from the Concord and 9th Blooms fill-in and stamped them in  some gaps, and on top of some of the blue. I think that if you look closely you can make them out.

Any stamp in a storm, right?

The sentiment is from Catherine Pooler. I took a piece of card, placed Be Creative double-sided sticky tape on it, added silver embossing powder, heat-set it, then die cut the ‘Merry’. I don’t think you can heat emboss many sticky tapes – but this one if ideal for things like this.

The shape of the sentiment tag is again from Catherine Pooler.

I shall be entering the following challenges:

Color Throwdown blue, light blue, silver

Crafty Hazelnut’s Christmas ChallengeChristmas with option of blue

The Holly and Ivy Christmas Challengeanything goes Christmas

Aud Sentiments Challenge Bloganything goes with a sentiment

Hidden word

20171110_155901

Hello everyone. I have been experimenting again. I have been playing with my Altenew alphabet dies, and also trying to do a technique – no idea what the technique is called – where the word is cut from the same background, then added back in with dimension…..can anyone help me with the name of the technique?

I used three colours only for the card – Altenew lilac and purple for the ink blended background, and Altenew dark green for the leaves that I stamped. I really like how the colours matched together.

The stamps are from Catherine Pooler, and I just let myself go with the stamping. I had no plan when I started out, and just kept adding smaller and smaller images from the same stamp set to fill in the gaps. I didn’t even use my Misti! (I know…..brave of me!)

The ink and stamps worked well together, so I just made sure before I stamped each one, that there was good coverage. I seem to be enjoying working with backgrounds at the moment, don’t I?

Once I had put the card together I added some sparkle to the ‘XMAS’ letters  as I felt that they didn’t really stand out very much – is this usual for this technique? Is my background a little too busy for this? Hubby couldn’t actually see ‘XMAS’ until I moved the card around, and said I needed to add something around the edge of each letter….hmmm – not sure about that.

I think I’ll try with the word a solid colour too, as a contrast to any background……

I shall be entering the following challenges:

AAA Cardsink blending

Cupcake Inspirationspurple, lilac, dark green

Cards in envyletters or words as focus

Sweet at Sweet Stampin’anything goes Christmas


Blooms fill-in (C&9th)

20171106_15093720171106_150917

Hello there. I hope everyone is having a good day – or had a good day if you are reading this in the evening. I have had this stamp set for a few weeks, and have been playing with different colours, and different parts of the layering. I haven’t added all the layers each time, and if I have done, then I have used more muted colours, to change the whiteness.


I attached to a base card after cutting out a panel with stitched rectangles from Lawn Fawn, but then noticed they are opposite ways up. I don’t think it matters, and actually I like both ways.

All the little individual stamps which make up this stamp set makes it so much fun just doing the one layer stamping. I’ll be trying the matching dies for a different look again, I am sure.

The one problem I did have was making sure the base layer, the solid layer, was stamped fully. I obviously used my Misti for this, but I found that some inks just didn’t want to play, no matter how many times I inked and stamped. The Altenew inks – the large oval inks – seemed to work well, but not really the smaller inks.

I tried different inks, and different card, so I think that you’ll have to use trial and error for this type of stamp set – but I’m loving it all the same.

I shall be entering the following challenges:

Just Us Girls – Thank full

Craftaholics R UsThank you

Here are also some of the other samples and colours I have used, before I put them together and make a card out of them:


Christmas Tree and WOW! powder

20171102_203608

A quick posting for today, showing different ways – using same colours – to stamp the same layering image. I used the Altenew Sketched Evergreen as I love this tree, and the three layers are easy enough to line up, but if you miss slightly – it doesn’t matter.

I used Altenew inks also, and used some WOW! embossing powder for the final layer on two of the cards. I have tried to photograph them, but we all know how notoriously hard it is to get the sparkle and shine easily seen.

The embossing powder actually comes out with a whiteness and sparkle to it, which I liked on the darker tree image, as it gives the impression of snow, I think. DO you?

The sentiment is stamped and embossed with clear embossing powder. On the lighter tree, I stamped in green, then went over it with Ranger Perfect Medium and used the WOW! powder again, but I must have moved the card – even though using my Misti. The embossing came out slightly off-set……..but I actually like it. It created a shadow effect which I tried to reproduce on another card – failed mightily(!!) – but will definitely keep trying to do it again. Happy accident’s, huh?

I did think about a star on top of the tree, or presents underneath the tree, or baubles, but keep it very simple. The embossing powder doesn’t need much else – and is much more effective in ‘real life’.

I shall be entering the following challenges:

Less Is MoreStamp Layering

Crafty Hazelnut’s Christmas Challengeanything goes Christmas (didn’t use the option)

The Merry Christmas Challenge anything goes Christmas

Crimbo CrackersChristmas related quick and easy