Shabby Chic……GDT Craft Challenge

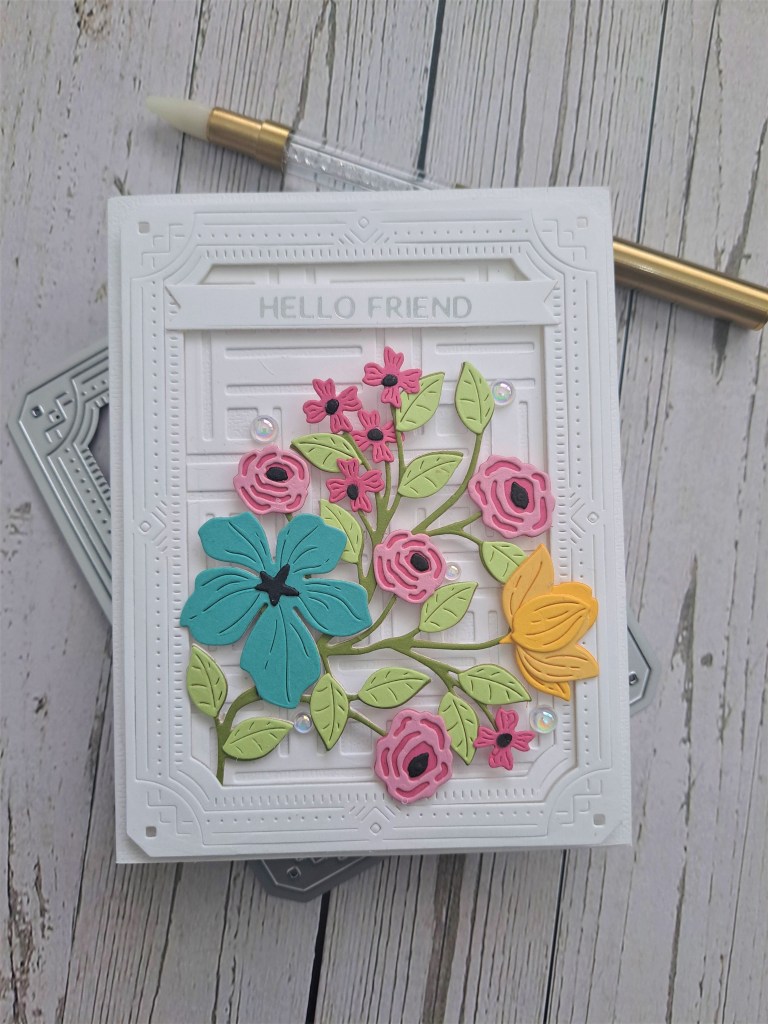
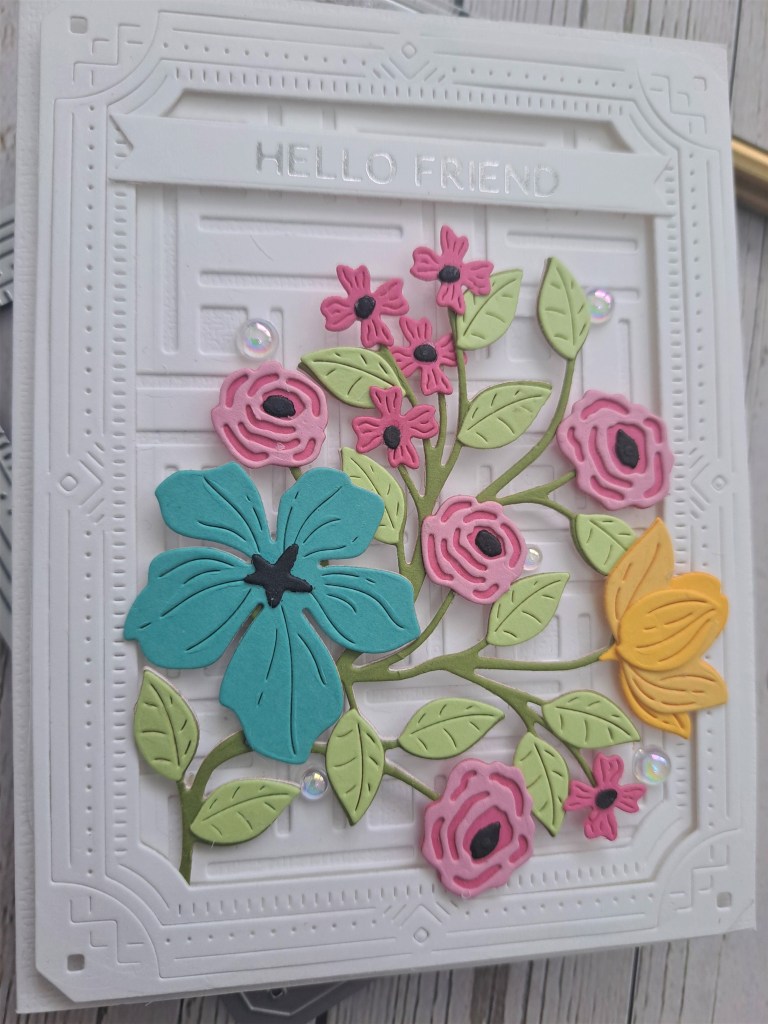
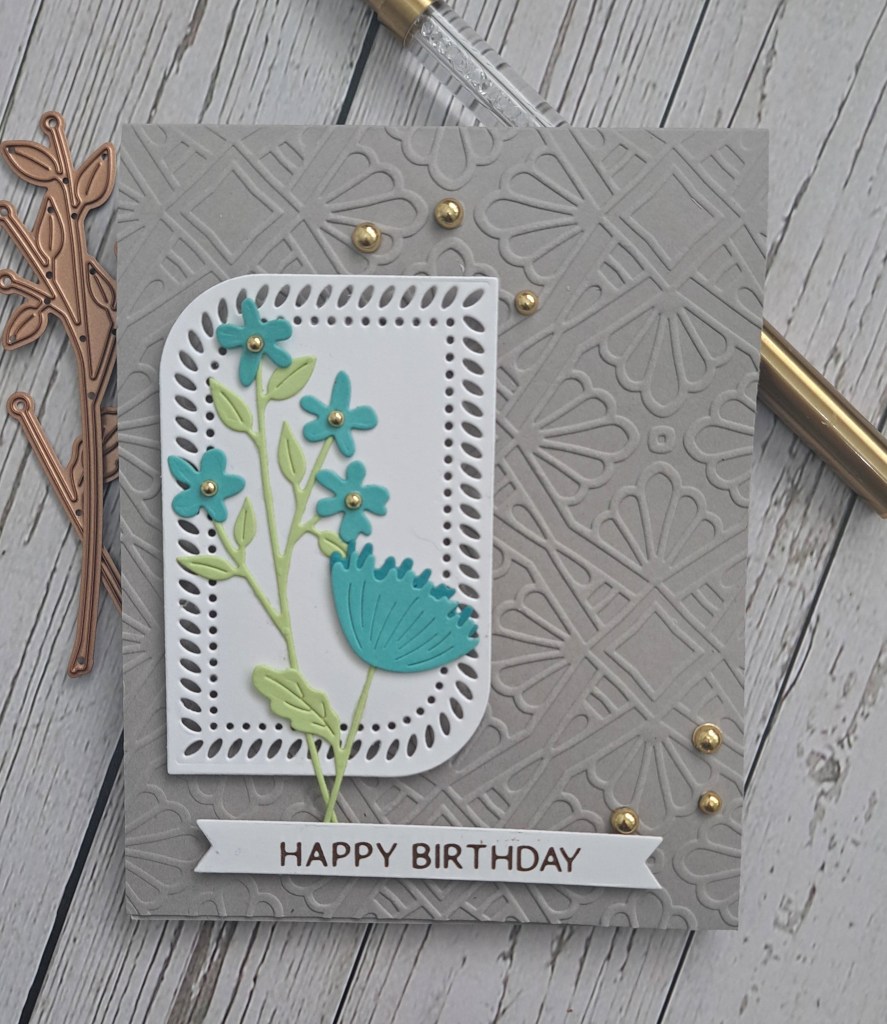
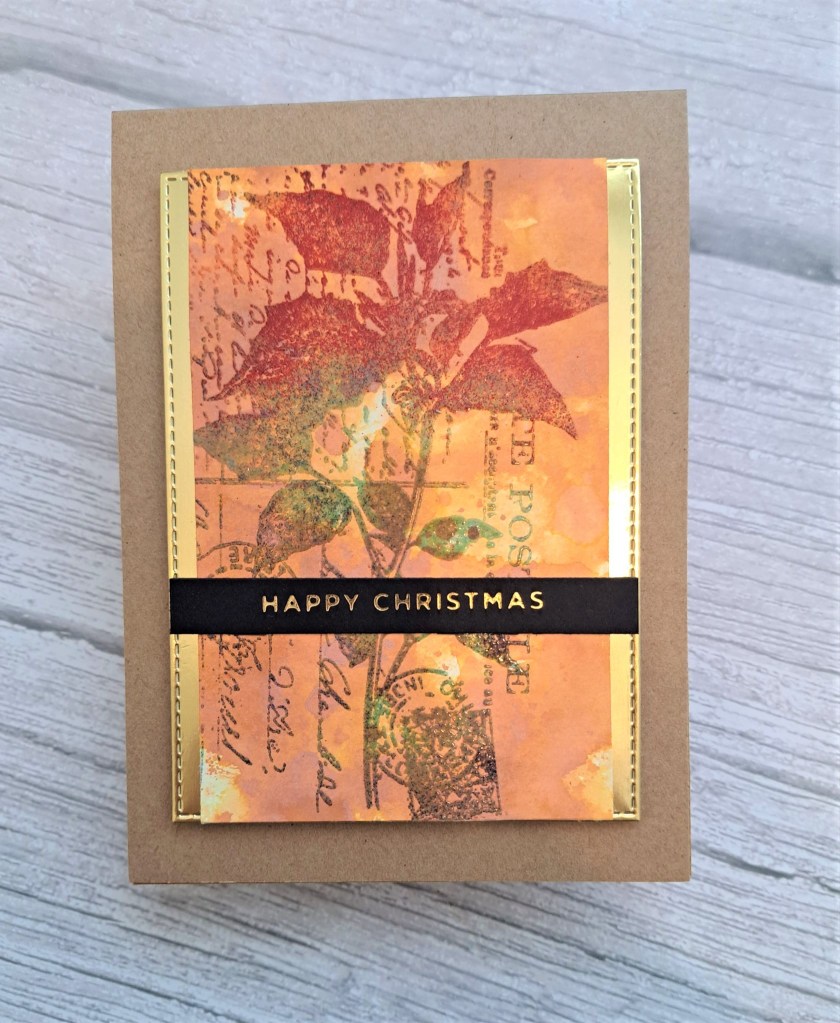
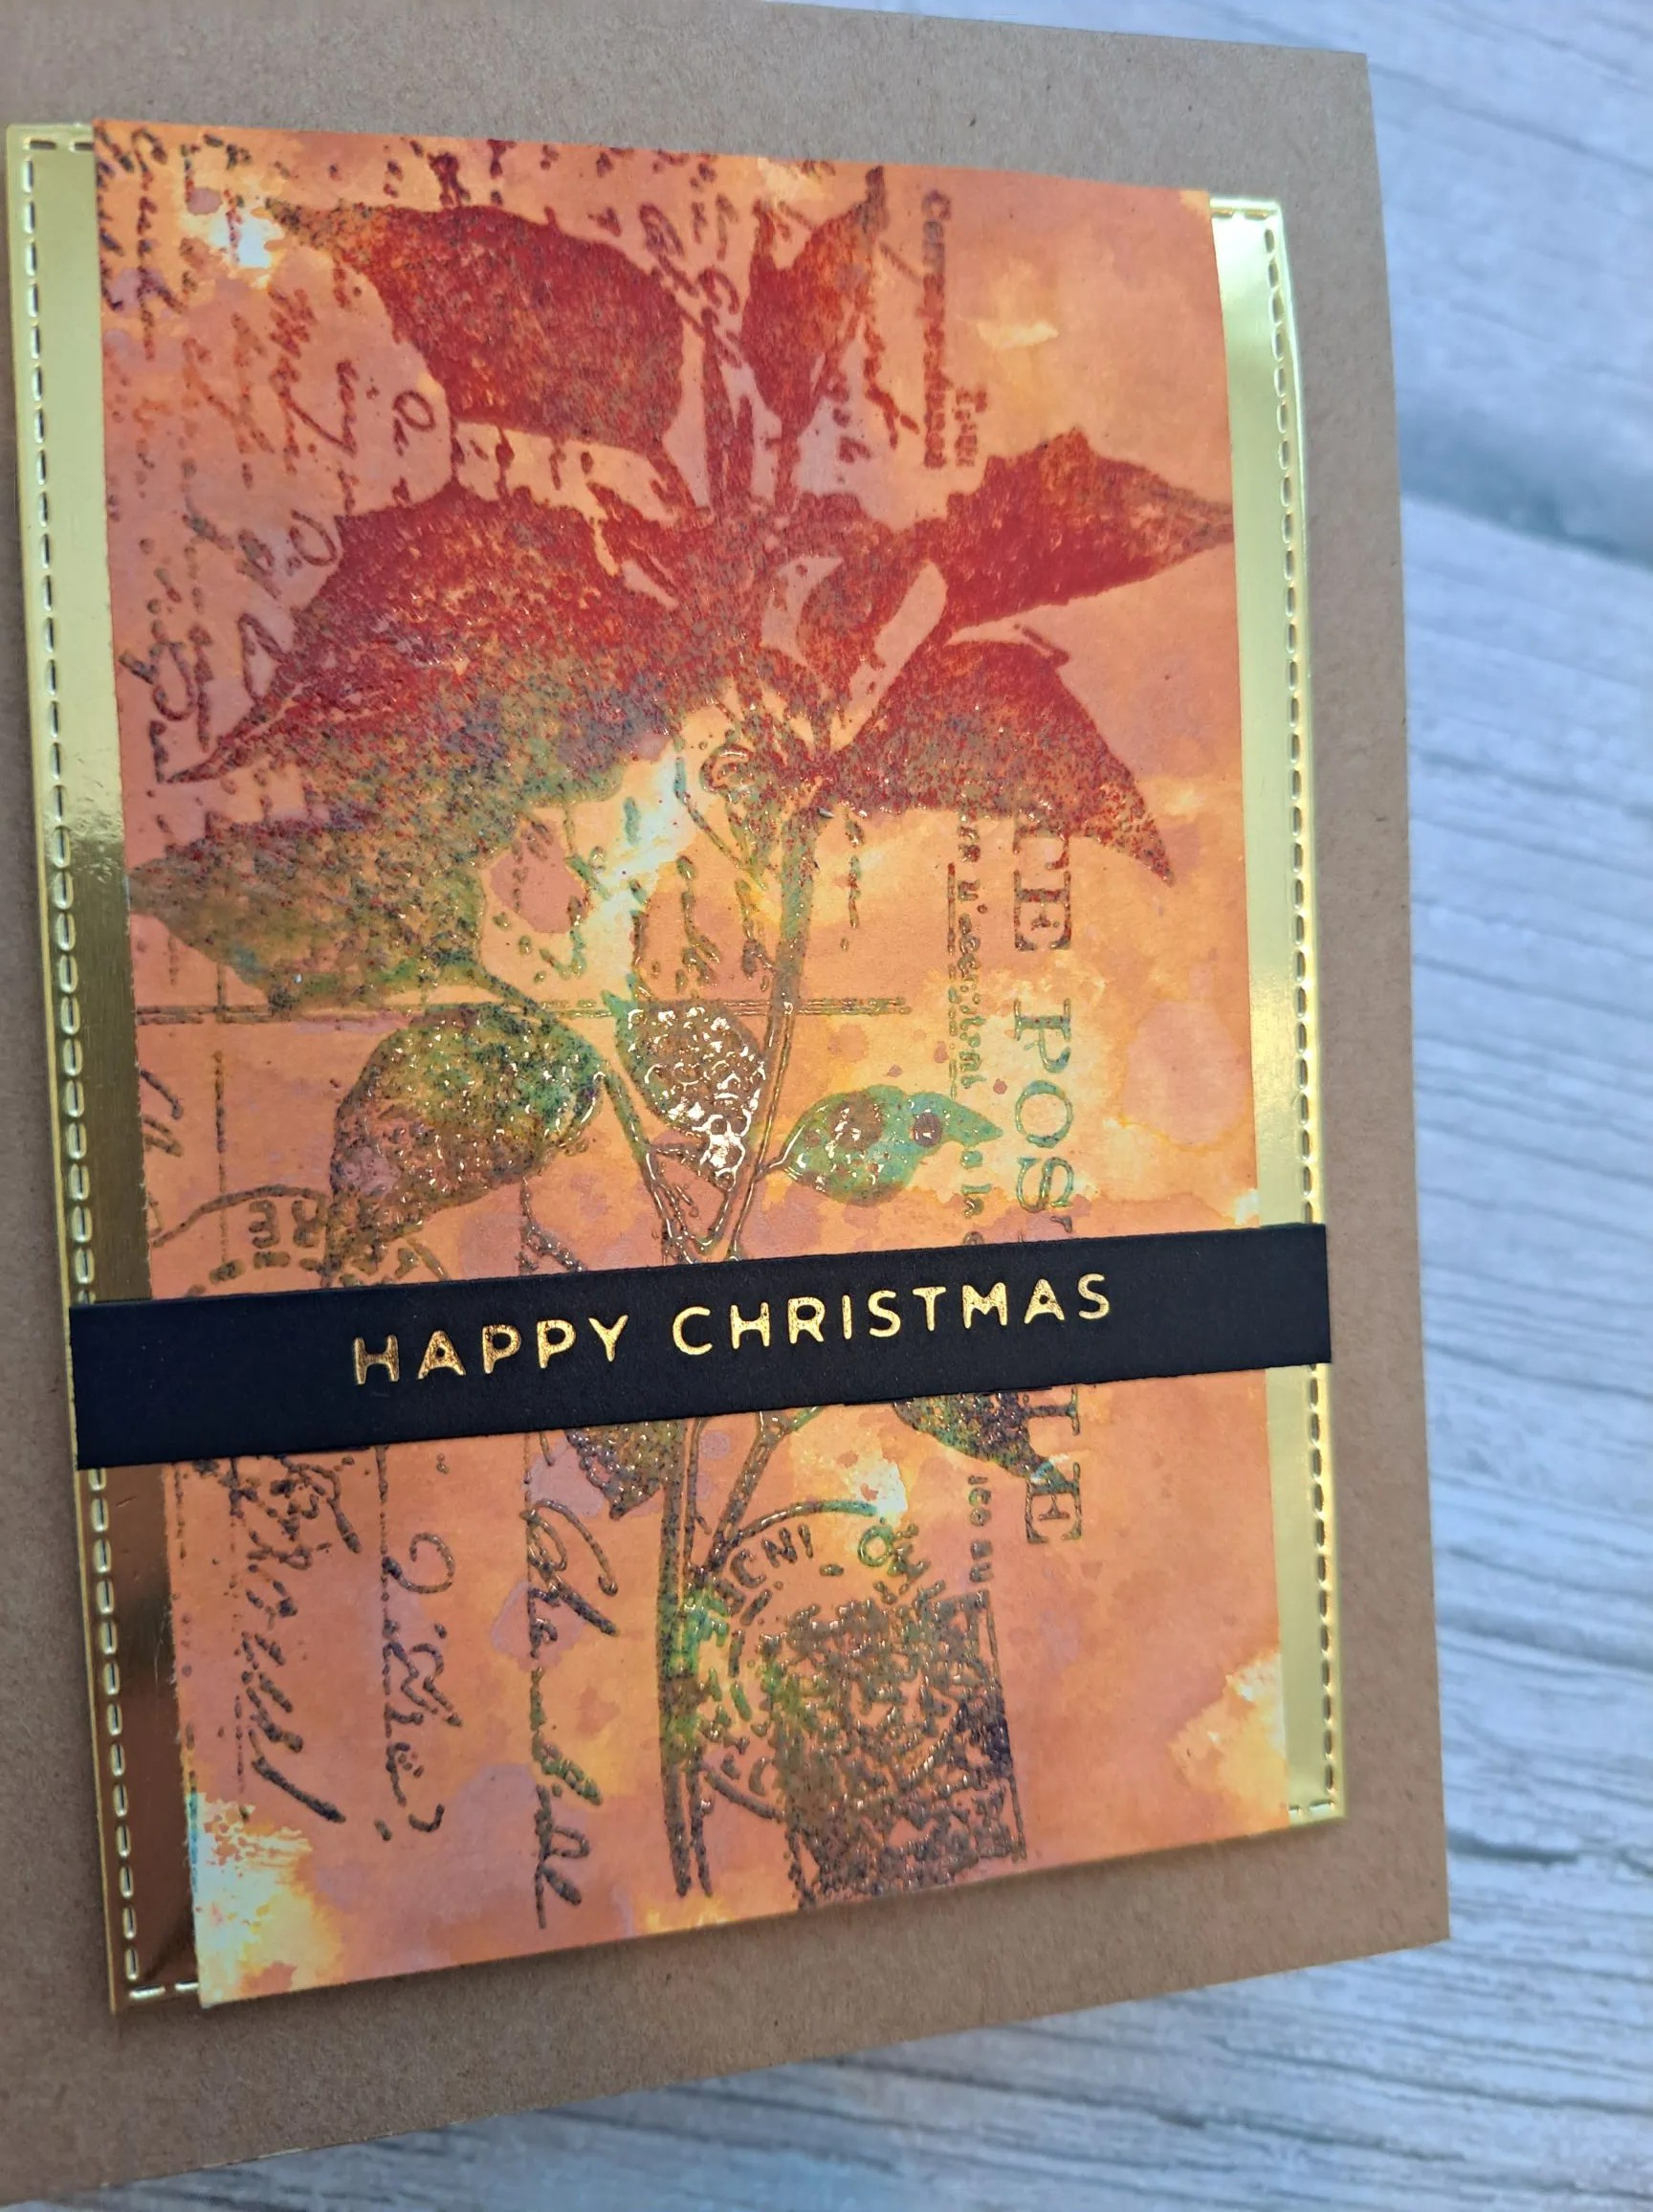
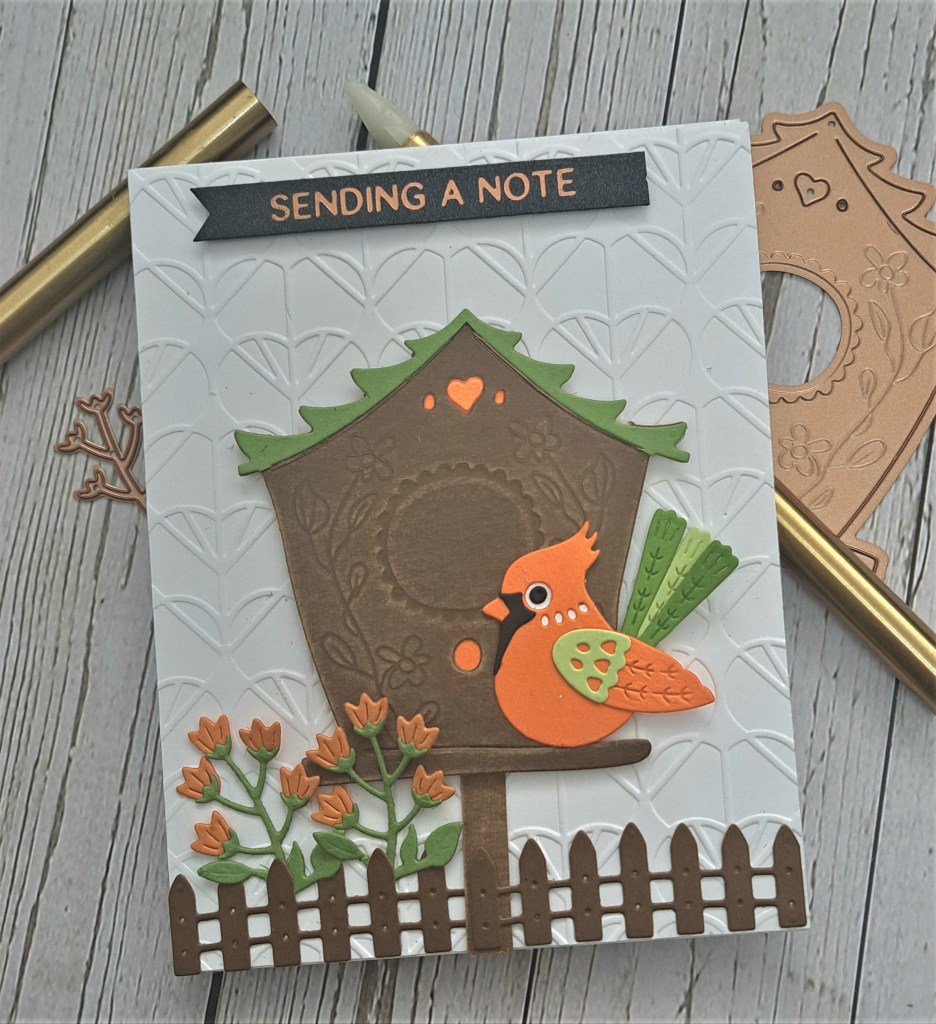
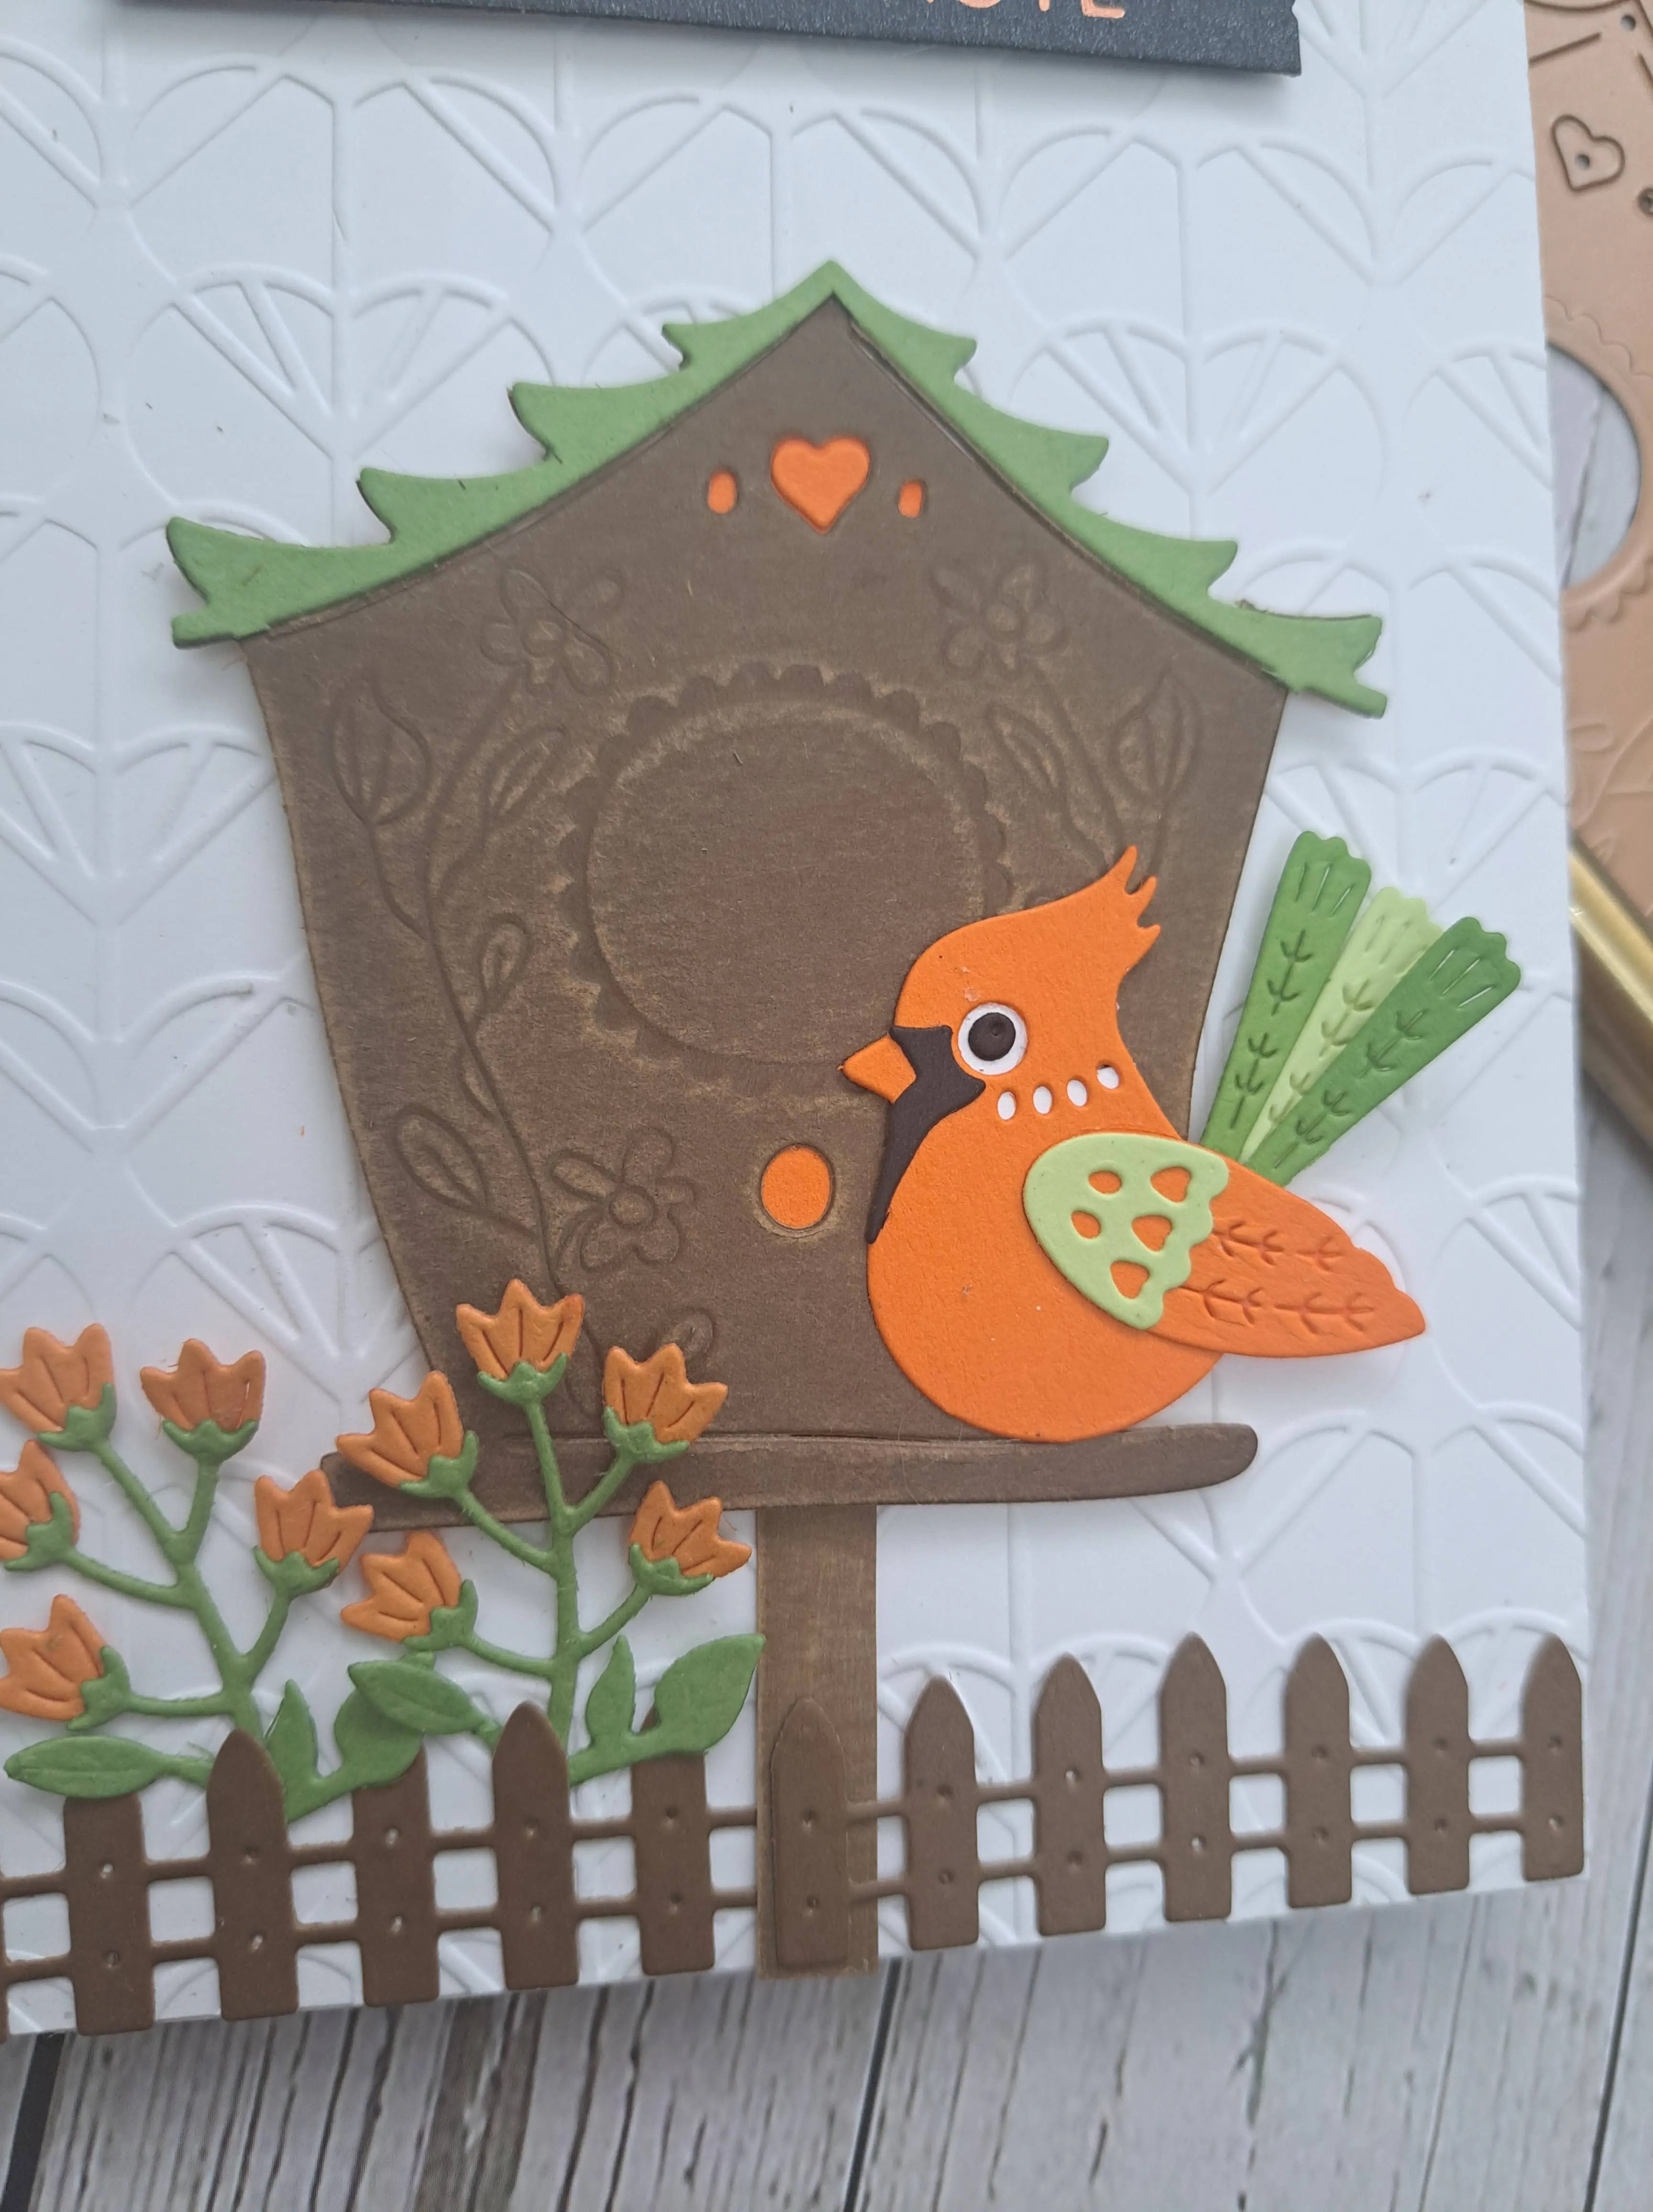
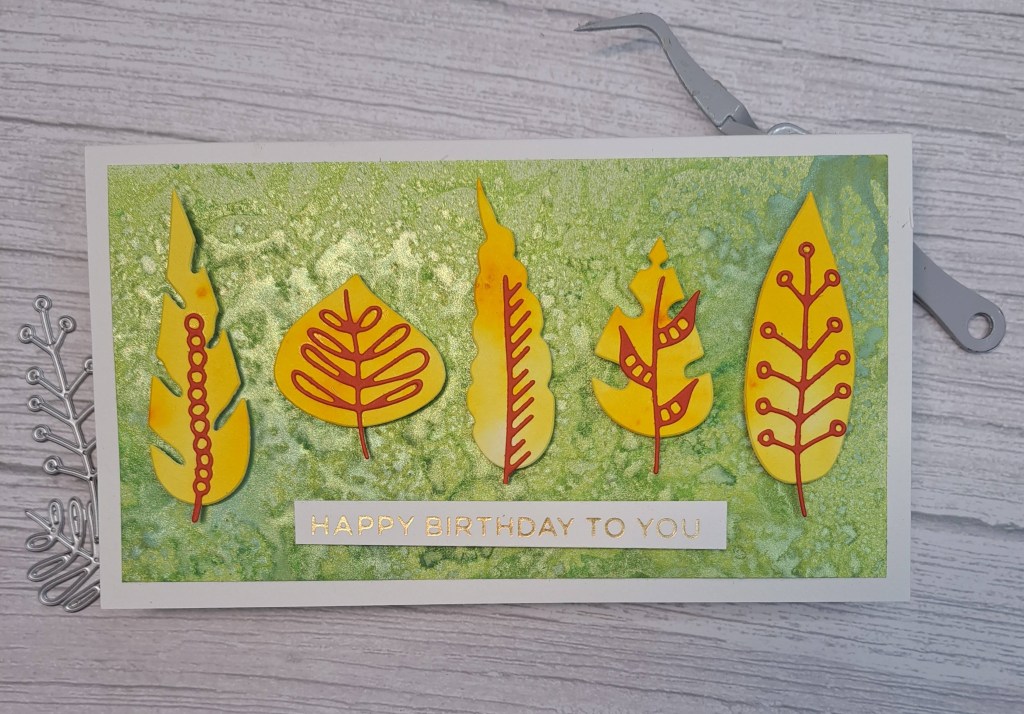
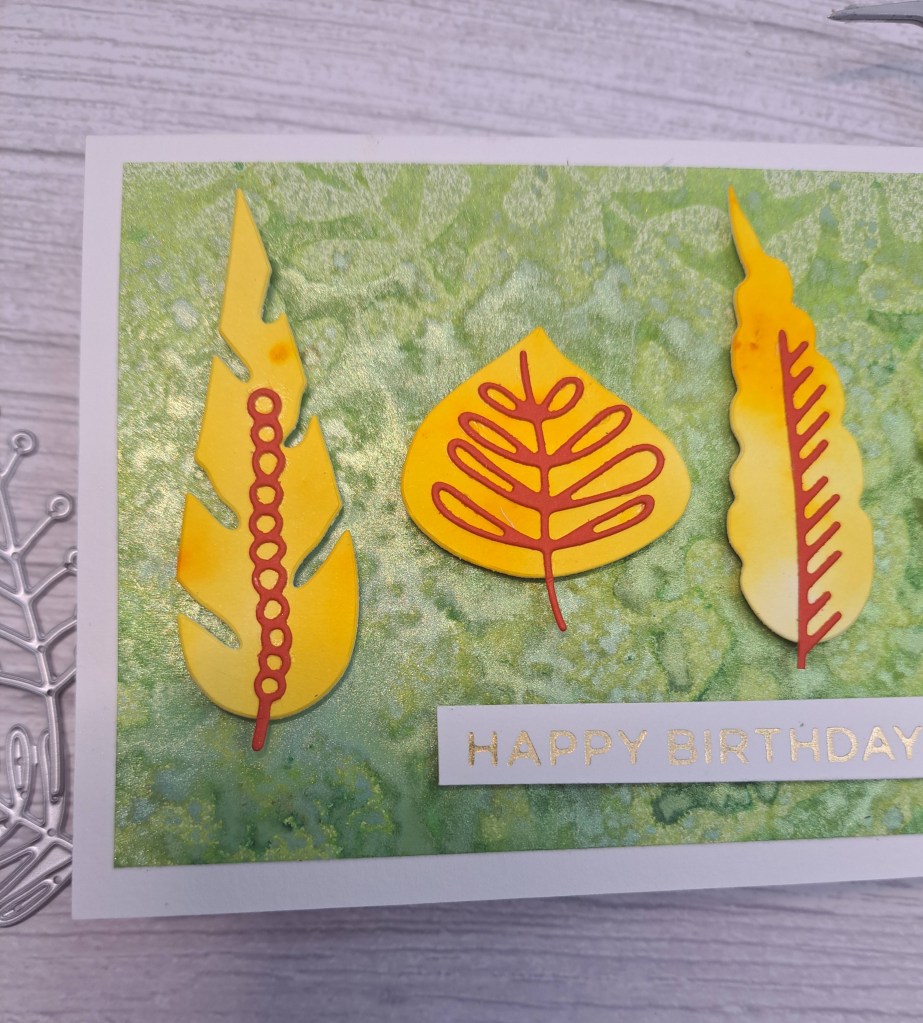
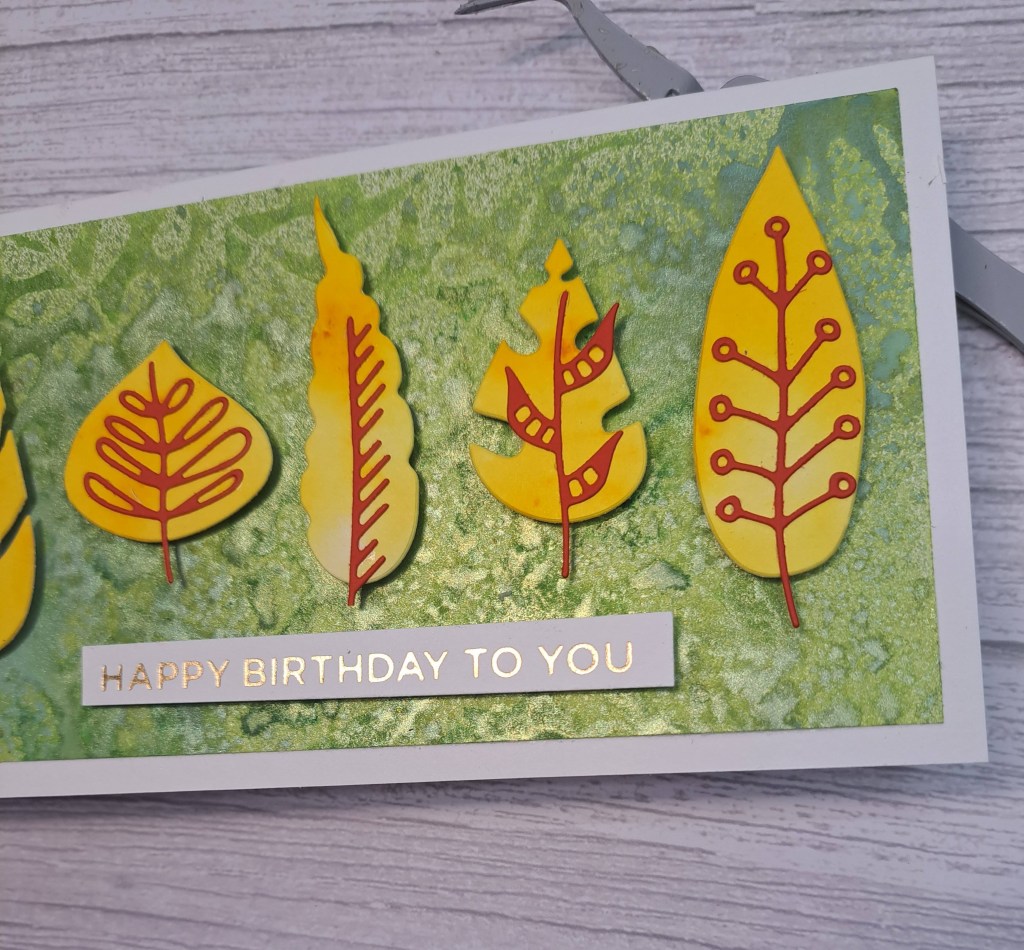
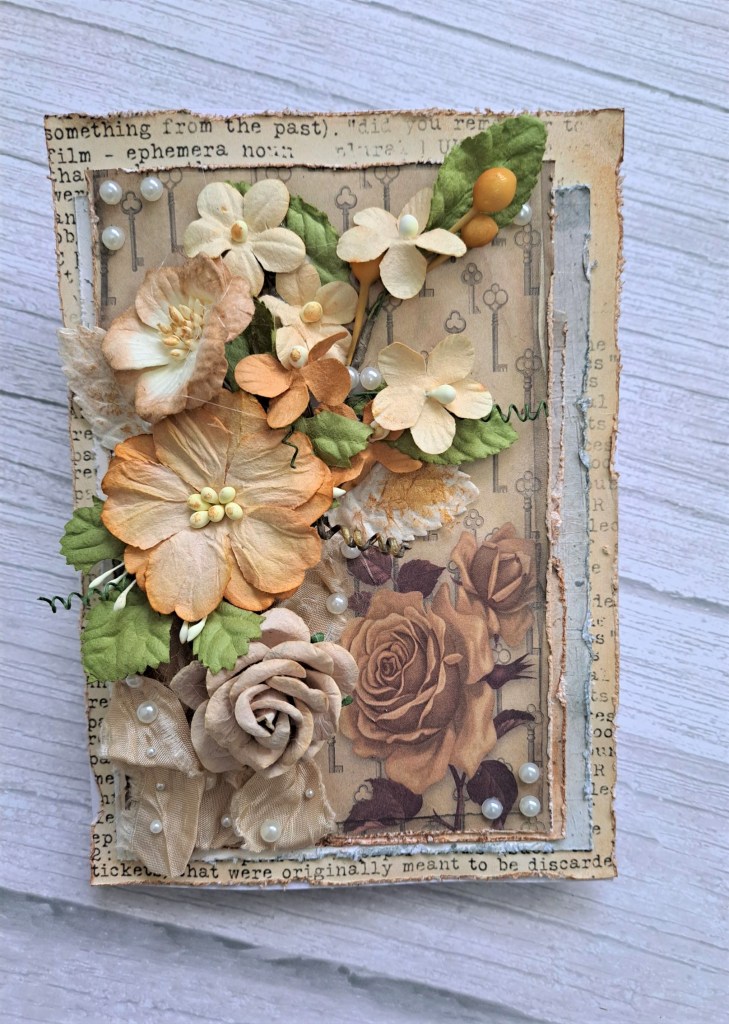
Hello there. I was lucky enough to be chosen as winner of a previous challenge at The Craft Challenge, and invited to be a Guest Design Team member for an upcoming challenge. The challenge theme is ‘Shabby Chic’ – here is my card:

So – I am hearing you ask ‘is this really Loopyloo? Has someone taken over her blog for a day?’ Well – this was certainly a challenge for me – but I’m giving it a go – and I really had fun with this card….

I asked for hints and tips from Jo and the CRAFT Team – and was advised to be posh in a tatty way, some torn paper. I also had a look through Pinterest – quite a bit of research to give me ideas – and then I played….!

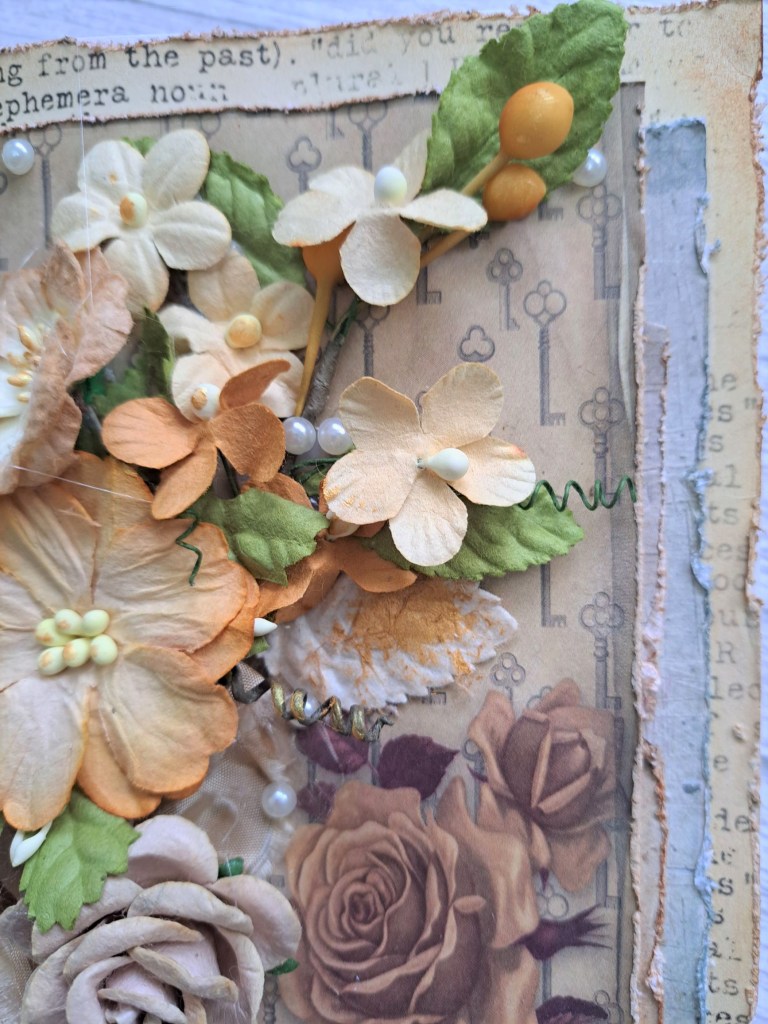
I hunted out some patterned paper, some paper flowers, some pearls, my edge distress tool, and my ribbon.

My card base is 5×7 inches, and I added several pieces of patterned paper, various but muted colours, distressed the edges, inked those distressed edges just a little with some Distress Ink and glued them down. I offset them so you can see the layers, and so that the large rose on the top piece of paper could also be seen.

I found some shabby ribbon which I have ‘stored’ for the past 3 years, and used a muted brown colour as a base for the flowers. Using my hot glue gun I added the ribbon, the flowers – cutting and bending until I was happy with the outcome. I added some gold wax to some of the leaves which I thought were too bright

I found some pearls in varying sizes and attached them with wet glue – dotted them all around the flowers, and onto the ribbon.

I really had fun adding all the embellishments and details. It was a challenge for me – but I think I rose to the occasion…..

I hope you give it a go and join us at The Craft Challenge. xx

I shall be entering the following challenges:

The Crafty Addicts anything goes

Avenue 613 Createanything goes

Creative Fingersanything goes

Beautiful Blossomsflowers

Friendly Florals

A Bank Holiday weekend here in the UK and some time for crafting. I created this card with some recent purchases.

I created the floral arrangement using Concord & 9th card stock ‘Four Petal Thank You’ die set from Spellbinders. Layering flowers and leaf die cuts seem to be my new joy………and a couple of years ago I wouldn’t have gone anywhere near any tiny, little fiddly pieces – now I quite enjoy them.

I die cut the favourite Pinkfresh Studio ‘Art Deco frame’, and die cut the middle out too. I used this middle piece of card with the new purchase from Catherine Pooler – the ‘woven‘ background panel. I wanted to insert this into the frame so instead of cutting the panel out wholly, I just used this inner piece.

The ‘woven’ panel was added as a ‘might as well’ when I was ordering recently, and I’m really glad I did. I think this die will be used a lot – it adds interest when used this way – white on white – and I am sure it will stunning in different colour schemes too – watch this space….!

A white card base, the deco frame adhered with 2D foam strips, the inner die-cut woven piece inserted, the florals added with 3D foam, a foiled sentiment strip and I thought I was done……but no…….I added some iridescent gems because they would pick up the colours near to them.

I shall be entering the following challenges:

Crafts Galore anything goes

Triple Bbirds and/or butterflies and/or blooms

Here Is A place To start anything goes – option trees and/or leaves

Lil Patch Of Crafty Friendsanything goes

Paper Fundayanything goes

My Time To Craftuse die cuts

Beautiful Blossomsflowers

Birthday Florals

Hello everyone. I have created this card for a few challenges:

The card base is in Cobblestone from concord & 9th – a nice light grey colour – and the front half dry embossed using a Spellbinders embossing folder.

I then added the white piece after die cutting with a Pinkfresh Studio die – ready for the addition of my florals.

The die set is from Spellbinders ‘Sealed Wildflowers’ and cut from a light green, then an aqua, and darker aqua layered behind for one of the flowers. The flowers were layered and then attached with wet glue to the white label piece.

I added a foiled sentiment, and then some gold embellishments to the centre of the smaller flowers, and larger gems dotted around the background as you see.

I really do like the way Spellbinders provides layering die cuts for their flowers – so many choices and uses…

I shall be entering the following challenges:

Color Throwdowngrey, aqua, green

Krafty Chicksoccasions

AAA Birthday anything goes birthday

The Crafty Addicts anything goes

My Time To Craft use die cuts

Ally’s Angelsanything goes

Beautiful Blossoms flowers

Have A Sweet Birthday

Hello there. The Alphabet Challenge has reached the letter ‘K‘, and Melanie has chosen the theme of ‘Kitchen – anything related to food‘. Here is my card:

I decided to create a slimline card to allow me to get more images into the scene. The oven, kitchenware and mice are all from Lawn Fawn – stamped, coloured with Copics, then die cut with their matching dies.

The background scene was created with patterned paper for the floor and wall, a strip of black for the granite worktop, a strip of white card for the kitchen units, onto which I layered some stitched squares for the kitchen cupboards.

I added some very small black enamel dots for the cupboard handles.

All the images were added with a mix of 3D foam or wet glue.

I hope you can come and join us following our theme. xx

I shall be entering the following challenges:

Crafty Animals anything goes with an animal

Make My Monday3 images of anything (3 mice)

Craft Rocket animals

Shopping Our StashHot, Hot, Hot (cooking/baking)

Ellibelle’s corneranything goes

AAA Birthday birthday anything goes

Pinspirational birthday and animals

Hello Bee Friend

Cardz 4 Galz has started a new challenge. Sue is hosting and has chosen the theme of ‘cute animals or insects’. Here is my card:

I first stamped the images from Simon Says Stamp, then coloured with Copics, and cut them out with the matching die set.

I die cut the Sizzix honeycomb through a card panel, then die cut it again using the outer and detail die in a light Kraft card stock, and layered that on top.

I played with some orange and yellow Distress Inks and smooshing, and placed this behind the honeycomb, then added all to a card base.

I added the coloured bees and the foiled sentiment, and dotted some sequins around and about for more shine.

I hope you can come and join us with your cute animals or insects. xx

I shall be entering the following challenges:

We Love 2 Createanything goes mixed media (Copics, Distress Inks, foiling, stamping)

Crafty Animalsanything goes with an animal

Creative Artiste Mixed Mediaanything goes mixed media (Copics, Distress Inks, Foiling, Stamping)

A Perfect Time To Craft anything goes

Crafting Happiness anything goes

Creative Fingersanything goes

Ally’s Angels anything goes

Messy Play Poinsettia

Hello once again. The Holly and Ivy Christmas Challenge has started a new challenge – anything goes Christmas/Festive. Here is my card:

I used a few techniques for this image, having a little messy playtime in my craft room.

The background to the poinsettia is from a Distress Oxide ink smooshing session. I seem to have a lot of inky backgrounds from playing around with the inks and oxides which I must try and use at some point….

Onto the ink smooshed background, I stamped the Tim Holtz poinsettia image. This was stamped in embossing ink, then I added pinches of Distress embossing powder onto the image (a technique I’ve wanted to try since seeing Tim Holtz demonstrate it) using a red and a green embossing powder, then heat setting.

I added a gold layer then as I felt the panel was looking quite vintage, I placed onto a Kraft card base.

The foiled sentiment was added as you see.

I hope you can come and join us. xx

I shall be entering the following challenges:

We Love 2 Createanything goes mixed media

Most Magical Time Of The Year anything goes Halloween or Christmas

Creative Artiste Mixed Media anything goes mixed media

A Perfect Time To Craftanything goes

12 Months Of Christmas anything goes Christmas – option of stars not taken

Beautiful Blossoms flowers

A Tweet Note

Here is a card I created using several Spellbinder die sets:

The background is dry embossed using a Spellbinders embossing folder, and adhered directly to the card base.

The bird was assembled – the die set is a cardinal but I have used artistic license here – and all the other elements die cut and assembled.

I used Concord & 9th card stock – the bright orange is the good old ‘Marmalade‘ card stock, which they aren’t making any more, but I happen to have a little secret stash. The slightly duller orange is the new ‘Clementine‘ – which is a lovely orange, just not as bright as ‘Marmalade‘…….

The bird house was die cut from Tim Holtz card stock, and I used the rubber mat to enhance the details of the die – then used a sanding block to distress it, making some of the details a little lighter in colour, and giving the appearance of being a little weather-worn.

All the elements adhered with glue or 3D foam, and the foiled sentiment attached at the top.

I shall be entering the following challenges:

Color Throwdown – green, orange, brown

Cut It Up die cuts – create a scene

CYHTP embossing folder – option of stripes not taken

Allsortsanything goes with a real animal

2 Crafty Critter Craziesanything goes with a critter

Crafty Animalsanything goes with an animal

Craft Rocketanimals

Triple B birds and/or butterflies and/or blooms

Sailing By To Say Hi…..

I was inspired to create this very colourful card by a few challenges.

I don’t often use block colours, no ink blending, no ink smooshing – just die cutting……and this card took quite a bit of working out – not as easy as it may look…..

The boat die set is from Heffy Doodle, and is called ‘Boats & Barns’ and – as the name suggest – you can a boat in varying forms, or barns……

I used Heffy Doodle card stock, some Concord & 9th card stock, and die the colourful layers. I wanted a bright and cheerful boat to go on a very blue water.

Once I had decided on the layout of the boat – where to out the funnel, how I wanted the portholes to look etc – I then used MFT stitched waves dies to create the – erm – waves.

Then I had to decide which wave I wanted the boat to be behind – so many decisions with this card…..which wave to use in which color, at what level to have it, is the boat going to be straight or wonky……? Goodness……..

This card was fun to create without getting messy for once – though I do like to get messy…!

I shall be entering the following challenges:

Cut It Updie cuts and create a scene

Farm Quest boats

Lil Patch Of Crafty Friends anything goes

Paper Minutesno designer paper

Ellibelle’s Corner anything goes

Crafts Galore anything goes

Just Because…..

A little bit of crafty time and this card was created:

I had this bunch of fruit from a Pinkfresh Studio washi tape left over after completing a previous card. The washi tape was placed onto a piece of card and die cut with the matching dies.

The background is a dry embossed hessian design, and a Pinkfresh deco frame added. I played with the frame position a while, before deciding to go with where it is now. You can see it, it doesn’t cover too much of the background up, and the piece of fruit washi doesn’t cover the frame up either – so I placed it centre bottom of the card panel. I like the odd placement.

Once the frame was attached, I added 3D foam to parts of the fruit bunch, attached, and added some sequins which I thought matched the colours.

A previously foiled sentiment to complete the card.

I shall be entering the following challenges:

Daring Cardmakers use some sort of tape – washi tape (Pinkfresh Studio)

Hand Stamped Sentiments photo inspiration

CYHTPembossing folder with option of stripes

A Perfect Time To Craft anything goes

Ellibelle’s corneranything goes

Here Is A Place To Startanything goes – option trees and/or leaves

Paper Funday anything goes – option the great outdoors

Leafy Birthday

I decided to put one of my gel plate backgrounds to use with this card:

The background was created using acrylic paints and a leaf stencil, onto which I also sprayed some Distress mica stain, add some dribbles of water, held the paper up to allow some drippage, and then let it dry.

I notice the mica stain seemed to resist the acrylic paint, so you can still see some leaves in the background.

The leaves are from a new Tim Holtz set, and the yellow parts are from an ink smooshing session, and that panel used to die cut the base leaves.

I decided to use red for the inner leave detail to really make them pop.

The sentiment is a foiled strip.

I am glad I was able to photograph the shimmer and shine of the distress mica stains.

I shall be entering the following challenges:

Simon Says Stamp Monday Challenge happy birthday

Color Throwdownred, yellow, green, white

Lil Patch Of Crafty Friends anything goes

We Love 2 Createanything goes mixed media

Creative Artiste Mixed Media Challenge anything goes mixed media

Crafting Happiness anything goes

AAA Birthday challengeanything goes birthday

Here Is A Place To Start anything goes – option trees and/or leaves taken