Have A Beary Good Day

Hello. I was having a try with colouring pencils again the other day, and decided – with the addition of some Gamsol – that I would try this CAS card:

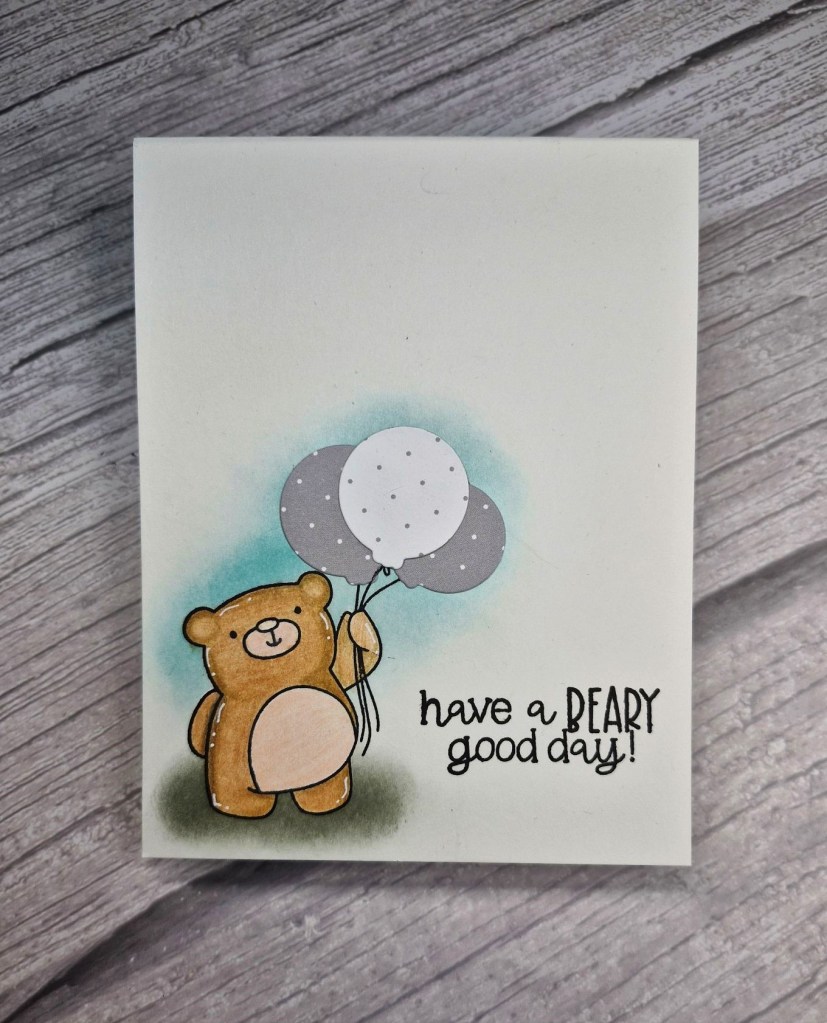
I tend to start out with a CAS idea – then get very confused and add lots of layers and lots of bling – so I am quite pleased with this one.

I first stamped the bear and balloon image (from a stamp and die set from Time 4 Tea Designs) onto a card base, then I stamped the image again onto some masking paper. One of my DT friends seems to be an expert at masking and then ink blending or colouring, so I thought I would give it a go again.

The colouring of the bear was using three Faber Castell pencils, a touch of Gamsol for blending, and done. Though it seemed to take me quite a while – certainly longer than if I used Copics – at least there isn’t a bleed-through onto the inside.

I then cut the mask and placed it over the bear and balloons, ink blended a grey for the ‘grounding’ of the bear, and a light blue for some sky around him.

I was going to colour the balloons, but I remembered this dotty patterned paper, so I cut the balloons from that and adhered flat, then added some white gel pen details to the bear.

No 3D foam or bling anywhere – very unlike me…..

The sentiment is also from the same stamp set.

I shall be entering the following challenges:

Color Throwdown light blue, grey, brown

Lil Red WagonCAS

Crafty Catz Weekly Challengeanything goes – option of monochrome not taken

Inkspirational CAS – option to feature a balloon taken

Creative Fingers anything goes

Allsortsatg – option of feathers and/or fur taken

Dancin’ Gingerbread

Hello. I ma hosting the new challenge at ABC Christmas Challenge. We have reached the letters ‘E’, ‘F’, and ‘G’. The Christmas themes are:

E is for embossing, F is for Faux, and G is for Gingerbread

I have also put a couple of stamp sets for a random winner:

I went with the Gingerbread theme. Here is my card:

The little gingerbread girls are from a Spellbinders die set, and you can make them as is, or you can make them dance. Of course, I made them dance:

I first die cut all the elements, and before gluing together most of the elements.

The background is a hot foiled panel – from Spellbinders – attached with glue.

To assemble the gingerbread so they dance, the head stays in one place. You add 3D foam to the centre of the head, attach the ringed die cut piece to the bodies, place over the 3d foam on the head – and stick that head down…..

Swinging bodies ensue…..

I hope you can come and join us with your Christmas creations following our themes, the Design Team have a variety of inspiration for you. xx

I shall be entering the following challenges:

Peace On Earth Christmas Challengeanything goes Christmas

Lil Patch Of Crafty Friends anything goes

Crafty Catzanything goes – option of monochrome not taken

Creative Fingersanything goes

Ellibelle’s Corneranything goes

Sparkles Forum Christmas ChallengeChristmas with plaid or tartan

Excited Congrats…

Hello again. I have a card to share using some of the products from the recent Pinkfresh Studio ‘Create and Connect Event’:

This floral arrangement is from the ‘Lantern Botanicals’ stamp set, now on general release, but was provided as part of our event kit.

I stamped the floral images four times – minus the lantern at the top of the stamp – in a light ink, onto textured cream/linen card stock. The stamp was left in the Misti so I could stamp again with a darker brown ink after ink blending.

I then used the three layering stencils to colour the leaves and flowers, wondering if I had made an error using the textured card. I did stamp on the smooth side, but as you can see some of the texture came through with the ink blending. I think this gives and almost vintage feel to the images, so I carried on blending all four of them.

Once coloured, I then placed each piece back in the Misti, ensured it matched, then stamped again with a darker brown ink.

These were all then die cut, and extra layers cut and adhered together to create more stability and depth to them.

I used another A2 piece of the linen card, played with arranging the images, then glued them down – snipping the ones that hung over the edge, and adding little pieces if there were any large spaces.

The sentiment was stamped in the same dark brown ink, die cut, extra layers added, then attached to the card:

I added some iridescent gems in spaces. I like how these gems pick up the light, but also the colour of anything around them.

I shall be entering the following challenges:

Color Throwdownpeach, sage green, cream

Beautiful Blossomsflowers

Simon Says Stamp Wednesday Challengeadd a sentiment

Ellibelle’s Crafty Wednesdayanything goes

Die Cut Divas anything goes with die cuts

Here Is A Place To Start anything goes

Vintage Telephone

The Alphabet Challenge has reached the letter ‘Y‘, and Meg has chosen the theme of ‘Yesteryears/Vintage’. Here is my card:

I immediately thought of the old fashioned phones we used to have, and this die set from Time For Tea designs is one I have had for while and never used.

I die cut all the phone elements in several shades of teal, and layered them together. Once assembled, I used a 5 x 7 inch card base to allow for the large sentiment – also from Time For tea Designs.

I decided to use a patterned paper for the background, from Lawn Fawn I believe, and used grey tones to allow the colour of the telephone to be the centre of attention.

I saw a little reel on one of the social media sites which showed how the younger generation has no idea, no clue how to use these old rotary phones, many had never even seen them before……and how often just we pick up the phone to call someone and chat, rather than sending a message or texting…..? I think actually talking to someone on the phone is going to be a lost art form…

I hope you can come and join us with your projects which follow our theme. xx

I shall be entering the following challenges:

Ally’s Angels anything goes

Lil Patch Of Crafty Friendsanything goes

Creative Inspiration Challengeanything goes

Die Cut Divasanything goes with die cuts

Here Is A Place To Startanything goes – option of ‘hip to be square’ not taken

Floral Birthday

Hello once again. Billie A is hosting the new challenge at Cardz 4 Galz, and she has chosen the theme of ‘use some green‘. Here is my card:

I stamped this image from Pinkfresh Studio using a lighter brown ink so it had a soft outline. Once this was dry, I then used all the layering stencils and ink blending to colour the images.

I then die cut this panel to allow for a green layer on the white card base.

Once layered, I added some iridescent gems to the centre of the flowers, and a white heat embossed sentiment.

I hope you can come and join us with your projects which include green. xx

I shall be entering the following challenges:

Ally’s Angels anything goes

Beautiful Blossomsflowers – optional mood board

Lil Patch Of Crafty Friends anything goes

Here Is A Place To Startanything goes – option of squares not taken

Stencil Funanything goes with stencils – option of Easter/Spring not taken

Delivering Warm Hugs

Hello there. The Holly and Ivy Christmas Challenge has started a new ‘anything goes Christmas‘ challenge. Here is my card:

I had fun creating this card with all those die cuts. I have to be in ‘the zone’ when I do this, but I enjoy the process.

The background panel is dry embossing using a Spellbinders embossing folder, and adhered flat to the card base.

The mug, marshmallows and candy canes are from Spellbinders, die cut and assembled with a mixture of glue and 3D foam.

the sentiment is heat foiled, and some silver sequins added for extra sparkle.

I hope you can come and join us with your Christmas creations. xx

I shall be entering the following challenges:

Simon Says Stamp Wednesday Challengeanything goes

CYHTP embossing folder – option of squares/circles not taken

Creative Fingers anything goes

Ally’s Angelsanything goes

Christmas Craft CreationsChristmas with stencils or embossing folder

Jingle Belles Christmas and mainly die cuts

Envelope of Flowers

I was inspired to create this card today:

I used the photo inspiration from the ‘Inspired By…..’ challenge as a starting point.

The background panel is dry embossed using a Spellbinders embossing folder, and cut to the size of the card – 5 x 7 inches this time.

The envelope die is also from Spellbinders, using a couple of sheets from their paper pads, and comes from a pack that creates a 3D envelope, but I cut off the sides and adhered the front to the base of the envelop with 3D foam to allow insertion of the elements.

The flowers are from a mixture of die sets from Spellbinders and Scrapbook and Cards Today, layered as necessary, and using Concord & 9th card stock.

I then played around with the floral arrangement until I had what I wanted, and adhered with glue and 3D foam. I was trying to achieve the overflowing envelope as per the picture, and also used the colours of the flowers to match too.

No added bling on this card, I think there is a lot going on already, and there is a touch of gold from the hearts on the front panel of the envelope.

I shall be entering the following challenges:

The Inspired By Challenge photo inspiration

Simon Says Stamp Wednesday Challenge anything goes

Ally’s Angelsanything goes

Beautiful Blossoms flowers – optional mood board

Die Cut Divas anything goes with die cuts

Hello Friend Wreath

Hello there. I have been absent for a few days as I was trying to catch up with some virtual events I had over the past few weeks. All card making and crafting of course. One of the stamp, stencil and die sets I have used for this card is from the Pinkfresh Studio Create and Connect event:

I first stamped the A2 floral image with a light grey ink using my Misti, and kept the stamp on the lid. I then ink blended using the current colours from Color Throwdown, and the three inks you see in the picture.

The layering stencils – of which there are five for this image – were all used, but I did use different colours on one layer of some of the stencils. I also tried to create some dimension on the same image with the same ink – heavy handed to one side, and lighter hand to the other.

Once ink blended, I replaced the panel back into the Misti, then stamped the image again with a darker colour a browny grey – I thought black would be too stark. Lessoned learned from the Pinkfresh event – stamping again after you ink blended……it is a heart-stopping moment, and I have made mistakes in the past – but trust the Misti, and ensure your panel is in the corner each time you stamp.

The whole panel was die cut with the matching die – which cuts all the elements out in one pass through the die cutting machine.

The background is a piece of Sage card stock from Spellbinders, dry embossed using an older embossing folder from Stampin’ Up, then glued flat to the white card base.

I then used the Fancy Circles die set – also from Pinkfresh Studio – and die cut the large circle three times, die cut the centre out with another of the circles, then layered them together for a more substantial circular base for my wreath. I could have used any nesting circles, but at this point I wasn’t sure if any of the circle would be showing until I had arranged my elements.

The circle was glued to the embossed panel, and the images arranged, adhered with glue, and the smaller pieces tucked in where I thought they were needed.

The sentiment is heat foiled and added as you see, and some green gems glued around.

I do like to attend the virtual events from several companies in the United States, and even though there are added customs charges to some of them, I find the event itself, the instructors, and the way they are organised is something I will keep doing. I have ‘rationalised’ the events I attend though………..kinda……!

I shall be entering the following challenges:

Color Throwdown burgundy, rose, sage

Lil Red Wagon stencils

Simon Says Stamp Wednesday Challengeanything goes

CYHTPembossing folder – option of squares and/or circles

Ally’s Angelsanything goes

Beautiful Blossoms – flowers – optional mood board