Wishing You A beautiful Day

Hello everyone. The Alphabet Challenge has reached the letter ‘Q‘ and the theme this time round is:

‘Quick and Easy’

Here is my card:

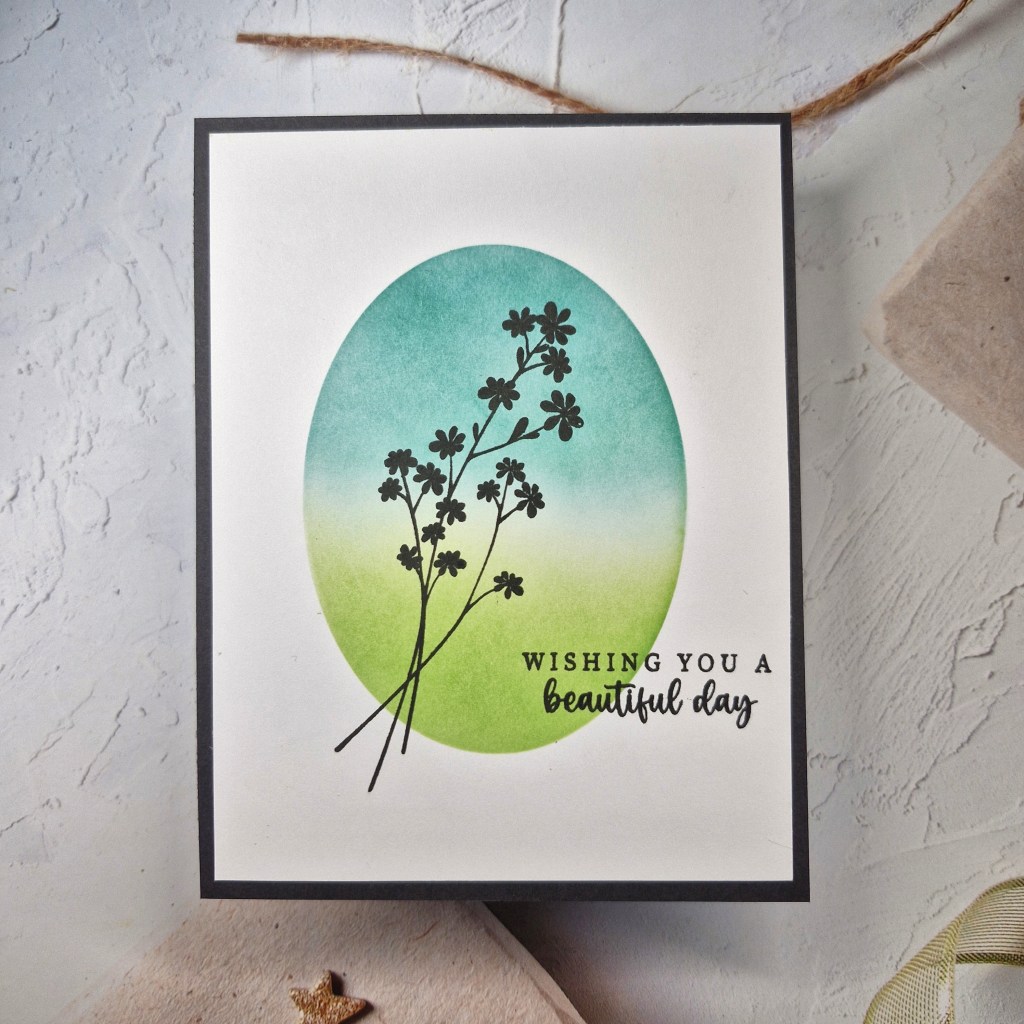
I rarely do what I consider this to be – a Clean and Simple card. I tend to always like layers and dimension, but I do think this is enough. It doesn’t need anything more.

I glued a black A2 sized panel onto a card base. then cut a slightly smaller piece of white card.

Onto this I placed the Gina K Designs ‘Masked Oval Stencil‘ – the outer part, leaving the oval free. I then ink blended a green and a blue – Pinkfresh Studio inks – nice and gently, and softly (I am a heavy handed blender!), and not quite getting them to meet in the middle – or very little meeting anyway.

Once that was dry, I stamped the Gina K designs image, and then the sentiment.

This was then glued down onto the black panel.

I hope you can come and join us with you ‘quick and easy’ makes. xx

Birthday Numbers

Hello once again. The Alphabet Challenge has started a new challenge. Having reached the letter ‘N’, Dawn has chosen the theme of ‘Numbers’. Here is my card:

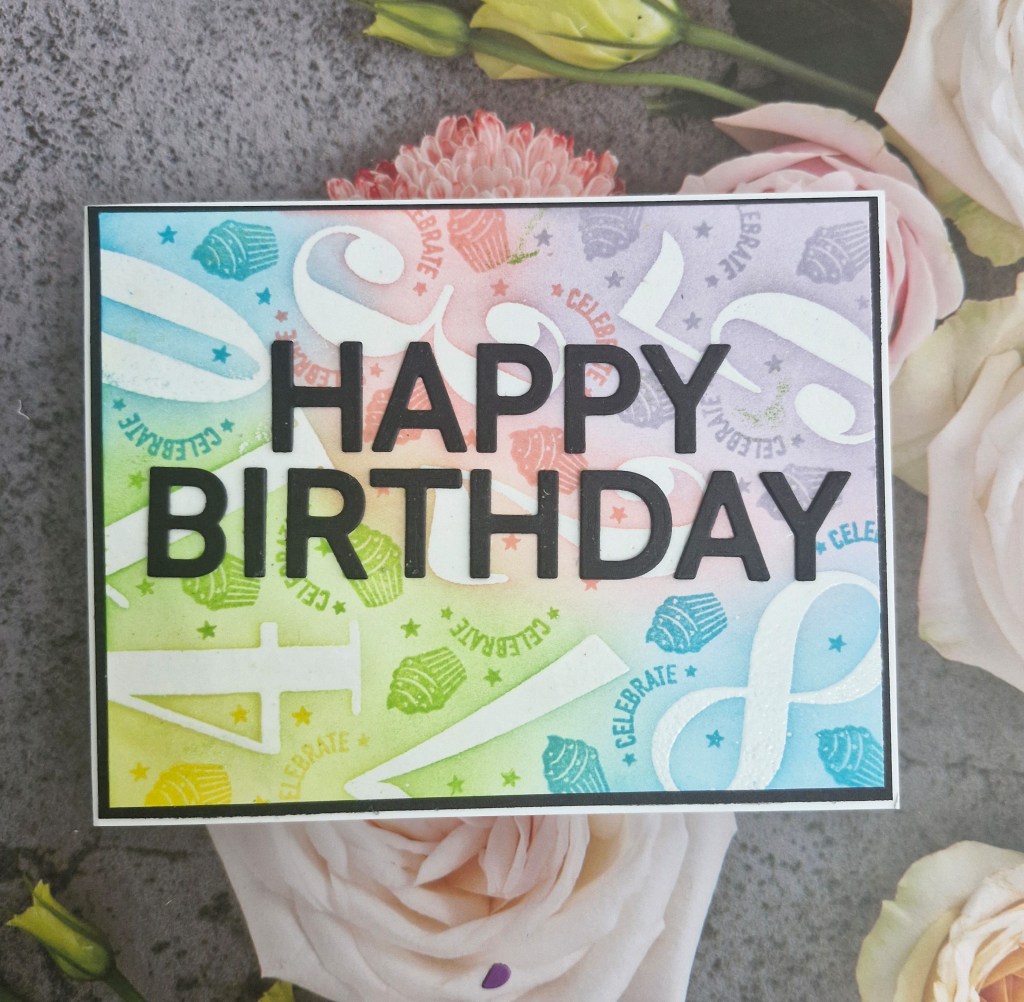
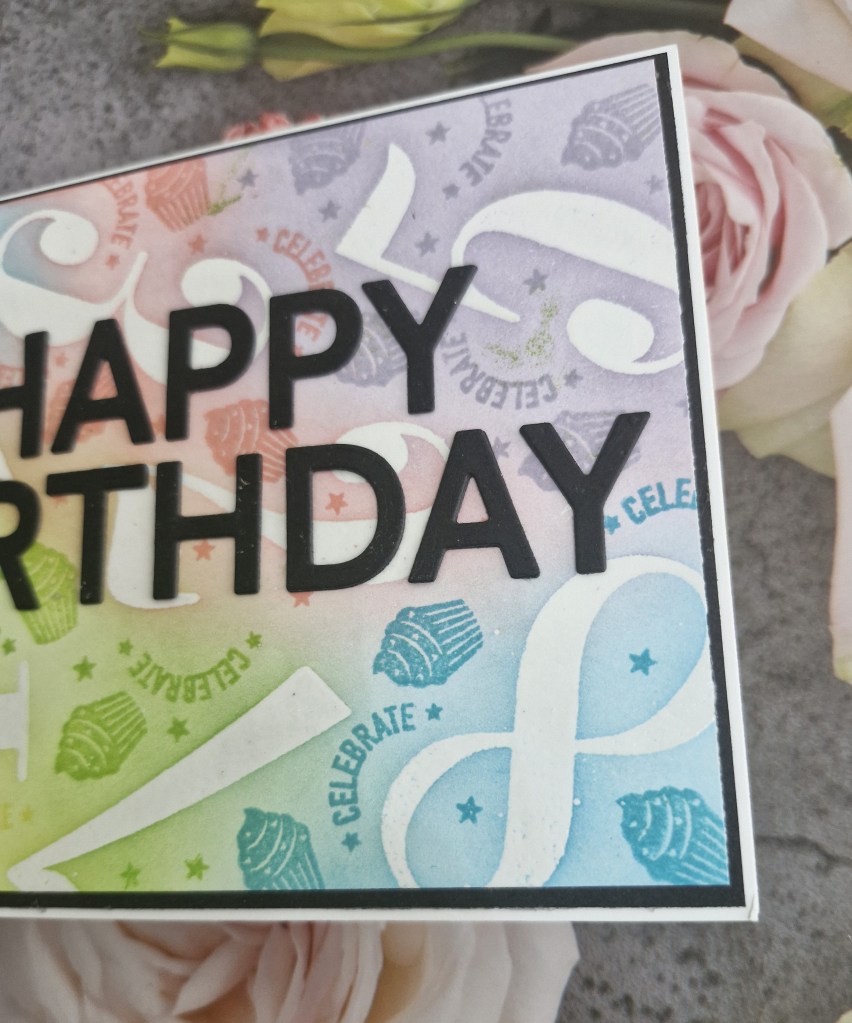
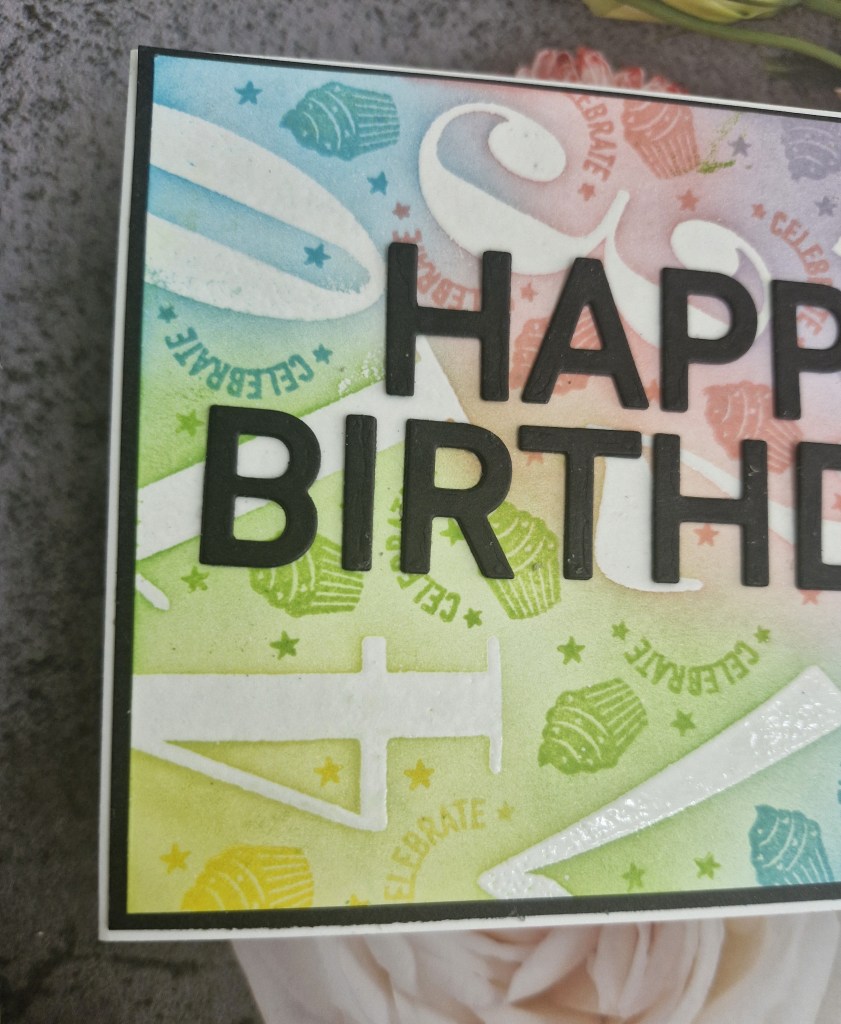
I chose to put my numbers on the background and use the emboss resist technique.

Onto w white panel, I used the large numbers from an LDRS stamp set received as part of the Crop and Create 2023. I arranged them on the panel, stamped with my Misti, then heat embossed.

Using a range of colourful ink pads, I gave my blending brushes a workout – and my arm.

Once colour blended, I used some smaller stamps of cupcakes and a little sentiment, as well as a tiny star, and stamped into the spaces using the same colour which is behind them – a tone on tone effect if you will.

This panel was cut down and a black layer added using Gina K Master Layouts dies, then attached to a white card base.

The sentiment is also part of the products provided by LDRS for this event, die cut a couple of times, and layered, then added to the panel.

I used the off-cut/outline of the black piece I had die cut the letters from to ensure they were straight and even.

I hope you can come and join us with your creations following our theme of numbers. xx

I shall be entering the following challenges:

Lil Patch Of Crafty Friends – anything goes

Crafty Gals Corner – anything goes – option of adding a ribbon not taken

Krafty Chicks – stamps

Ally’s Angels – anything goes

Love To Craft – anything goes

Christmas (or not) Bingo – column I – die cuts, free, stamped image
Addicted To Stamps and More – birthday

My Ride Or Die

Hello once again. The Alphabet Challenge has reached the letter ‘M;, and Billie A is hosting and chosen the theme of

‘Masculine’

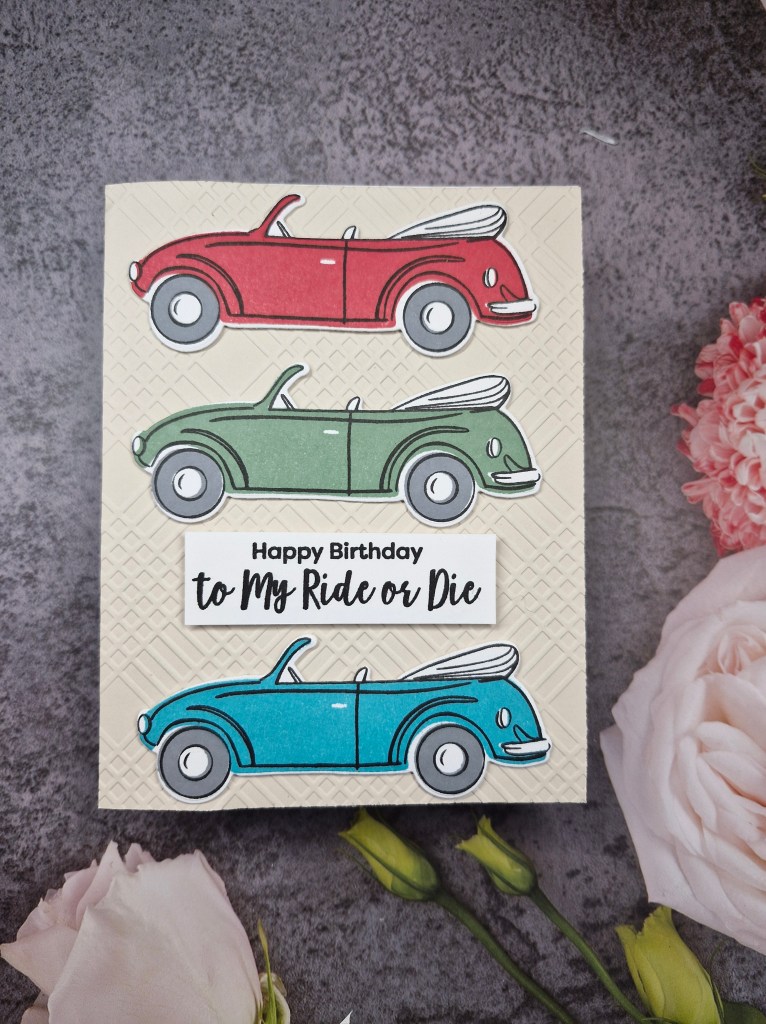
Here is my card:

I don’t make very many masculine cards – only if there is a theme for one of my design teams. This card was given to my husband for his birthday last month. We have recently watched some challenge programmes on TV, and this was the sub-title of one of the shows. I knew I had seen the sentiment in my stash and the Color My Life app made it easy to find it – from MFT….

The background panel was dry embossed using a Spellbinders embossing folder and attached to a card base.

The car stamp is from The Greetery – just the car outline stamped, then the solid colour, but I didn’t use the detail stamps for the rest of the image.

Stamped in the colours you see then die cut, arranged onto the embossed panel, then the sentiment stamped and added.

I hope you can come and join us with your masculine creations. xx

I shall be entering the following challenges:

Fab’n’Funky – birthday or anniversary

Ellibelle’s Corner – anything goes

A Cut Above – die cuts – option of monochromatic not taken

Here Is A Place To Start – anything goes

Lil Patch Of Crafty Friends – anything goes

Ally’s Angels – anything goes

Thinking of You

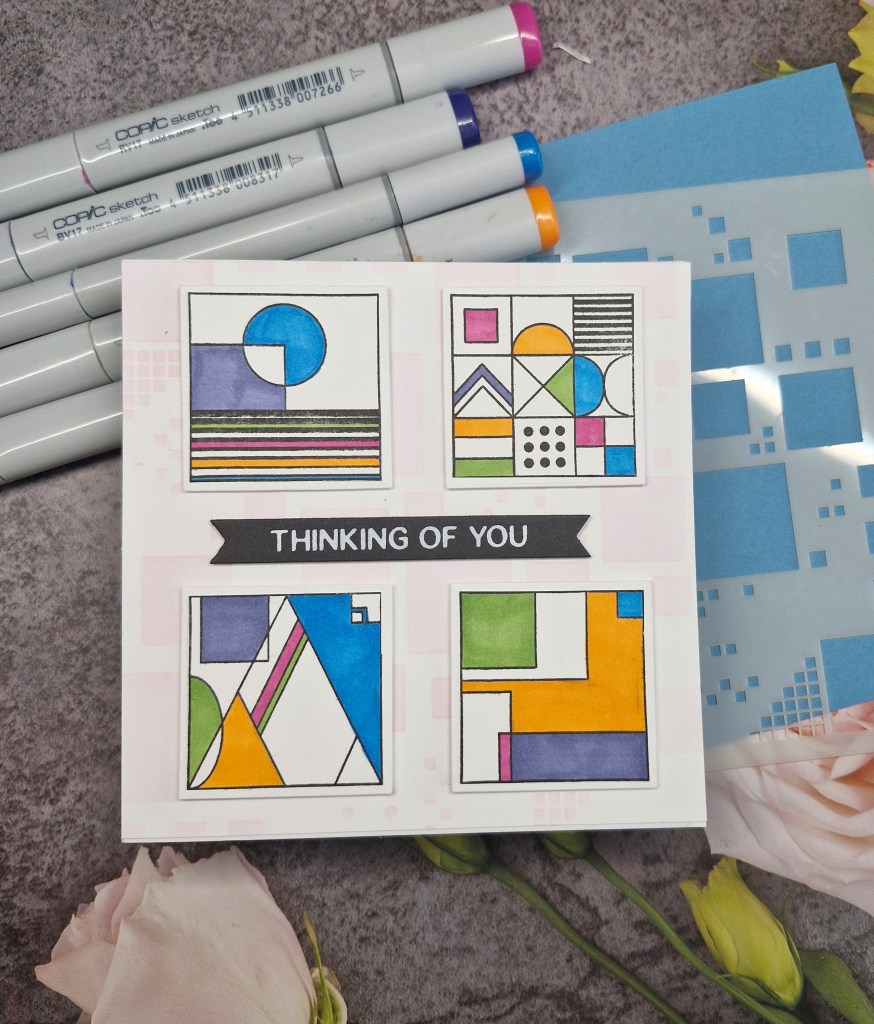
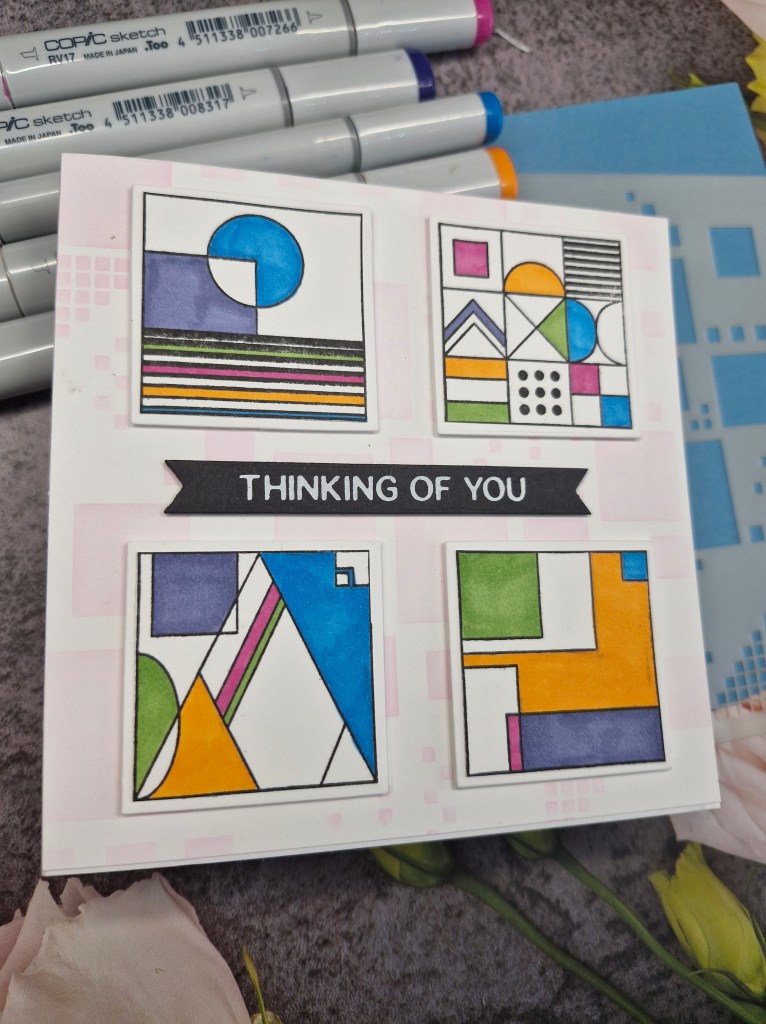
Hello everyone. Cardz 4 Galz has started a new challenge, and the new theme has been chosen by Debbie. We want to see your ‘squares, or a square card‘. Here is my make:

Starting with a square card base, I used the stencil you see and ink blended some light pinks to create more interest in the background.

The four squares are from a Uniko stamp set, stamped, coloured with Copics, then die cut with a nesting square die.

These squares were then added with a thin 3D foam tape, and a foiled sentiment added in the centre.

I hope you can come and join us with your creations featuring squares – or a square card base. xx

I shall be entering the following challenges:

Pammie’s Inky Pinkies – anything goes

Ally’s Angels – anything goes

Time Out – friendship/encouragement/support

Lil Patch Of Crafty Friends – anything goes

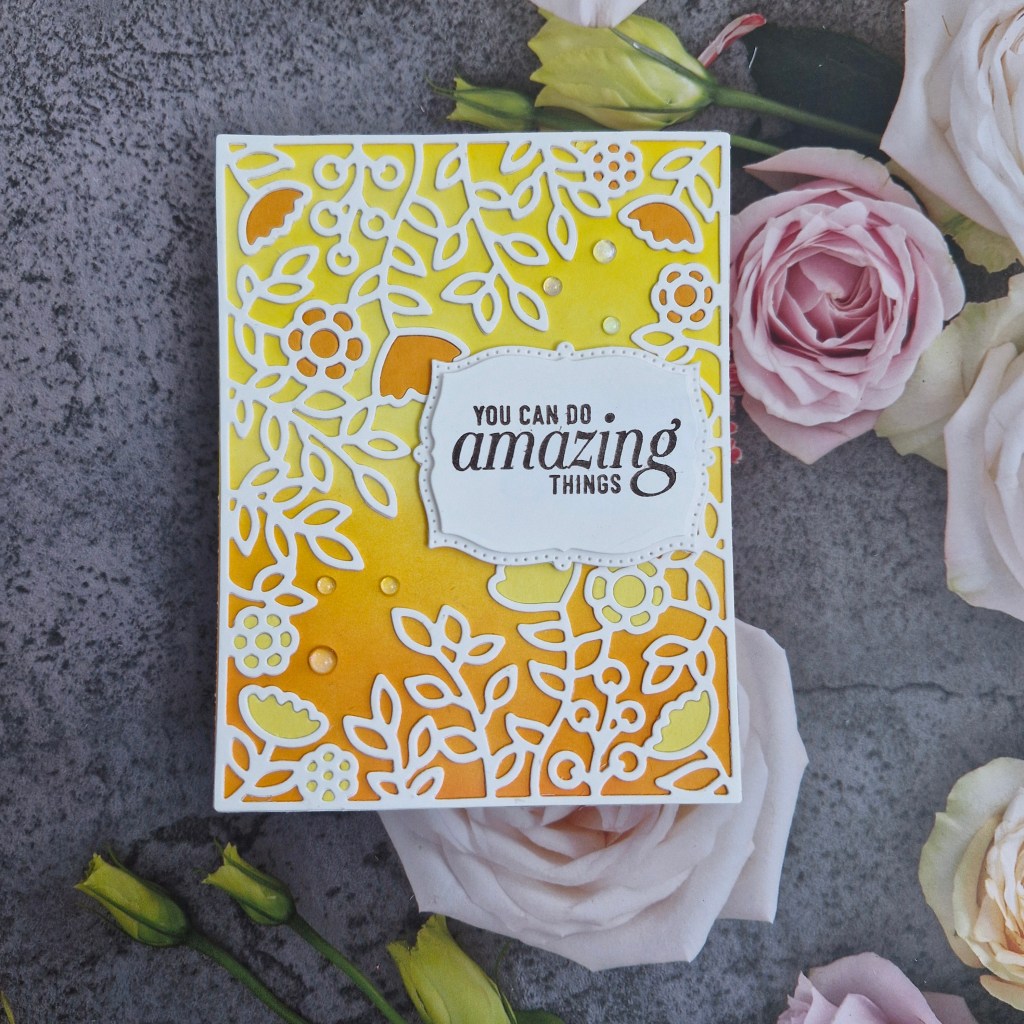
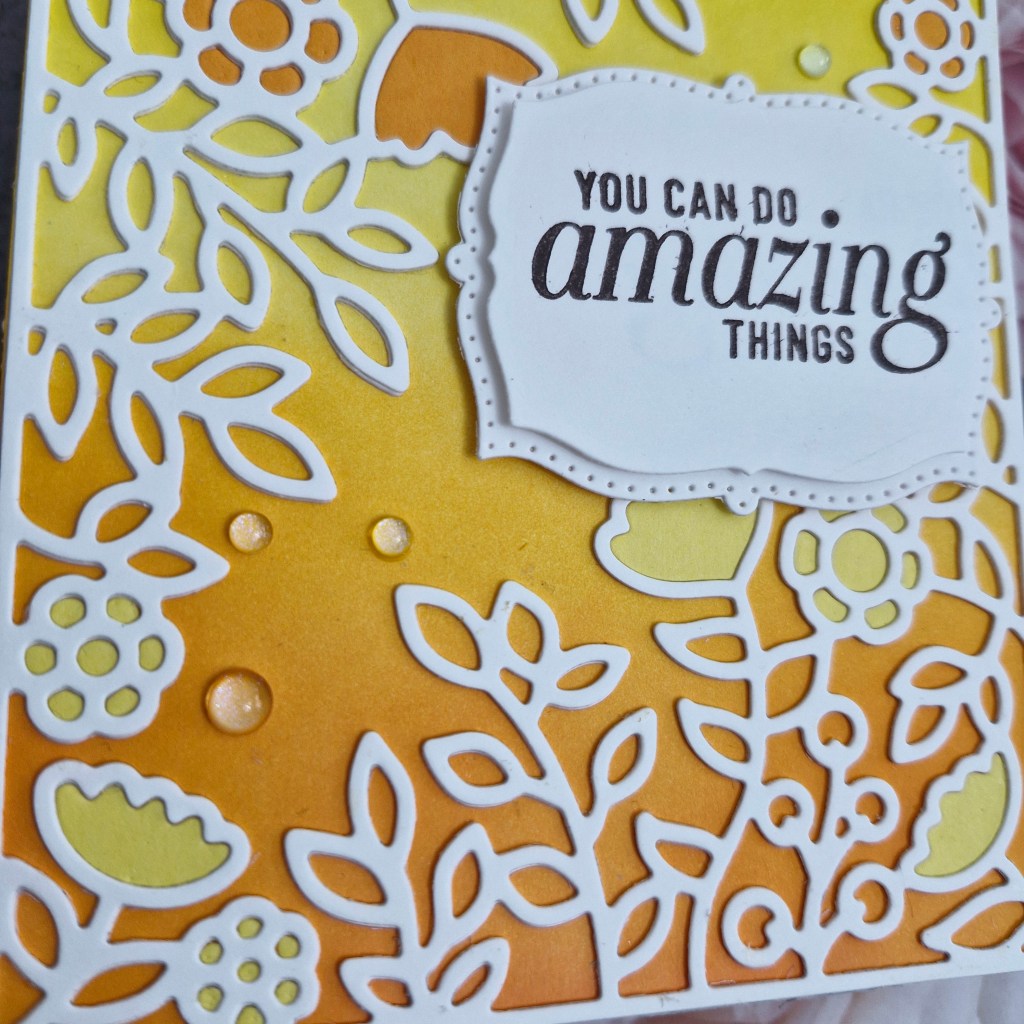
You Can Do Amazing Things

Hello. More crafty play today to create this encouragement card:

I followed the colours at Color Hues Challenge – yellow and orange – and ink blended some yellow Pinkfresh Studio ink on the top half of an A2 panel, and Lawn Fawn ‘carrot’ ink on the bottom half.

Whilst this panel was drying, I die cut the Pinkfresh Studio ‘Secret Garden‘ cover plate twice in white card stock. I then took a piece of orange and a piece of yellow card stock and die cut again to get the flowers.

The inked panel was dry, and I glued the first white die cut onto that, then inlaid the flowers – orange flowers on the yellow half, and yellow flowers onto the orange half. This was a little fiddly – all those itty bitty dots – but I managed to find all the pieces.

I then glued the second white panel on top – just in case there was some glue leaking out of those itty spaces. That was also a little fiddly – to get the glue everywhere, but worth it I think.

The sentiment was stamped in brown ink – a little less harsh than black – then die cut with the smallest Pinkfresh Studio ‘Dotted Fancy Frames‘ die – which came as part of the Create and Connect event this past weekend. The second layer behind the sentiment is also a part of that die set.

I added some iridescent gems – which pick up the yellow and the orange behind them.

I shall be entering the following challenges:

A Perfect Time To Craft – anything goes

Ellibelle’s Corner – anything goes

Color Hues – orange and yellow

Triple B – birds and/or butterflies and/or blooms (blooms)

Cut It Up – anything goes with die cuts.

Soak Up The Sun

Hello once again. The Alphabet Challenge has reached the letter ‘H‘, and Helen has chosen the theme of:

H is for Holidays – summer or Christmas in July
Here is my card:

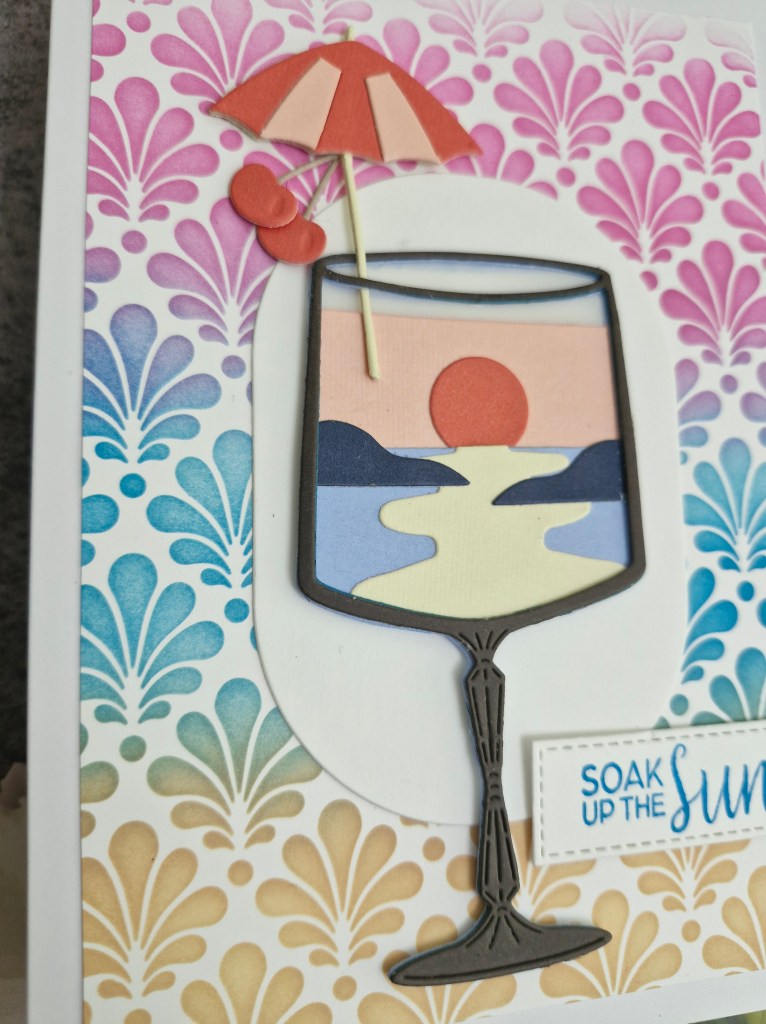
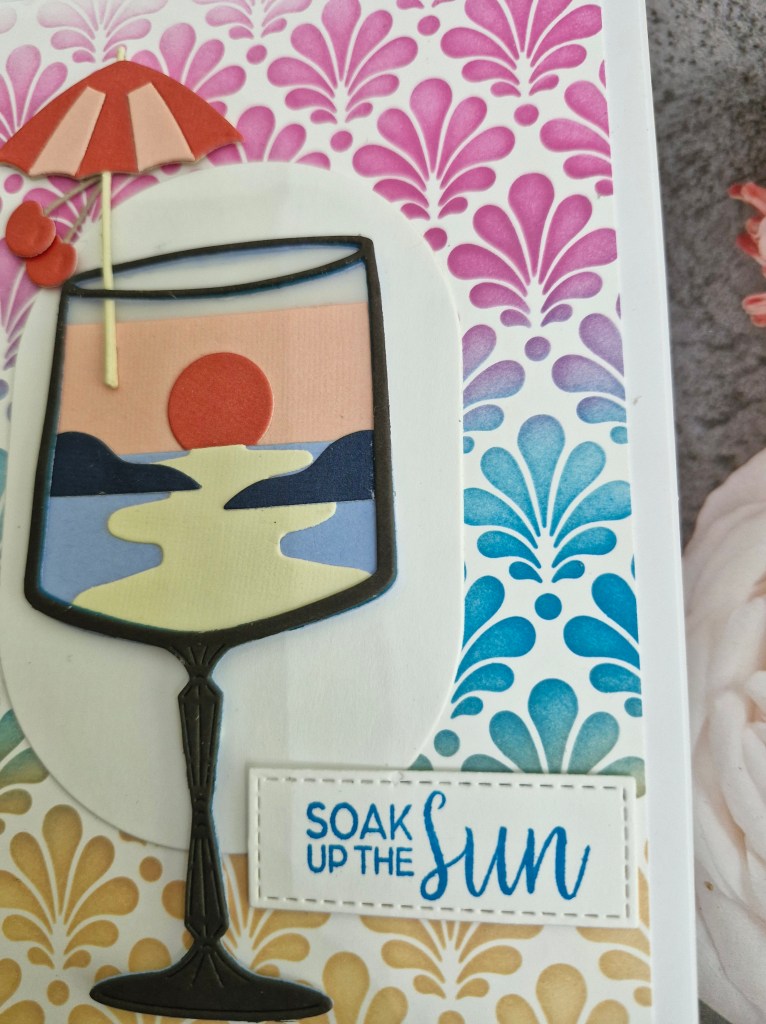
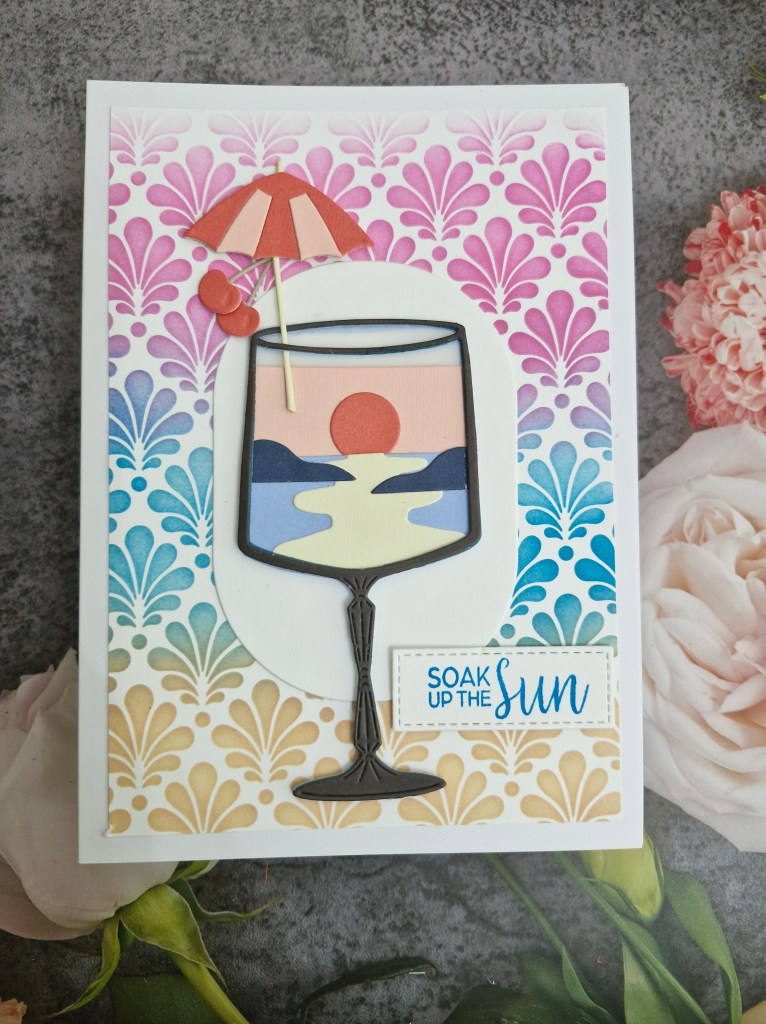
This die set and stencil were part of a virtual class hosted by Spellbinders, and I thought would suit the summer theme for this challenge. Though we haven’t had much of a summer in the UK, and it is still raining, it did give ne hope that we could have some warmer weather soon……

The background is ink blending through the stencil, a rainbow kinda look using only three colours of ink, but ensuring they overlapped to create a five colour look. This panel was cut down a little and glued straight to the 5×7 inch card base.

The elements for the glass and scene were die cut and glued down, and the umbrella and cherries and added. That’s why I chose a larger card base, as I wanted to get the height for the added elements.

I tried the glass against the background panel, and felt it got lost in the colours, so I added a plain white oval.

The sentiment was stamped then die cut using a stitched rectangle.

I hope you can come and join us with your holiday themed creations – summer or Christmas in July. xx
I shall be entering the following challenges:

Creative Knockouts – summer fun

Just Us Girls – summertime

Lil Patch Of Crafty Friends – anything goes

A Perfect Time To Craft – anything goes

Crafts Galore – anything goes

Stencil Fun – use a stencil – option of shades of blue

Here Is A Place To Start – anything goes

Shades Of Blue

Johanna is hosting the new challenge at Cardz 4 Galz, and she has chosen the theme of ‘Shades Of Blue‘. Here is my card:
Using a newer die set from Spellbinders, I created the openings using 4 different shades of blue card stock. There are a few of similar tunnel die sets from Spellbinders, this one is ‘Cloud Tunnel’.

It is very easy to place the dies in different positions on each piece of card to create the size and shape of the opening, and also the create as much or as little of each layer showing as you please.

The second darkest blue I layered with 3D foam, but the other layers were glued flat to each other.

The moon and stars are also from the same dies set, and I stamped an appropriate sentiment on the front piece.

I hope you can come and join with your creations following our theme. xx

I shall be entering the following challenges:

AAA Colourful Challenge – colour board – mainly blue

Lil Patch Of Crafty Friends – anything goes

A Perfect Time To Craft – anything goes

Crafts Galore – anything goes

Here Is A Place To start – anything goes

Love To Craft – anything goes

You Are Simply Amazing

Hello everyone. Some crafty time yesterday created this card for a few challenges:

The background panel is a turnabout stamp from Concord & 9th. It was one of the many, many items received as part of their ‘Summer Camp’ virtual weekend. They always provide such a great number of items for this weekend event – and so many ‘camp counsellors’ which I know I regard in high esteem and watch many of their YouTube channels.

The first thing I did was the turnabout panel, using the colour scheme from the current Color Throwdown challenge. I used Concord & 9th inks, and their turnabout jig – which also came with the event – then cut that down to slightly smaller than an A2 card base.

I then stamped and die cut the separate flowers and leaves, and die cut ‘Jumbo Butterfly‘ from The Greetery, using the matching stencils to ink blend the colours on it.

The sentiment is also from the same event, and stamped into an oval, die cut from a Gina K Designs master layouts die set.

The oval was attached with 3D foam, the flowers and leaves added, then the butterfly, and some iridescent gem for the centre of the flowers – and some down towards the bottom right.

The gems are from Spellbinders, and reflect the colours around them.

I shall be entering the following challenges:

Color Throwdown – pink, green, purple

Lil Red Wagon – layer it up

Simon Says Stamp Wednesday Challenge – anything goes

Cupcake Inspirations – anything goes

Ally’s Angels – anything goes

Beautiful Blossoms – flowers

You Bring Colour To My World

Hello. I have created a fun and colourful card to share today:

I die cut the brush elements from a Taylored Expressions set, and assembled them. Card stock is from Concord * 9th and Heffy Doodle.

The background panel was die cut using an old Catherine Pooler postage die, and dry embossed using a Stampin’ Up embossing folder – an oldie but a goodie……

The splats are from a Tim Holtz die set – a little trimming here and there for them to fit where I wanted them.

As I decided to use the same brown for the background panel as I had used for the brush handle, I ink blended a darker brown onto the handles to make them stand out a little more.

I shall be entering the following challenges:

Color Throwdown – yellow, orange, red

CYHTP – embossing folder – option of beach not taken

Allsorts – anything goes or masculine

Creative Fingers – anything goes

Craft Rocket – no designer paper

Unicorn Challenge – embossing

Ally’s Angels – anything goes

Excited Congrats…

Hello again. I have a card to share using some of the products from the recent Pinkfresh Studio ‘Create and Connect Event’:

This floral arrangement is from the ‘Lantern Botanicals’ stamp set, now on general release, but was provided as part of our event kit.

I stamped the floral images four times – minus the lantern at the top of the stamp – in a light ink, onto textured cream/linen card stock. The stamp was left in the Misti so I could stamp again with a darker brown ink after ink blending.

I then used the three layering stencils to colour the leaves and flowers, wondering if I had made an error using the textured card. I did stamp on the smooth side, but as you can see some of the texture came through with the ink blending. I think this gives and almost vintage feel to the images, so I carried on blending all four of them.

Once coloured, I then placed each piece back in the Misti, ensured it matched, then stamped again with a darker brown ink.

These were all then die cut, and extra layers cut and adhered together to create more stability and depth to them.

I used another A2 piece of the linen card, played with arranging the images, then glued them down – snipping the ones that hung over the edge, and adding little pieces if there were any large spaces.

The sentiment was stamped in the same dark brown ink, die cut, extra layers added, then attached to the card:

I added some iridescent gems in spaces. I like how these gems pick up the light, but also the colour of anything around them.

I shall be entering the following challenges:

Color Throwdown – peach, sage green, cream

Beautiful Blossoms – flowers

Simon Says Stamp Wednesday Challenge – add a sentiment

Ellibelle’s Crafty Wednesday – anything goes

Die Cut Divas – anything goes with die cuts

Here Is A Place To Start – anything goes