I wanted to share a card I made using an older stamp and die set from Mama Elephant:
I was searching for another Mama Elephant set, when I came across this, called ‘Cupcake Wishes‘, and decided to have a play.
I stamped the images and coloured with Copics, then used the matching dies to cut them out. The background was created using a stencil from Lawn Fawn, and colours which I though would work well with the image.
This panel was cut down slightly and adhered to the card base. The images attached with 3D foam, then the Spellbinders sentiment die cut, and also attached with 3D foam.
I have no idea why I chose the number 8 for the candle – just on a whim.
Hello everyone. I am here to announce the new challenge starting at The Alphabet Challenge. We have reached the letter ‘Z‘, and Deborah has chosen the theme of:
Z is for Zoology
Here is my card:
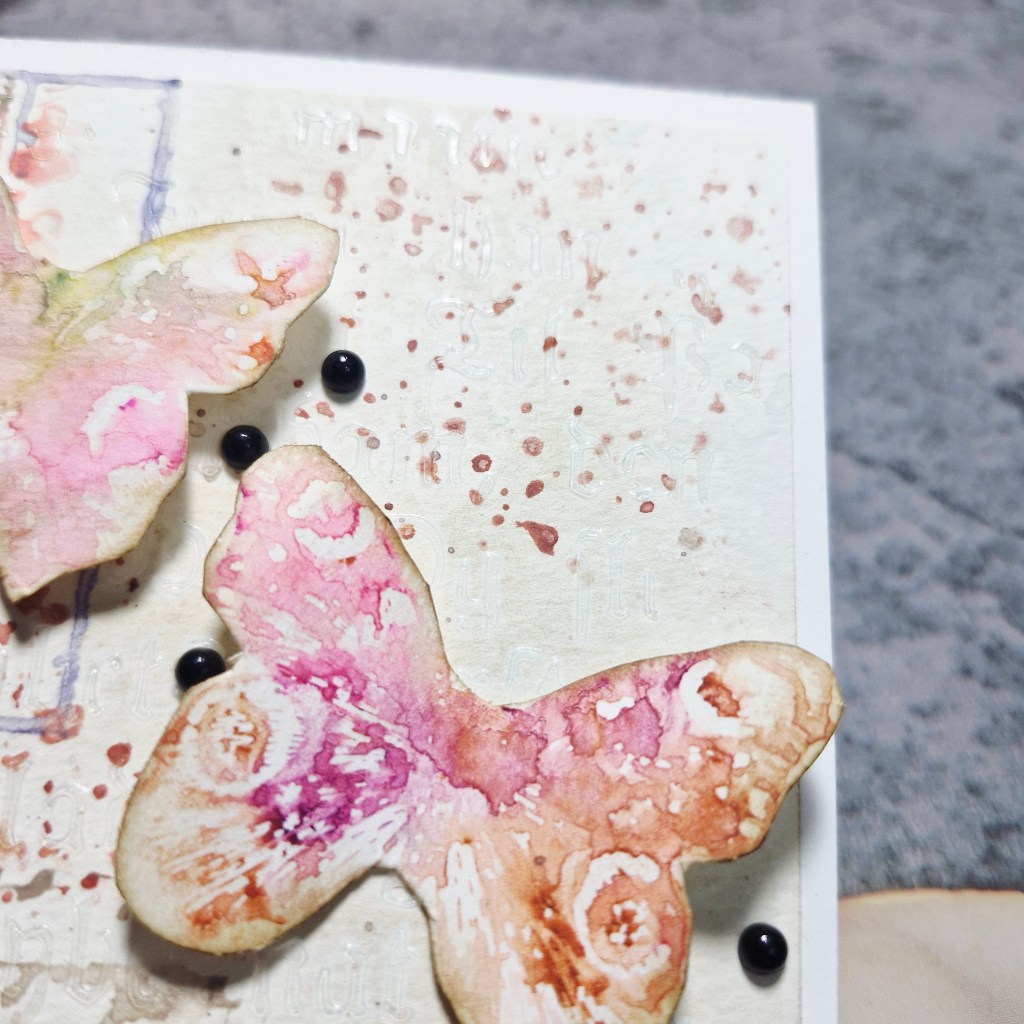
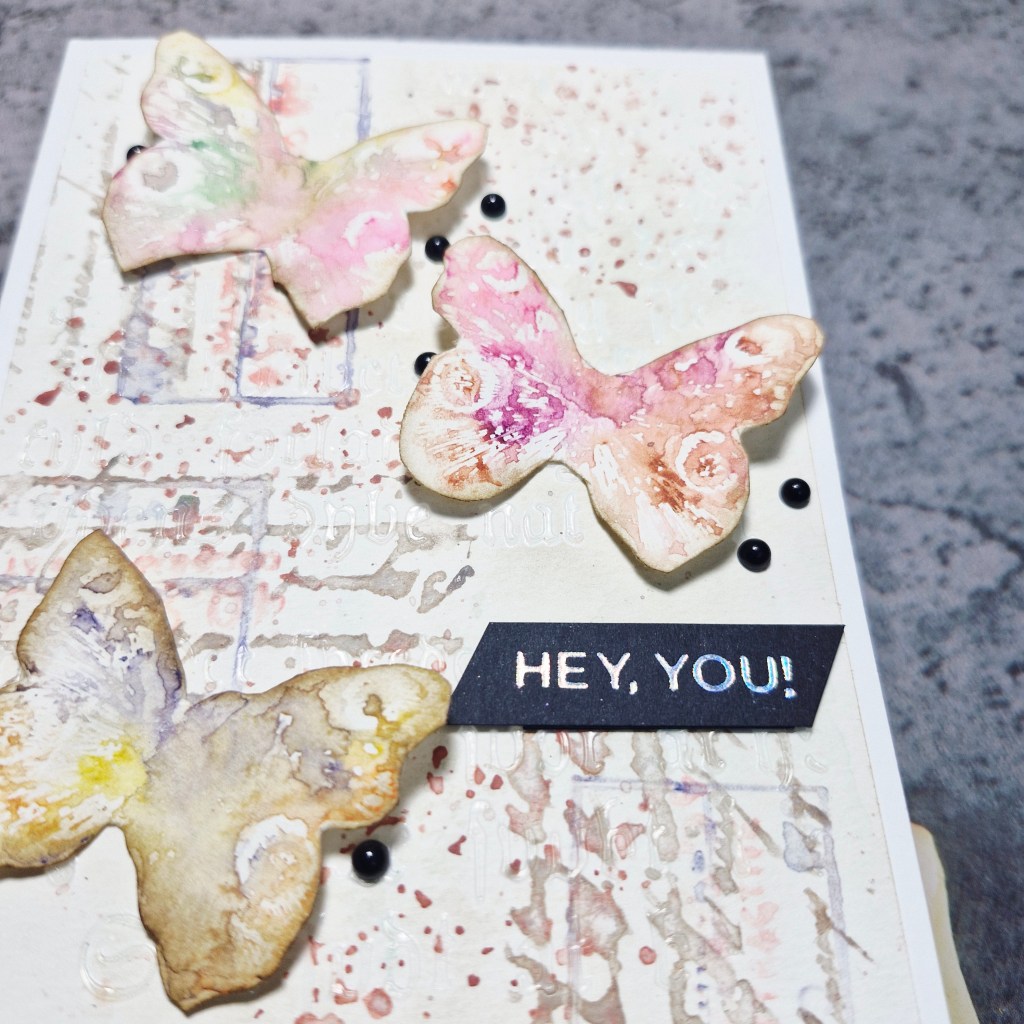
As you can see I chose butterflies, which – according to Google – are classed under the order of Lepidoptera.
I started by grabbing the Tim Holtz/Stampers Anonymous red rubber stamp set called ‘Flutter‘ and chose to go down the mixed media path.
I first grabbed my Distress Pencils, some water, and then coloured each butterfly stamp with the wet pencil nibs in a selection of colours, applied a spray of water to that, then stamped.
This gave a water-colour pattern, not precise, which is what I was going for. After that had dried, I fussy-cut them out…..yep, me, fussy-cutting…….!!
Now for the background panel.
This was created with a piece of Distress watercolour card, some script stamps, Distress pencils – using the same wet pencil to stamp technique, and stamped a couple of times.
This was left to dry whilst I hunted out more stamps I could use, and found a label stamp on which I used a light purple Distress pencil – same technique – wet nib then spritz.
Once the panel was dry, some splatters applied and left to dry – again.
I then used a stencil from Finnabair ‘Gothic’ script and some clear embossing paste – you can see a slight shine in some parts on the background.
Once everything was dry, I attached the background panel to a white card base, created a little curve in the butterfly wings and attached with glue – 3D foam under each wing to maintain dimension.
The foiled sentiment was added – silver on black – and little black gems stuck down as you see.
I hope you can come and join us with your projects following our theme. xx
I shall be entering the following challenges:
Just Add Ink – inspiration & colours – pink, brown – light and dark, white,
Hello. I thought I had posted this card a day or two ago – but obviously forgot to even write it – never mind post it.
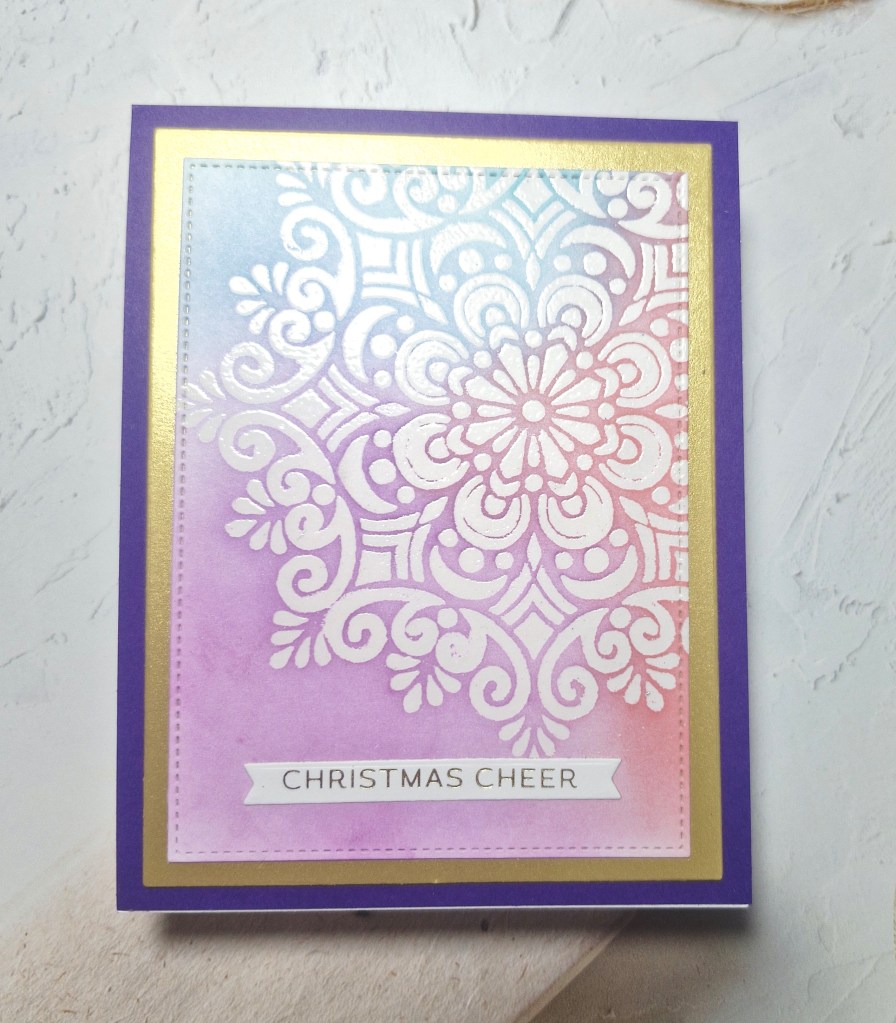
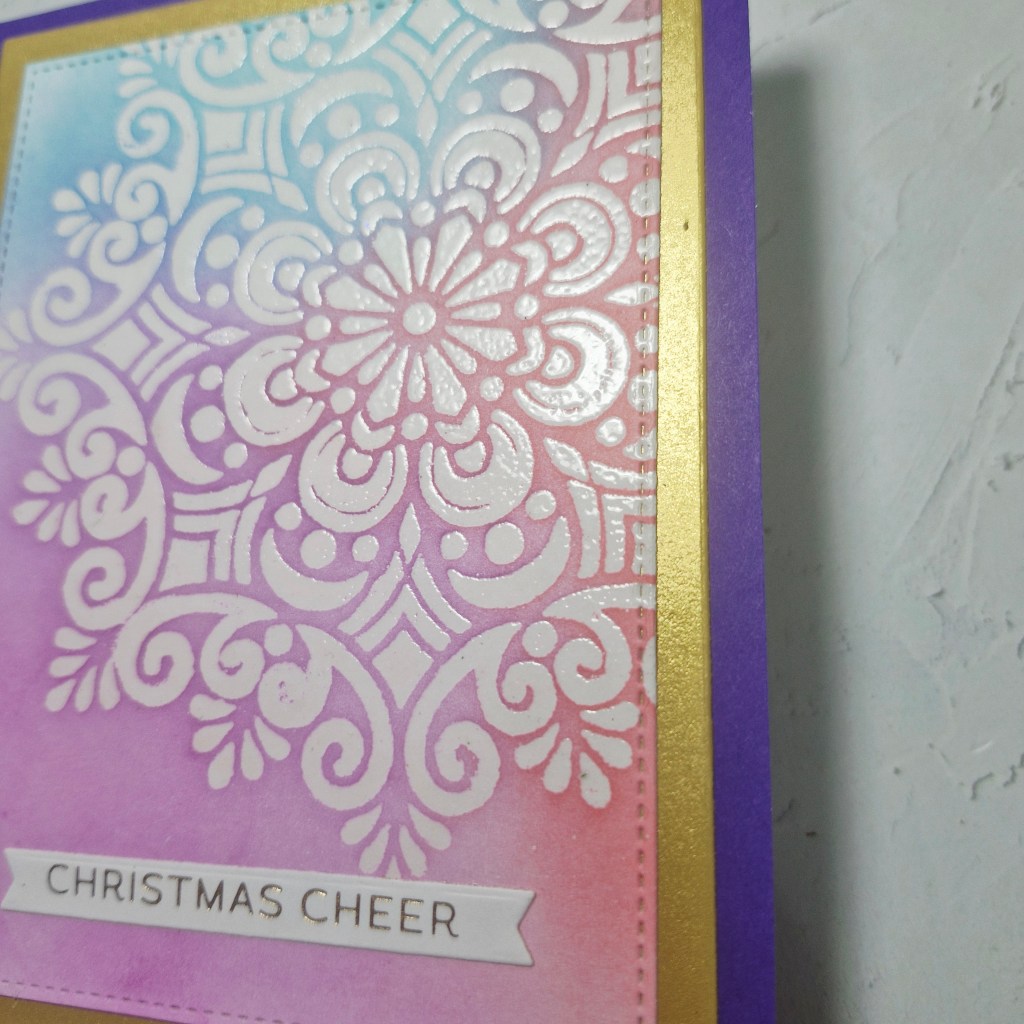
This card was created as I was intrigued by the current challenge at 52 CCT – their Christmas technique theme this time is for using heat emboss resist. I thought of a Gina K Designs stencil I had of a large snowflake, so decided to give it a go:
The first step was to tape the 6×6 inch stencil onto a piece of white card which measured slightly bigger, and pounce some embossing ink through it. I think I remember doing this on a previous virtual event, so I had a blending brush already set aside for using this embossing ink.
I first brushed some anti-static powder onto the card stock, then taped the stencil down round the edges. It took a little doing, a lot of pouncing instead of brushing, but I managed to get the whole image done, then used white embossing powder and heat set the design.
I then took three colours of Pinkfresh Studio inks and blended them all around, wiping it down between each colour to not cross-contaminate.
The blending was taken to the edge of the larger piece of card, so I could choose which part to use, and die cutting with a Gina K Designs Master Layout die set to get a stitched rectangle.
This rectangle was then matted with brushed gold card stock from Spellbinders, then a deep purple card, and attached to a white card base.
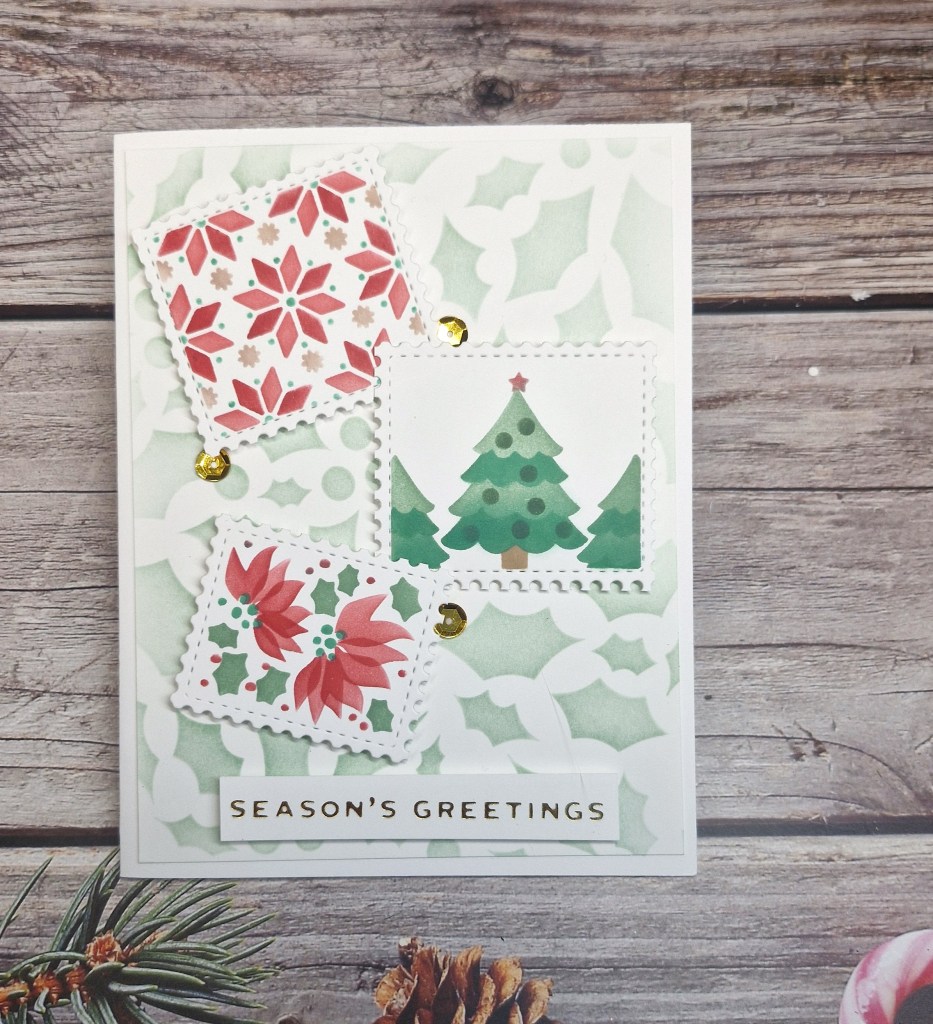
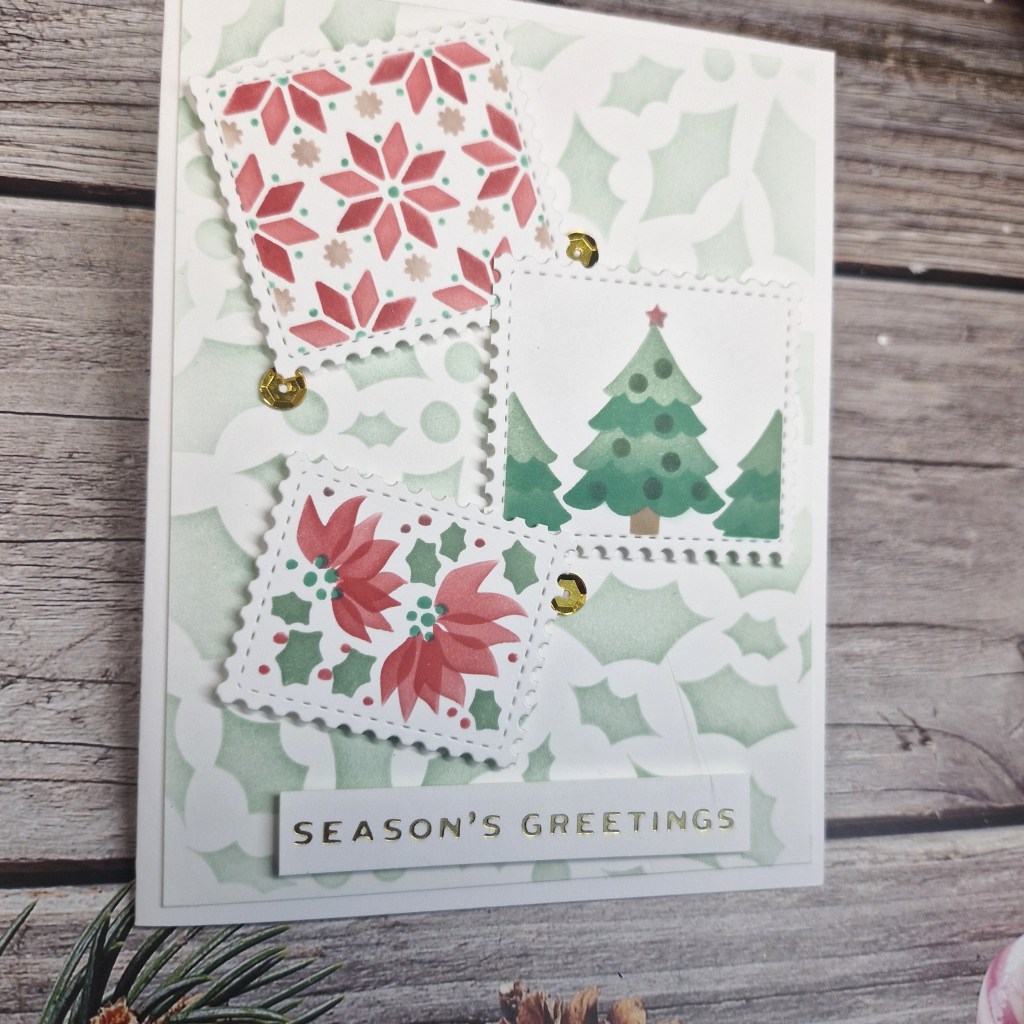
Here is a card I created using some of the rest of the images from the Waffle Flower Postage Collage I used the other day:
I had already ink blended and cut apart the images, so I created the muted holly background using a recently purchased holly stencil from Clarity Crafts, and cut it down slightly smaller than an A2 card base.
This panel was glued directly onto the card base, and the three images attached with 3D foam – jaunty angles – the foiled sentiment added, and then some gold sequins for added detail.
I shall be entering the following challenges:
Inkspirational – use stencils – option to use snowflakes not taken
Hello once again. Cardz 4 Galz has started a new challenge. Sue J is hosting, and she has chosen the theme of
A Cute Christmas
Here is my card:
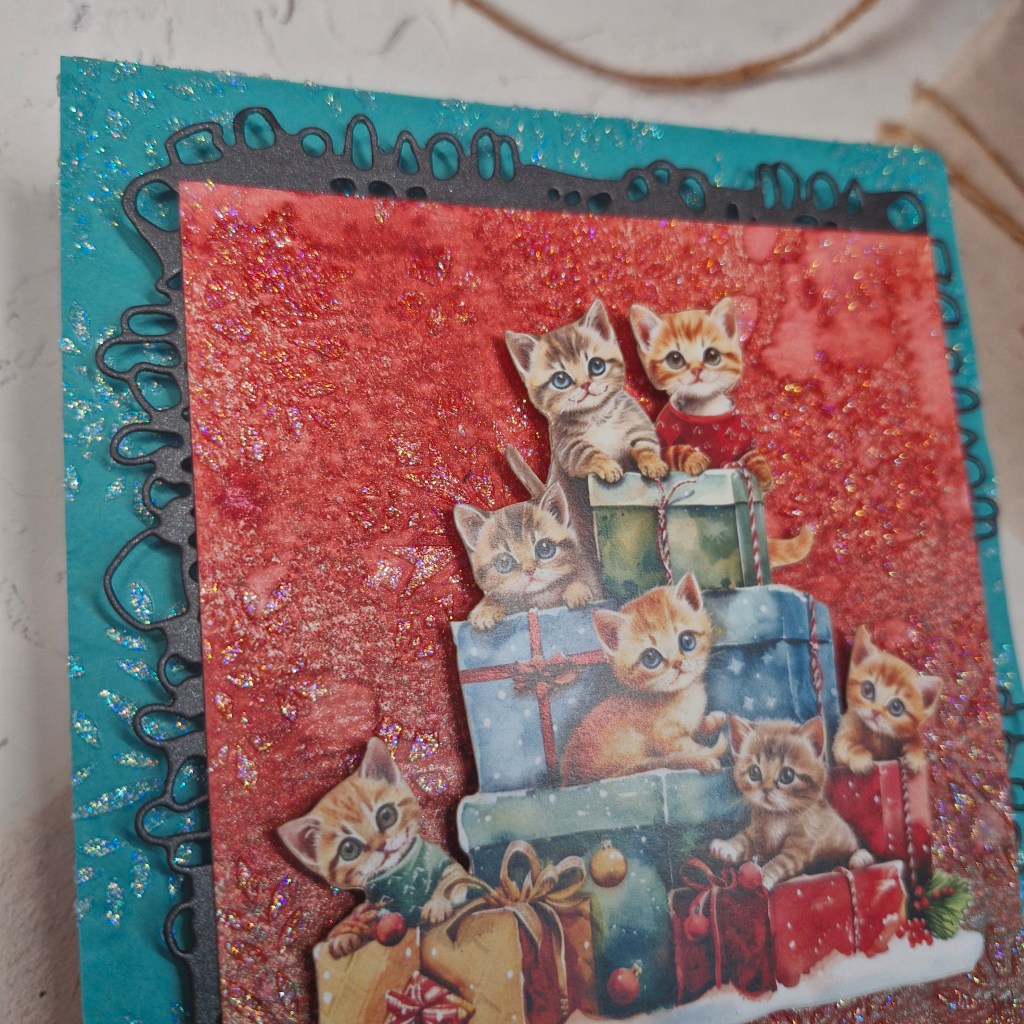
After my sojourn into CAS cards the past few days, I went all mixed media for this one – a little messy crafting.
The blue card base was created by using glitter stencil paste through a Simon hurley snowflake stencil. This was put aside to dry, then I created a panel with mica sprays, some water droplets, some dribbling of water, let that dry, then used the same snowflake stencil and the same glitter paste on top. As the paste is translucent, it gave some shimmer and shine, whilst also allowing the background colour of both panels to shine through.
To frame the red panel I cut it down so it would exactly into a black die cut tag frame from AALL & Create, cut out of a black shimmer card stock.
The main cat image – more cats there than I actually have – but only just…….is also from AALL & Create, pre-die cut, added with 3D foam, then the foiled sentiment added to the top of that.
I hope you can come and join us with your creations following our ‘cute Christmas’ theme. xx
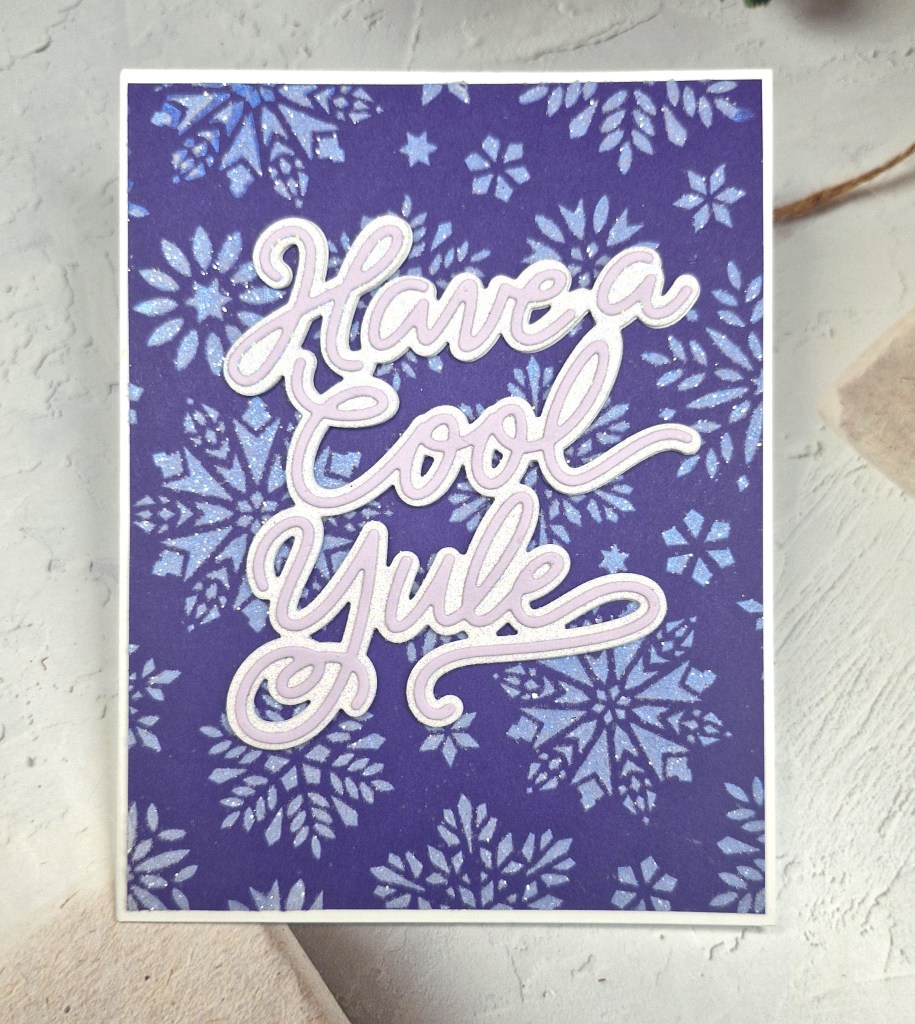
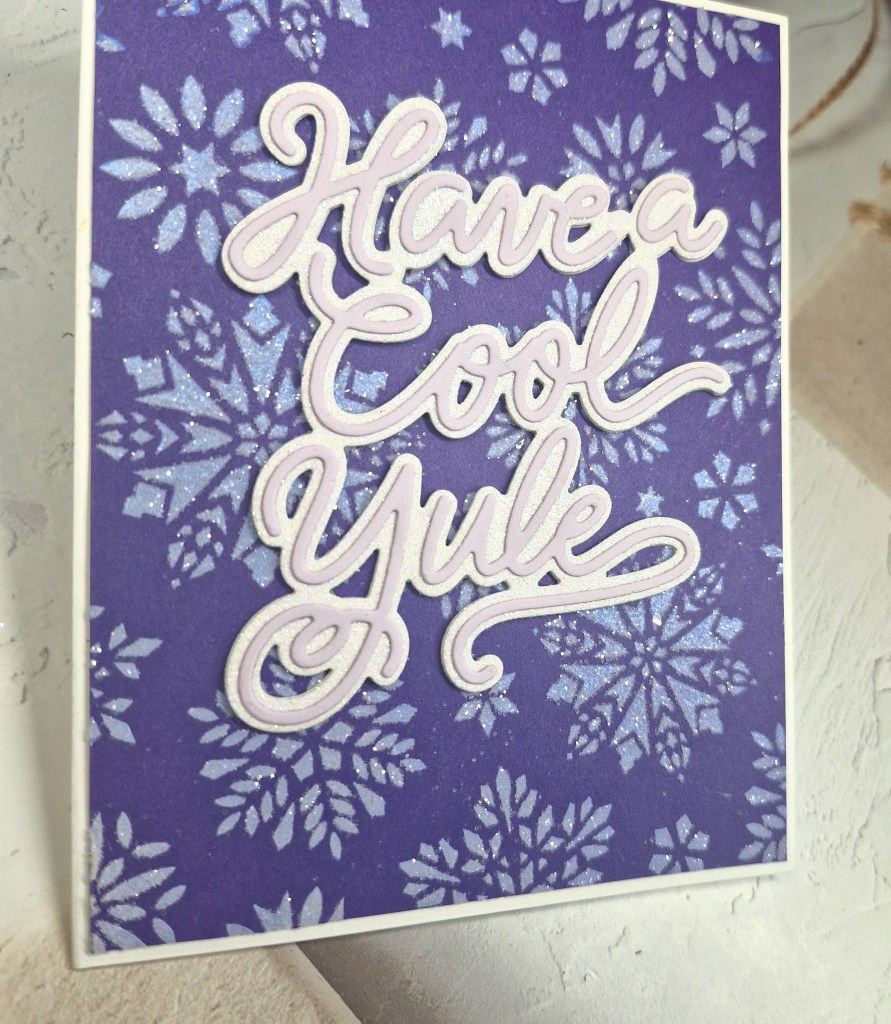
I had some time yesterday to attend a virtual craft event, so whilst listening and watching – I tend to do the cards at a later date – I created this card:
The background panel was created by using some plum coloured card stock from my stash, and a Simon Hurley snowflake stencil with silver glitter paste. This paste is semi-translucent, so you get some lovely hues through the glitter.
That had to dry for a while, so I used the sentiment die from Hero Arts (a product received from another recent virtual event) using white glitter card stock for the shadow layer, and lilac card stock for the top most sentiment layer.
I die cut the sentiment a few times with different colours of purple, until I decided on the lighter lilac colour. The shadow layer was die cut three times to add more dimension.
I struggled to get all the glitter from the paste to show in the photo, but I think you can see what I mean by the different hues within it.
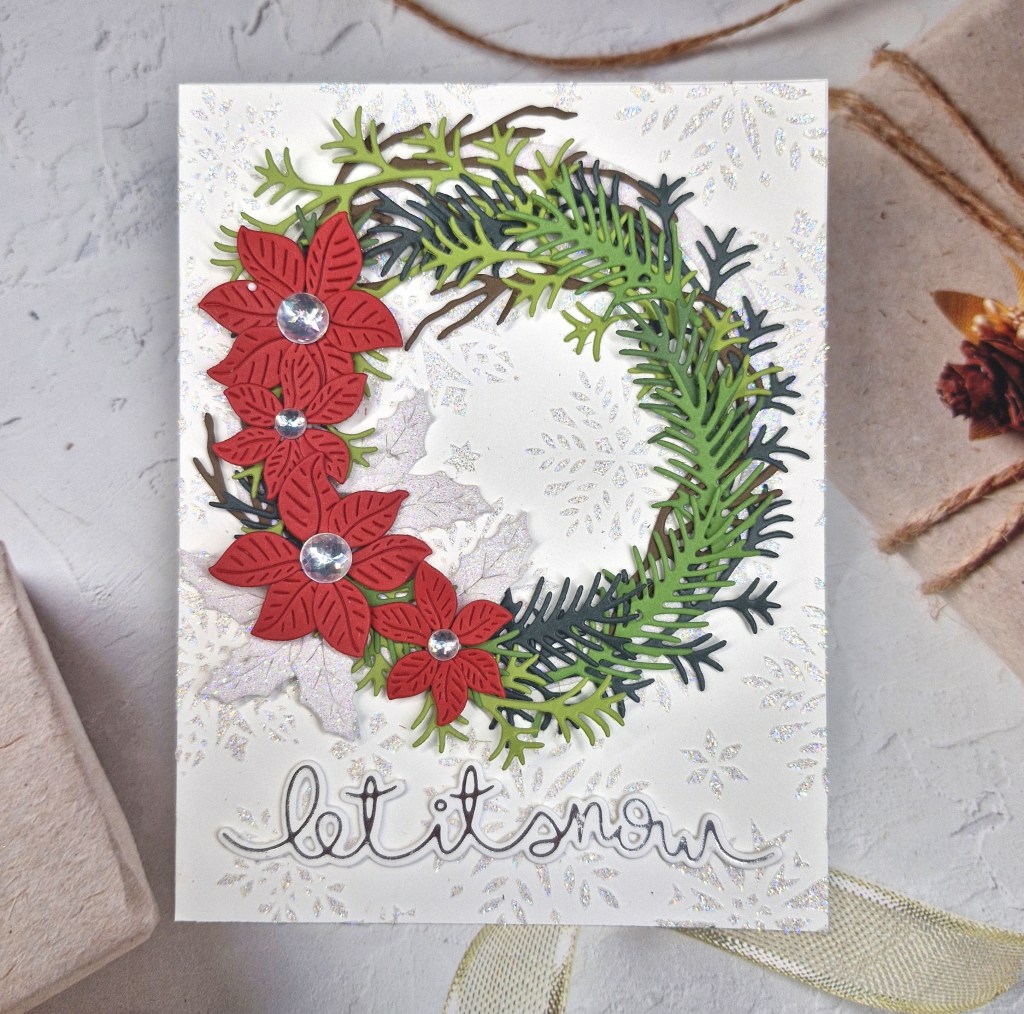
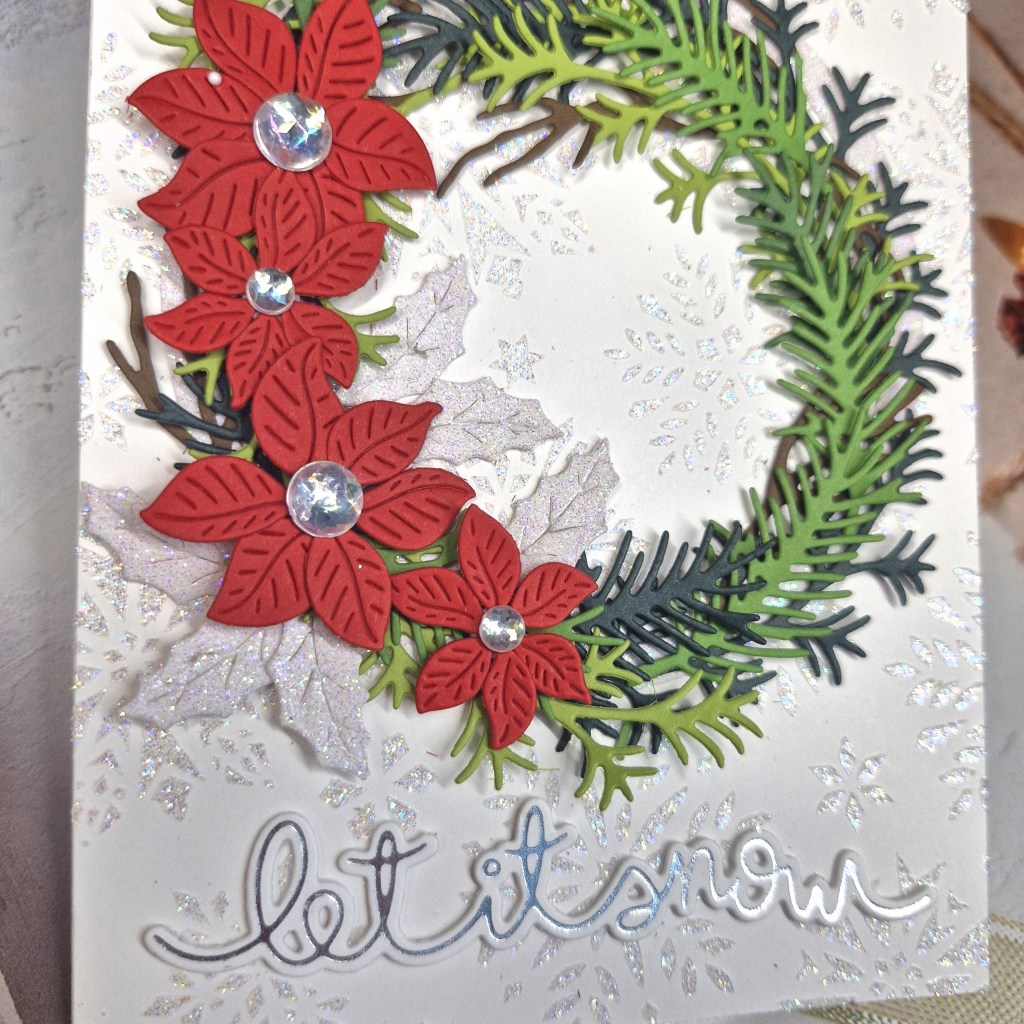
Hello everyone. I have a card to share that I have been procrastinating over for the past few days. I finally managed to decide on how I wanted the wreath to look:
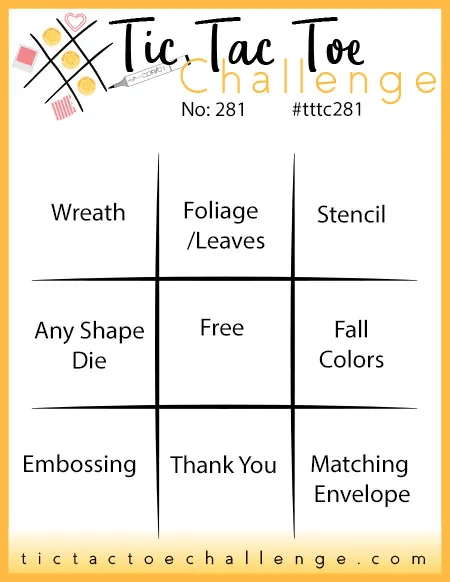
The starting point for my card was the top row of the current challenge at Tic Tac Toe – wreath – foliage/leaves – stencil.
The background is using a Simon Hurley stencil received from a recent virtual event, and also using his Unicorn Horn Lunar Paste. Whilst this panel was drying, I searched through the CML app for foliage, branches, leaves, poinsettia and holly, and picked out three or four of the Spellbinders die sets I have.
I used a few shades of green for the foliage, a brown for the branch dies, red for the poinsettia layers, and I used silver glitter card for the holly leaves. Once all die cut, and the back panel was dry, I created a circle frame using some nesting circle dies and stuck that down, so I had something to follow when arranging all the elemnts.
The branches and leaves were glued down – just the tips so there was movement and dimension, then the poinsettias attached with a little circle of 3D foam, the holly leaves added lastly.
Silver gems were glued to the centre of the flowers, then the silver foiled sentiment from Lawn Fawn – stacked a couple of times – was glued down to the bottom of the card.
Lots of glitter and shine on this card, and I’m so pleased I actually managed to finish it…
I shall be entering the following challenges:
Tic Tac Toe – top row – wreath – foliage/leaves – stencil
Hello once again. I am here with a creation for the new challenge at The Alphabet Challenge. The theme has been chosen by Melanie, and she has chosen:
Z is for Zoom – anything which goes fast
Here is my card:
I used a Spellbinders die set to create the plane and banner, and a mixture of acrd stock from Concord & 9th and Spellbinders.
I did have to watch a YouTube video several times to be able to layer each part in the correct way – but I managed to achieve it – finally.
Once the plane and banner was assembled, I used an MFT stencil to create the background clouds. I wanted lots of clouds, and lots of dimension so I used a blue card panel and some slightly darker blue ink to create it.
The panel was adhered flat to the card base, the plane and banner attached with a thin 3D foam, then some clear enamel dots added here and there.
I hope you can come and join us with your creations following our theme.
Hi there. I have another project to share using some of the pieces left over from a previous project:
I again used the stencil from Pinkfresh Studio and there recent virtual event, as well as the washi tape suite.
The washi was adhered to some white card, then the images die cut using the matching dies.
The background panel was created using the layering stencils received as part of this event, and die cut using a couple of frame dies. For this frame, I also inserted the middle back into the frame.
There was too much white visible around the frame and flowers, so I added a panel of Concord & 9th card stock, and glued everything down. The sentiment is a foiled sentiment previously created.
Hello there. The ABC Christmas Challenge has started their second challenge of the year. The letters are ‘C’ and ‘D’ and we have chosen the themes of:
C is for Cute
and/or
D is for Die Cuts
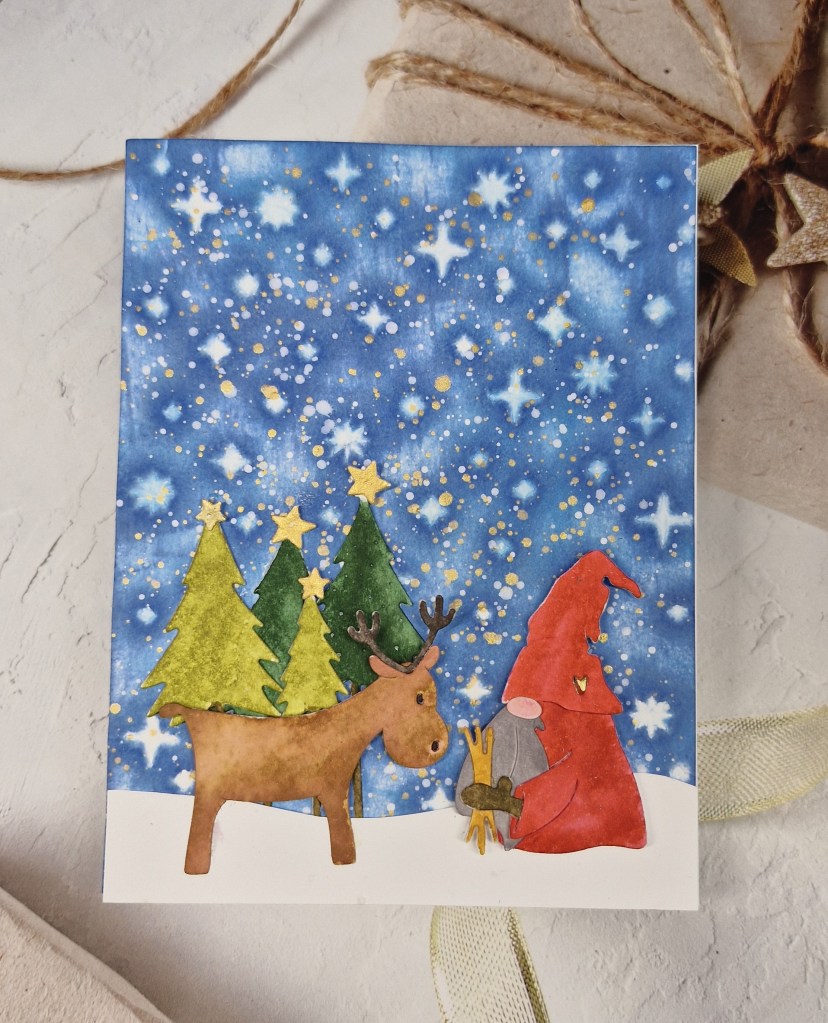
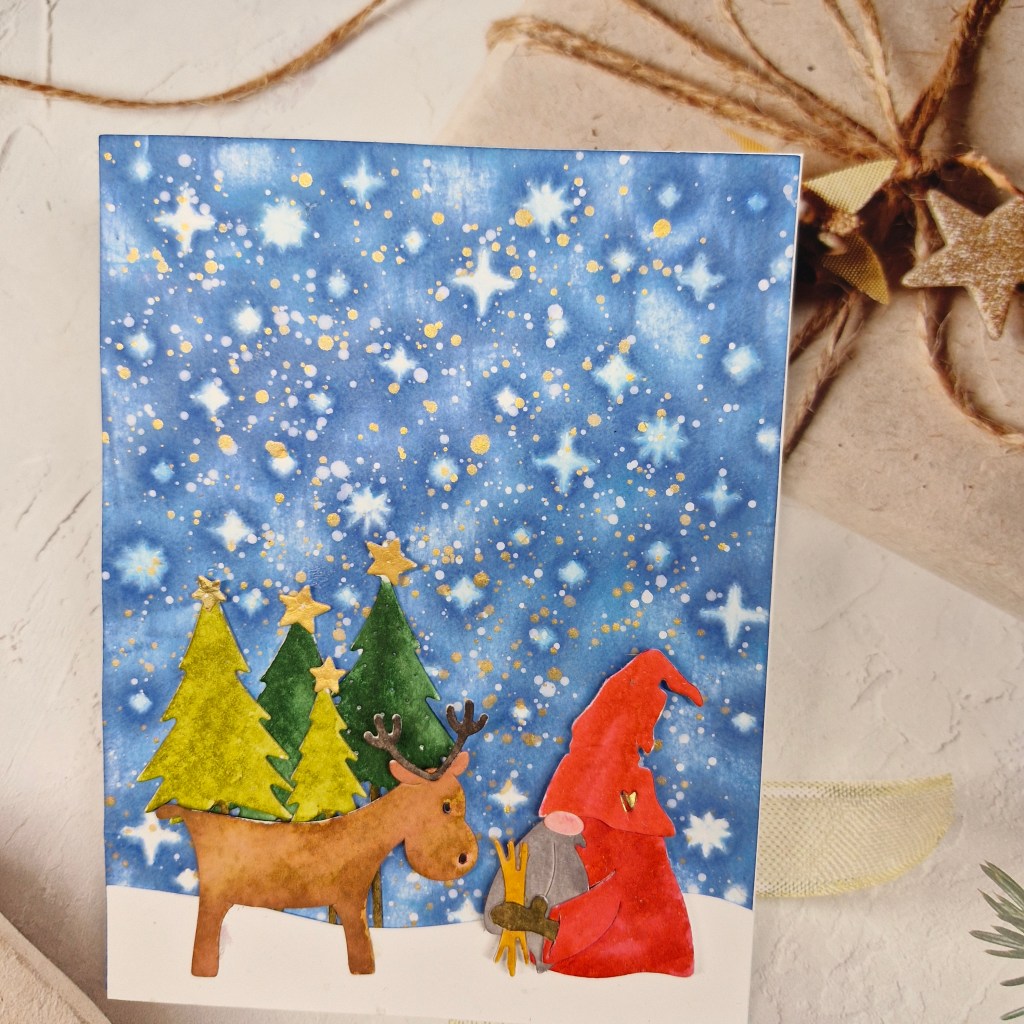
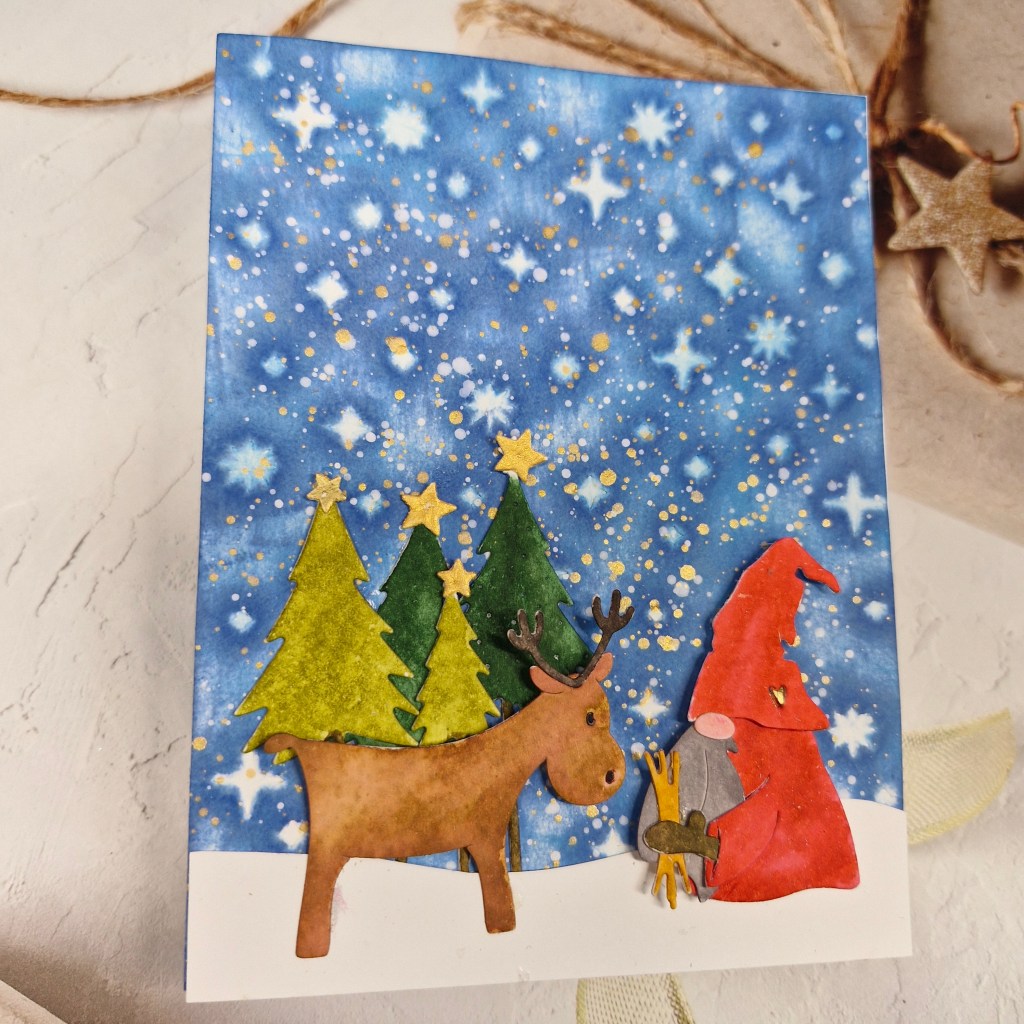
Here is my card which incorporates both of the challenge themes:
This was another mixed media card and using some products received as part of the Gummiapan Advent Calendar. I just loved the gnome feeding the reindeer, and as I already had the trees from a previous order, I thought they would work to create a scene.
I started with the background, and used a Pinkfresh hot foil plate to create an imprint in the card. I then used Distress Oxide inks to swipe across the back of the card so the details would remain white as they were deeper. I added some water – not too much as this was normal card not water-colour card – then when dry I splattered on some gold and white acrylic paint.
For the main images, I did use water-colour card stock and my Zig water-colour markers – something I haven’t used for a while.
The images were die cut then water-coloured, gluing together once dry. The gold stars were painted using my gold marker.
I cut the snow bank free hand and attached before adding the images.
I hope you can come and join us with your Christmas/festive creations following one of both of our themes. xx