Believe In Yourself

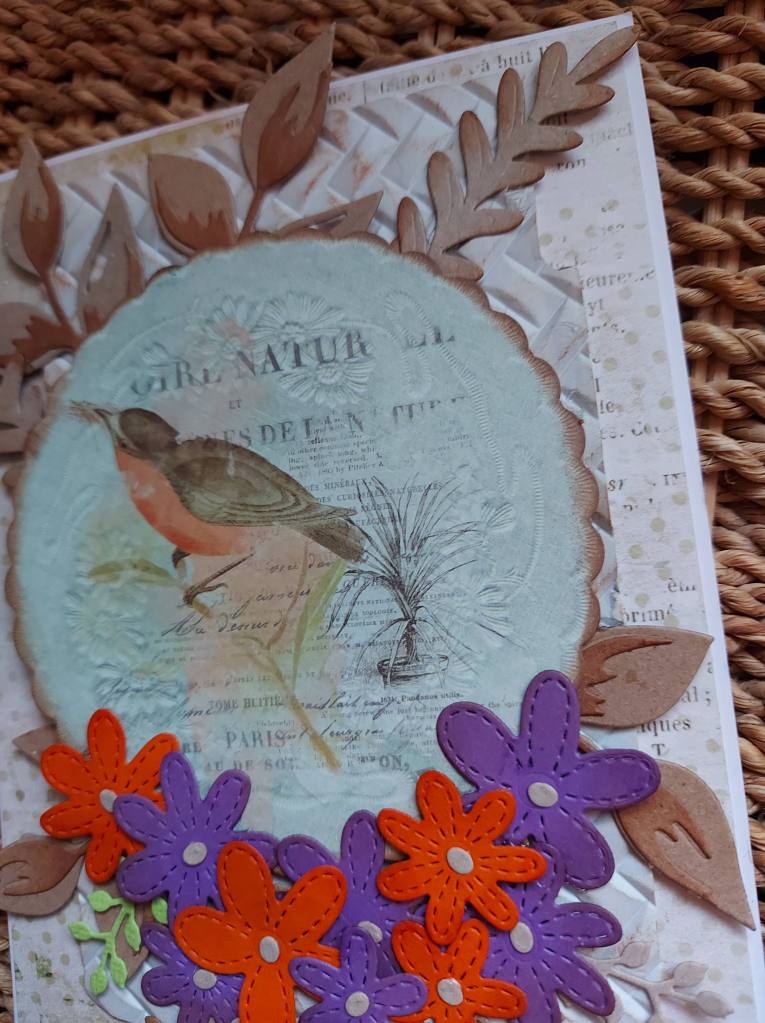
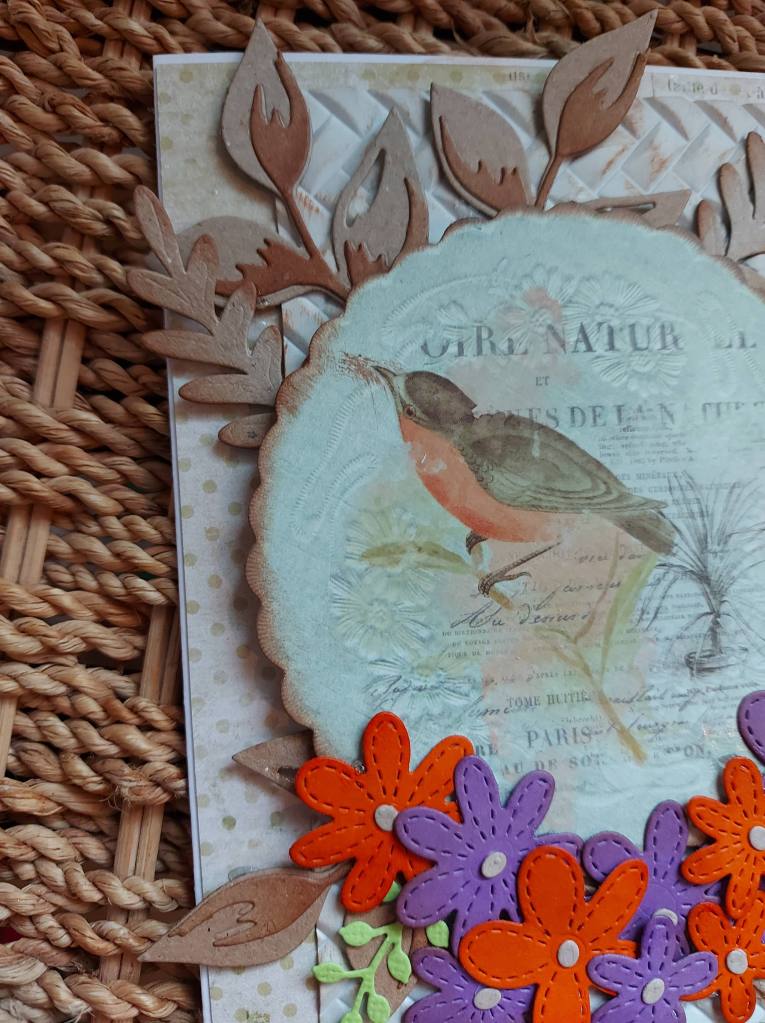
Hello again. I have created a card for one of my friends going through some tough stuff at the moment, and decided to use patterned paper from my stash:

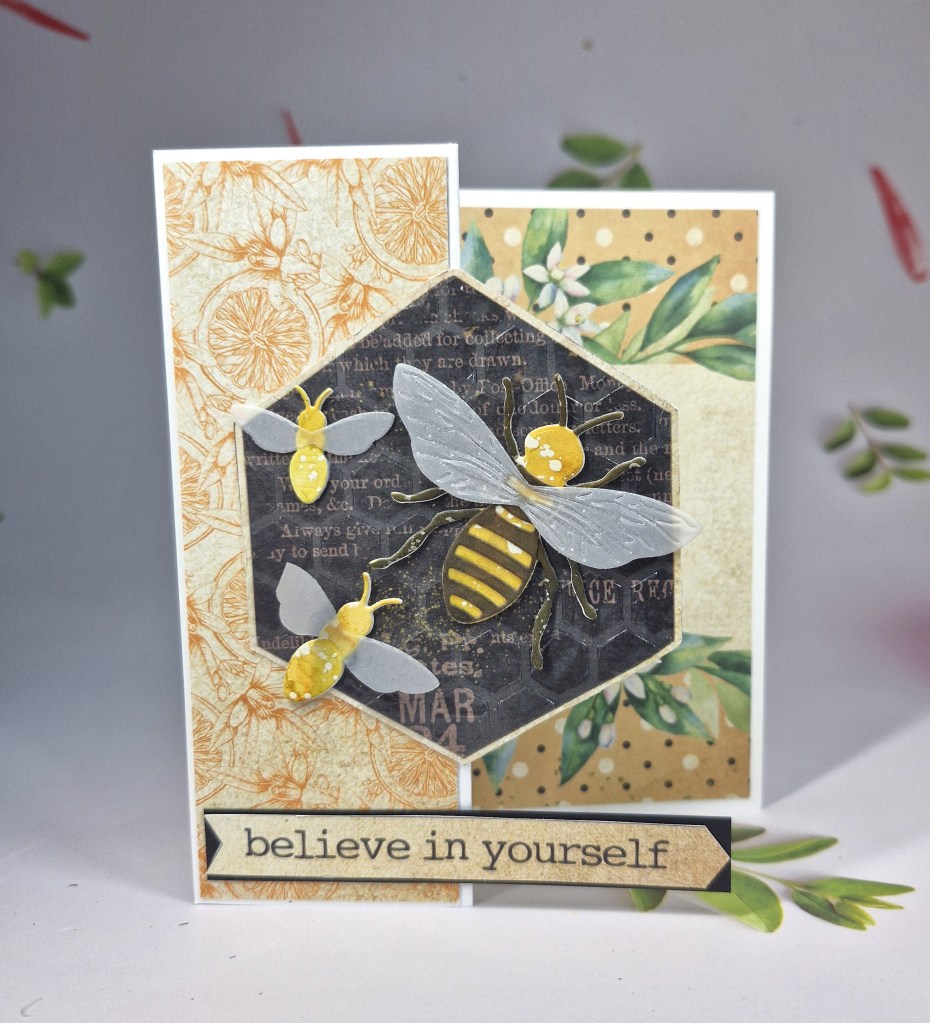
I wanted to create a Z fold card for the current challenge at Die Cut Divas, together with the theme of ‘bees’ from Double D challenge.

I knew I had some honeycomb/bee papers from 49 & Market somewhere, and I hunted them out, picked several of the papers and decided which ones I wanted.

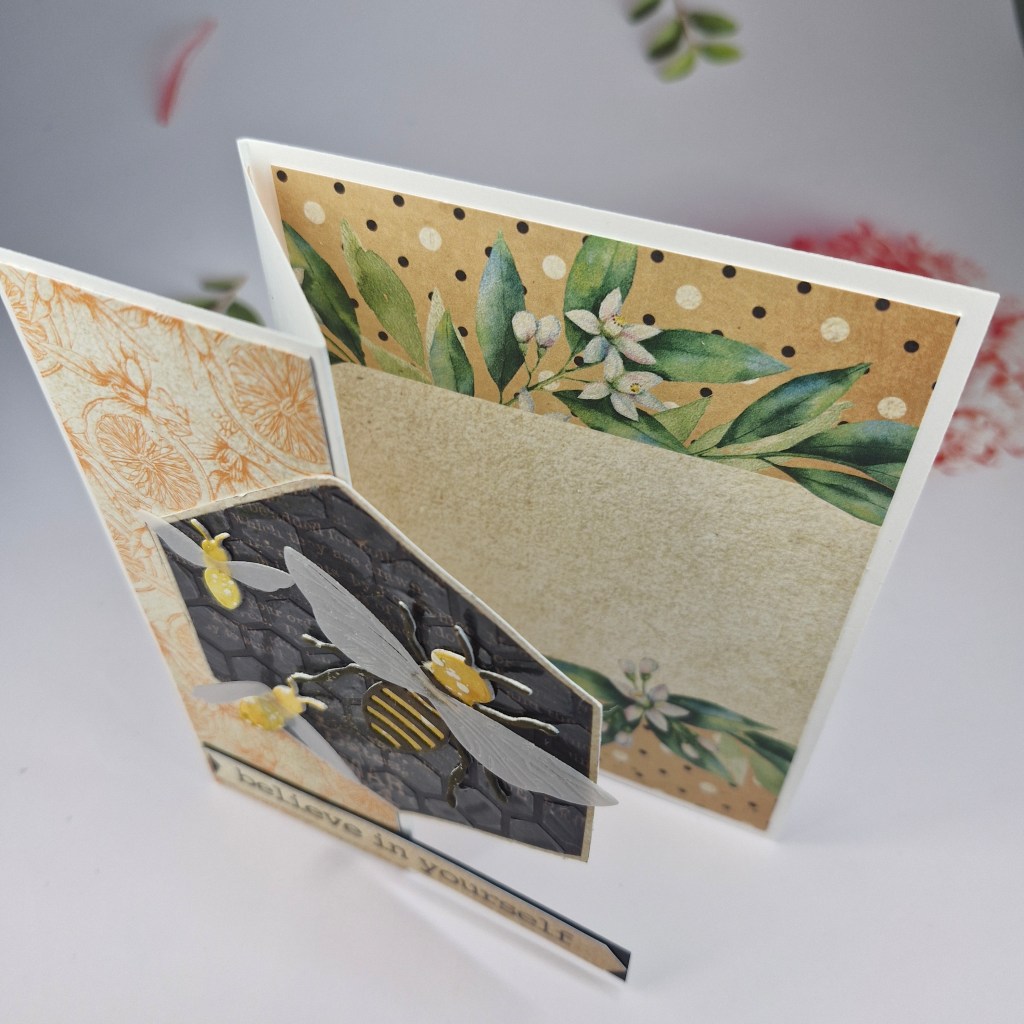
I created the Z fold using an A2 card base, matted one piece on the inside, and another piece to the front narrower panel, also covering the rear of that folded piece.

I used the ‘Honey Bees’ die set from The Greetery to create the three bees – all coming from the same die set. The yellow part of the bees is from a previously created panel – ink smooshing, acrylic paint splattering, and I think there was even some water droplets thrown in for good measure. I liked the almost honey-like colour on the panel.

The black stripes of the main bee were cut at the same time, from the same yellow piece, and coloured with a W9 Copic marker – not black – as I wanted the legs and antennae to look a little warmer, and stand out from the black hexagon.

The black hexagon piece is from the same patterned paper pack, but onto that I also used some Distress paste – the translucent paste – and a Simon says Stamp honeycomb stencil to create a little more detail and interest behind the bee, scraped through quite haphazardly.

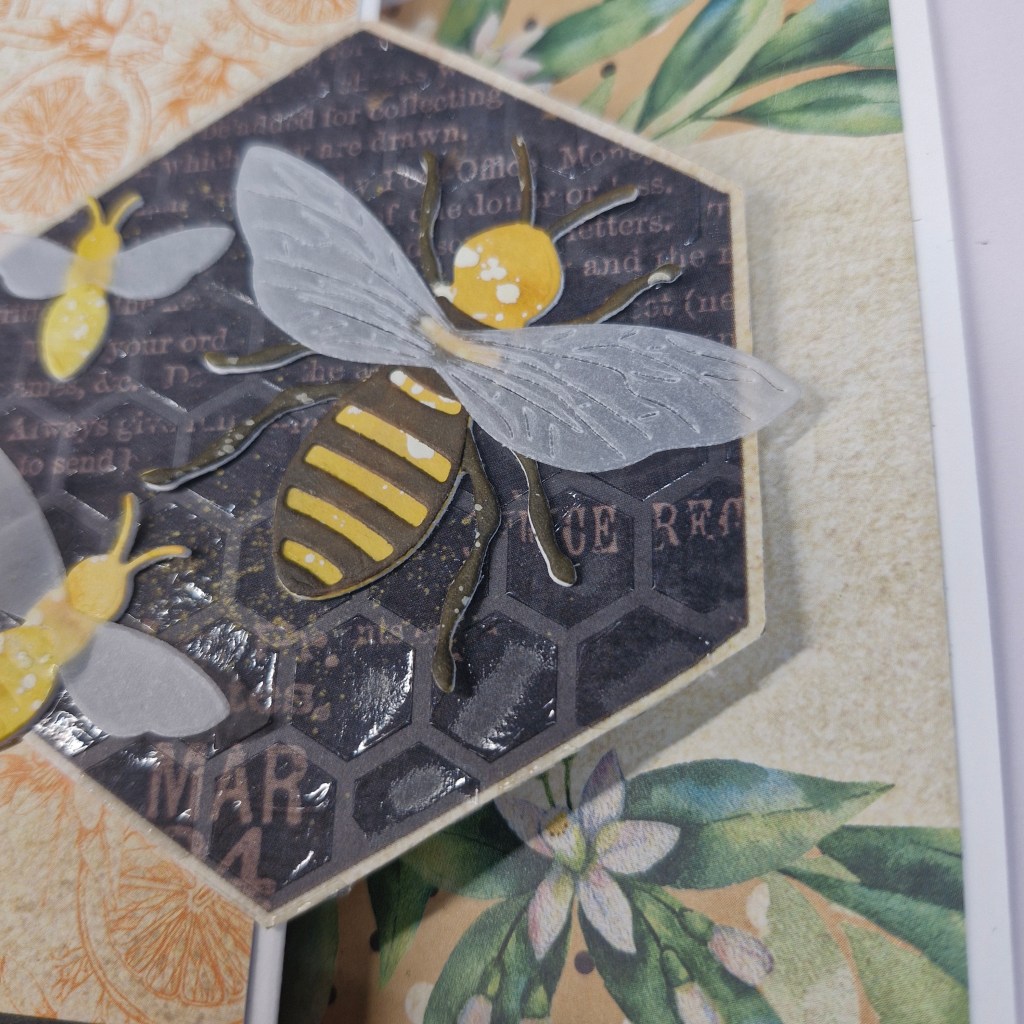
The wings for all three bees were die cut from vellum, and all the layers attached. I had to wait until the following day for the paste to dry, but then it was putting everything together to make the card you see.

I added the sentiment strip, layered with a piece of black for stability.

I shall be entering the following challenges:

Double D Challenge use bees and/or the word happy

We Love 2 Createanything goes mixed media

Crafty Animalsanything goes with an animal

Die Cut Divas die cutting and Z fold card

Crafts Galoreanything goes

Love Those Patterned Paperspatterned papers option of summertime

Peace On Earth

Hi there. Another creation to share using the ‘found’ Tim Holtz ephemera:

This is another 5×7 inch card base, with a Kraft piece on top, the edges distressed with some brown Distress Ink.

I also used some Tim Holtz papers, distressing that edge too, and adhered to the card base.

I took another of the Tim Holtz base board pieces, distressed the edge with brown, the used a Tim Holtz stencil to put some glitter paste through parts of the leaves I wanted. Then added the sparkle paste around the edges of the base board.

I used a couple of the sentiment strips from Tim Holtz ephemera pack distressed the edges again with brown, then glued them both down.

Using a snowflake stencil, I mixed some sparkle paste and brown Distress Ink and created some ‘dirty’ snowflakes which would show through the aperture. The poinsettia image was glued down, and then the baseboard added.

The sentiment board – also distressed with brown ink – was glued with collage medium, and the final touch was the bell image – glued to the top of the aperture.

Another creation which was a lot of fun, out of my comfort zone – but I went with it.

I shall be entering the following challenges:

Ally’s Angelsanything goes

Creative Fingers anything goes

Peace On Earth anything goes Christmas

Creative Artiste Mixed Media Challenge anything goes mixed media

We Love 2 Createanything goes mixed media

Merry Little Christmas Challengeanything goes Christmas

Ellibelle’s Corner anything goes

Winter Wonderland

Hello. I have ‘found’ some Tim Holtz ephemera packs I bought either last year or the year before and had a play:

I started by taking a piece of Kraft card stock measuring 5×7 inches, and blended Distress Ink ‘Candied Apple‘ over the whole panel.

Using a Spellbinders embossing folder, I ran that panel through, then distressed the surface with a sandpaper block.

The brown ribbon was placed across, stuck down the the back of the panel, and then the panel adhered to a 5×7 inch card base.

The ephemera pieces were laid out and played with until I was happy with the scene it created, and a red striped Tim Holtz paper placed behind the aperture. The images were glued onto the paper – measured and placed according to the base board panel – then the base board panel was distressed slightly with a brown Distress Ink, then adhered with Distress Collage Medium.

The deer was added after that was stuck down, then some more collage medium added to the top and bottom of the base board aperture, then mica flakes scattered there.

The sentiment board was distressed a little with some brown Distress Ink, then also glued down with collage medium.

I enjoyed playing with products from my stash that are not my usual ‘go to’ products – and getting inky and messy, of course.

I shall be entering the following challenges:

Ally’s Angels anything goes

Hand Stamped Sentimentsphoto inspiration – the deer in the scene caught my eye

Creative Fingersanything goes

Peace On Earthanything goes Christmas

Make My Mondaywild animals

Christmas Crafts All Year Round Christmas with reindeer/moose/deer

Windows of Blue

Hello again. I have created a card I would like to share with you:

I was inspired by the blue and the window/shutters of the Inspired By challenge, and used the arch window die from The Greetery. I wanted the window pane section to be separate from the arch itself, so I first die cut the arch using a Simon Says Stamp arch die set, then die cut the window panes inside that. I then die cut the panes again in a lighter blue and pieced them back in. All the card stock is from Concord & 9th.

The background was created using a Spellbinders stencil and ink blending the two Distress Inks you see in the photo, keeping the darker blue towards the bottom.

Once this was adhered to the card base, I added the window with 3D foam, die cut the flowers, and added them for a pop of colour.

The flowers and sentiment strip are both from Spellbinders.

I also added some glittery gems from Pinkfresh Studio to the centre of the smaller cluster of flowers.

I shall be entering the following challenges:

Inspired By – photo Inspiration

A Perfect Time To Craft – anything goes

Daisy Chain Challenge – no designer paper

The Crafty Addicts – anything goes

Ally’s Angels – anything goes

Warm Winter Wishes

Hello once again. I had some messy and inky play yesterday to create this card:

I first created the panel for the mug. I used a Simon Says Stamp snowflake stencil, and through that I put some Altenew paste onto water colour card. Whist that was drying, I took some Distress Heavy Kraft card stock, stamped and heat embossed the sentiment in white, then sprayed with Distress Oxides in two purple colours. Again – this was set aside to dry.

Once the white snowflake panel was dry, I took purple Distress Inks, and ink blended over the top. I wanted the snowflakes to catch the ink, but also to have some purple on the background for an almost grungy look, and to be able to see the pattern from the water colour card itself. I then die cut the mug shape using a Heffy Doodle die set.

The sentiment cup holder was wiped with a dry cloth to try and get the white sentiment back, then die cut. The top of the mug was also using some of the left-over pieces from the die cutting of the mug and the holder piece.

I wanted a snowflake background, so took a Simon Says Stamp embossing folder, and as I didn’t want it stark white, I ink blended the lighter purple Ditress Ink around the edges.

The background panel was glued directly onto the card base, and the mug attached with 3D foam.

I found some purple sequins and dotted them around as you see.

I shall be entering the following challenges:

Allsortsanything goes, option to make your own background taken

The Four Seasons Challengeanything goes winter

Give A Crafter A Cookie photo Inspiration

Ally’s Angels – anything goes

Mix It Upanything goes – option to use more than one medium taken

Flying By To Say Hello….

I had a play with new – and some not so new – items and created this card:

The hummingbird die is part of a Spellbinders/Bibi Cameron class last weekend. We created a total of three cards with the hummingbird die set, which also comes with some large lilies. I understand these die and their add-ons will be released next month. In the meantime, I have been playing….

I changed my mind several times with this card. I first die cut the hummingbird and all the layers with some lime green and yellow card stock – to match the colours of a current challenge – but decided the image was too flat, despite the layers.

I decided to create my own yellow and lime green card by ink smooshing Twisted Citron and Squeezed Lemonade Distress Inks, and then using those two panels to die cut the bird layers. The only decision to be made was which colour for which layer – but I like how this turned out.

The background panel was created using a piece of light blue card stock, a a Sizzix 3D embossing folder. I thought the blue was too even, so I then took the Hero Arts Unicorn White pigment ink and gently – so very gently – swiped it across the piece of card. The white highlighted the most raised areas of the embossing, and I was much happier with this look.

I cut down that panel to be slightly smaller than an A2 card base, adhered it with 3D foam, and then attached the bird – also with 3D foam.

The sentiment is from the add-on sentiment stamp set from the same release.

I also added some light blue iridescent sequins – three slightly underneath the wings of the bird, and three below the sentiment.

I shall be entering the following challenges:

Simon Says Stamp Monday Challengeemboss it

Color Throwdownpale blue, yellow, lime

2 Crafty Critter Craziesanything goes with an animal as main focus

Crafty Animalsanything goes with an animal

Triple B challengebirds, blooms, butterflies – any or all

Many Snowflakes

The Holly and Ivy Christmas Challenge has started a new ‘anything goes Christmas’ challenge. Here is my card:

I started by dry embossing using a Simon Says Stamp embossing folder – I knew I wanted a lot of snowflakes on this card and this folder fitted the bill perfectly.

I then die cut the Hero Arts snowflake die out of a larger circle of white card and adhered it to a previously created background. If I remember correctly, the background card was sprayed and splattered, and then a shiny coat added – but I can’t remember what the shine is from as I did this soooo long ago – just waiting to be used!

I then stuck some varying sizes of gems into the centre of each snowflake and stuck the whole circle down onto the embossed panel.

The sentiment was stamped in black and clear heat embossed – to give this a shiny look too – then fussy cut around the general shape – not too fussy and fancy – just the overall shape of the sentiment.

I hope you can come and join us this time round. xx

I shall be entering the following challenges:

Mixed Media Loversanything goes mixed media

Peace On Earth Christmas ChallengeChristmas mood board

Crafty Hazelnuts Christmas Challenge anything goes Christmas

Lil Patch Of Crafty Friends anything goes

Addicted To Stamps and More anything goes

CYHTP embossing folder – option things with wings not taken

Hello There….

I used the colours for the current Color Throwdown Challenge to create this card:

I first turned to some ink smooshing onto Distress Heavystock Mixed Media card using Antique Linen for one piece, Bundled Sage for another couple of pieces, and then my first play with Villainous Potion – my goodness that purple is – well – purple! Such a strong and vibrant colour, which I thought was a perfect foil for the other two more subdued colours……

Once those pieces had dried sufficiently, I die cut the Birch Press Design Eucalyptus and Berries die several times – not yet deciding which colour I wanted for which element.

I knew I wanted the berries to be the cream, and the leaves green, but the stems I had a play and think about – deciding on what you see here – a mish-mash of both really…..the leaves and berries are layered dies to create dimension.

I die cut the purple with a circle die, but then die cut it again smaller so I could have more of the leaves and berries hanging over the edge.

The base cream card stock is embossed with the new Tim Holtz ‘Woven‘ embossing folder, and adhered to the card base.

The purple circle was adhered with 3D foam squares, and the leaves with a mixture of foam squares and glue.

The sentiment was stamped onto cream card stock.

I shall be entering the following challenges:

Color Throwdown sage green, purple, cream

Krafty Chicksanything goes

CYHTP – embossing folder, option to use green

INTAASinclude a circle

The Alphabet Challenge – ‘Y’

Helen is hosting the new challenge at The Alphabet Challenge. Having reached the letter ‘Y’ we want to see ‘Your Favourite Colour Combination’. Here is my card:

I didn’t really think I had an absolute colour combination, but looking back through my cards, I do seem to trend towards more green, blue, and red – and for this card I also used a spot of yellow.

Onto a white card base I used my oval mask created myself using some mylar. I then took the Lawn Fawn cloud stencil and some blue Distress Ink and worked my way down the oval. I then stamped the sentiment from the same stamp set in the top right corner.

The image is from Clearly Besotted, stamped, coloured with Copics, and cut using my Scan-n-cut – always a little nerve-wracking when the colouring has already been done……!

The Design Team has come up with lots of very colourful creations, I hope you can come and join us using your favourite colour combination.

I shall be entering the following challenges:

Simon Says Stamp Monday Challenge – add some green

Promarkers Challenge use markers and CAS

Lil Red WagonCAS

Colour Crazy Challenge week 9 anything goes with colouring

Inkspirational – word prompt – CURVE

Playing with colours and papers

Hello. I’ve spent a little time in my craft room today, playing with different patterned papers I have accrued – and that’s a lot of patterned papers….. I actually don’t know how to layer them, how to play with the sizes of them, or how to put collections together really – but I enjoyed creating this card.

There are so many layers, so many different elements, a lot of die cutting – and a lot of gluing…..

I attended the virtual Maker Mania 4 last weekend – well, I say attended, when I still have lots more to see and lots more ideas to try a re-create from that weekend. A lot of the papers I used today were from the kit sent from MM4 – and some oldies but goodies from my stash.

I started by using a rub-on from the kit – the bird on the centre of the circle – which was also part of the kit. I can’t remember the last time I used a rub-on image – if ever – but this bird just sang to me – pun intended!

The flowers are from MFT, the layered leaves were from Sizzix, as was the embossing folder.

A piece of patterned paper onto the base card, to which I glued the dry embossed piece after I had also distressed that with the same brown distress ink. The circle was glued down with Pinflair glue – I like to be able to move it and lift it when layering other elements, and that glue gives me enough time.

The layered leaves – top layer again darkened with distress ink – were added next, then the orange and purple flowers – and you guessed it – they were dampened down a little with brown distress ink – and all arranged as you see here.

So – outside my comfort zone, enjoying playing – and maybe – just maybe – getting to grips with patterned paper and layering…….but still a work in progress…..

I shall be entering the following challenges:

Color Throwdown purple, orange, green, kraft

Here Is A Place To Start use patterned paper

Simon Says Stamp Wednesday Challenge anything goes

Beyond The Blue Challengelayered die cuts (leaves and flowers)

Critter Crazy Challengeanything goes with a critter

Die Cut Divas anything goes with die cuts

Join Our Community
Beyond The Blue
Grab our Badge
Please grab our Blog Badge