One Layer Happy Birthday

Hello. A new challenge has started at Happy Little Stampers CAS Challenge, this time we want to see your CAS cards with no added layers. Just the card base with your images and/or sentiments on it. No layering. No die cuts – one layer.
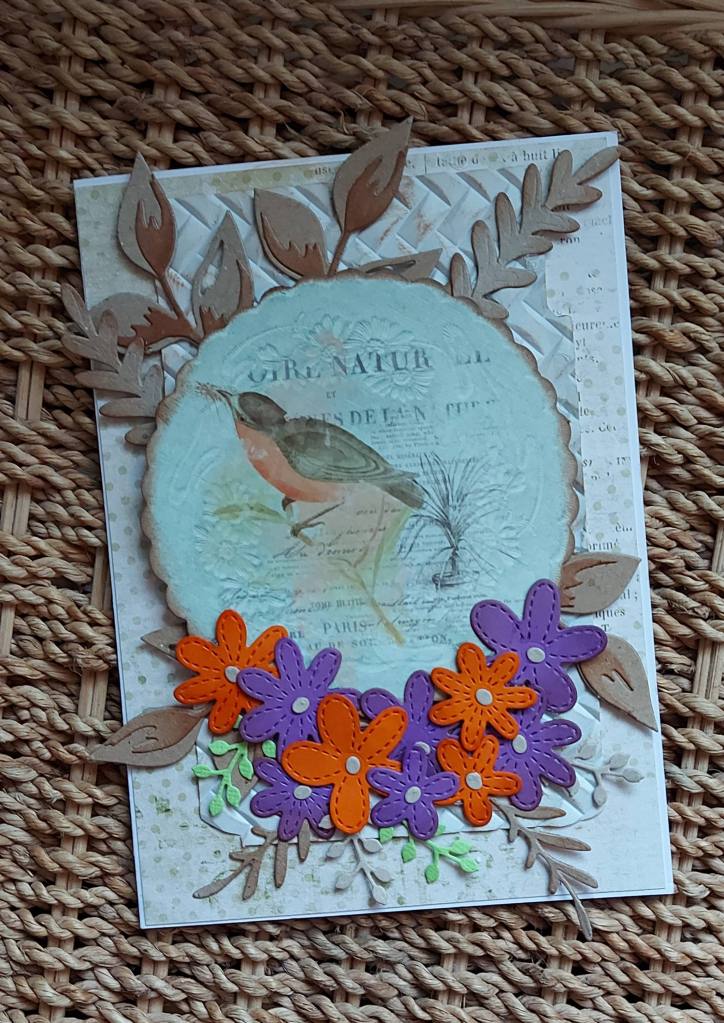
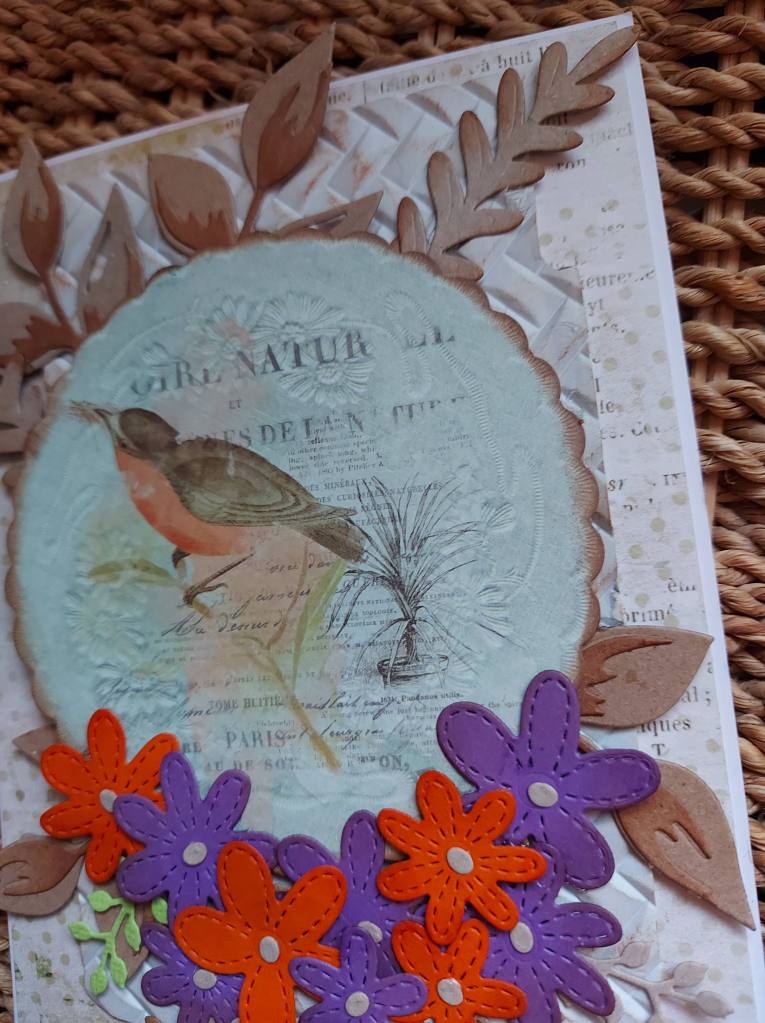
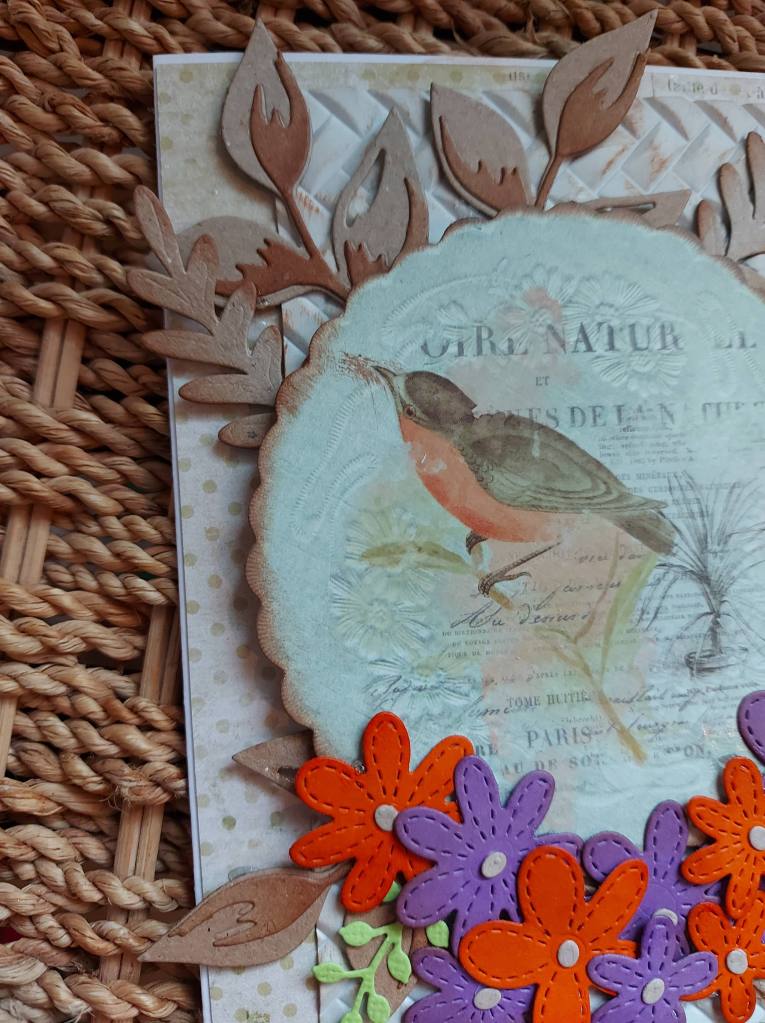
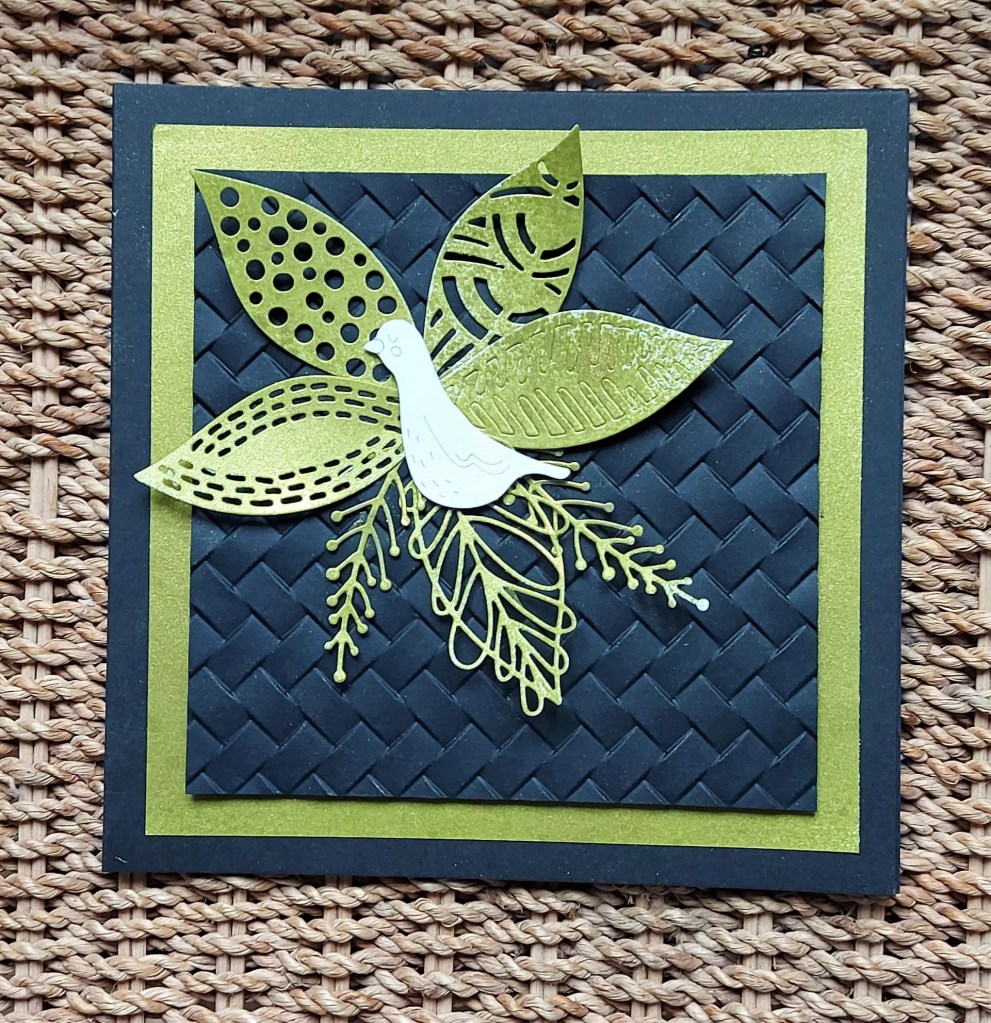
Here is my card:

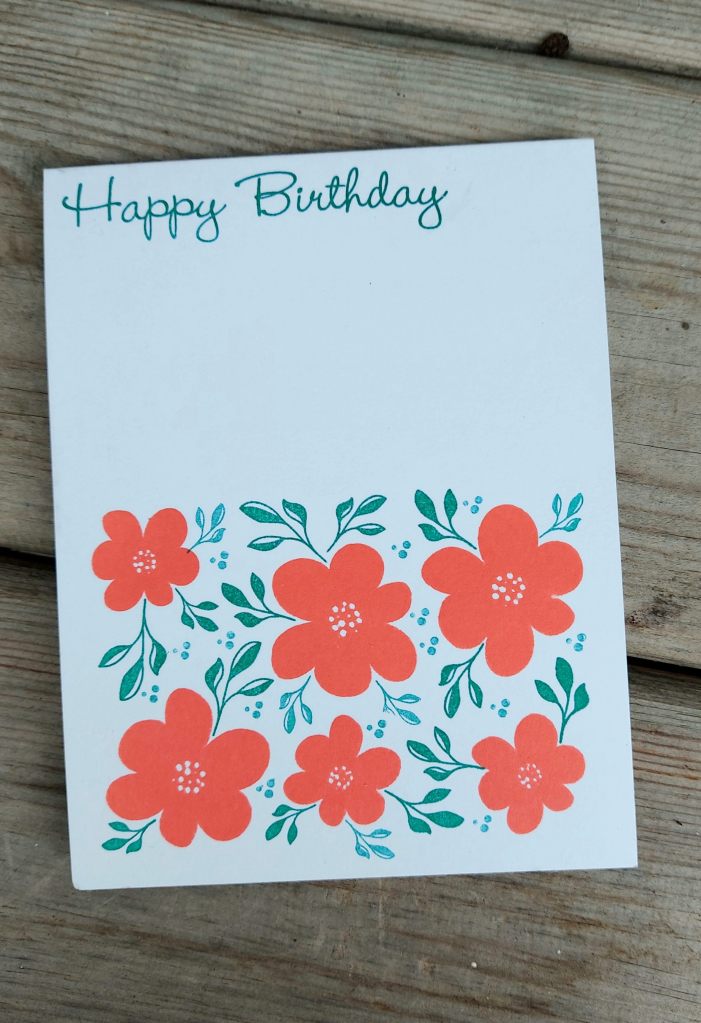
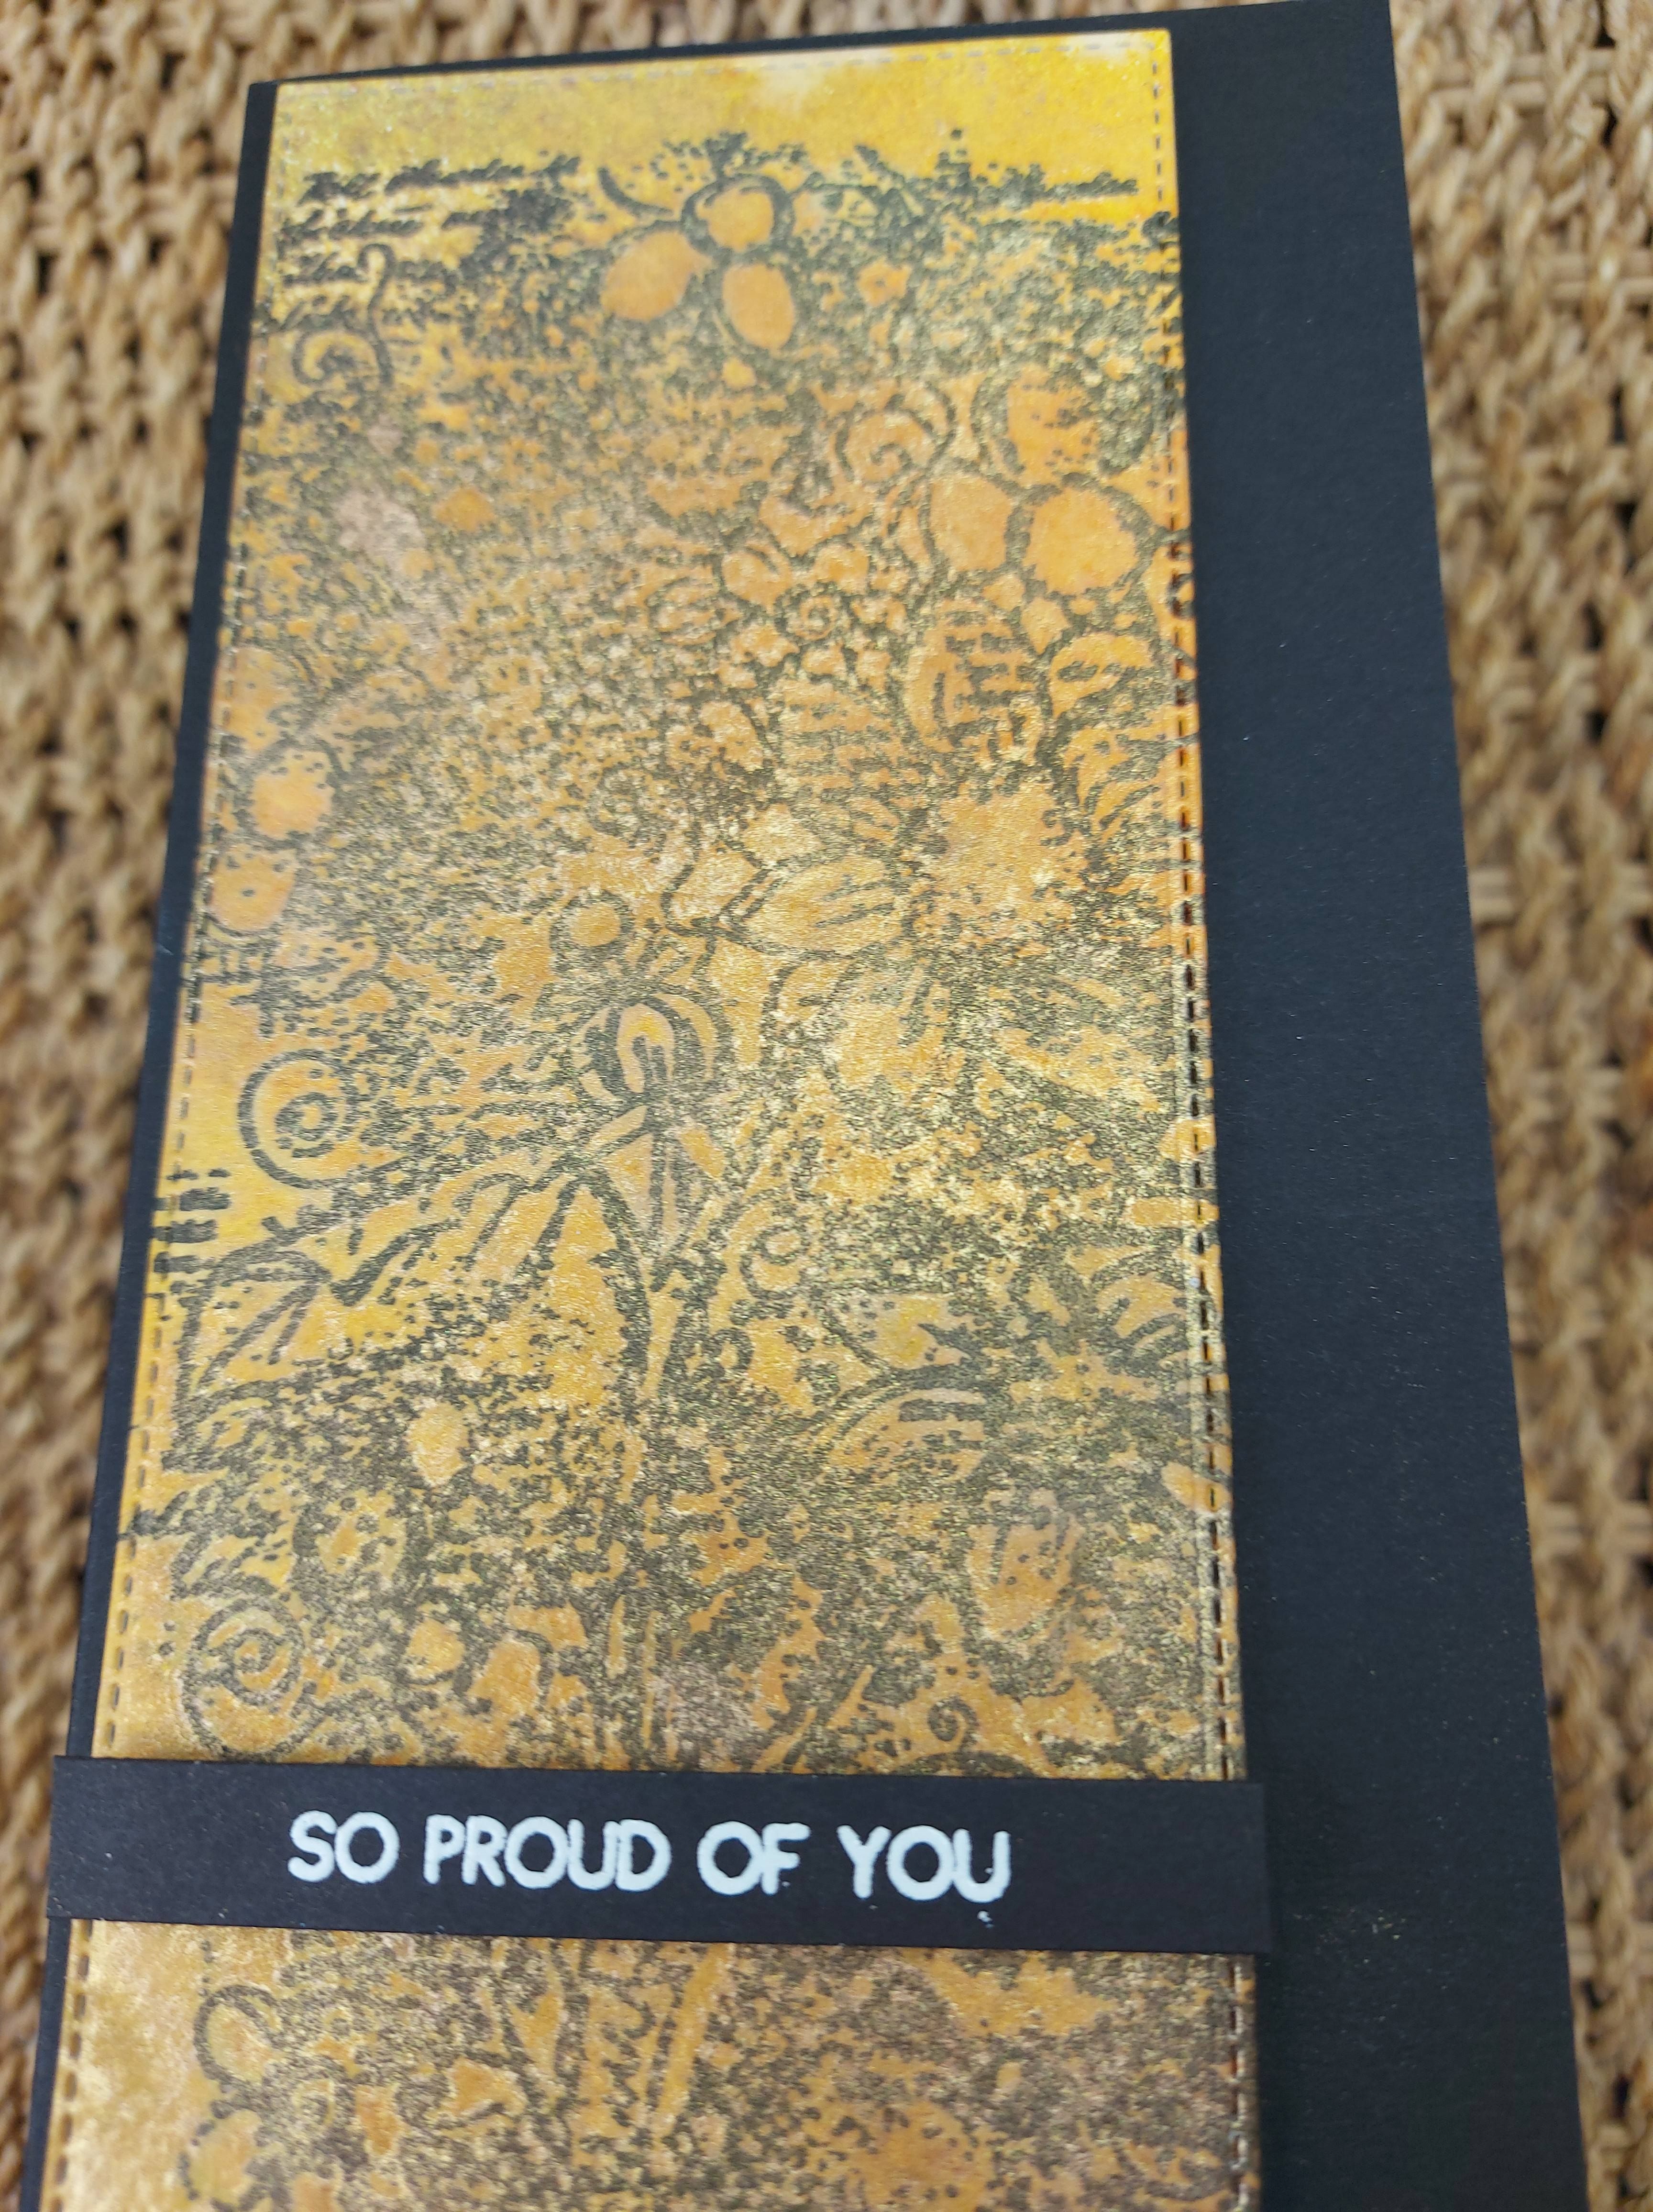
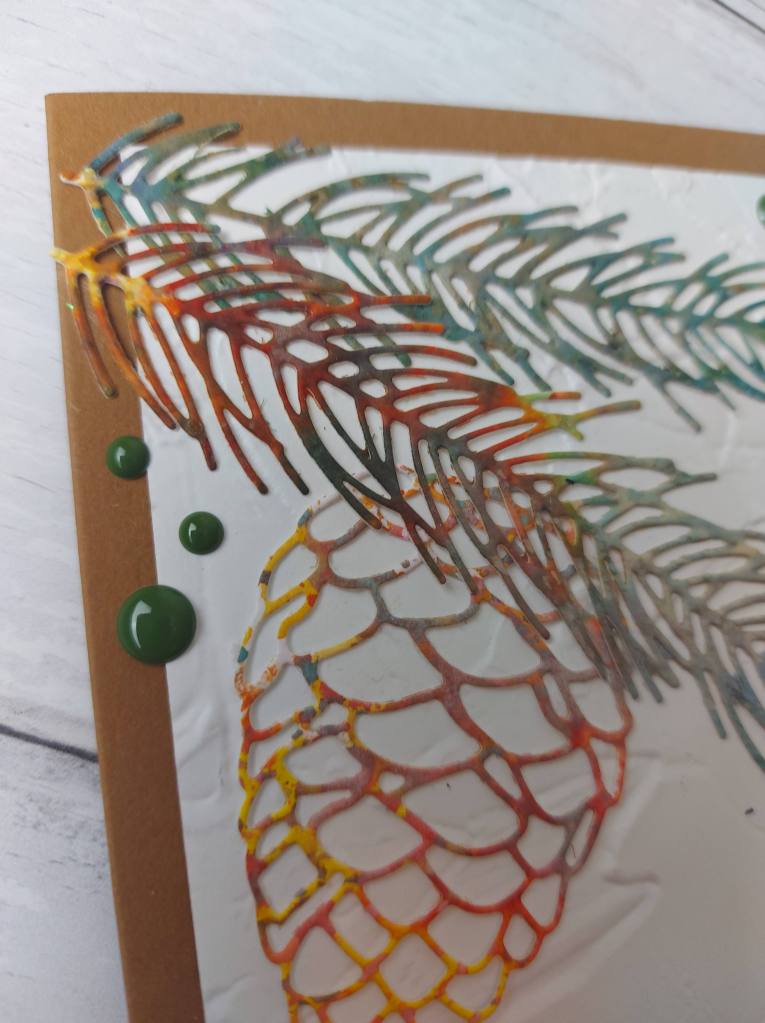
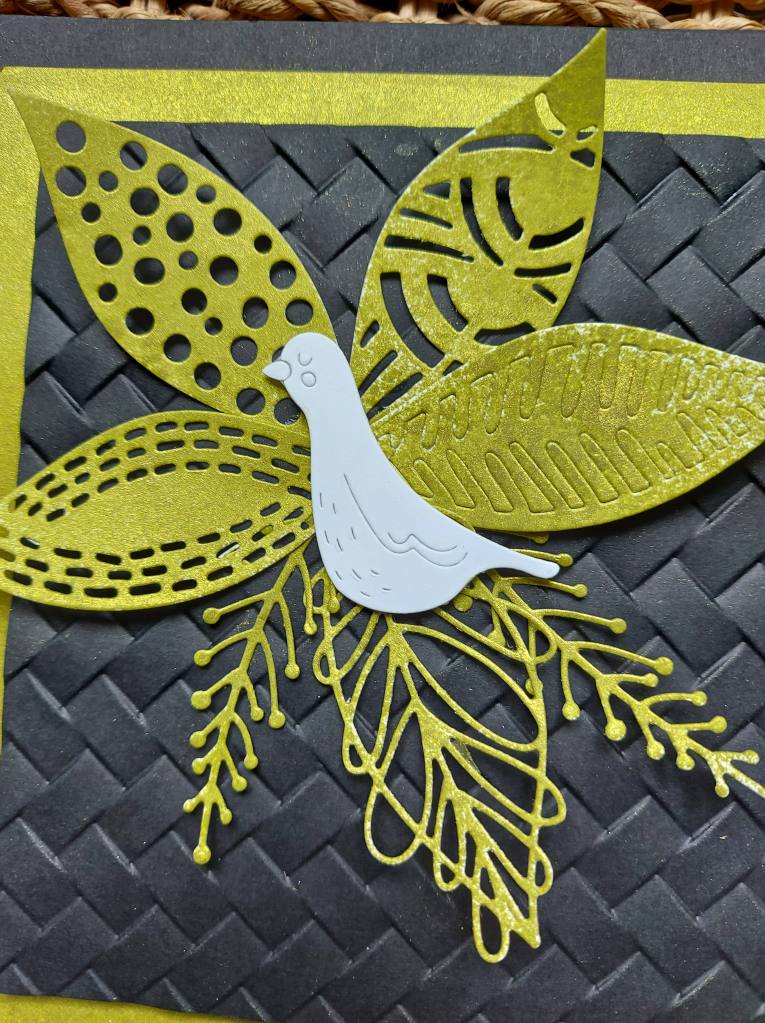
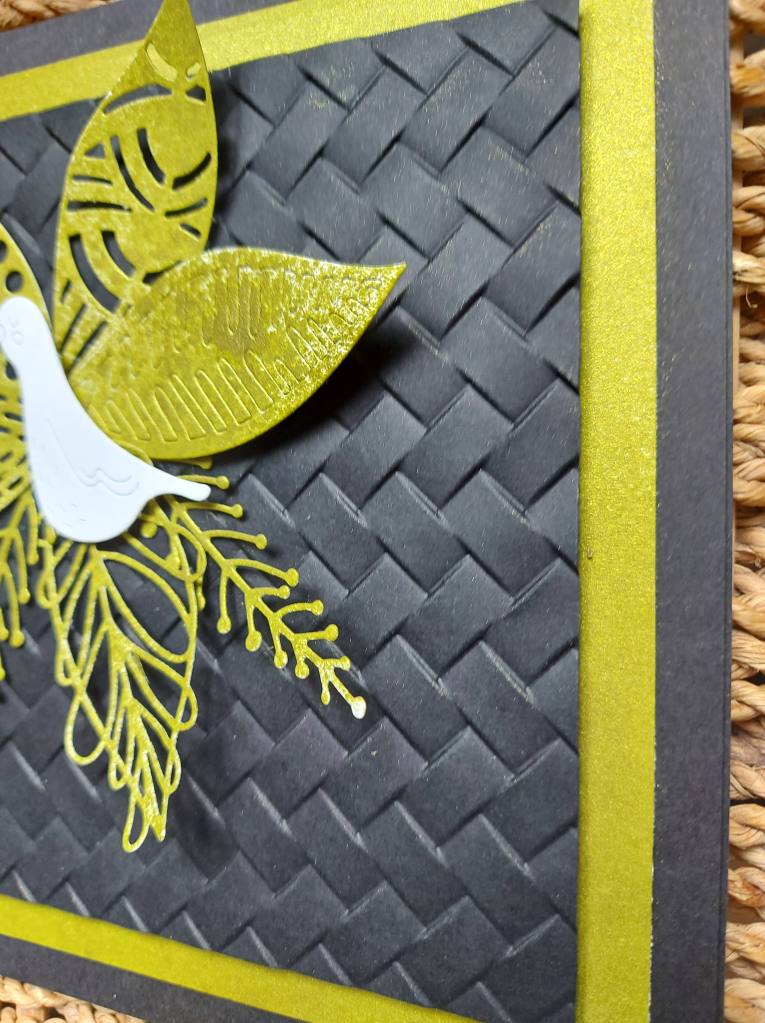
Using a top folding A2 card base out of Neenah card stock, I stamped the two layers from the Uniko ‘Background Blocks Layered Modern Floral’ using Catherine Pooler inks.

I chose these two colours virtually straight away, and chose Catherine Poole rinks as they always stamp first time on new stamp sets – a little rubbing over the stamp with the fingers, but then you are good to go. Of course -having the Misti helps – just in case!

There are some little stamps in the set too which I used to stamp extra in the main image – those little dots and a few leaves….

As a little aside – this is the second card I created for this challenge. The first card just didn’t take my fancy. I used some layering flower and leaves sets from Altenew, some masking – but the end result didn;t really do it for me – I kept thinking about t, and finally – whilst tidying my craft room for yet another virtual crafting session – I came across this stamp set just sat there waiting to be added to the CML app.

Bingo – I prefer this card much better – it just kinda sings to me…..

I hope you can come and join us for this challenge – there are some amazing one layer cards from the Design Team – and such a difference between each make – such inspiration….. xx

I shall be entering the following challenges:

TTCRD anything goes

Time Out Challengeinspired by words (flowers)

Uniko Challenge anything goes – option autumn colours

GRAB OUR BADGE

Playing with colours and papers

Hello. I’ve spent a little time in my craft room today, playing with different patterned papers I have accrued – and that’s a lot of patterned papers….. I actually don’t know how to layer them, how to play with the sizes of them, or how to put collections together really – but I enjoyed creating this card.

There are so many layers, so many different elements, a lot of die cutting – and a lot of gluing…..

I attended the virtual Maker Mania 4 last weekend – well, I say attended, when I still have lots more to see and lots more ideas to try a re-create from that weekend. A lot of the papers I used today were from the kit sent from MM4 – and some oldies but goodies from my stash.

I started by using a rub-on from the kit – the bird on the centre of the circle – which was also part of the kit. I can’t remember the last time I used a rub-on image – if ever – but this bird just sang to me – pun intended!

The flowers are from MFT, the layered leaves were from Sizzix, as was the embossing folder.

A piece of patterned paper onto the base card, to which I glued the dry embossed piece after I had also distressed that with the same brown distress ink. The circle was glued down with Pinflair glue – I like to be able to move it and lift it when layering other elements, and that glue gives me enough time.

The layered leaves – top layer again darkened with distress ink – were added next, then the orange and purple flowers – and you guessed it – they were dampened down a little with brown distress ink – and all arranged as you see here.

So – outside my comfort zone, enjoying playing – and maybe – just maybe – getting to grips with patterned paper and layering…….but still a work in progress…..

I shall be entering the following challenges:

Color Throwdown purple, orange, green, kraft

Here Is A Place To Start use patterned paper

Simon Says Stamp Wednesday Challenge anything goes

Beyond The Blue Challengelayered die cuts (leaves and flowers)

Critter Crazy Challengeanything goes with a critter

Die Cut Divas anything goes with die cuts

Join Our Community
Beyond The Blue
Grab our Badge
Please grab our Blog Badge

Flowering Cactus

A quick post today to share a one layer card:

I just love that sentiment, and when coupled with the flowering cactus – I just had to buy the stamp and die set and play with it.

The set is from Memory Box, and I stamped the image onto a Neenah 110lbs card stock to reduce the amount of Copic bleed-through to the other side when I coloured it.

I kept the tones quite similar, using the colour scheme from a recent Hero Arts virtual class, and colours suggested by Daniel West.

I shall be entering the following challenges:

Colour Crazy Challengeweek 37, anything goes colouring

Allsorts Challenge anything goes – option nature

AAA Cards CAS – no layers – option HUGS (option not taken)

Pink Gem Challenge challenge 20 – anything goes

Colour Crazy Craft Challenge
Grab our logo
Gem of A Craft Challenge

Lantern and Poinsettia

Hello once again. The Holly and Ivy Christmas Challenge has started a new challenge. The theme is always ‘anything goes Christmas/Festive’ – here is my card:

During the past year I have taken some online classes with Susan Tierney-Cockburn – moving out of my comfort zone and trying something new. I struggled – and still do – when creating these flowers using her Spellbinders collection of dies – but I keep trying. I am pleased with how this poinsettia turned out….

The only thing I didn’t really feel I got to grips with was the centre – I really messed that up – which is why there is Nuvo drops and some glitter there……..!

I managed to create these flowers and leaves following her YouTube videos, and have even invested in the flower forming tools – I feel they would help as I was using my ball tools when I created this and didn’t quite get the detail and lines and veins of the leaves – you will probably see another variation on this theme….

I didn’t put a candle in the lantern either – and I don’t think it’s missed – maybe another variation for the future…..

The base card was layered with squares using Sue Wilson stitched dies, and one of her embossing folders too to add the holly swirl details in the white background piece.

The lantern was die cut from Tim Holtz metal coloured card stock, then I used some of his embossing powders on it to try and create a more weathered and metallic look.

I am definitely going to create this flower again – maybe in other colours – as I actually quite enjoyed stepping out of my comfort zone.

I hope you can come and join us with your Christmas/festive creations. xx

I shall be entering the following challenges:

My Time To Craftembossing (I used wet and dry embossing)

Merry Little Christmas Challenge anything goes Christmas

Mix It Up Challenge anything goes mixed media – option monochrome

Mixed Media Lovers Challenge anything goes Mixed Media

12 Months of Christmas Challenge Christmas with option of metallic

My Time To Craft!
SPREAD THE MERRY LITTLE LOVE AND GRAB A BADGE!
SPREAD THE MIXED UP LOVE - grab a badge
The 12 Months of Christmas Link Up

Poinsettia Wreath

Hello. I have had time to play in my craft room today, and created this card:

Taking the colour scheme from the current Color Throwdown Challenge, I started with a black 7 inch square card base. Onto that I layered a slightly smaller dove grey card from Concord & 9th which I had dry embossed with a wood grain embossing folder, and slightly ink blended with Distress Ink.

The wreath was die cut twice, and I cut one of them to add more layers to the part that was showing.

The poinsettias were die cut from a cream textured card stock I had and the edges were inked with some Pumice Stone Distress Ink – but then I added some Weathered Wood as I didn’t think it was grey enough. The extra darker leaves were die cut from the same cream card stock, but ink blended before I die cut with the same grey Distress Inks.

I stuck the wreath down with glue – leaving some of the twiggy bits unstuck for dimension and movement, and the poinsettias and leaves were stuck down with 3D glue – I like to use that for the more dimensional elements when I’m adding more – like the extra leaves – so I have some time to play around with the layout.

I then added some stickles to the centre of the flowers.

I shall be entering the following challenges:

Color Throwdownblack, grey, cream, kraft

Addicted to stamps and Moreany occasion

Krafty Chicksoccasions

Die Cut Divas anything goes with die cuts

Crafty Hazelnuts Christmas Challengeanything goes Christmas – option to use the word ‘Joy’ (option not taken)

Right Click to Save
Grab our Badge
Please feel free to copy to your sidebar

So Proud OF You……

The Alphabet Challenge has reached the letter ‘M’ – and Melanie has chosen the theme of ‘Motivational or encouraging sentiment‘. Here is my card:

I am sure you know someone who would appreciate an encouragement card. There have been quite a few – from my side of things at least – that deserve that little more recognition from me. I always try to express those thoughts in person, but sometimes a little something-something can add and boost their confidence.

I have a team in mind for this card, and will be taking it to them shortly.

I again used the new Tim Holtz Mica sprays for this card – after I had stamped the image from Polkadoodles. I may repeat this card again and this time heat embossing the image, but for this I like the overall effect.

I did go back in with some clean water on some of the flower images to ‘lift’ some of the spray to make them more visible……

The image is so much more visible in real life – and those mica sprays have so much shine – but I just can’t seem to capture them on a photo…….!

As this stamp is so long, I went for the slimline style, but I did cut it down on one edge, and left a border of black instead of centering it in the middle – I like how that seems to make it more dramatic.

I hope you can join us with your encouraging sentiments – I am sure they will be appreciated by the recipient. xx

I shall be entering the following challenges:

Stinkin-inkers Challenge Pick Me Up

Creative Artiste Mixed Media Challenge anything goes mixed media

Creative Fingers Challenge anything goes

Crafters Castle Challenge anything goes

Mix It Up Challenge anything goes – option monochrome

Stinkin' Inkers Challenge Blog
Creative Artiste Mixed Media Challenge Blog
Creative Fingers Challenge Blog
Monthly Challenges!
SPREAD THE MIXED UP LOVE - grab a badge

Thankful For You

Hi there. Cardz 4 Galz had started a new challenge with a new theme. Caz has chosen the theme of ‘Autumn/Fall Leaves‘. Here is my card:

I wanted to make a card with this kind of sentiment on it for a good friend who has been absolutely invaluable to me over the past few weeks. I’ve needed someone to help with some things – and she has been right there. She has run me around and generally kept in touch when I needed a boost – I am so, so thankful for her. She’s an absolute gem.

I started by stamping the Concord & 9th turnabout onto a Kraft card stock, using four autumnal colours from Gina K. The turnabout jig is a must for me to be able to line things up – thanks to the Concord & 9th Summer Camp I ‘virtually’ attended – the jig was included in the kit, and Cathy Zielske showed us how to use it…..

Once the background was stamped, I used the leaf die to cut the large leaf out of white card stock, but I added some colour by stamping the small splotch stamp so it wasn’t quite so stark. I also decided to add the panel to a white card base to bring it together.

I also decided to add some sequins so I hunted through my stash and found a Catherine Pooler sequin mix, but when I open it some of them just kinda fell onto my card – so I stuck them down where they fell. That’s one way to decided where they go, isn’t it?

I hope you can come and join us with your girlie autumn/fall leaves creations – I look forward to seeing you in our gallery. xx

I shall be entering the following challenges:

Simply Create Too fall leaves

The Four Seasons Challengeanything goes FALL

Crafty Calendar Challenge anything goes

Cards Galore Encore Anything goes

Die Cut Divas anything goes with die cuts

Simply Create Too Challenge Blog
Please Grab Our Badge
Our Badge
Grab our Badge


Christmas Pine Cones

We have a new challenge starting at The Holly and Ivy Christmas Challenge. The theme is always anything goes as long as it’s Christmas or festive. Here is my card:

Using one of my pre-made ink smooshed cards, I die cut the pine cones and branch. The base is a 3D embossing folder – leaving it white to be able to see the texture, but also to highlight the pine cones and branches.

I also used some enamel dots I had laying around – no idea where they came from. I think they were part of a kit or an online order as a freebie – but I thought the colours matched the card perfeclty.

Quite simple in it’s design, but lots of texture.

I hope you can come and join us with your Christmas makes. xx

I shall be entering the following challenges:

Krafty Chicks Christmas

Creative Knockouts anything goes

Crafty Hazelnuts Christmas Challenge – anything goes Christmas

DL Art Challenge fall colours

My Time To Craft Christmas photo inspiration (white background and festive themed, green, brown)

Right Click to Save
Creative Knockouts
Please feel free to copy to your sidebar
DL.ART


Birthday Balloons

Hello once again. I’ve been playing some more in my craft room, and using some of the backgrounds I created a while ago – this time using an alcohol ink piece of Yupo to create this CAS card:

I used this die from MFT which cuts the balloons and the frame, and with the additional balloons provided I die cut them from the piece of Yupo paper.

The frame I stuck down with some foam strips – they were very, very sticky so I’m glad I stuck it down straight! The balloons were stuck down using wet glue…….and then I wondered what I was going to do for the sentiment – I had forgotten to stamp it before I put all the layers together. I didn’t think the Misti would help, due to the dimension, so I actually stamped using an acrylic block! Shocker! I rarely do that because I always get it wrong…..

This time, I prepped my stamp, I used a Catherine Pooler ink, and chose an outline sentiment…….and it worked! It’s always good when a plan comes together – but I was nervous of spoiling the card…….I’m glad I didn’t! It is only a few pieces of card, but still……

I shall be entering the following challenges:

Seize The Birthday anything goes birthday with option pastel colours (not taken)

Clean and Simple on Sunday CAS Balloons

Watercooler Challenge occasions

Aud Sentiments Challenge birthday sentiment

For your blog
Aud Sentiments Challenge Blog

Shimmery leaves and a dove

Hi. I have been inspired to create this card using the elements from the current challenge at Festive Friday. They proved an inspiration list, and you have to use at least three elements from that list. I must admit I think I used more than three elements – I enjoyed playing and constructing my card. Here it is:

I started by using one of the new Tim Holtz mica sprays, and sprayed two pieces of card, as I knew I wanted at least a 6 inch square panel, and I also wanted to die cut the leaves from it.

Whilst that was drying, I die cut the dove from Simon Says Stamp – putting some tape on the back to hold all the pieces together – minus the legs. I couldn’t figure out a way to keep the legs on the dove – so it’s juts sitting there instead!

I then took another piece of black card and dry embossed the basket weave from We R Memory Keepers, by which time the sprayed panels were dry – and so, so shimmery!

I layered the square of green onto the black card base, added the embossed panel, then played the layout of the leaves, and ended up with them as you see. I didn’t stick the entire leaf down each time, leaving some just kinda flapping and giving movement, then added the dove with some foam squares.

So let’s have a look at the inspiration list:

It appears I used a dove, white, leaves, non-rectangular card base, die-cuts, and spritzing………

I shall also be entering this card into the current challenge at Beyond The Blue – with the theme of ‘let it shimmer’ – those mica sprays are really, really shimmery – whether I’ve managed to catch the shimmer in the photos or not – it’s certainly there. xx