White Daffodil

Hello. I’m here to share a card which again took some patience -maybe I’m learning that I have some patience after all….

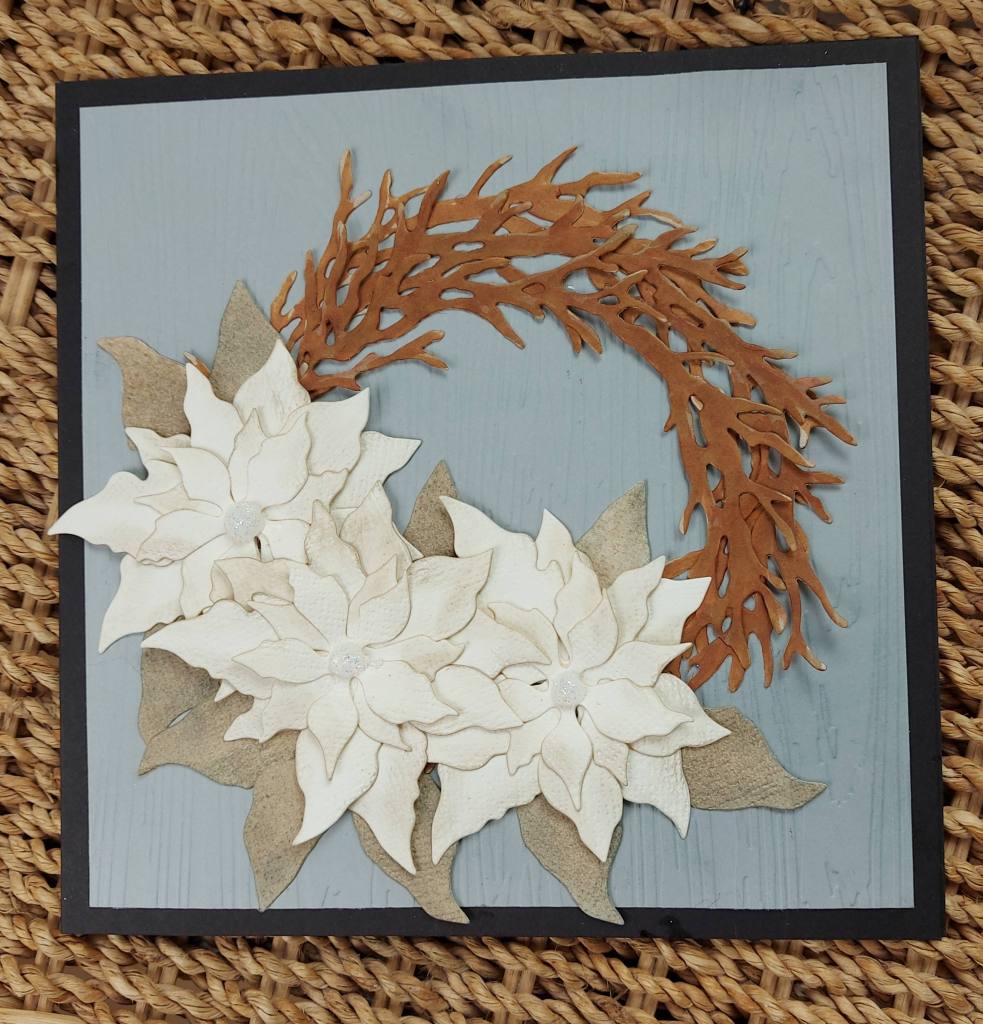
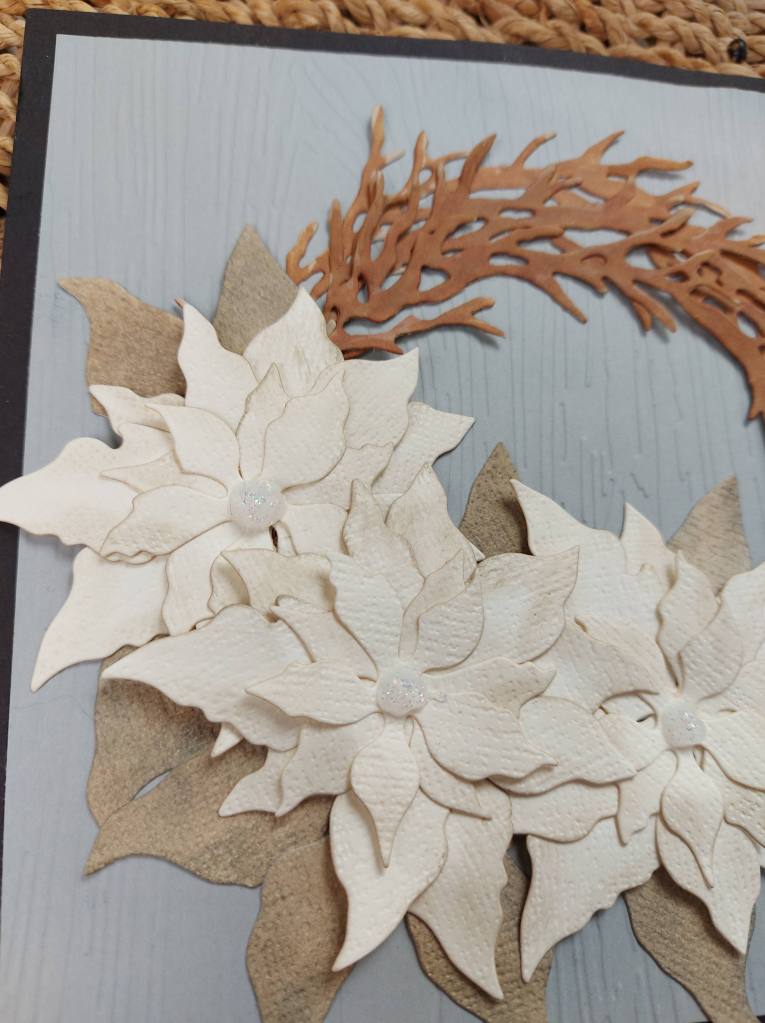
I chose this daffodil die in memory of my mum – who recently passed – her favourite flower:

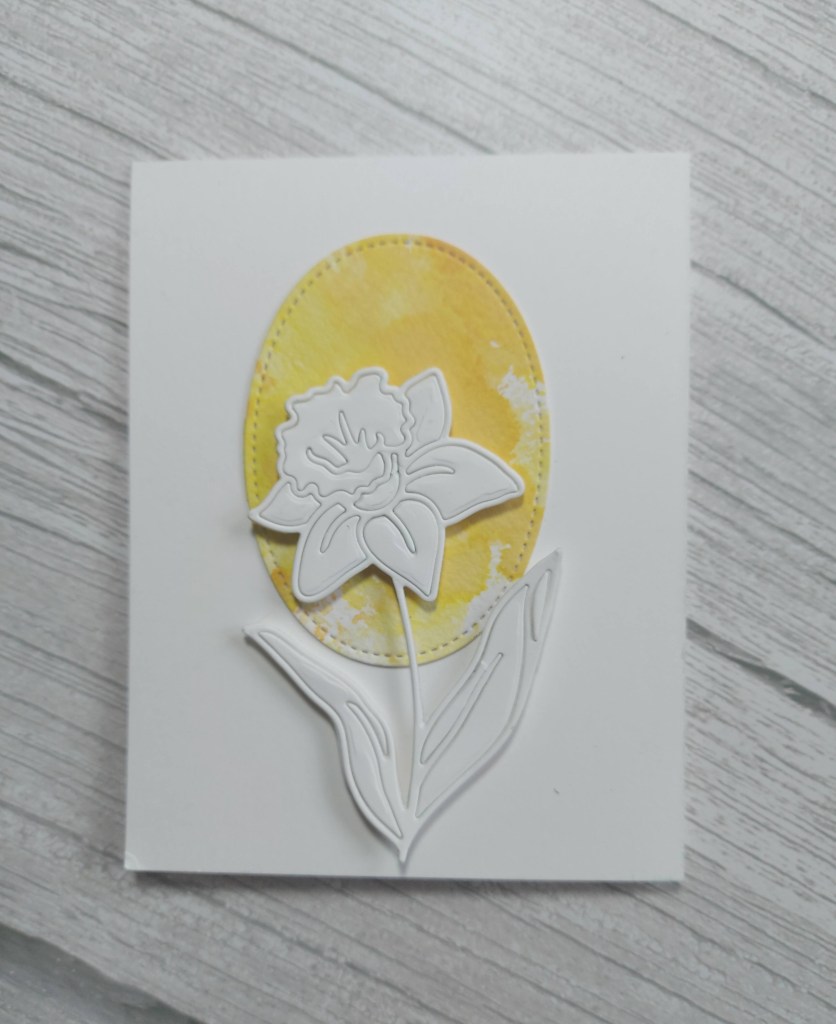
I die cut an oval from a previous yellow ink smooshing background panel – glued flat.

The daffodil is from Simon Says Stamp, and I die cut it out of white card stock – and then the complications began…..

I wanted all the pieces to stay in the stem – which they did – and then I decided to add some dimension. I was thinking 3D foam squares, then foam pieces, then layering die cuts together…..

In the end, I stuck white card onto some foam, then die cut……..and then some of the pieces fell out of the die cut and wouldn’t go back in neatly…

I persevered, and then die cut another flower form the white card and placed it on top of it all – so one die cut piece on foam, and then another die cut piece on top of it all…..

I am sure there is a simpler way of doing this! Maybe layering die cuts together would have been the way to go – maybe I’ll try that another time……

I shall be entering the following challenges:

Clean and Simple on Friday CAS spring flowers

Creative Fingers anything goes

Cup Cake Inspirations anything goes

Lil Patch of Crafty Friends anything goes

‘X’ for Xanthic

Hello there. The Alphabet Challenge has started a new challenge. Veronica is hosting this time round. I must say I had no clue what ‘Xanthic‘ meant initially – but it means ‘relating to yellow’. So – here is my card:

Here I played with ink smooshed card stock in yellow and green – inking, smooshing, splattering – all to have some fun and play.

Once those pieces had dried, I used the Honey Bee Stamps ‘Lovely Layers: Sunflower’ die set to cut out the leaves – layering several of the sunflower petals together – even cutting into the leaves a little for more movement and dimension.

The background is a stitched diagonal cover plater from Reverse Confetti, and the sentiment is from Altenew.

Some sequins added for something extra.

The Design team have a very varied take on the ‘Xanthic’ theme – it would be great if you were to check them out – and hopefully we’ll see you in our gallery. xx

I shall be entering the following challenges:

Watercooler Challenge – anything goes

Die Cut Divas – angle it (stitched lines angled)

Lil Red Wagon make it stitched (background panel stitched)

Simon Says Stamp Wednesday Challenge anything goes

Cupcake Inspirationanything goes

Arty Divas – anything goes

Mistletoe Christmas

Hello – it’s time for The Holly and Ivy Christmas Challenge to start a new challenge. The theme is – as always – anything goes Christmas. Here is my card:


I used the layers of the Taylored Expressions stencil and Distress inks, trying a different colour combination. For the holly berries, I didn’t use the stencil, but some glittery drops where the stencil would have put them.

The tag is die cut using a Simon Says Stamp gift tag die and then stamped a mistletoe outline stamp to cover the tag. I added the sentiment then placed it all together as you see – and even managed to place the hole in the tag over a red berry – bonus!

I hope you can come and join us and make a start on your Christmas stash. xx

I shall be entering the following challenges:

Crafty Catz Weekly Challengeanything goes – option not a square

Crafty Hazelnuts Christmas Challenge anything goes Christmas

Watercooler Challenge occasions

Addicted To Stamps Christmas

Creative Fingers Challenge – anything goes

Crafty Catz Challenge Blog Badge
Please feel free to copy to your sidebar

Have a Beary Good Day…..

Hello once again. Happy Little Stampers CAS Challenge has started their challenge for February. The theme this month is ‘inky’ – in a CAS style. Here is my card:

I knew I wanted to create an ink smooshed background – but how to keep it CAS? I decided to use two colours of Distress Inks, and smooshed them onto my craft met. I took a piece of water-colour card, added some water to one corner of it, and dropped in the two colours – drying between each colour. One of the layers must have been slightly wet still, so it created an almost orange or peach colour where they blended – which I quite like.

I then splattered those same two colours onto the piece of card.

Whilst that was drying, I stamped the images from the Time For Tea Designs stamp set, and coloured them with Copics, trying to find colours which were very similar – and throwing in a green one there for a different pop of colour.

After stamping the sentiment, I die cut them with the matching dies, and then decided which part of the inky background I wanted to use, and where, to keep things CAS.

I used a Catherine Pooler die set which I’ve had for ages, and cut the panel quite a bit smaller, then added the bear – some of him off the panel using foam pads, and some directly onto the panel with glue – the same with the sentiment.

The last thing to do was add some white gel pen for detail – which I tend to go over-board with but I believe I restrained myself here. I hope you can come and join us with your CAS ‘Inky’ creations. xx

I shall be entering the following challenges:

Colour Crazy Challenge – week 4 – anything goes with colouring

Cutie Pie Challenge CAS and a cute image

Colour Crazy Craft Challenge
The Cutie Pie Challenge Blog

HLS CAS anything goes

Hello there and a Happy New Year. I have a card to share today as Happy Little Stampers CAS Challenge has started a new challenge. We are starting off with an easy theme – anything goes CAS. Here is my card:

I used a stamp and matching die set which came with the kit for the Crop and Create delivered card making weekend back in October of 2021. I took quite a few virtual classes from people and companies I admired and yet never hoped to think I would attend one of their classes. This is one such class – and amazing few days, fabulous teachers – and great products as part of your kit. It is called ‘Change The World‘ and has the globe with flowers sitting on top, some additional flowers and leaves, and sentiments to match

This is a variation of one of the cards taught by Cathy Zielske – I white heat embossed the stamp set, then ink blended a green and a blue Distress Ink – to create an emboss resist.

I did the same with the two individual flowers – stamped, ink blended, die cut – then attached them to this card. The sentiment is stamped using the same colour as the ink blending – but Distress Oxide as it stamps better than the Distress inks.

I am starting to think I’m going to need quite a few birthday cards over the coming weeks, so this will be a great addition to my stash.

I hope you can come and join us in our ‘CAS anything goes‘ theme – I look forward to seeing you in our gallery. xx

anything goes

I shall be entering the following challenges:

A Bit More Time To Craft anything goes

QKR Stampede anything goes

A Perfect Time To Craft – anything goes

Die Cut Divas – flowers – include a die cut

Participation Badge
Monthly challenge

Cardz 4 Galz New Year or New Stash

Hello there. Cardz 4 Galz has started a new challenge. This time the theme chosen by Helen is ‘New Year or New Stash‘. Here is my card:

This card was created using a new stencil from Pinkfresh Studio – a layering stencil – which I’m finding I enjoy using………as long as I keep everything today and don’t get any ink smudges – which happens quite a lot…..

I also used the hint and tip from a few YouTube videos about using the Misti to line the stencil up and keep everything straight – worked very well for me. No longer did I have to tape each layer down – just used the Misti magnets and kept moving them around. I did notice that it worked best when the stamping mat was removed first – some more of the edge to keep the papers and stencils straight.

I used Distress Inks for the stenciling and then die cut that piece to fit the inside of an A2 card base:

I had a plan in mind – but it took me quite a while to figure it out….

The front panel was cut using a hillside border, and that top part embossed using an Altenew debossing panel. I then added some acetate at the back, to hopefully create a window.

The part that was cut from the front panel was cut to size – leaving the ‘window’ in the middle – stamped with an MFT sentiment, and attached to the bottom of the acetate.

The back of this front panel looked a little ragged – sticky showing through the acetate – so I managed to create two backing panels the same as the front to hide all the mess. Some red dots added for some more colour and interest on the front.

I hope you can come and join us – I look forward to seeing you in our gallery.

I shall be entering the following challenges:

Crafty Sentiments Designs – anything goes

Stamplorations December stencil challenge anything goes with a stencil

Happy Little Stampers stencil challengeanything goes with a stencil

Dragonfly Dreams anything goes

TTCRD anything goes

OUR BANNER FOR YOUR blogs
Blog Badge
GRAB OUR BADGE

Christmas Shaker

Hello. I have a quick post today to share a shaker card using Mama Elephant and Lawn Fawn dies:

I used Mama Elephant ‘Arch Snow Globe‘ dies, stacked to create the shaker, instead of using 3D foam. The top layer is from a piece of card I blended ‘Peacock Feathers’ onto.

The Lawn Fawn ‘Stitched Snowflake Frame’ was used for the ink smooshed Peacock Feathers background piece to the snow globe, and I also used it on the Kitsch Flamingo spray stain background panel.

The trees are ink blended pieces using Kitsch Flamingo and also Milled Lavender distress Inks, sat on a white glitter hill side.

I have no clue where the sequins came from – other thna found in my stash – but they matched the colours perfectly.

I shall be entering the following challenges:

Color Throwdown Pink, Lavender, Aqua

A Perfect Time To Craft – anything goes

Love To Craft – anything goes

Merry Little Christmas Challenge – anything goes Christmas

A Bit More Time To Craft anything goes

Participation Badge
SPREAD THE CRAFTY LOVE - grab a badge!
SPREAD THE MERRY LITTLE LOVE AND GRAB A BADGE!
A Bit More Time To Craft Challenge

Beautiful Inside and Out

Hello. Following on from my craft time yesterday, I created a card for the current challenge at Just Us Girls:

I’s a colour challenge this time round, and I decided to use my new set from The Greetery. One of our online shops in the UK has started to stock The Greetery – I took the opportunity to purchase several sets. This was one of them.

I first used the base stencil to blend the first layer of the flowers in yellow, then used Altenew inks and rest of the stamps to create the full image.

I then used the matching die to cut out the middle of the image to create a window – this would make a great shaker card, something I’ll try in the future – and used the matching stencil to ink blend some Salvaged Patina Distress Ink around the outside.

The sentiment is from Altenew, and stamped with Salvaged Patina Distress Oxide – better than the Distress Inks when stamping – and then layered the floral panel onto a white card base with 3D foam.

I searched my stash for some turquoise embellishments, and found these tiny stars, which I added as you see.

Hello Friend

I’ve been playing with a layering stencil received as part of the Crop and Create kit a few weeks. I seem to be getting the hang of stencils – whether they are layering or not – and I’m enjoying creating variations using the same product.

The six layers to the flower stencil from Pink Fresh Studio were all still used for this card – but two shades of orange for the sunflowers, and the leaves and other floral images I used two – maybe three – shades of grey – all Distress Inks.

I didn’t mask anything off – just used a little – make that tiny – blending brush for each section. The stencil also comes with a die to cut the inner part out – which I obviously used – and die cut the whole slimline panel using a Mama Elephant slimline die I had.

The Kraft card base has a Kraft panel, embossed with a Sue Wilson pin-point embossing folder for some added interest, and the floral panel raised with 3D foam strips

The two words are also from the Crop and Create kit – one from Gina K and the other from The Stamp Market. This is the second version of the words – the first was by heat embossing with gold – but I didn’t like that, so went back to just layering three each of the words – Kraft – on top of the shadow layer.

But I did add some gold(ish) sequins – just because I could……..!

I shall be entering the following challenges:

The Color Throwdown orange, brown, grey

Addicted to Stamps and More dies and/or stencils

Time Out Challenge friendship/encouragement card – option to use pink not taken

Stamplorations Stencil Challengeuse a stencil

Poinsettia Wreath

Hello. I have had time to play in my craft room today, and created this card:

Taking the colour scheme from the current Color Throwdown Challenge, I started with a black 7 inch square card base. Onto that I layered a slightly smaller dove grey card from Concord & 9th which I had dry embossed with a wood grain embossing folder, and slightly ink blended with Distress Ink.

The wreath was die cut twice, and I cut one of them to add more layers to the part that was showing.

The poinsettias were die cut from a cream textured card stock I had and the edges were inked with some Pumice Stone Distress Ink – but then I added some Weathered Wood as I didn’t think it was grey enough. The extra darker leaves were die cut from the same cream card stock, but ink blended before I die cut with the same grey Distress Inks.

I stuck the wreath down with glue – leaving some of the twiggy bits unstuck for dimension and movement, and the poinsettias and leaves were stuck down with 3D glue – I like to use that for the more dimensional elements when I’m adding more – like the extra leaves – so I have some time to play around with the layout.

I then added some stickles to the centre of the flowers.

I shall be entering the following challenges:

Color Throwdownblack, grey, cream, kraft

Addicted to stamps and Moreany occasion

Krafty Chicksoccasions

Die Cut Divas anything goes with die cuts

Crafty Hazelnuts Christmas Challengeanything goes Christmas – option to use the word ‘Joy’ (option not taken)

Right Click to Save
Grab our Badge
Please feel free to copy to your sidebar