Cat agenda

Hello again everyone. I have two cards to share with you today – cards which I am not exactly happy with, but took me ages to sort out. I don’t know whether my eye isn’t suited to seeing such clean cards, or I have made them too big – there is just something about them I am not liking……..

I started with the inspiration from CASology with the theme of ‘square’ and combined with the them from Aud Sentiments and As You Like it. I had in my head the ‘Little Cat Agenda‘ from Mama Elephant, as I am definitely a cat person, having two gorgeous big black cats, and that I wanted them to be on a square, and wanted to use the sentiment from Lawn Fawn, but I just couldn’t get the layout right.

Do I die cut a square on the card and inlay the cat? Do I stamp the cat flat to the card? How would I colour the cat? Such conundrums that I struggled with for ages. I ended up stamping the cat on water-colour card, colouring them with my Zigs, then die-cutting a small square from Lawn Fawn wonky squares.

The sentiment I die cut from black card which had double sided sticky sheet on the back, so it would be easier to adhere to the card base, but played with the layout time after time.

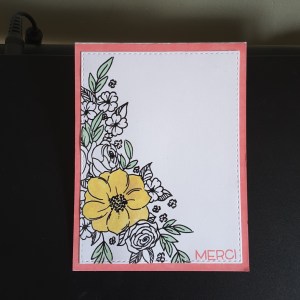
In the end, I went for a long and thin card, and used a white base card and a biscuit colour card, juts so I could see which one I preferred – and actually didn’t like either of them that much.

Maybe the card is too deep or too long……..

In any event, I am posting them and wonder of there are some hints and tips you could give me? Or maybe it’s just that I am not getting the Clean and Simple look right at the moment….please tell my mojo to come back!!

CASologysquare

Aud Sentimentsthinking of you

As You Like It fur or feathers and why

Kibble Kits

Good day everyone. I have quite cute for this card – very unlike me! I saw some challenges out there and took the opportunity to combine some with the same card.

I stamped the IndigoBlu ‘Kibble Kits’ stamp in Versafine black onyx, then cut this down with my wonky rectangles. This was stuck onto a panel I had created using Lawn Fawn ‘Stitched Woodgrain Backdrop’, then onto a base card using a lighter blue.

The circle was die cut using Stampin Up stitched circles, and the banner cut using the smaller wonky rectangles again. (I don’t seem to be able to resist using these rectangles)

The small blue cat is actually a button, as you can see from the little collection I have there. Bought at a craft show somewhere, I have never used any of them. This was attached to the circle with Pinflair 3D glue.

The sentiment is from Altenew ‘Painted Greetings’.

This card was actually quite simple to make, and came together quite quickly, once I had decided on the colours and layout. Even that was easier than normal as I was guided by the sketch challenge and by the colour challenge.

It may be a little too busy for the Less is More challenge, but as that particular challenge gave me the inspiration to use my cat button, I will enter anyway………..

Less Is Moreuse a real object

CAS(E) this sketchsketch

Dragonfly Dreamsanimals

Cardz 4 Galzcats/kittens or both

Shopping Our Stashwood or wood grain


Altenew Blissful Bud

Hello everyone. I’m back home in UK, and I’m struggling a little with the time difference coming this way. Very unusual. I usually struggle going the other way….it’s taken me a couple of days to get my crafting head back on. I really enjoyed searching through my sister’s stash, so many things I haven’t got, but now I am back I can concentrate on my own things.

These cards are mainly from Altenew ‘Blissful Bud’, and I haven’t had time to play with them until today. It just happens I am playing with them when the cue card from CASology this week is:

So, out came my Altenew inks, and I set to playing. I used the blues and yellows, as I know that I can layer them well, but with some other colours I still struggle. I played with the position of the bud itself, putting it in different areas of the card, and even angled the stem in different ways so it wasn’t straight all the time.

The sentiments from that stamp set are also lovely, and I chose the ‘warm hello’ to enter the card challenge, but used a few others, too. I used my wonky rectangles to cut the main piece of card out, then added different colour card bases for some variety.

I also played with the Stampin Up ‘Tranquil Tulips’ stamp set, which had been waiting for me when I got home from Canada. A hostess stamp set, which was a lovely surprise from my chosen demonstrator. (Shell Bower)

This set has images which give a water-colour effect when stamped, and has a few flower images as well as tulips. You can see one example in the photos above – the Happy Birthday card – but I also played with the layout of another one I stamped:

I stamped the tulip, then die cut that piece of card using Reverse Confetti ‘Vertical Stripes Cover Panel’, stuck down the surrounding part of the die cut flat, then raised each individual stripe with 3D foam………I may be trying that with some of my other cover plate dies, as I like the effect.

As well as the CASology challenge, I shall also be entering the ‘best bud’ card into the current challenge from Addicted to CAS, with the theme of ‘friends’.

Guest Designer Colours (V2)


20170812_215745

Hi everyone. This is my third card as guest designer for CAS Colors and Sketches, and the second colour themed card. The challenge is to make a card using the colours Crushed Curry, Bermuda Bay, and Calypso Coral. As you know, I am currently away in Quebec City visiting my sister, and I don’t have the exact colours to hand.

After a little look through her crafting goodies, I found some Distress Oxides which seem to run a good match. I used Fossilized Amber, Worn Lipstick, and Cracked Pistachio. I haven’t tried the distress oxides before, but I am loving them. So good at blending, so good at using as a water colour – will definitely invest when I get back to UK.

I started this card using  a stamp from Penny Black – ‘Flower Cascade’. A gorgeous stamp which I stamped in Versafine Black Onyx, then heat embossed with clear embossing powder. I then coloured using the Distress Oxides.

To use them as a water colouring effect, I smudged each colour onto an acrylic block, then used a water brush to colour in the yellow flower, and the Cracked Pistachio. I didn’t want too much colour on the card, trying to keep it clean and simple, so I decided not colour any more than the main flower and some of the leaves.

I used the Worn Lipstick pad and ran it around the edge of a white base card – fabulous coverage again – then attached the stamped part flat.

The sentiment stamp reflected I am currently completely out of my comfort zone in Quebec – a please and thank you are basically the limits of my foreign language attempts – and stamped ‘Merci’ in Worn Lipstick, a small stamp from Lawn Fawn.

I hope you like my take on the colour scheme, with an addition of some muted colours, and look forward to seeing what you create to play along.

I shall be entering this card into the following challenges:

Tuesday Throwdownanything goes

Try it on Tuesdayin my garden

Through the Craft Room Dooranything goes


No stamping

Hi everyone. I hope you are all well, and enjoying some crafting time. I’ve been putting together this card. It may look simple, but let me tell you it has taken me a few hours to get it right.

I am following the challenge theme for Simply Less is More – CAS no stamping, and Cards In Envy – baby blue or pretty pink. I had an idea of creating a coloured card and die cutting a flower or something from it, and even did that, but I just didn’t like how it turned out.

I then decided to use my Gansai Tambi ‘Pearl Colours’ to create a flat background, but shimmery. I covered a piece of white card with the Pearl Pink,  and let one layer dry before adding another layer. I did three layers in total as I wanted quite a solid colour. I managed to get a photo with the shimmer showing. I let this dry completely before using Lawn Fawn ‘Stitched Windy Backdrop’ for added interest to the shimmer.

I then moved onto the sentiment. This is from Neat and Tangled, called ‘Big Hugs ‘ – can’t think why!? I die cut this in black card many times – I think 6 in total, and layered them on top of each other for a slight bit of dimension.

I was going to glitter it, and decided not to as I think the bold and black letters really stand out from the pink shimmery background. I added the whole pink layer to a plain white card base.

So, even though it looks simple, it took me a while to put together – drying time, die cutting, and sticking time – but I think it’s quite effective.

I will also be entering this card into the Mix It Up challenge – anything goes, and Simon Says Stamp Wednesday challenge – anything goes.

I have some very exciting news – I have been asked to be guest designer for the month of August, weekly cards, for CAS Colours and Sketches!!!! Two colour challenges, and two sketch challenges. How about that? Sooooo excited to be doing that. The first challenge goes ‘live’ on Tuesday – I hope you can join us. :)


Red, white, and blue sketch

20170705_213629

Hi there. I’m still in quite a patriotic mood today. I made an earlier blog posting with colours of England, and decided to make another card with the colours from the good old Union Jack. I am aware there are lots and lots of countries with red, white, and blue on their flag, so instead of going down the St George Cross route, I followed the sketch from CAS(E) this Sketch.

The three colours were die cut from Lawn Fawn ‘Road Border’ and stuck down to a smaller card than usual, keeping a wider bit to the left, and narrowing down to the right – all set at a nice jaunty angle – as per the sketch. The strips were only 6 inches long, and I was putting them at an angle, so I had to go with the smaller size card.

The sentiment is from a Catherine Pooler set from the Foundations box, and I angled each word slightly on my block to give a more rounded look to them so they looked like they were following the shape of the strips. Actually, that bit took longer than the rest!

I only had a short time to play tonight, as one of my puddy tats has hurt his leg, and I had to take him to the vets – thank goodness not serious. As he is almost 7kgs (Yep!!), he has probably strained his shoulder jumping down from somewhere. You can see a picture if him on a previous blog post – Spring Flowers + failed feline photo bomb from April 19th. He also has a brother just as gorgeous – I may be biased!

I shall also be entering this card into the following challenges:

Cards In Envypatriotic – red, white, blue

Createalicious challengeanything goes with option for red, white, blue

Addicted to Stamps and MoreClean And Simple


Copper card

Good morning all, I have another card inspired by several challenges.

I started by using a piece of Narwhal card from Lawn Fawn, and stamped some flower images from the new Catherine Pooler Stamp of Approval collection (I said I was going to play with collection this weekend). I laid them out on the card and used my Misti to pick them up, stamped with Ranger Perfect Medium, and heat embossed using Cosmic Shimmer ‘Ancient copper metallic’ embossing powder. They are quite solid images, so I thought the embossing would stand out very nicely on the grey card.

Once I had covered the piece of card in the flowers and completed heat embossing them, I added some smaller flower and leaf images from previous collections, to fill in the gaps, and added this piece to a background of orange card. I have no idea where this orange card came from, but I like the way it seems to match and enhance the copper embossing.

The sentiment is also from a Catherine Pooler Stamp of Approval box, but one I had bought previously – the Lovely Notes Collection. The ‘thank you’ stamp comes in three varying degrees of the word image, and I used the main solid image – stamped with Perfect Medium, and heat embossed with the same copper embossing powder.

I cut the sentiment out with one of my ‘Wonky rectangle’ dies from Lawn Fawn, and added it to the card with some foam pads.

I found the most difficult part of this card was where to place the sentiment. I placed it at the very bottom, near the top, off to one side…………and eventually decided to place it as you can see it, which left a lot of the copper background visible.

I shall be entering this card into the following challenges:

Just Add Inkphoto inspiration

Addicted to stampsflowers and stamping

Hand Stamped Sentiments photo inspiration


Color Layering Koala

Hello there, everyone. I am now back from London. Quite a few days with no crafting – definitely suffering withdrawal symptoms. And guess what was waiting for me when I got back? The new Catherine Pooler Stamp of Approval box. Ordered and delivered within 8 days. Fabulous. I will be playing with them over the weekend.

Another thing which I am highly excited about – I am guest designer for Inkspirational Challenges for the challenge which starts tomorrow morning!! (Saturday) I know………..OMG! The first time I have been asked……so excited and nervous! Please check it out tomorrow, it’s a great inspiration photo – trust me!

For the card today, I had a little cute moment. Aren’t the koalas cute?

I started by stamping the tree from Altenew ‘Birch Land’ to one side of a plain white piece of card. I then stamped the koala and the baby, from Hero Arts ‘Color Layering Koala’ using Versafine ‘Black Onyx’ as an outline, stamped off once for the base of the koalas, then direct after inking for the next layer, for the two different brown looks using the same ink, cutting them out using the matching die set.

For the leaves I used Catherine Pooler ‘Aquatini’ and Stampin Up ‘Night of Navy’ – artistic license for the eucalyptus to be those colours!

For the grass, I used Catherine Pooler ‘Lime Rickey’ and rubbed it along a piece of plain white card, then cut it out with the Lawn Fawn ‘Simple Grassy Hillside’ dies, stuck it to the base card, and cut the whole thing using my Lawn Fawn ‘Wonky stitched rectangles’.

Once I had that base card, I realised the pointy edges of the grass were not stuck down, so I placed my two koalas under the edge of the grass, adding the die cut eucalyptus leaves. The base card is a navy card from Creative Expressions – love their foundations card.

I shall be entering this card into the following challenges:

Color ThrowdownNavy, Aqua, lime green, kraft (used brown)

Addicted to stamps and moreanything goes

Colour Crazy Challengeanything goes

I hope to see you tomorrow morning when the Inspirational Challenge goes live…………..


Two-fer

Morning all. Today I shall be posting two cards, as I am not sure if I can post anything else during the week. I have a few days in London on business, but it is up-in-the-air how many days, and how long for. That’s the way the cookie crumbles, sometimes.

This first card is obviously monochrome, and in my favourite colours. Black is a colour, right? Whether it is for the stamping, or for the sentiment, I do like using black on my cards somewhere – unless the card is sweet and cute – then I have to resist the instinct! However, I can still stamp the outline in black, can’t I?

I used the Birch press layering dies again, cut all three layers in black, with a white base card. The sentiment is a stamp from an Altenew stamp set, cut out with the Lawn Fawn wonky rectangles die set.

This second card is using my Brushos – I bought some new colours last week – and a stamp from Visible Image. I stamped and embossed the face and whiskers and heat set with black, then used the resist technique and my Brushos. Can you believe this Brusho is the black. Only the black. No other colour added………what a true burst of colour in what is called ‘black’. How amazing is that?

I then added some green to the eyes, and went over some of the white areas in the eyes with a white gel pen to bring a little more life to them.

I shall be entering the black and white card into the following challenges:

Creatalicious challengesfavourite colour

Allsorts Challengeuse two or more dies (used 4)

I shall be entering the cat card into the following challenges:

Just Us Girlsuse powdered dyes


Colourful inspiration

Good evening all. For today’s card I have been playing with loads and loads of inks. Can you tell? I have been ink blending and creating Brusho backgrounds, and die cutting. Quite a bit of playing and fun I had.

For the base card, I used a piece of Crafters Companion water-colour card, and blended colours from Lawn Fawn. These inks are wonderful and blend very, very nicely. I will definitely use them again for this technique. I also did some water splashes to create some added interest to the background.

I actually tried to emulate the colours from the Daring Cardmakers challenge with the middle bottom image being of what I saw as sea and sun-setting sky.

You had to use three elements from these pictures, so I continued to create another ink-blending background, from which I cut small strips – to match the top middle picture, and laid those down in a criss-cross pattern just off to one side.

The third element I used were the flowers. Well, I couldn’t just put one or two on, could I? I started by creating a Brusho background with one of the blue colours, added some yellow, added some purple. I just kept adding until I liked the colours.

I then stamped the flowers from the Altenew ‘Adore You’ stamp set onto that background with Versafine Black Onyx and die cut them with the matching stamp set.

I glued everything down flat, and I used a glue I haven’t used before but bought at Doncaster Dome craft show this past weekend – Tombow multipurpose liquid glue. My goodness that stuff is strong, isn’t it? It may take over from my usual favourite glue from Creative Expressions – Cosmic Shimmer. I really like the Tombow….

I will be entering this card into the following challenges:

Daring CardmakersJune Elemental challenge

Crazy 4 Challenges – at least three of something (strips, flowers)