Let’s Crab Lunch Sometime

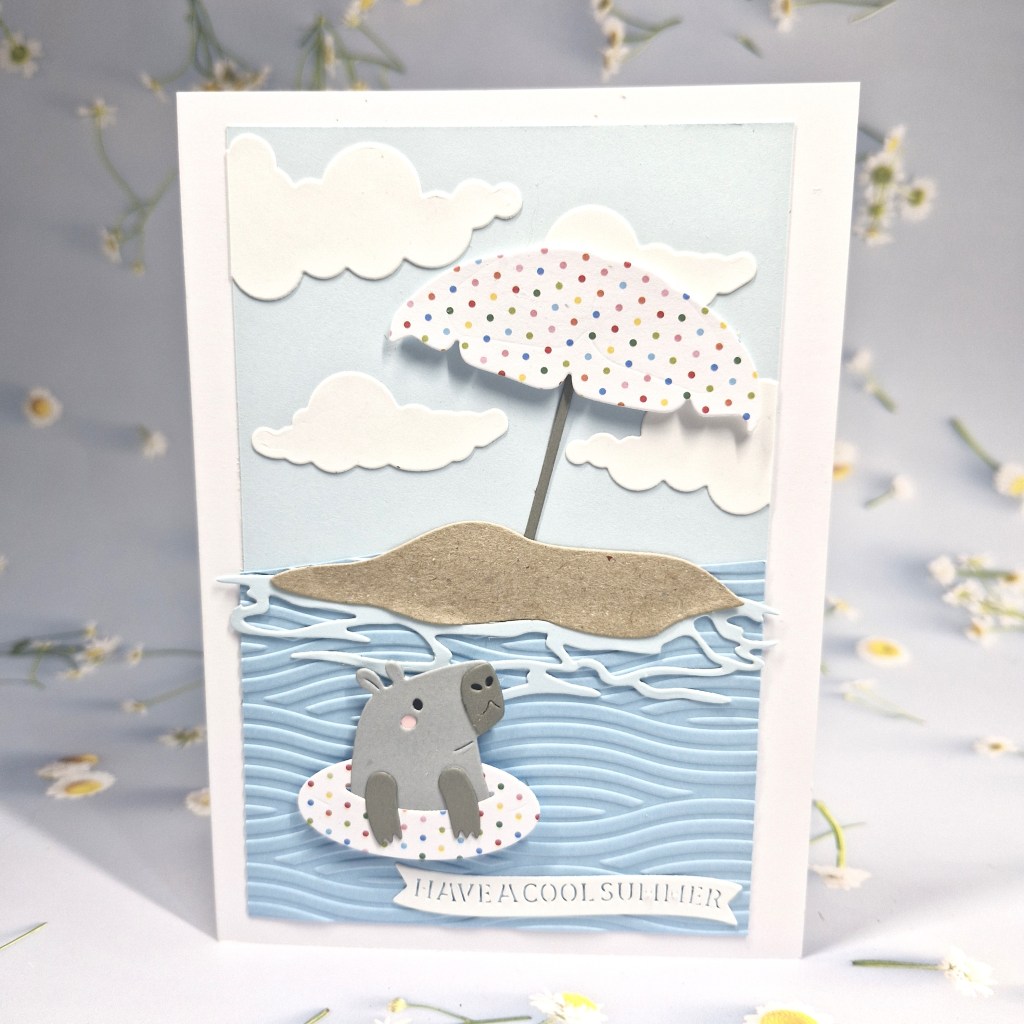
Hello. I have in my craft room again, taking advantage of the air con in there to cool down a little. I was inspired by a few challenges to create a summer/beach themed card and took the opportunity to use some new products.

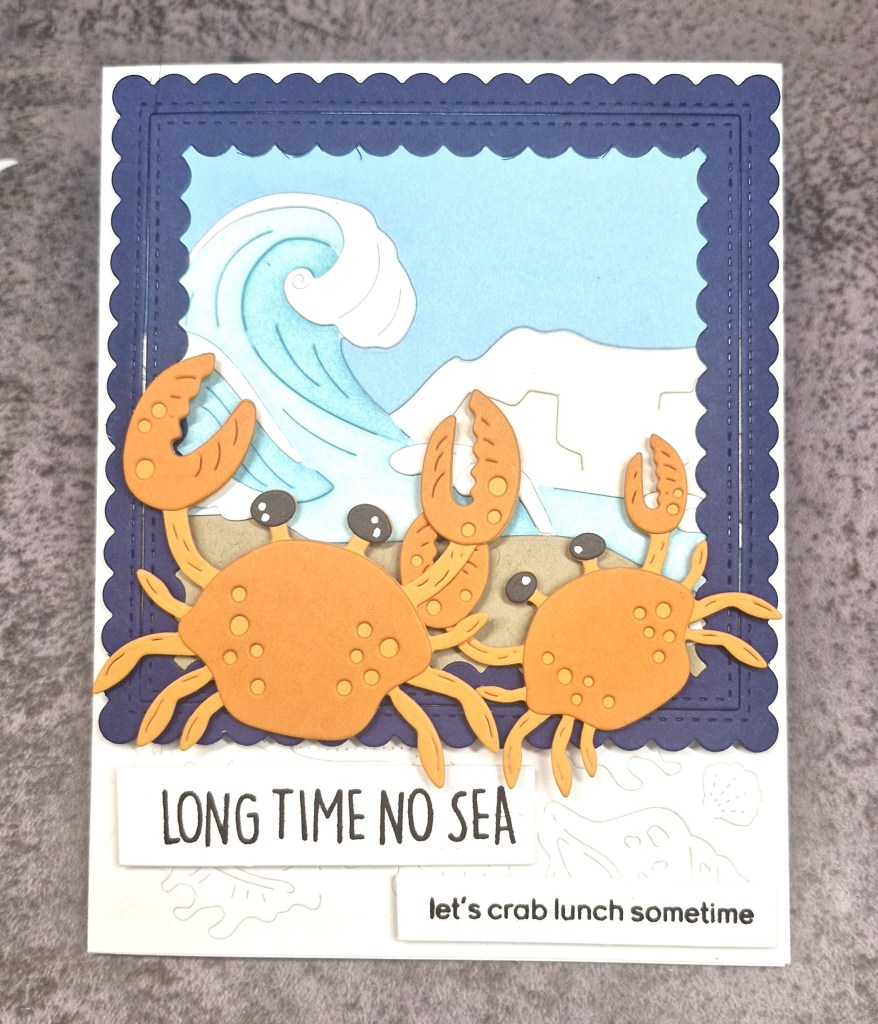
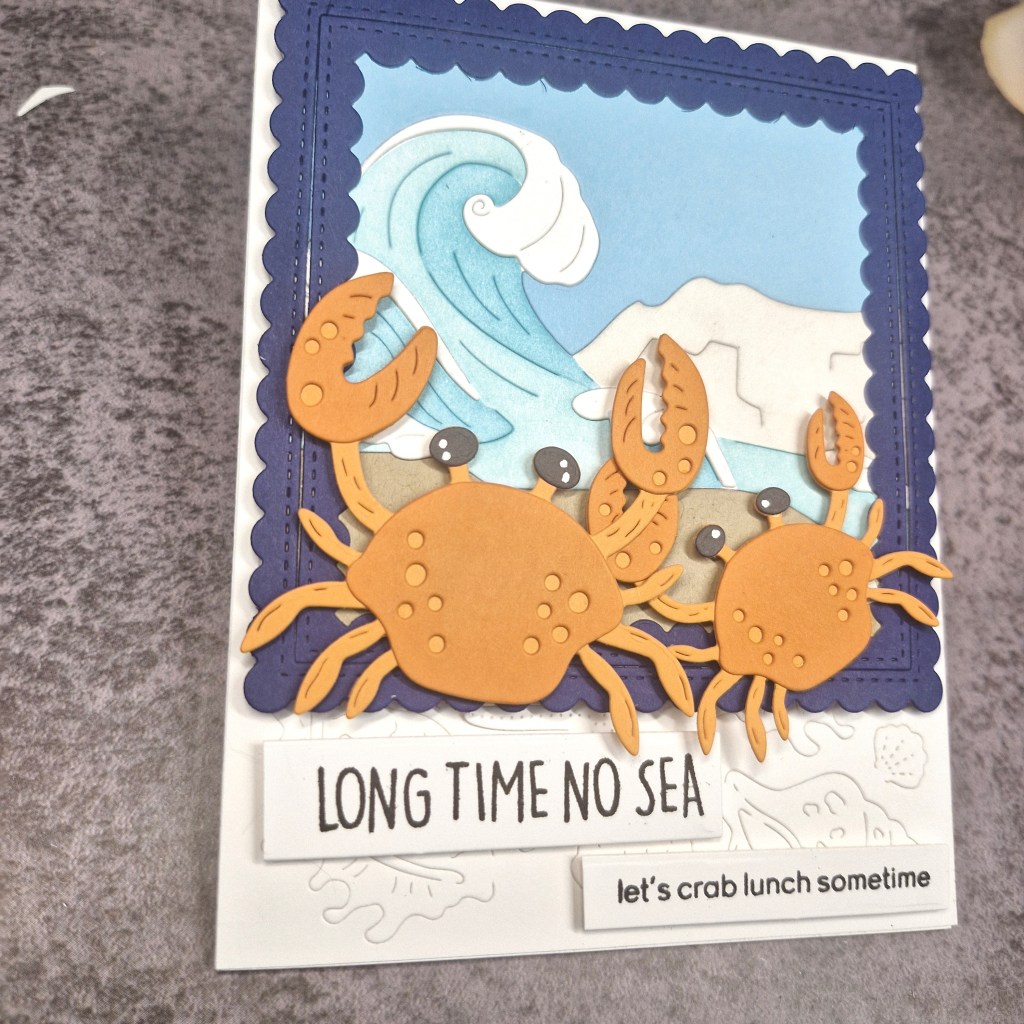
The scene die cuts are from Waffle Flower, and the waves themselves also have stencils which you can use to colour them. Once the waves were cut and coloured, I used the additional die which creates the same shape as the wave die at the bottom in a light brown card for the sand. I also used the top of the wave die to create a light blue sky, so they would inlay and slot in together when backed by a piece of white card.

The dark blue frame was die cut from a Pinkfresh Studio die set and glued around the scene. I did cut the scene down around the edges to keep it within the square.

I die cut the crabs from two slightly different orange card from Spellbinders, then layered them together. Die cutting dark grey for the eyes, onto which I highlighted with white gel pen.

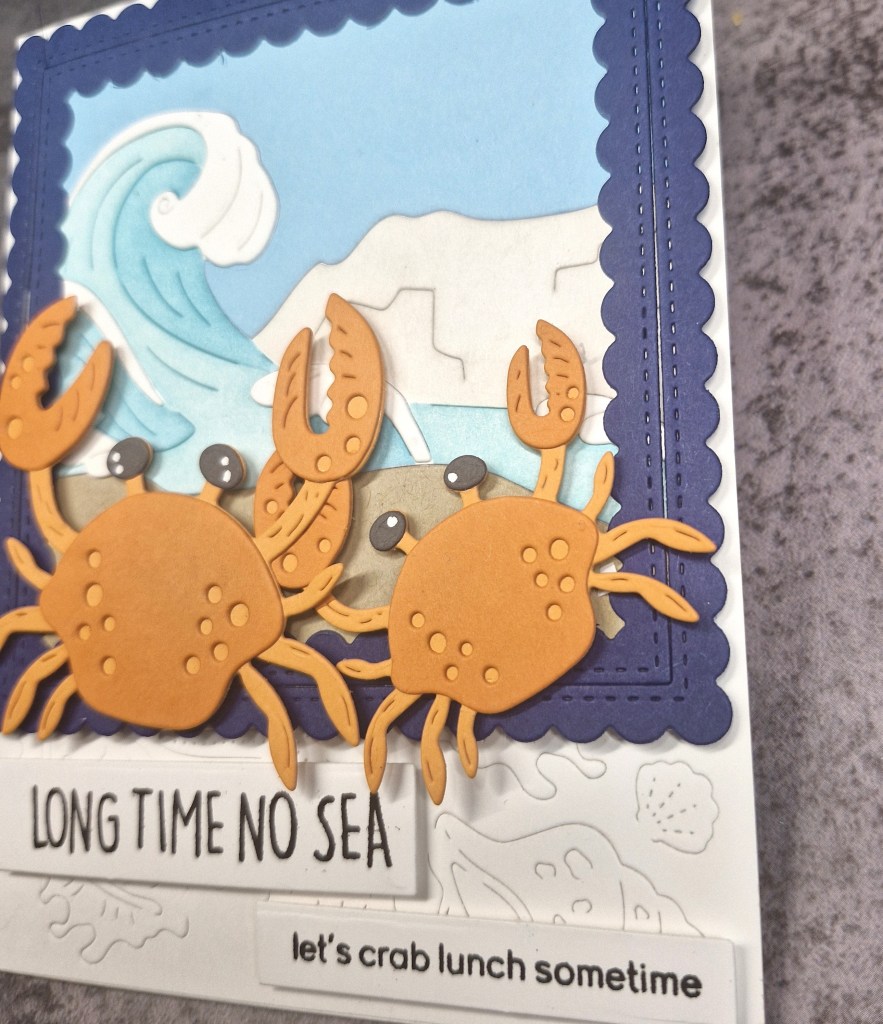
When placed onto a white card base, I felt it needed something extra, a little more detail on the plain white, so I also used the Waffle Flower ‘Seashell texture’ plate – no blending, leaving it white.

The framed scene was added, then the two sentiments were stamped using a Heffy Doodle set, then cut using a couple of strip dies, adhered with 3D foam.

I then added the two crabs with 3D foam.

I shall be entering the following challenges:

Double D Challengebeach

Simon Says Stamp Monday Challenge vacation

Aud Sentiments fun fold and/or summer and a sentiment

Addicted To Stamps & Moredie cuts and/or stencils

Lil Patch Of Crafty Friendsanything goes

The Sisterhood Of Craftersfun in the sun

Feathered Birthday

Hello again. I have a card to share for the new challenge which has just started at The Alphabet Challenge. Vicki is hosting, and having reached the letter ‘F‘, she has chosen the theme of ‘feathers‘. Here is my card:

This card turned out to be very technique based. I didn’t plan it that way, it is just the way things happened – and I quite enjoyed the process.

I started by creating the ink well, a layering stamp from The Greetery. This was die cut, and the label for the ink well stamped then die cut, layered on top of the ink bottle.

The feather is a die cut from Waffle Flower, then ink blended the layers to create the mottled effect on the feathers – then going over very lightly to take some of the whiteness off. The nib as die cut and glued down.

The wax seal is from Spellbinders, using their wax, then the flowers and sentiment on the seal was coloured with gold using a gold paint pen from Crafters Companion.

Then I turned to creating the background panel. I thought a postage die would fit in with the quill and pen, so I used an old Catherine Pooler die for that panel, die cut out of a light grey card stock. I added another layer of light grey card stock on top which had been die cut with a stitched detail around the edge.

The written details were added using a slightly darker grey ink and a Spellbinders press plate. I cannot remember how I did the darker grey rim around the edge of this panel………

All layers were added to the white card base using either glue or 3D foam when I was happy with the layout.

I hope you can come and join us with your creations featuring feathers. xx

I shall be entering the following challenges:

Addicted To Stamps & More die cuts and/or stencils

Inkspirational – use stencils – option of geometric not taken

Lil Patch Of Crafty Friendsanything goes

Ally’s Angels anything goes

Ellibelle’s Corneranything goes

Have A Cool Summer

Hello everyone. Cardz 4 Galz is starting a new challenge. Pamela is hosting and has chosen the theme of:

‘Welcome to summer – anything summer related’

Here is my card:

To create this card, I used some die sets from Spellbinders, and an embossing folder -also from Spellbinders.

The background panel is a piece of light blue card stock for the sky, with a darker blue card for the sea, which I used the embossing folder for – looking like waves.

The hippo and the beach scene were all die cut and attached together, and I added some patterned paper for the ring and umbrella to add some pops of colour.

The clouds are die cut from white card stock, and the sentiment was attached as the final addition.

I hope you can come and join us with your creations related to summer. xx

I shall be entering the following challenges:

Crafty Animals anything goes with an animal

Crafts Galoreanything goes

A Cut Aboveanything goes with die cuts

Aud Sentiments fun fold and/or summer and a sentiment

Hello Friend

Hello everyone. I have been a little remiss in posting, but I have been creating behind the scenes. I have been enjoying playing with products from some virtual events this past few months, and I have a card to share using products from the recent Simon Says Stamp and Gina K designs collaboration:

I used the colours from the current Color Throwdown challenge to create this card.

The images of the flowers and leaves were stamped, then coloured those using Pinkfresh Studio inks and the matching stencils. I used a heavier hand towards the centre of the flowers and the bottom of the leaves for a little more interest.

The sentiment was stamped in black, then all the images and the sentiment were die cut with the matching dies. The sentiment I layered three times for more dimension.

I took a smaller white panel and used a Pinkfresh Studio Letterpress plate to create the subtle detail in that small white panel, layered that with a black panel, then adhered to the card base.

I then arranged the flowers and leaves, attached the flowers with 3D foam, and the leaves with glue, before adding some enamel dots. The turquoise and yellow dots attached the the centre of the flowers were from Time 4 Tea Designs, and the three small green dots are from Concord & 9th.

I shall be entering the following challenges:

Color Throwdown yellow, green, turquoise

Stencil Fun stencils – option of summer fun

Craft Rocketno designer paper

Addicted To Stamps & Moredies cuts and/or stencils

Inkspirationalusing stencils – option of geometric

Jolly Holiday Branch

It’s time the new challenge at The Holly & Ivy Christmas Challenge. The theme is always ‘anything goes Christmas’. Here is my card:

I first started by stamping and heat embossing the Pinkfresh Studio berry branch images in gold. I then used the layering stencils to colour them in, then die cut with the matching dies.

Whilst I was heat embossing, I also did the sentiment.

The background was created by using a Spellbinders embossing folder, then attaching a gold glitter frame from some Pinkfresh Studio dies, with some 3D foam.

The images were arranged to my liking around the sentiment, and added with a mixture of glue and 3D foam pieces. For some reason, I had some gold glitter leaves laying around on my desk – so I added them in certain places for added interest.

I hope you can come and join us with your creations – anything goes Christmas. xx

I shall be entering the following challenges:

Lil Patch Of Crafty Friends anything goes

Crafts Galore anything goes

A Cut Above anything goes with die cuts

12 Months Of Christmas Link-up anything goes Christmas – option of one or two layers not taken

Peace On Earth anything goes Christmas

A Butterfly Note

Hello. More time in my craft room today to create this card. My goodness – this was a labour of love. It seemed to take forever, and quite a few variations and tried at it……..

To create this card, I used some Waffle Flower products and Pinkfresh Studio inks. I started by cutting the ‘Butterfly Blossom‘ texture die out of white card stock. I then used the layering stencils to colour them all in. There are 5 layering stencils, two for the flowers, and two for the butterflies – the background and then the details on the wings. I didn’t use the fifth stencil – butterfly bodies and flower centres – as I die cut them out of Spellbinders brushed gold card stock.

I also blended a little darker shade for the flower centres, before adding the brushed gold on top to give a little added detail.

Once blended, I die cut the base layer once more and glued it behind to give a little more dimension and stability, then glued down to a card base.

The sentiment is also from Waffle Flower – white shadow layer and brushed gold for the sentiment – two more layers of white behind the words.

The most time I took was choosing which colours – I played with several other combinations until I decided on these colours – but I will play more with this set now I kinda know what is going on…..!

I shall be entering the following challenges:

Creative Fingersanything goes

Crafty Animalsanything goes with an animal

Stencil Funuse stencils – option of summer fun

Craft Rocketno designer paper

Make My Monday one or more butterflies

Pooh Birthday

Hello everyone. I had a little play in my craft room today to create this fairly simple card:

I used some new dies to me from Spellbinders which included Pooh bear and some of his friends. These were bought as part of a Facebook live sale from one of our UK companies – Sir Stampalot. They do this sale once a month, and I generally pick up a few crafty bargains.

I started by die cutting Pooh himself, then the honey jar and the balloon. I chose colours from the current Color Throwdown challenge – which I haven’t entered in quite a while. The balloon and honey jar were then cut

Once the bear was die cut, I used another die for the turquoise back panel. I thought the panel and the balloon looked a little plain, so I used an embossing folder to add some details. I can’t remember who this is from, and it isn’t in my CML app.

The panel was adhered with 3D foam tape, then I added the bear, ensuring all the other elements fit in. The gold foiled sentiment was then added last.

I shall be entering the following challenges:

Color Throwdowngreen, turquoise, orange

Addicted To Stamps & Moreany occasion

Daisy Chain birthday

Crafty Animalsanything goes with an animal

MAWTTbirthday

Hope Your Day Is Beautiful

Another challenge has started at The Alphabet Challenge. Deborah is hosting and has chosen the theme of

‘Embossing – heat or dry’

Here is my card:

For this card I chose another Pinkfresh Studio product suite called ‘Best Thing‘.

I first stamped and gold heat embossed all the images, coloured them with the matching layering stencils, then die cut them all out.

To put the card together, I added a panel which had been embossed using a Spellbinders embossing folder.

The birdcage was die cut from gold glitter card stock and adhered flat, then the floral images and bird attached and arranged as you see.

The sentiment is also gold heat embossed, and die cut and layered a couple of times.

I hope you can come and join us with your embossed creations – heat or dry. xx

I shall be entering the following challenges:

Love To Craft anything goes

The Flower Challengeflowers and add heat or dry embossing (both added)

Crafty Animalsanything goes with an animal

Crafts Galoreanything goes

Stencil Fun stencils – option of summer fun not taken

Craft Rocket no designer paper

Swan Easel

Hello once again. It is time for the next challenge at Cardz 4 Galz. Debbie is hosting, and has chosen the theme of:

‘Easel card’

Here is my card:

For the base of the easel card I used a 5×7 top-folding card. I knew I wanted a larger card to ensure I managed to get everything on there.

The front of the card was scored, then I cut a slightly smaller piece of brushed gold card stock for edge of the visible sides – three in total – and before attaching to the card base I die cut the circle from the larger piece for behind the swan.

These three pieces of gold were attached, three pieces of white card stock cut down to layer on top, and each of those three pieces were placed into an embossing folder from Spellbinders to add some interest, then glued down.

The next step was to hot foil the swan and floral images. This is from a Pinkfresh Studio set received from their ‘Create & Connect’ event in February of this year. Once hot foiled, all the images were ink blended using the matching layering stencils, then die cut with the matching dies.

The circle frame is also from Pinkfresh Studio, the gold circle previously cut added to the back, the swan and some florals added, then attached to the easel card.

The rest of the images added below the circle to form a swag.

The next step was the sentiment, which I used as the ‘stopper’ to allow the easel to stand open, and this was two hot foiled sentiments, die cut at least several times for depth, and glued down. Gold gems added for further interest.

I hope you can come and join us with your easel card creations. xx

I shall be entering the following challenges:

Lil Patch Of Crafty Friendsanything goes

Mix It Upanything goes – option of paper piecing not taken

Love To Craftanything goes

Tic Tac Toe top right to bottom left diagonal – die cuts – free – ink blending

The Flower Challengeflowers and add embossing – heat or dry (embossing folder)

A Little Holiday Sparkle

Hello everyone. It’s time for the next challenge at ABC Christmas Challenge. We have reached the letters ‘L’ and ‘M’. Our Christmas themes this month for those letters are:

‘L’ is for Lights, ‘M’ is for Music

Here is my card:

This background chock full of lights is using a die from Concord & 9th, but instead of die cutting the background panel and inlaying all those lights, I decided to dry emboss the panel to create the impressions for the lights and the strings.

The lights were then die cut from colours of card stock, then placed on the impressions. The base of the lights was die cut from gold glitter card and then also glued into place.

The gold foiled sentiment was added with some 3D foam.

I hope you can come and join us with your Christmas creations following one or both of our themes. xx

I shall be entering the following challenges:

Peace on Earthanything goes Christmas

Lil Patch Of Crafty Friendsanything goes

Christmas (or not) Bingo column ‘N’ – Christmas – free – glitter

Merry Little Christmas Challenge anything goes Christmas

12 Months of Christmas Link-up anything goes Christmas – option of one or two layers not taken