The Alphabet Challenge has started a new challenge. We have reached the letter ‘V’, and Debbie has chosen the theme of ‘Vellum’. Here is my card:
I first took some vellum and applied alcohol inks, I think two or three shades of green, moved it around – generally played really – and set that aside to dry. Once dry, I die cut the leaves – snipping one and adding to the larger image – and adhered with wet glue.
The card base is created with some linen textured card, and an arch die cut added.
I added the foiled sentiment strip, and I felt the card was done. No embellishments – just a very CAS card.
I hope you can come and join us with your ‘vellum’; creations. xx
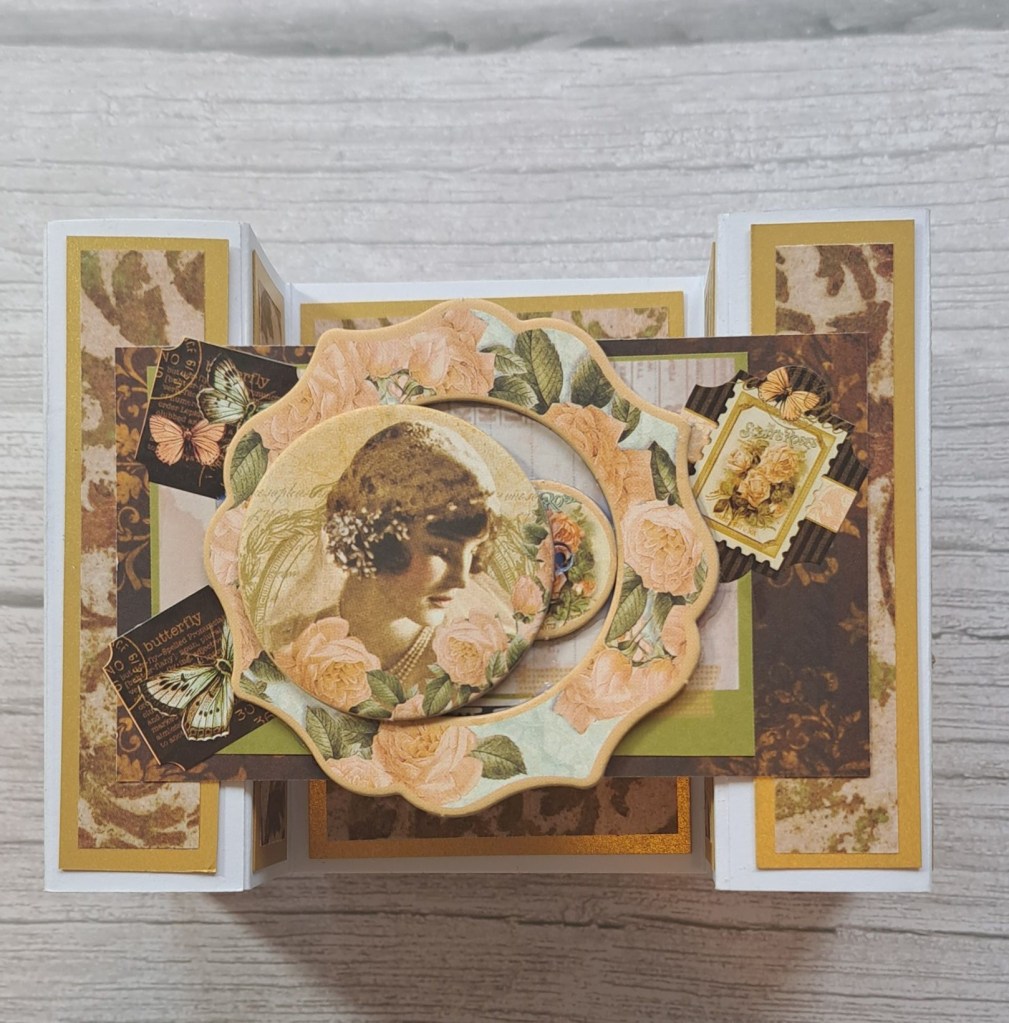
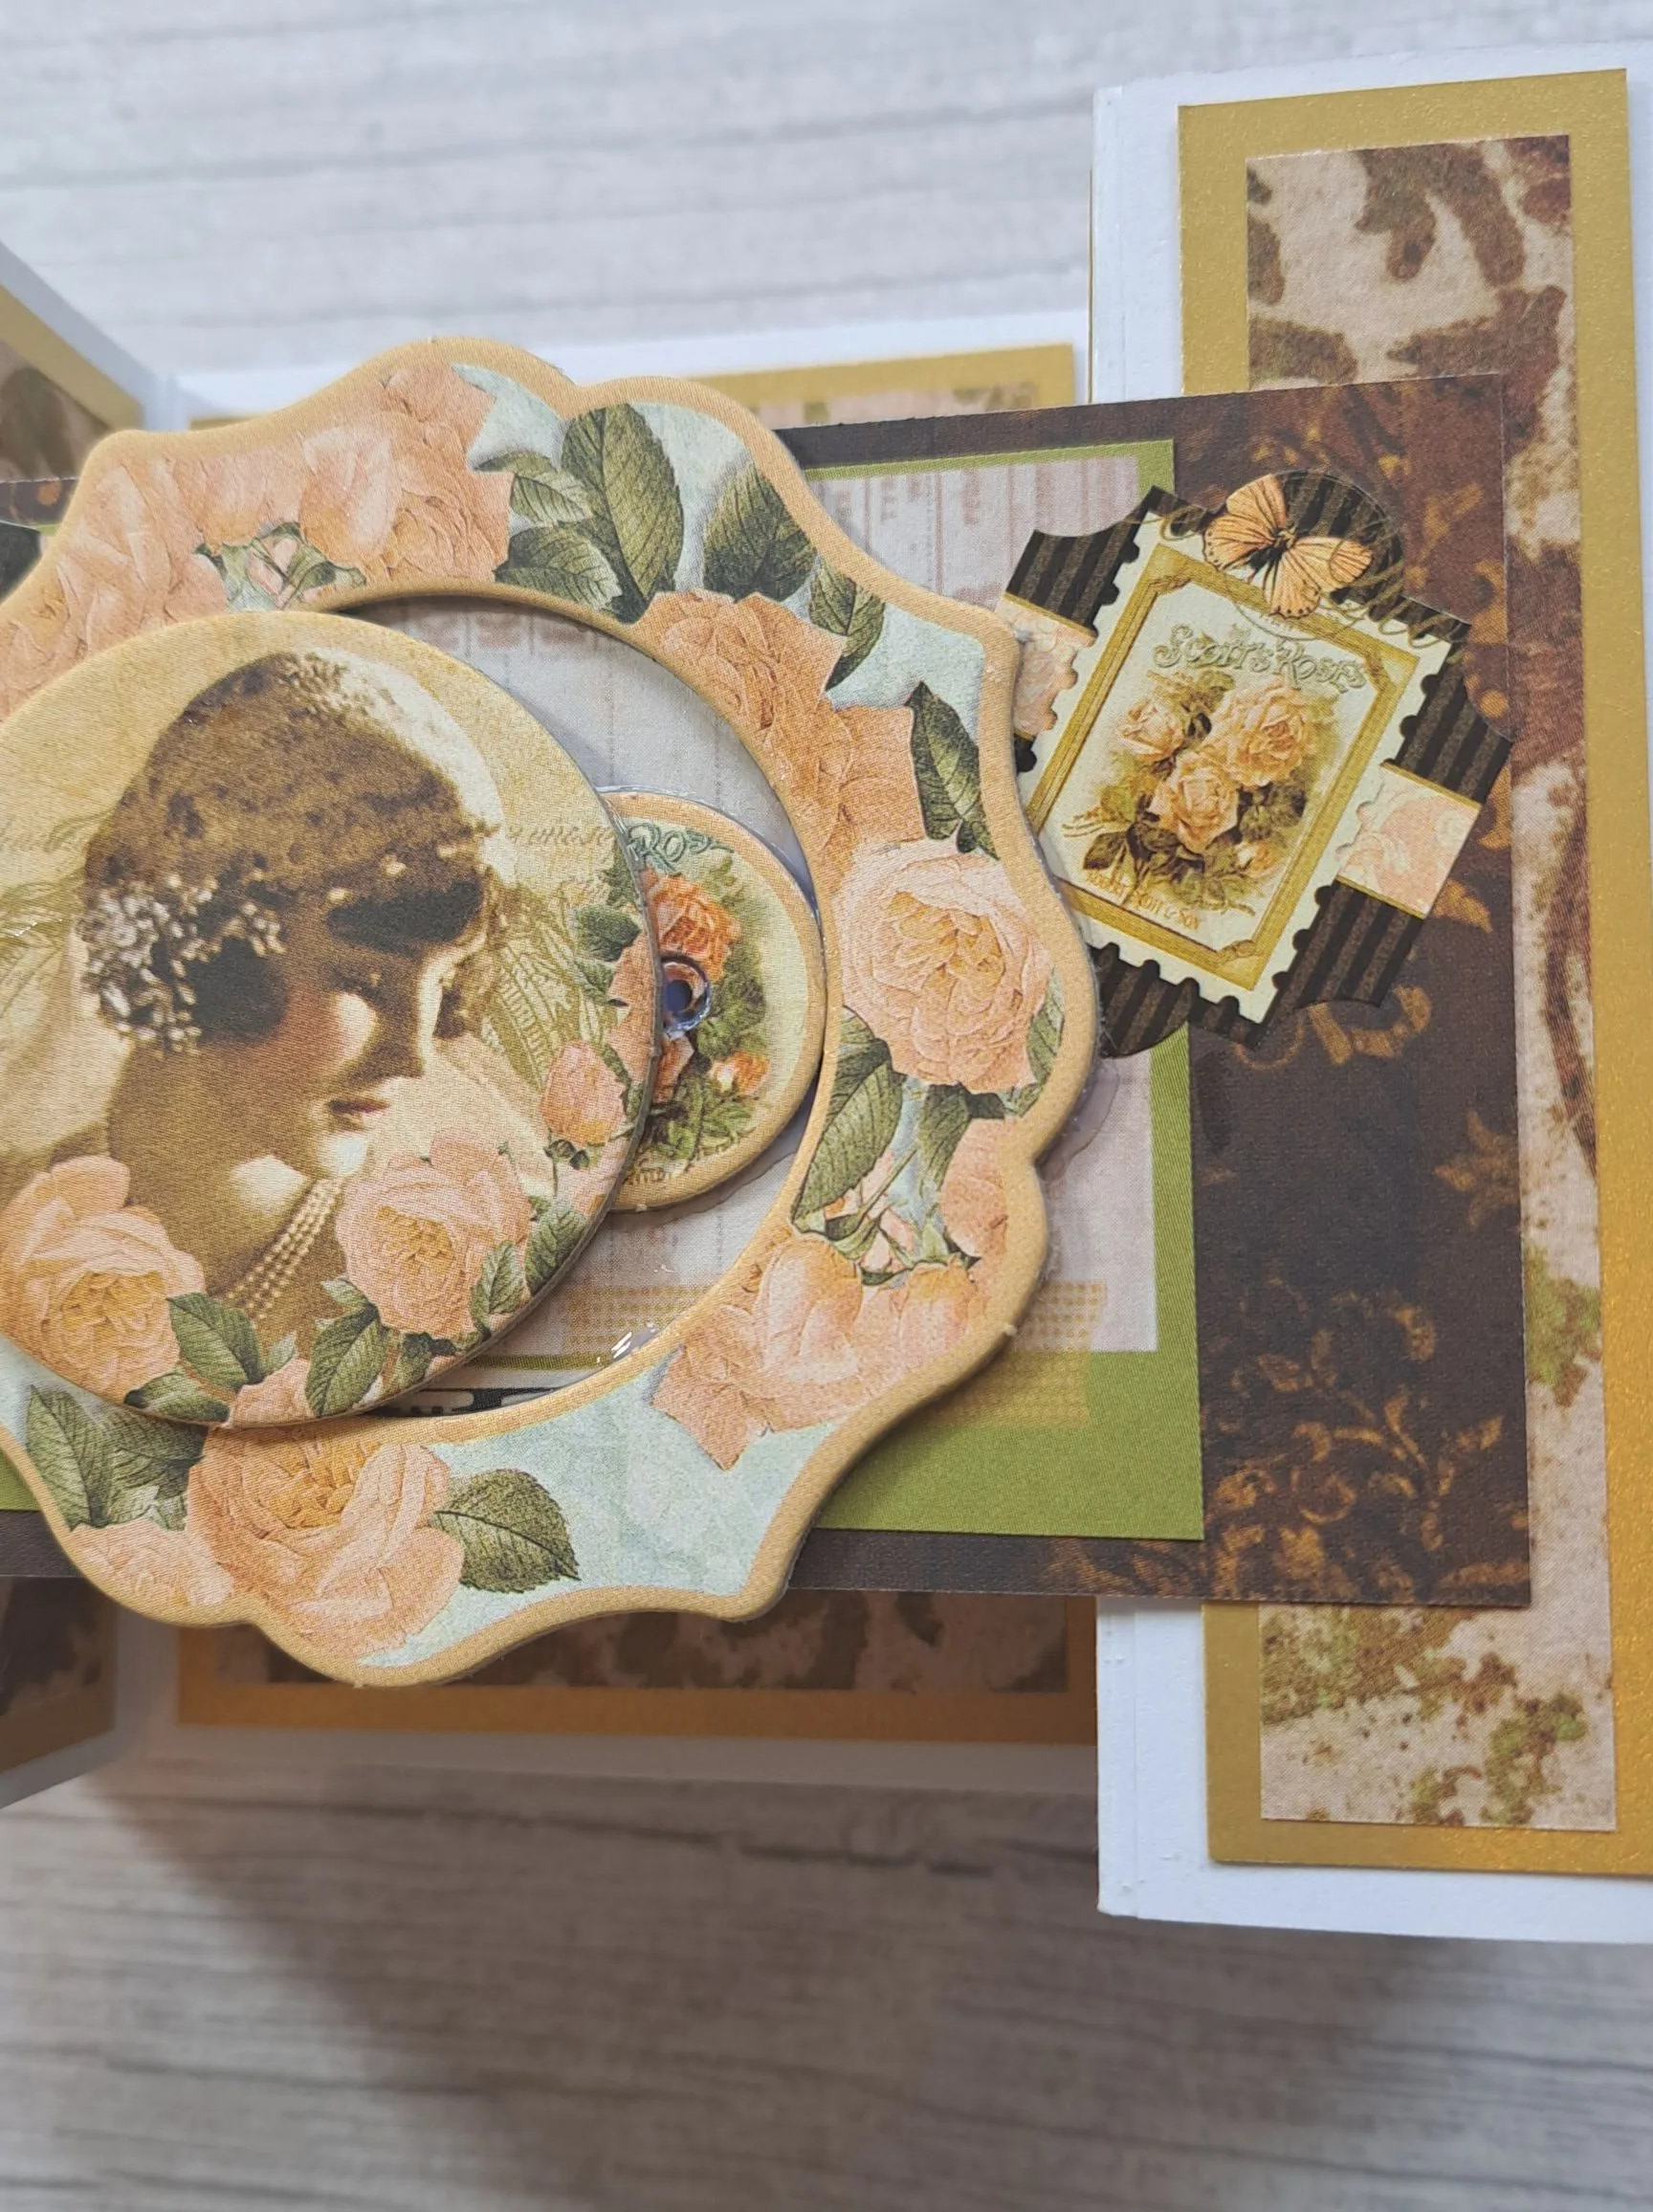
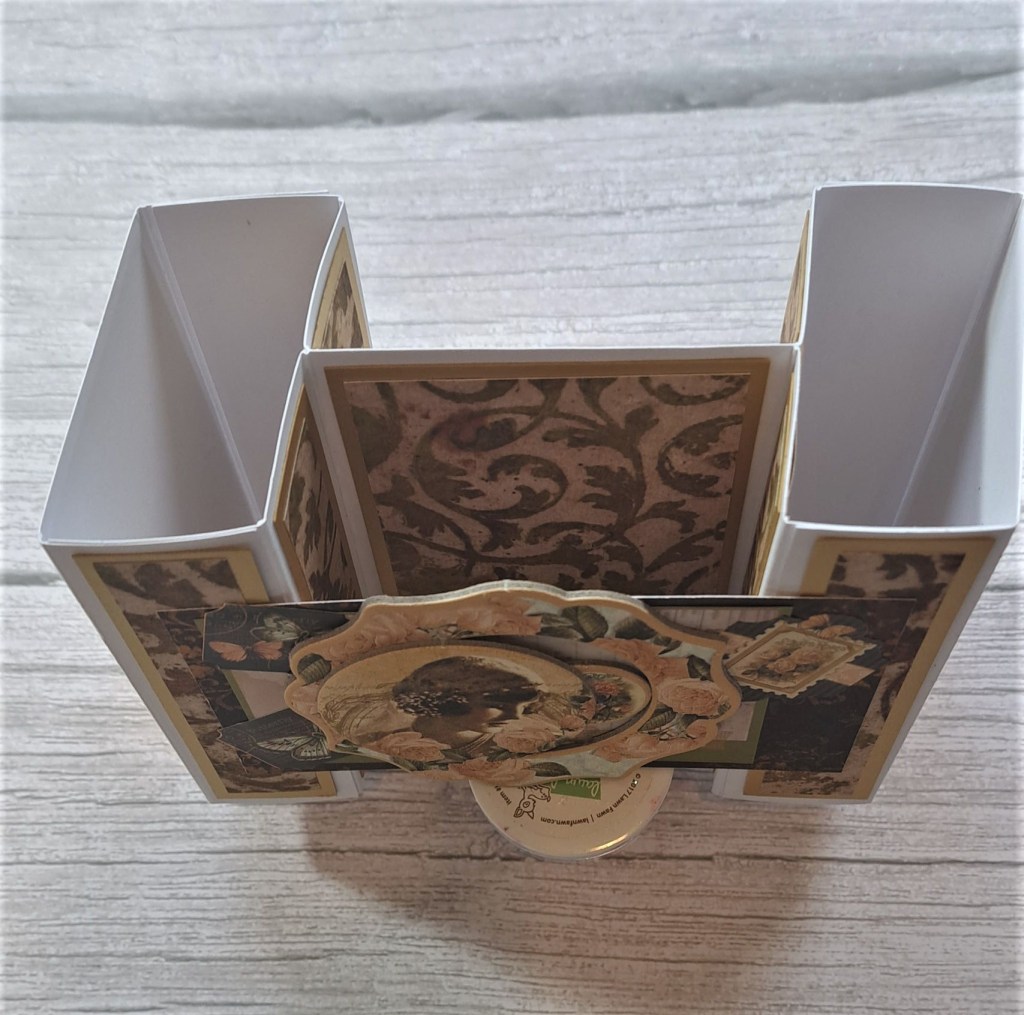
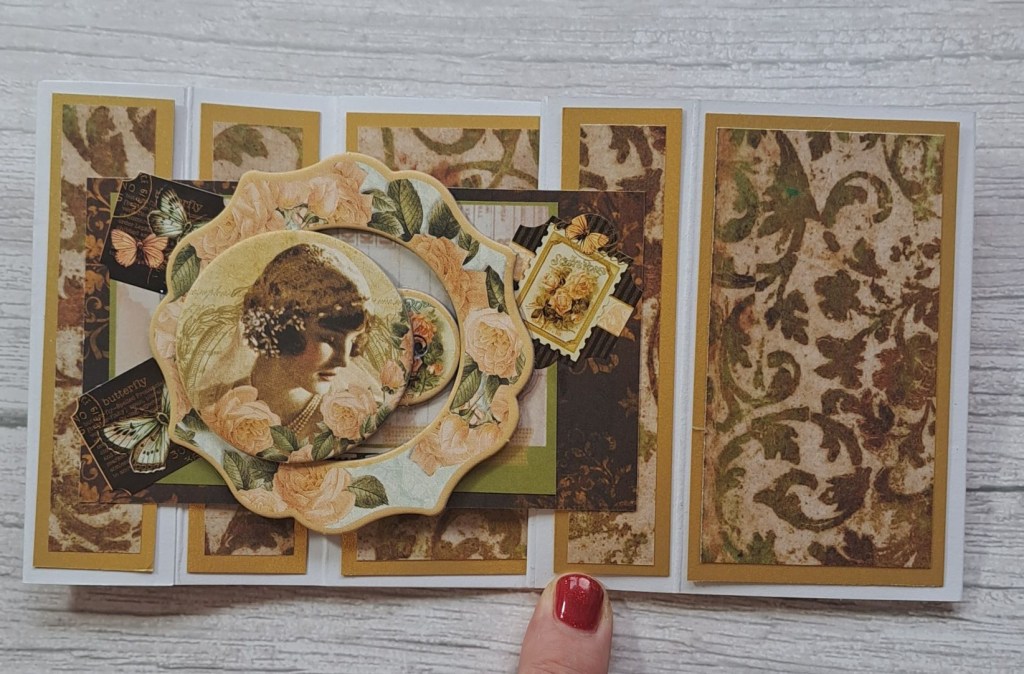
Claudia has chosen the next theme at Cardz 4 Galz, and she wants to see your shaped cards. Here is my card:
I created the base column card using instructions from a previous online crafty event – Maker Mania – and it was quite simple to put together.
I chose a white base card, and then used some Graphic 45 papers and ephemera to embellish. I don’t use my patterned papers enough, and I certainly don’t use ephemera very much, but I am trying different things, exploring different avenues – anything to do with paper crafting I’ll give it a go.
This also folds down to be mailed easy:
I struggle with layering and ephemera, what colours to use and where to place the items, but I’ve decided that what works for me is to lay things out and just go for it……..as long at the ‘stuff’ co-ordinates it seems to work. I can see I’ll be playing around a little more in the future.
I hope you can come and join us with your shaped cards. xx
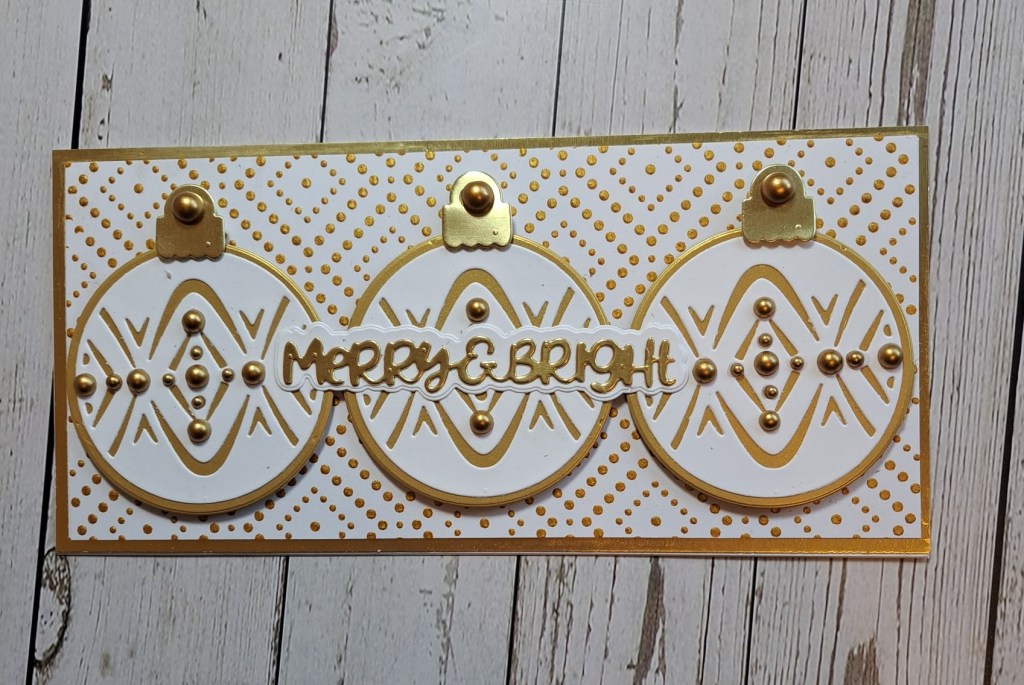
The three circle dies are from a kit through Scrapbook and Cards. I found out about these kits from another online card making course. The kits ship every two months, and combines a stamp set, die set, and a class with different people/companies. I believe the next one is with Gina K – but I haven’t received that yet – it takes a little more time to get to me here in the UK.
This die set was from LDRS Creative and I decided to make baubles.
I first created the dotty background with a Spellbinders stencil and gold paste. I left that to dry for 24 hours – just in case – and prepared the ‘baubles’.
I die cut the base circle from Spellbinders gold card stock, die cut the main decorative circle from white card stock, then layered. I used another die set for the bauble topper – adding with 3D foam.
Onto the slimline card base I added a gold base layer – I ‘gutted’ this layer to preserve some of that fabulous card stock – layered with the gold dotty panel, then added the baubles.
The sentiment was die cut from the same gold with a white shadow layer.
I decided to add some matt gold gems – kinda hard to stop when you get started.
I hope you can come and join us with your festive/Christmas makes. xx
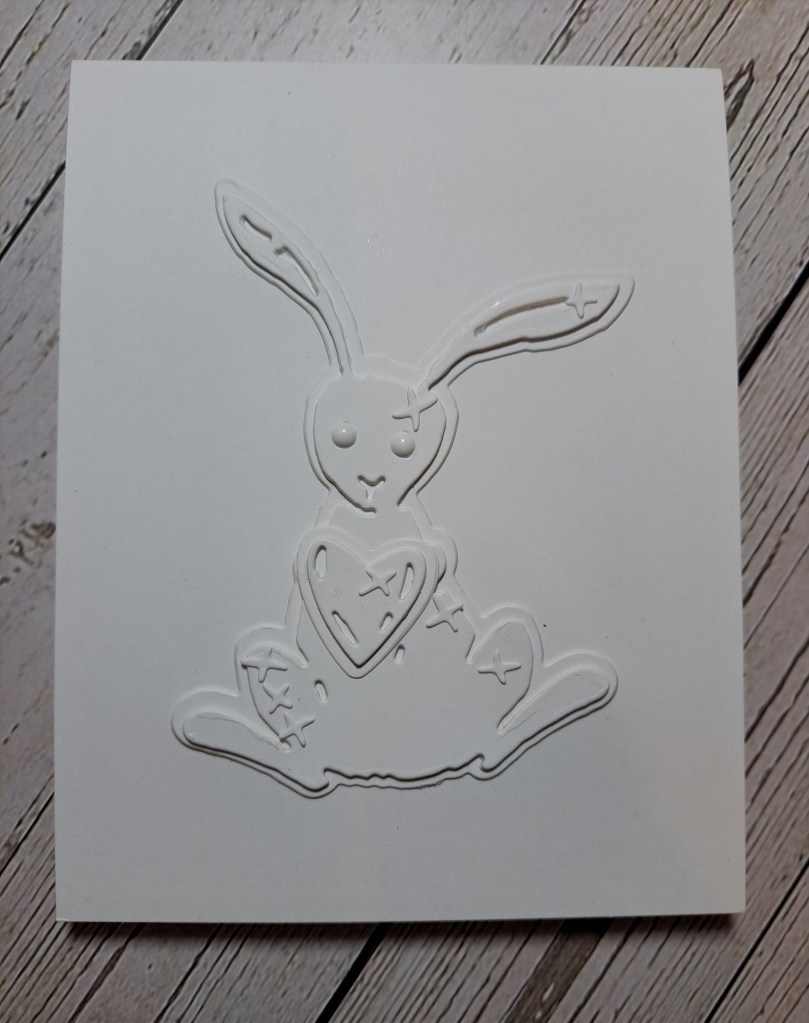
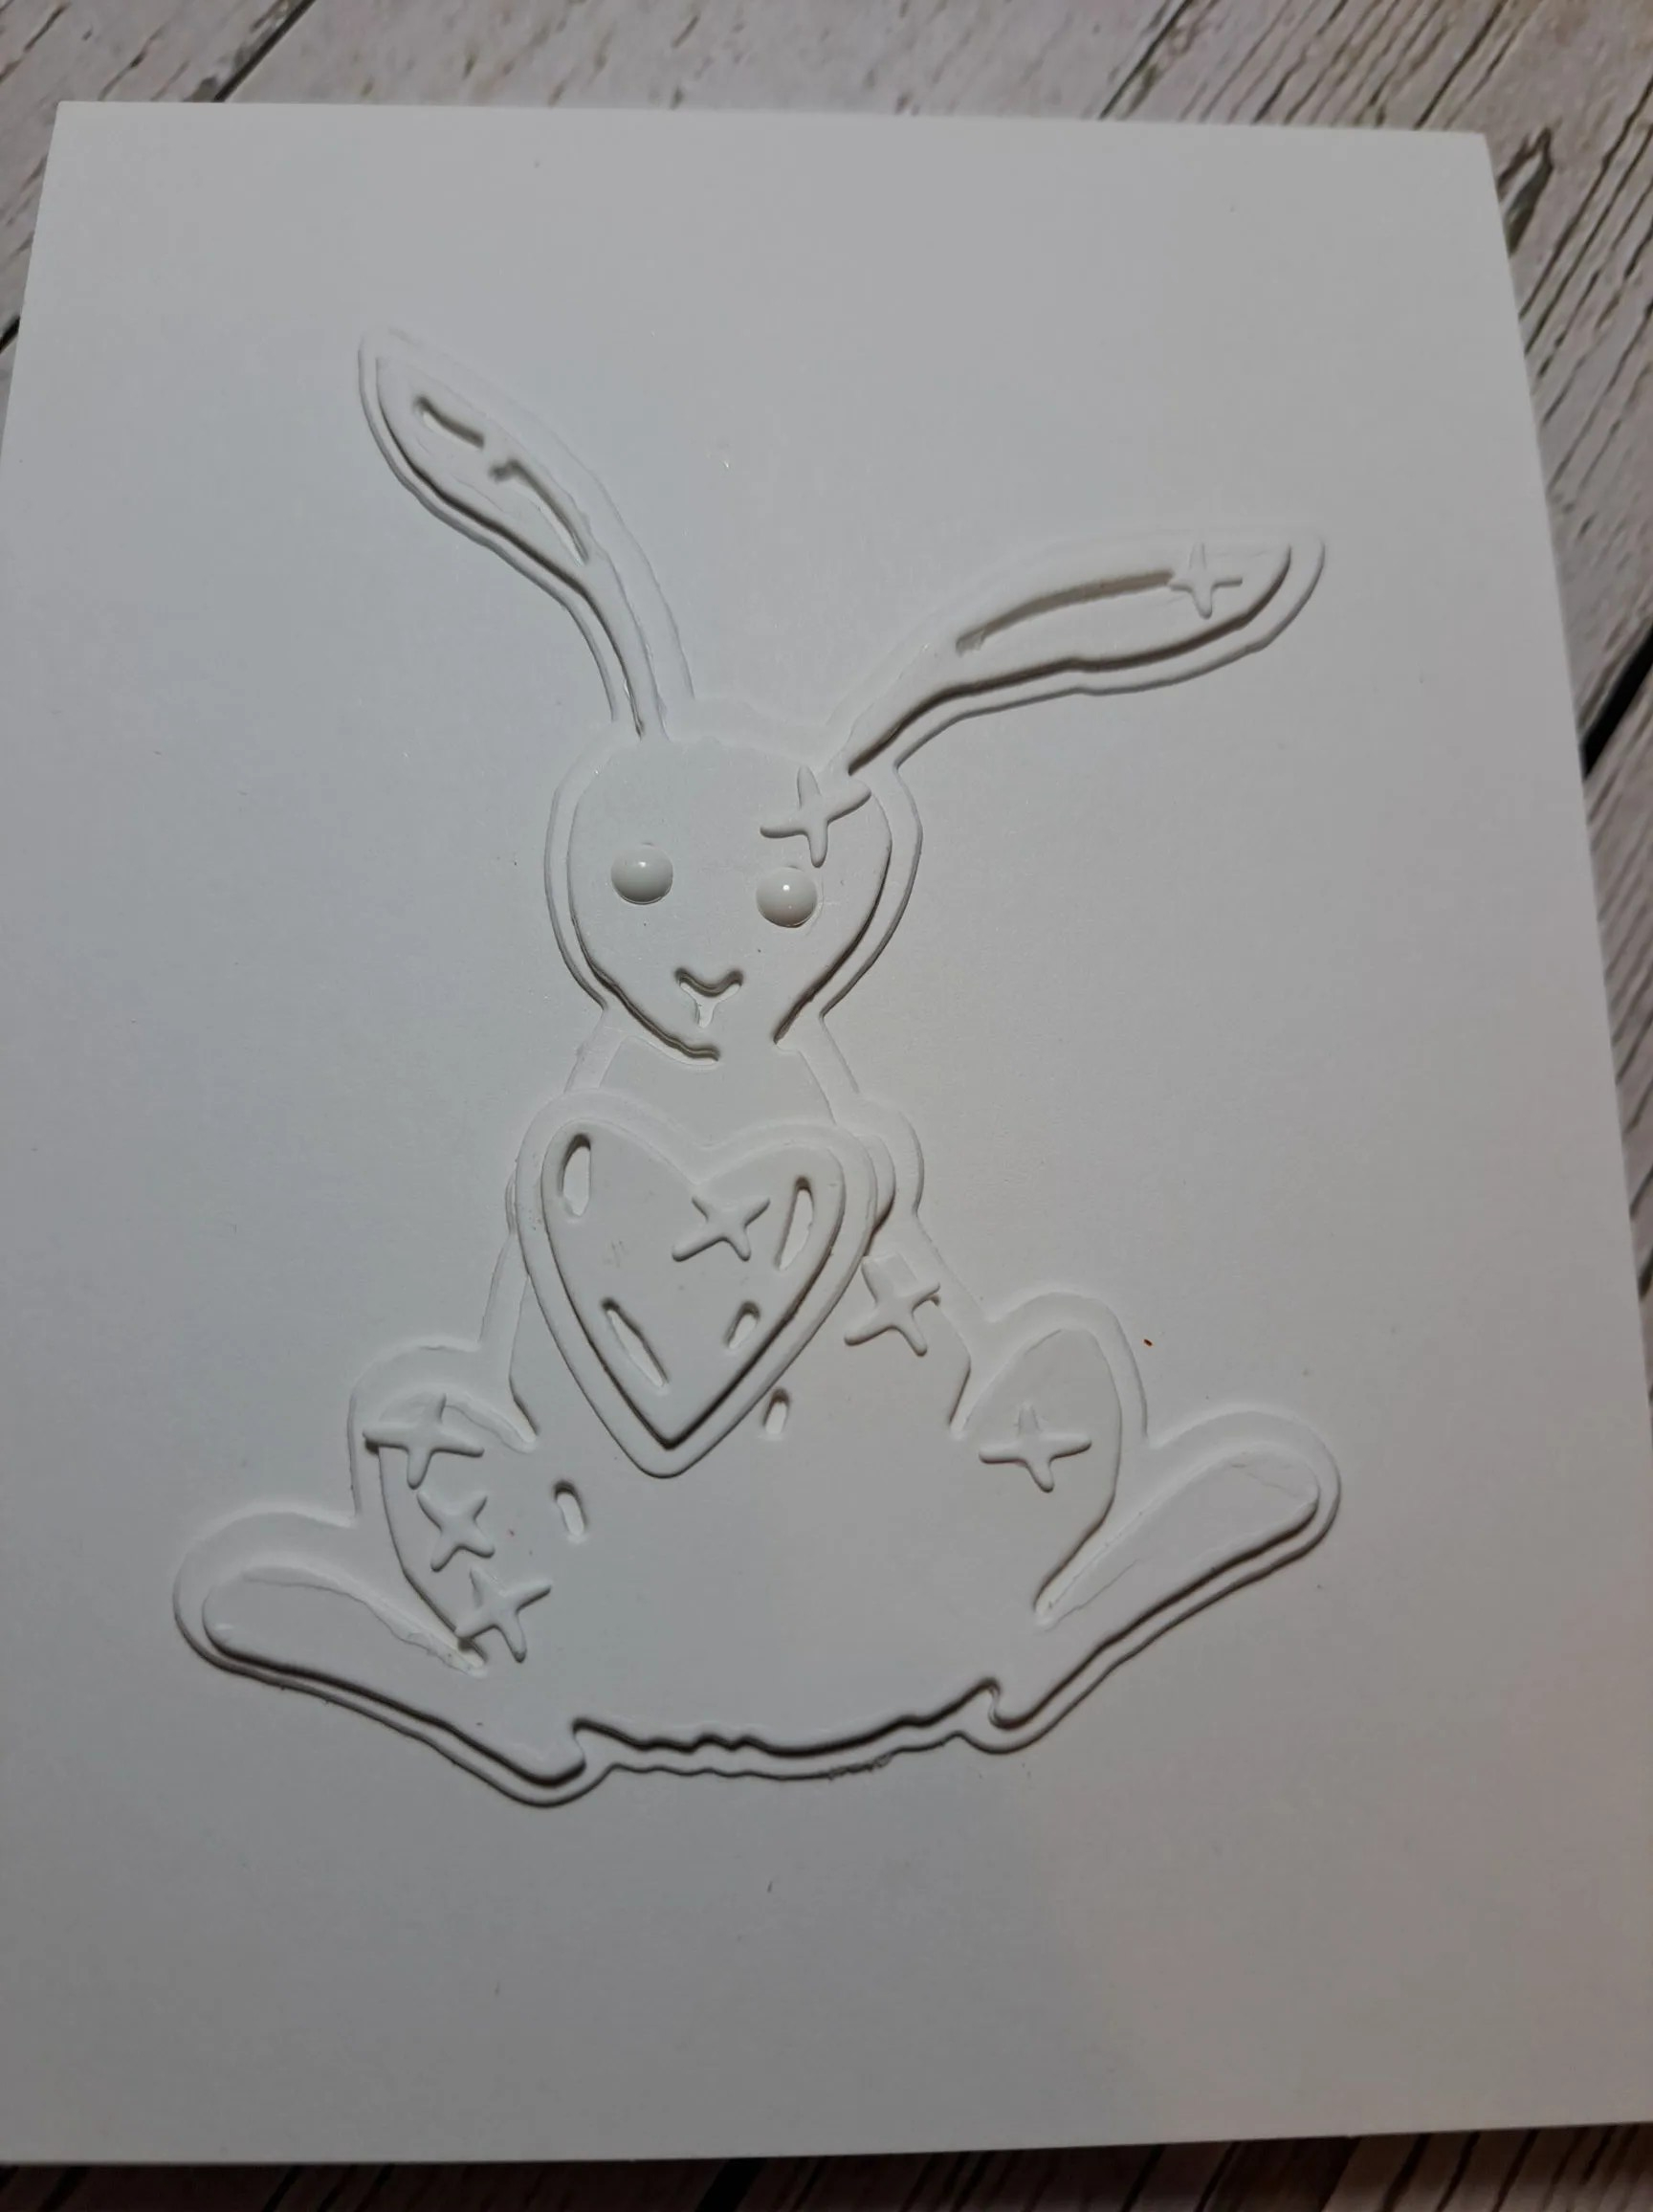
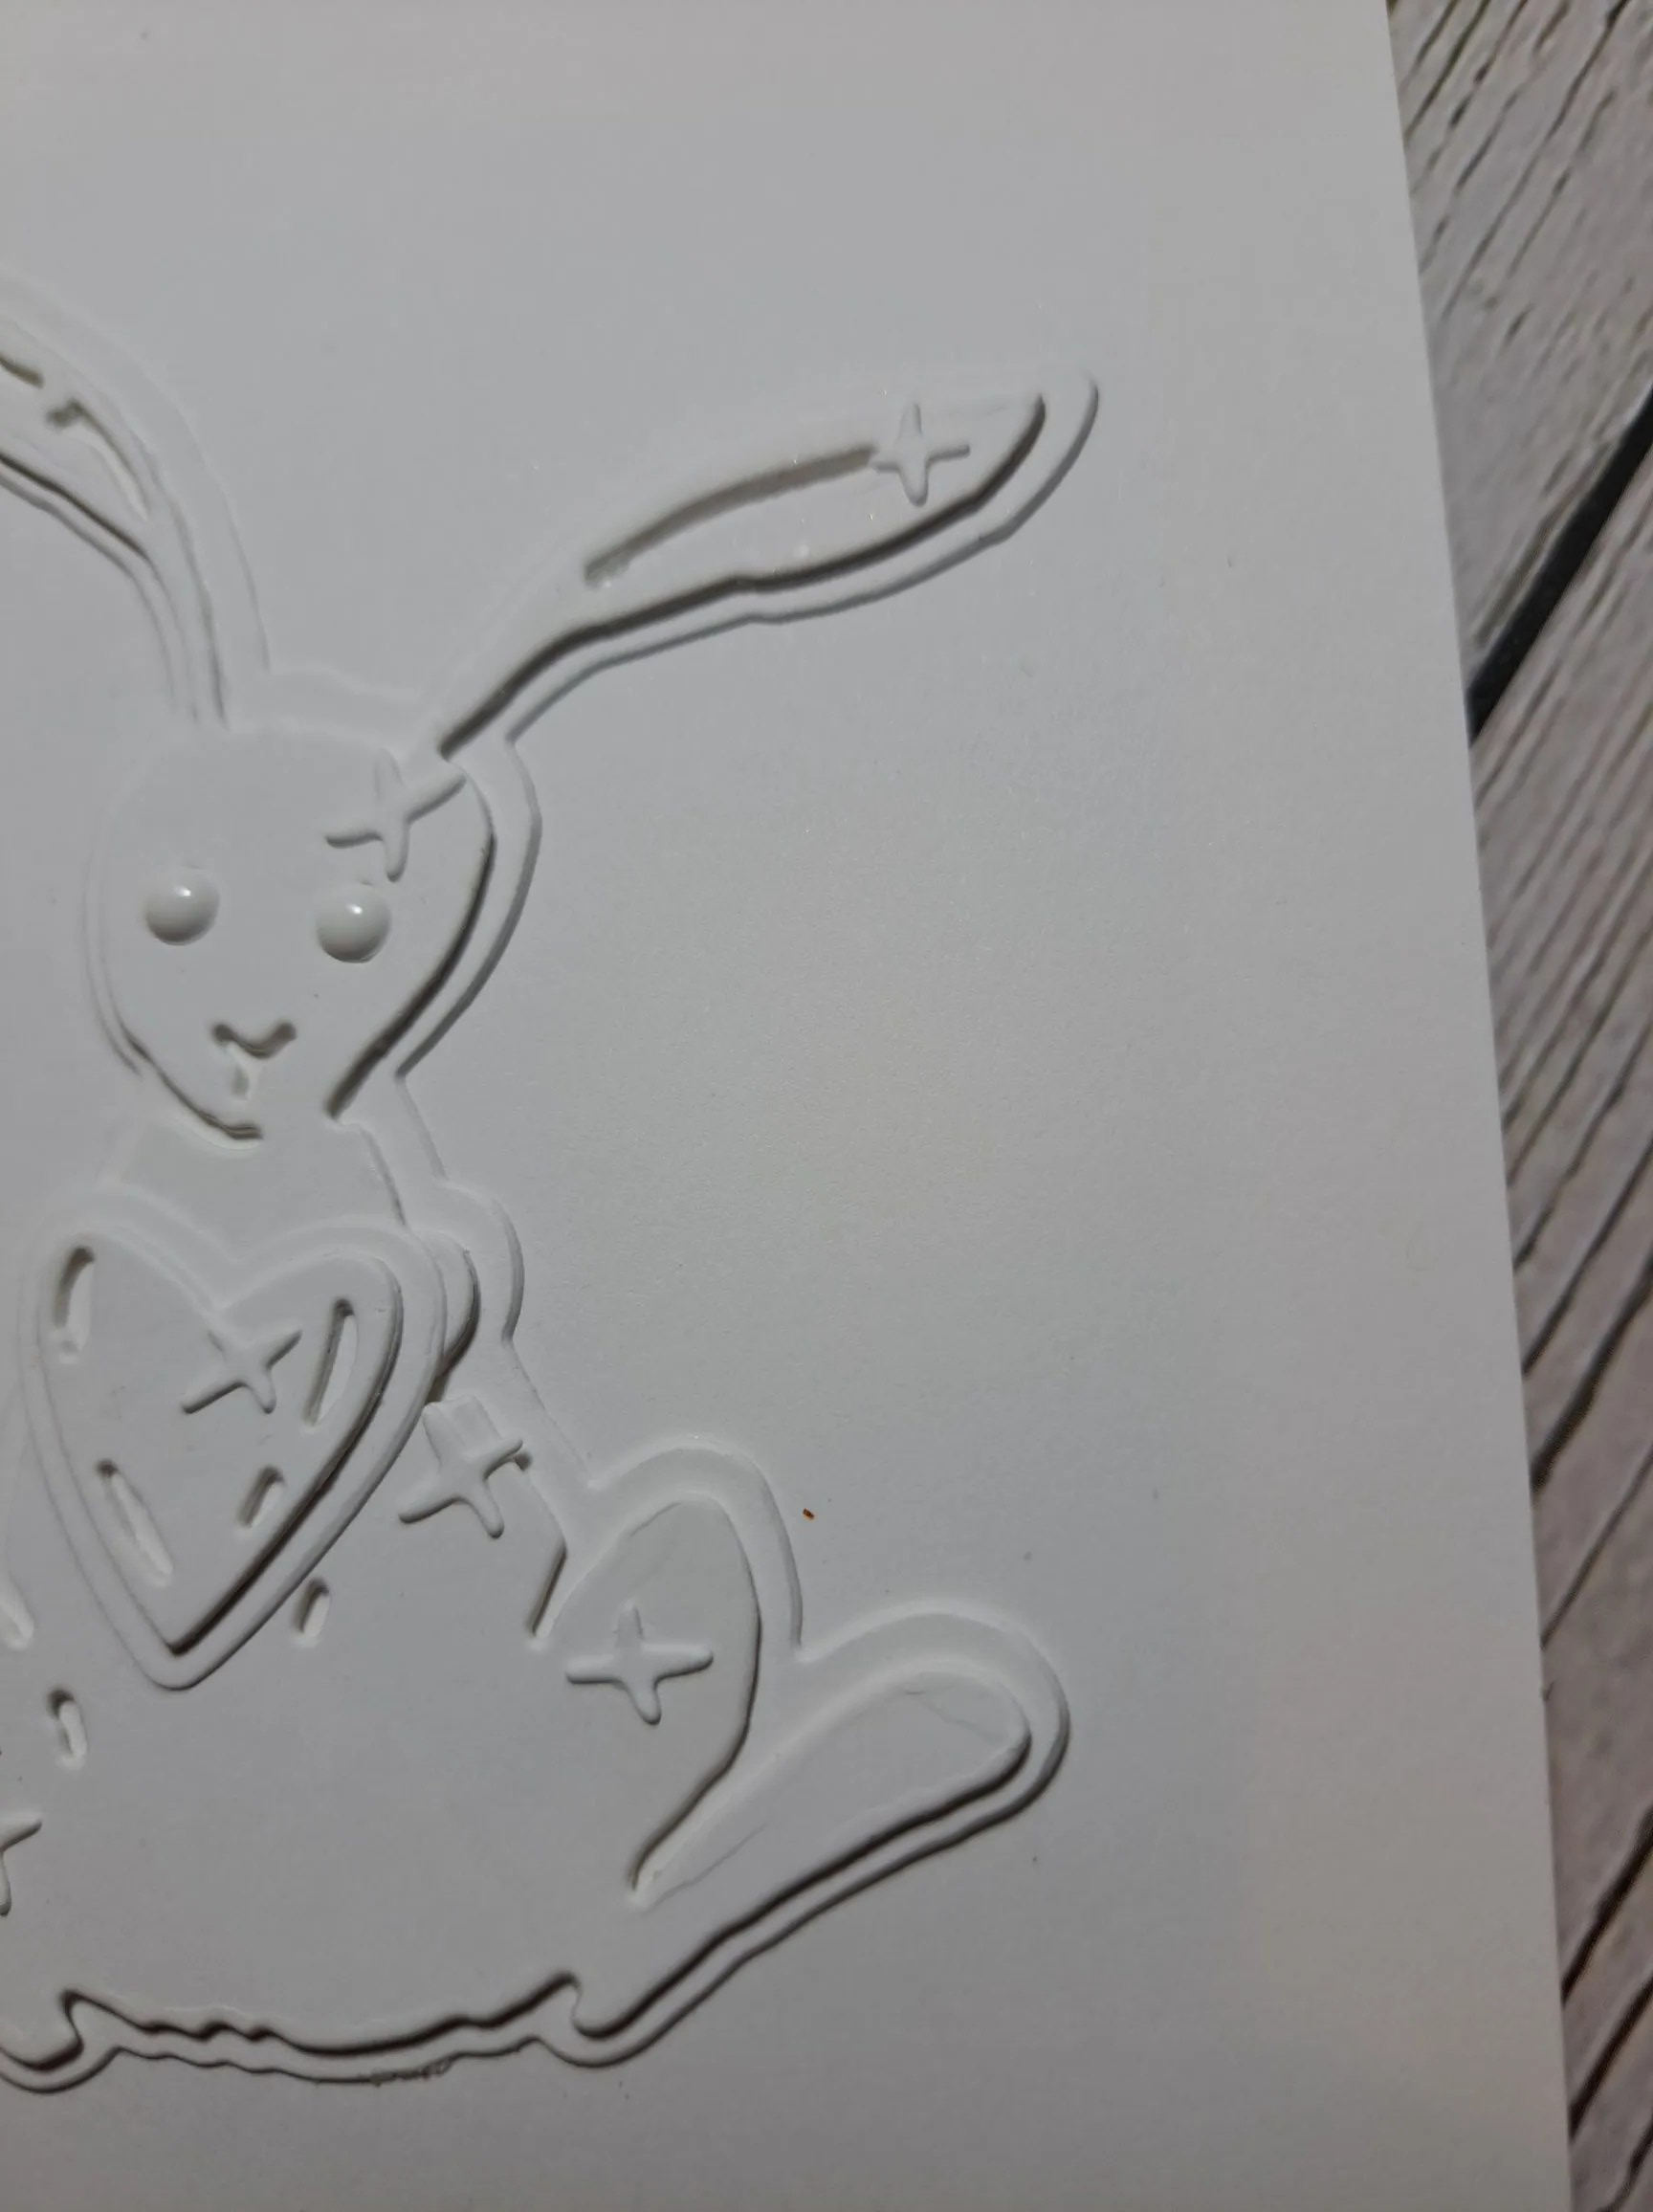
I have a card to share inspired by white-on-white challenges – and it was – indeed – a challenge:
I received this stitched rabbit recently, and thought I would try and use it for these themes – CAS and white-on-white.
I first die cut the shadow layer, then die cut the rabbit three times and layered them up. I thought that way I could create some dimension and ‘shadow’.
I did the same with the heart – one layer for the base and three layers for the heart itself, which I placed as though the bunny was holding it – I may have suddenly gone all romantic…….!
I added some of the die cut stitches to various places on the rabbit, one on the heart and was feeling just about finished – when I remembered I had some white gems – I used those on the eyes……
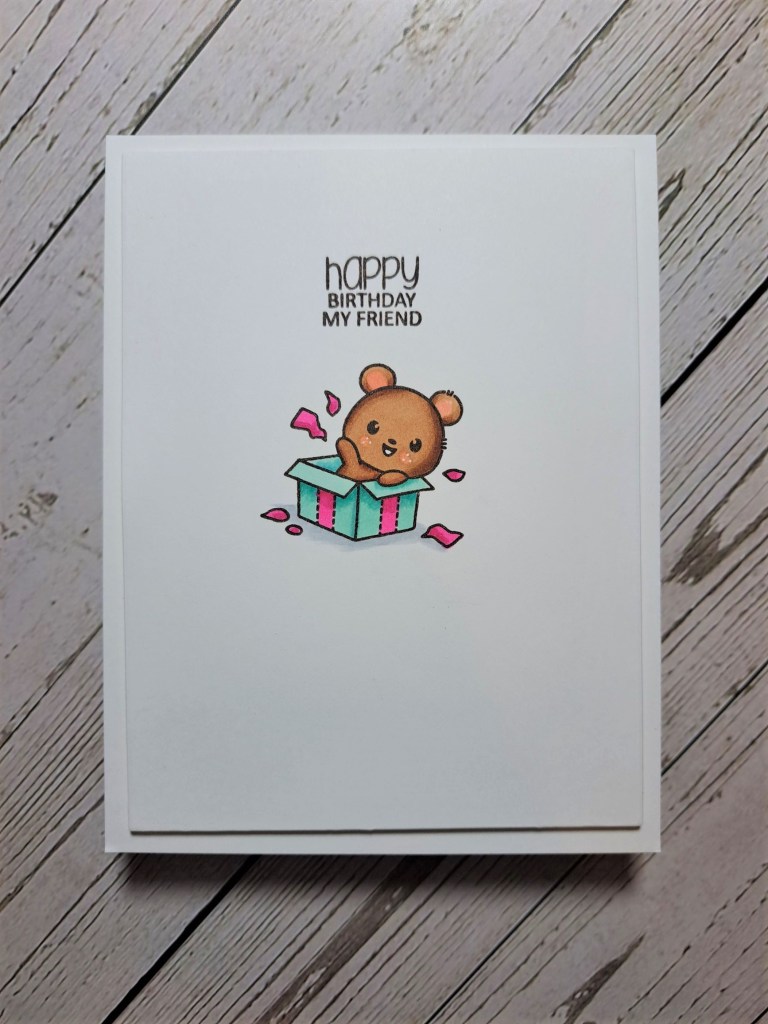
Hello. I have a CAS card to share using a Clearly Besotted stamp:
I stamped the image onto panel and coloured with Copics. I then stamped the sentiment in the same brown Gina K amalgam ink, cut the panel down to be slightly smaller than the card base, and adhered with 3D foam.
I decided the bear needed some grounding, so I added a little cool grey Copic shadowing.
This card took a little planning, some drying time – and patience…..
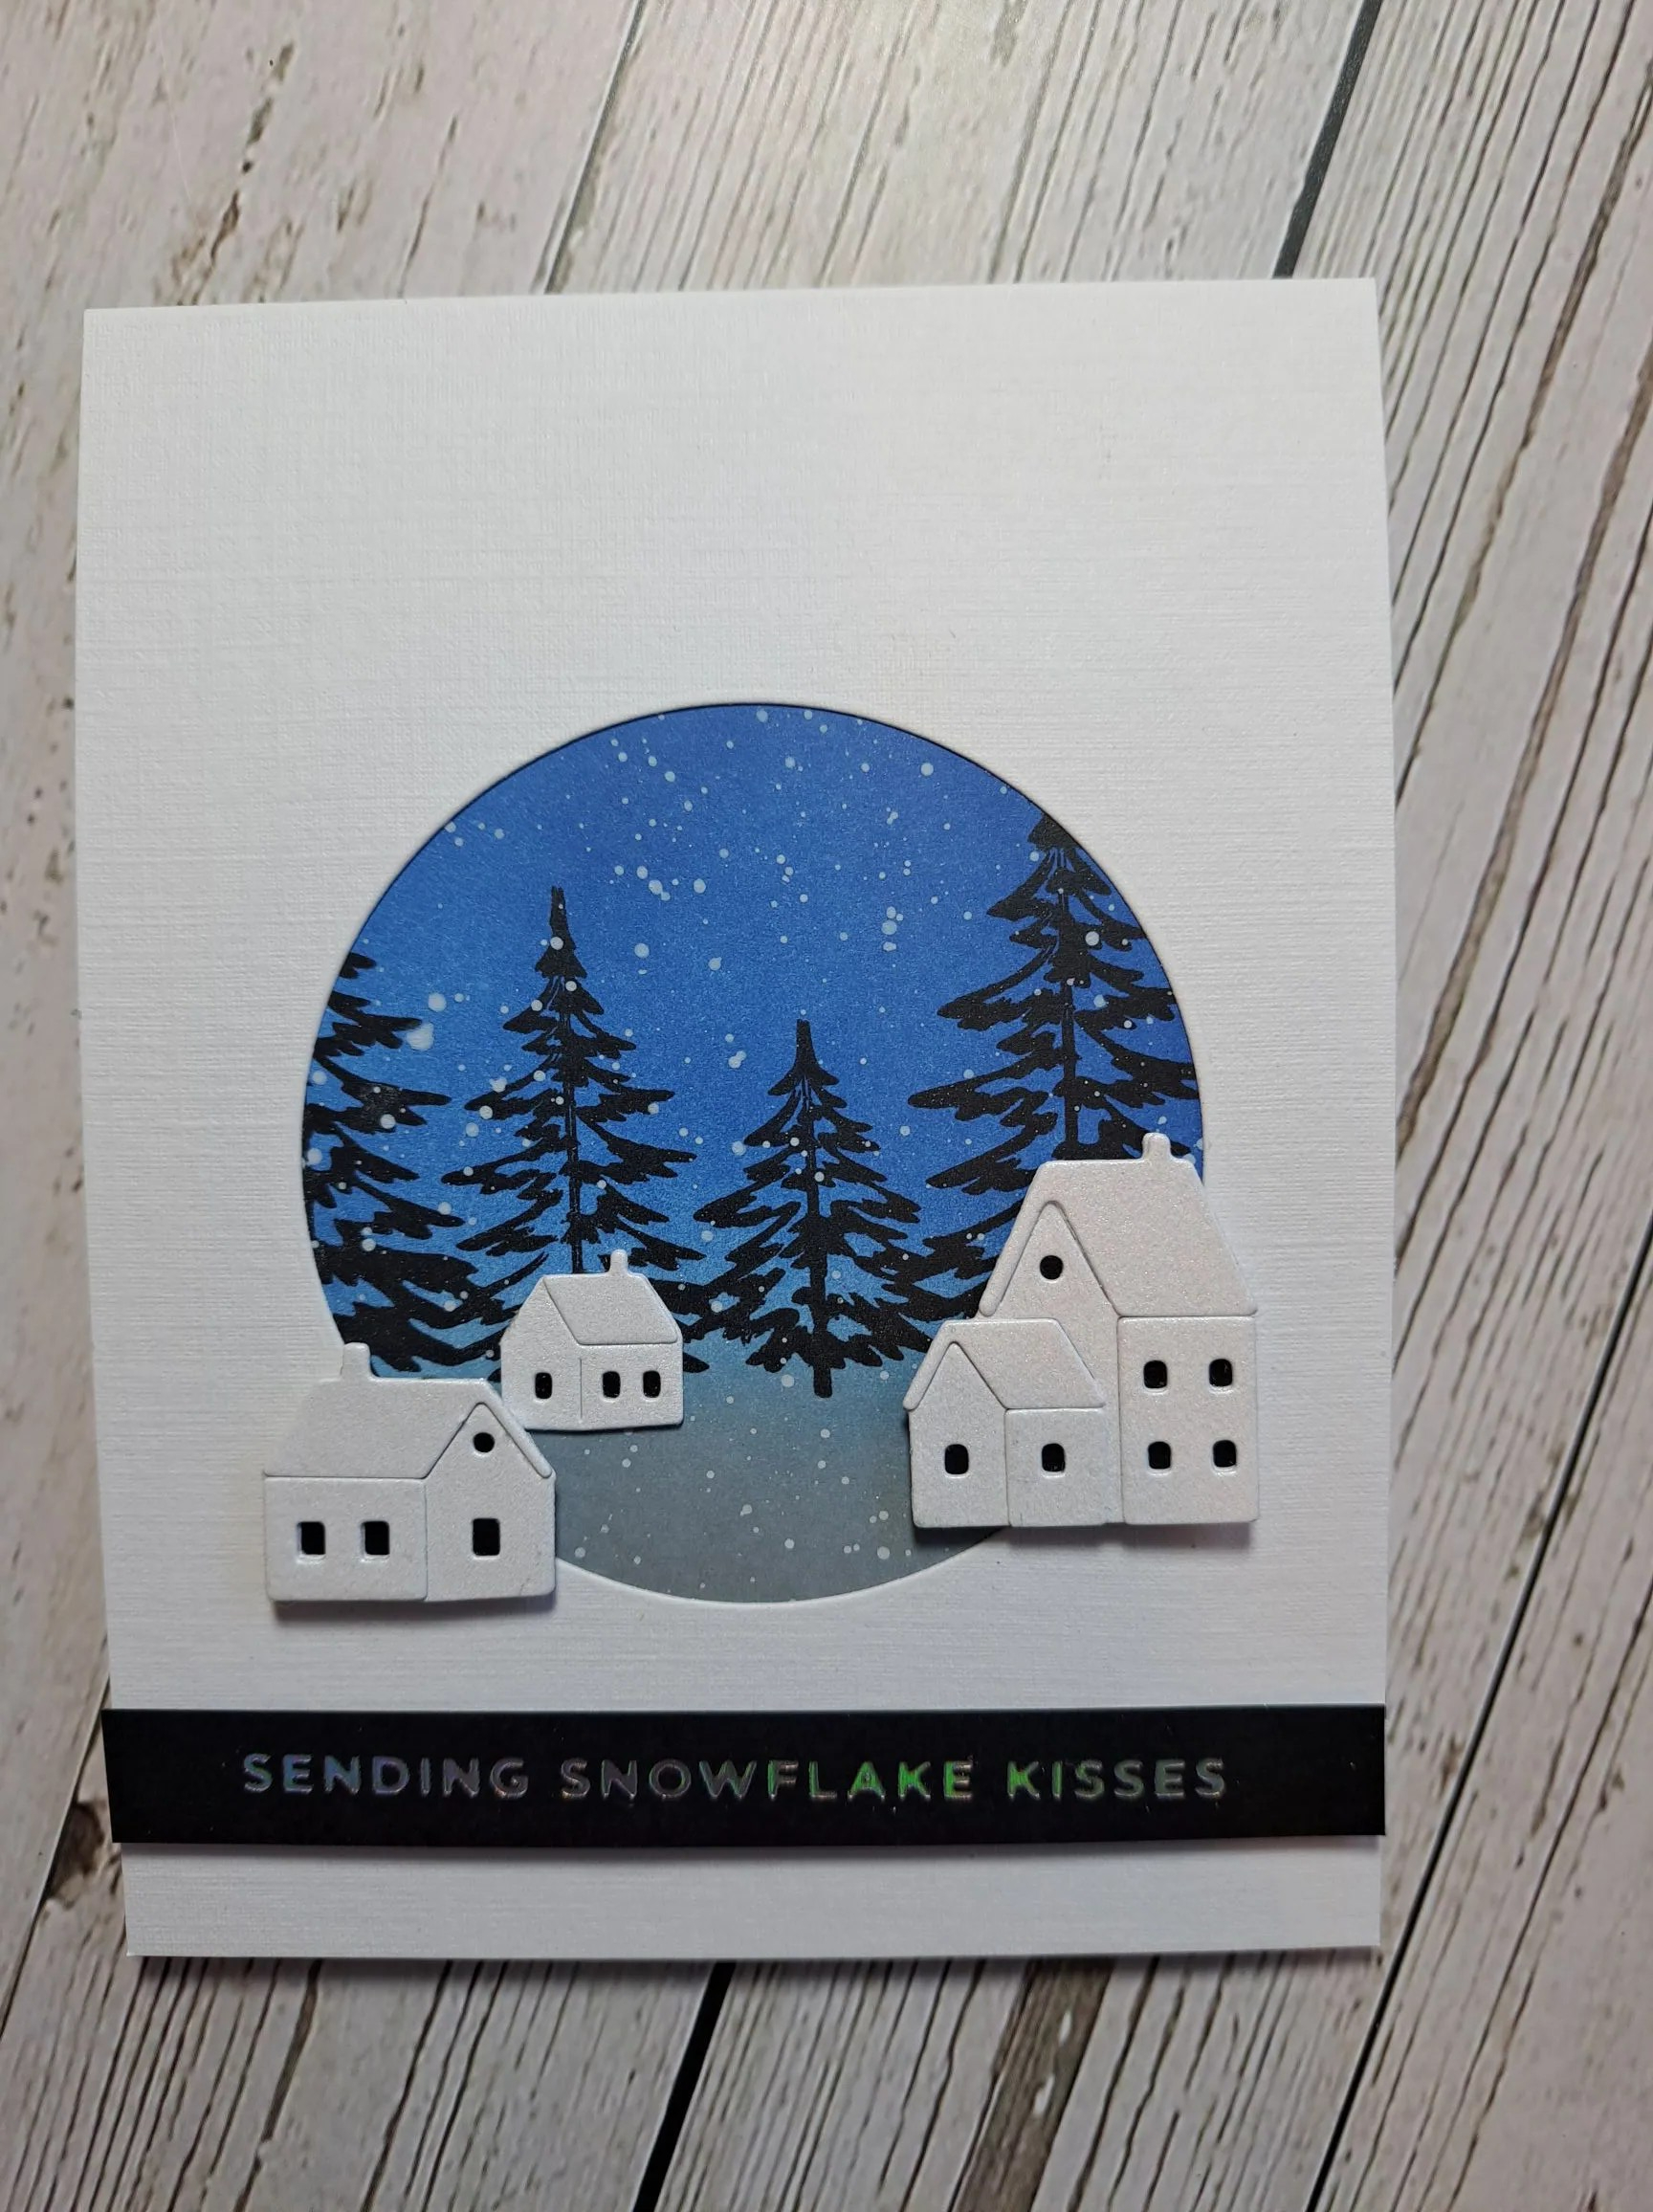
I started by ink blending a piece of card with Distress Inks – Prize Ribbon and Hickory Smoke. Once dry, I stamped the trees in Versafine Black Onyx – and waited for it to dry again. Then splattered with white acrylic paint – and waited yet again.
Whilst waiting for all the drying to happen, I die cut the houses from The Greetery from ‘Ice White’ card stock from Pink frog Crafts here in the UK, pieced all the layers together – not a major issue – then stuck some black card stock on the back of the houses to fill in the windows.
I then die cut a circle from the front of the card base, die cut a larger circle from the ink blended panel – deciding which part I wanted to show through the aperture, glued that to the back of the card front – adding a white panel on the back to cover the mess. Sorry – the creative process……
I then placed the houses as you see – the smallest one with glue, and the other two with 3D foam squares, added a foiled sentiment – and done….
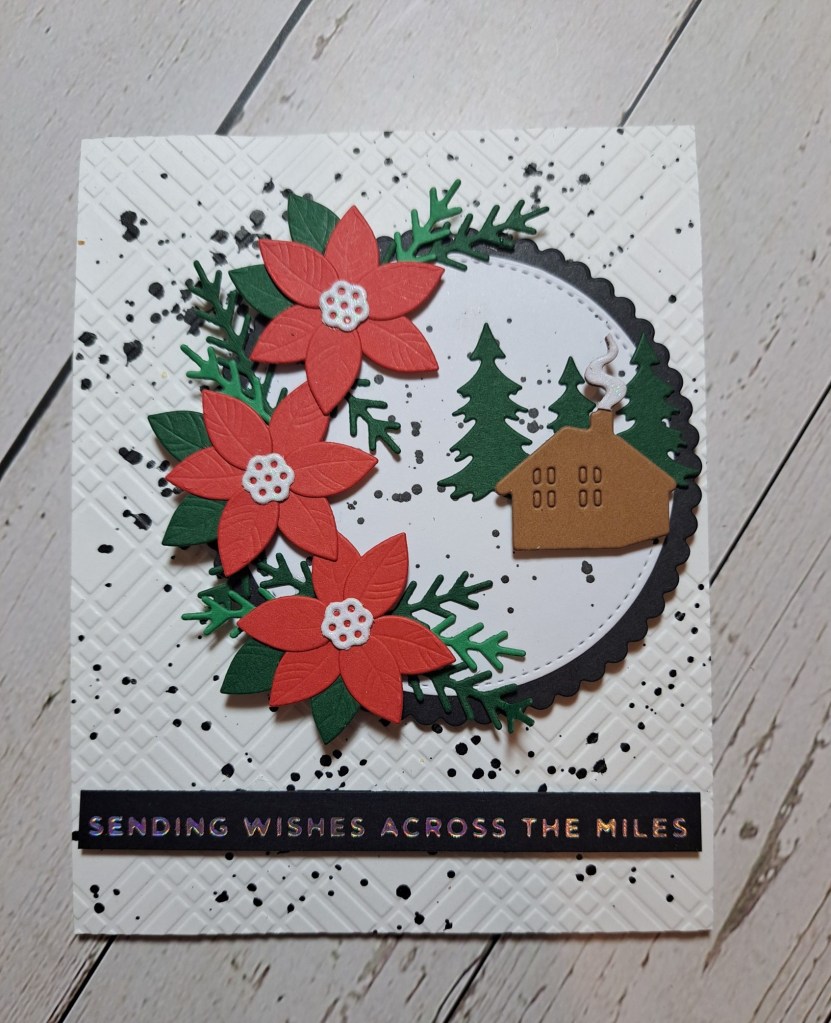
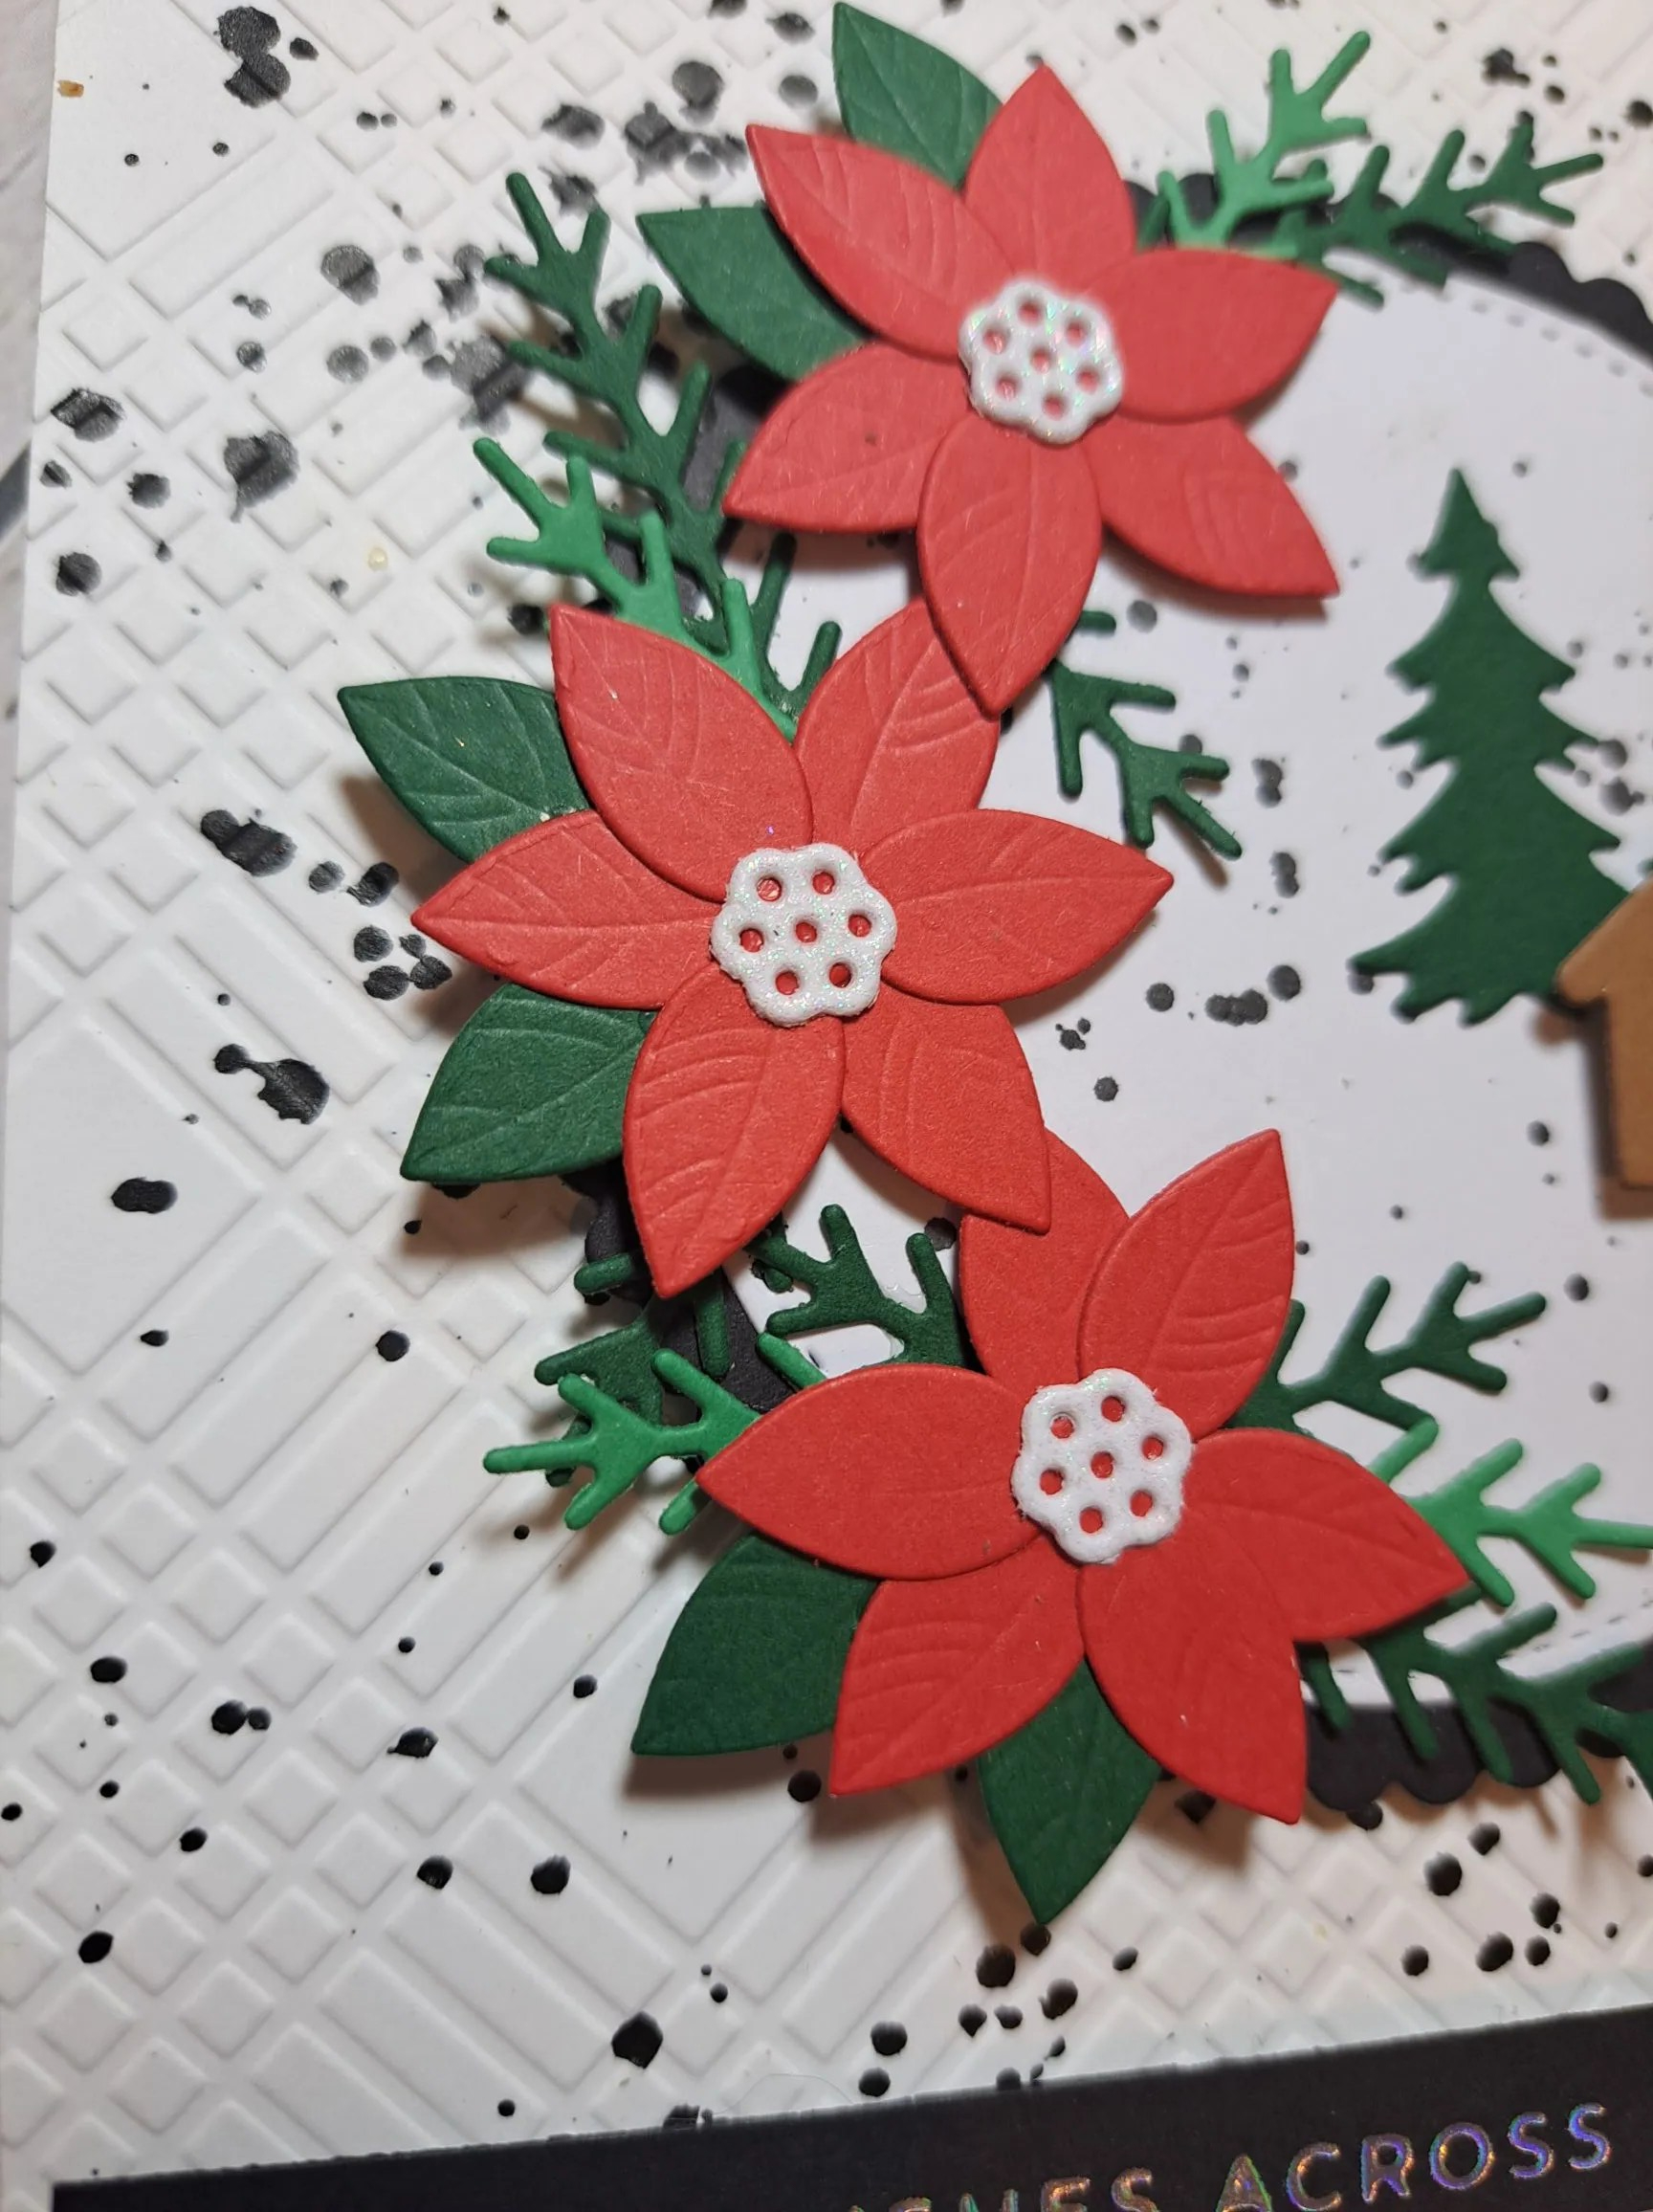
This has been a busy crafty weekend for me – a virtual class with Jenn Shurkus, and on the breaks from the class – and before it starts US time – I was able to make this card:
I took the opportunity to use some Spellbinders products – new and unused – to create this card.
I started by die cutting the elements – flowers, leaves, house, and trees, then created a scalloped circle and inner white circle using a Gina K Designs Master Layouts die set.
I then used a Spellbinders embossing folder – choosing to use the debossed side – and splattered that piece with some black acrylic paint.
I played a little with the layout – where to put the house and trees – how and where to add the floral elements – and found I liked this layout – using a mixture of 3D foam and wet glue to stick them all down.
The sentiment is a previously foiled strip.
After I had thought I had finished the card, I decided to add some white glitter card to the smoke coming out of the chimney…..
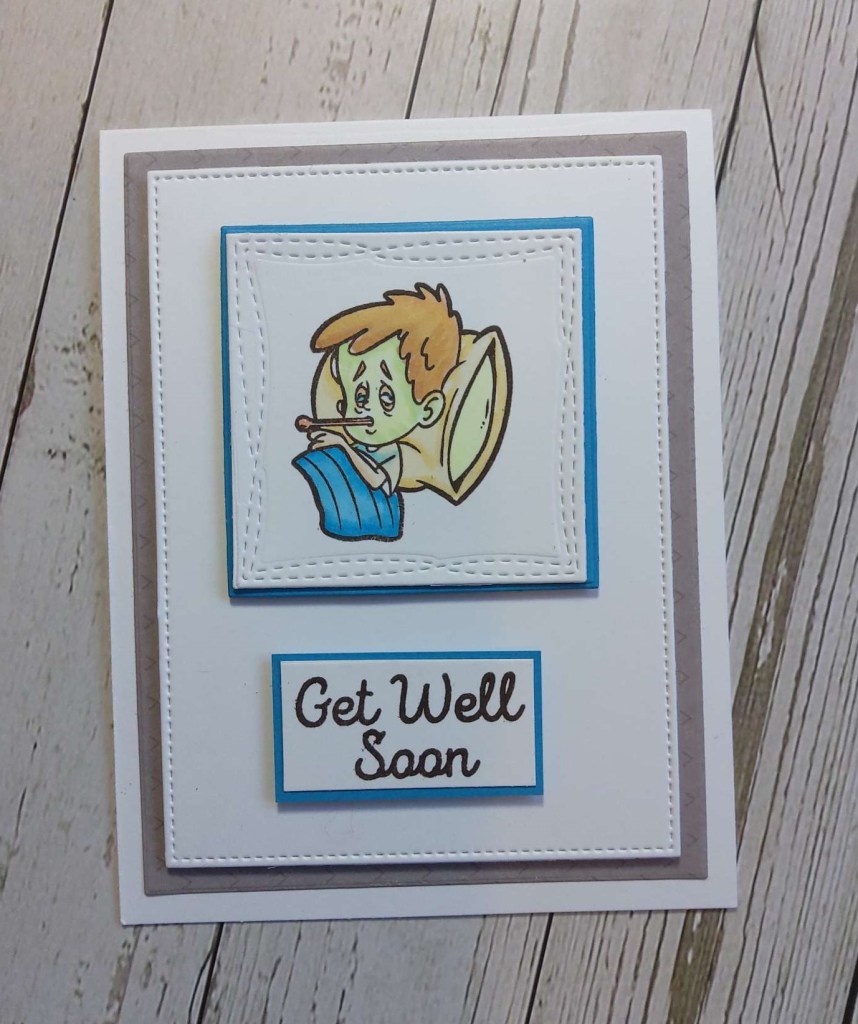
The Alphabet Challenge has started their first challenge of the year. We are at the letter ‘U‘, and we want to see your ‘Under The Weather/Get well‘ creations. Here is my card:
I stamped and coloured the image from Brutus Monroe then die cut using a wonky stitched rectangle die, and matted that with a blue piece of card. I added a couple more panels to the cards base, and added the sentiment as you see.
I decided to make the boy look quite sick and poorly, colouring his skin green – which was quite fun to do actually.
I hope you can come and join us with your ‘under the weather/get well/ creations. xx
Hello there. Cardz 4 Galz has started a new challenge. Caz has chosen the theme of ‘Clean and Simple’. Here is my card:
I chose a Heffy Doodle image, stamped then coloured with Copics, and die cut with the matching die set.
I then die cut a circle into white panel, added a piece of previously created ink smooshed card behind the aperture, and then added the image so he was poking his head out of it.
The sentiment was stamped and cut into a strip, adding as you see.
I hope you can come and join us with your CAS creations. xx
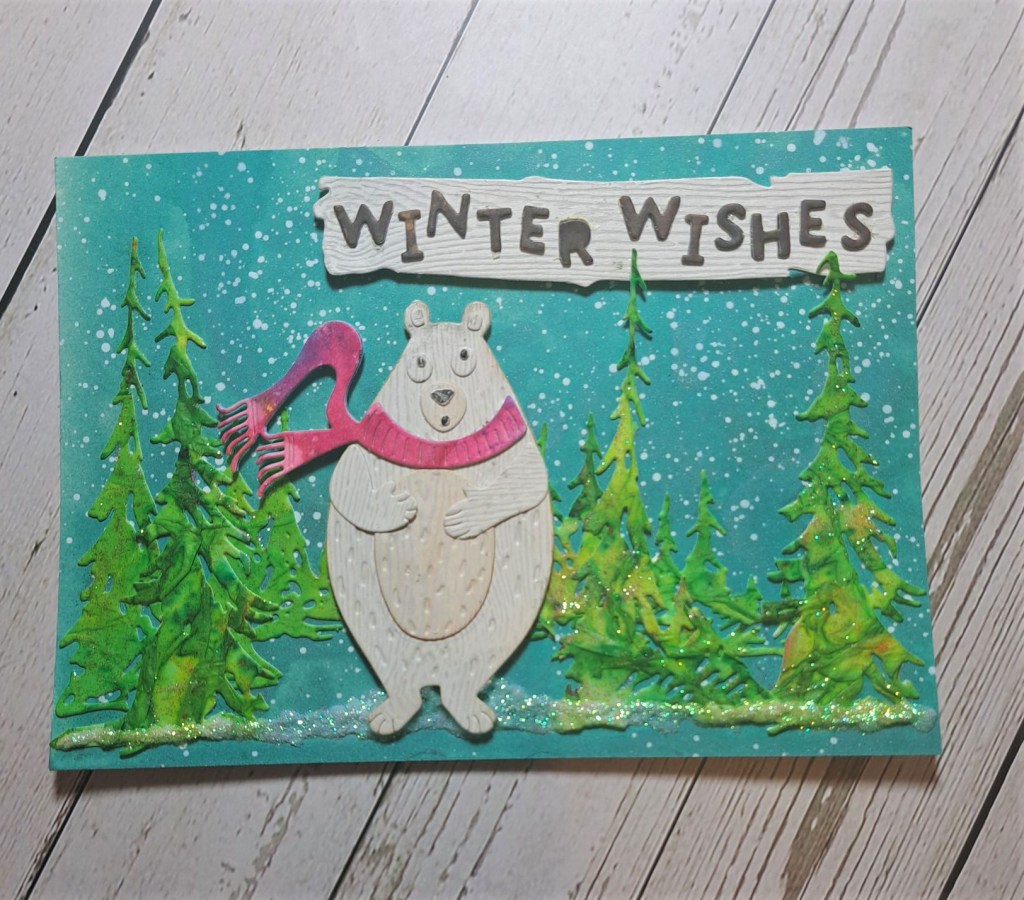
Hello once again. The ABC Christmas Challenge is at the beginning of the alphabet again. Helen is hosting this time round, and we want to see your ‘A for Anything goes’ and ‘B for Bears’ Christmas creations. Here are my cards:
A is for Anything Goes
B is for Bear
As you can see – two very different styles of cards.
The first CAS card is using s Clearly Besotted image, stamping, colouring with Copics, then using an oval to die cut, layering that white oval with black, then adding a foiled sentiment.
The second definitely not CAS card took a little more preparation.
I sprayed some Tim Holtz mica spray onto some Distress Heavystock card, splattered with white acrylic paint and set aside to dry.
I then totally channeled Tim Holtz from one of his YouTube videos, and die cut the bear from white and grey wood grain card stock, layered together, then added a pink scarf using a previously created ink smooshed panel.
The trees were die cut from a panel of card onto which I had glued some tissue paper, added water, added Brushos, then when dry added some gold wax. The die cutting of the trees flattened the ridges on the trees – but if you add the wax prior to die cutting then the detail is still there.
I snipped and placed the trees, added the bear, added some white glitter drops for the snow on the ground, then added the sentiment – die cutting the ‘board’ from the same white and grey card stock, and adding the letters in a haphazard fashion – I struggle with straight when I do a sentiment like this, so I went overboard with the higgledy-piggledy.