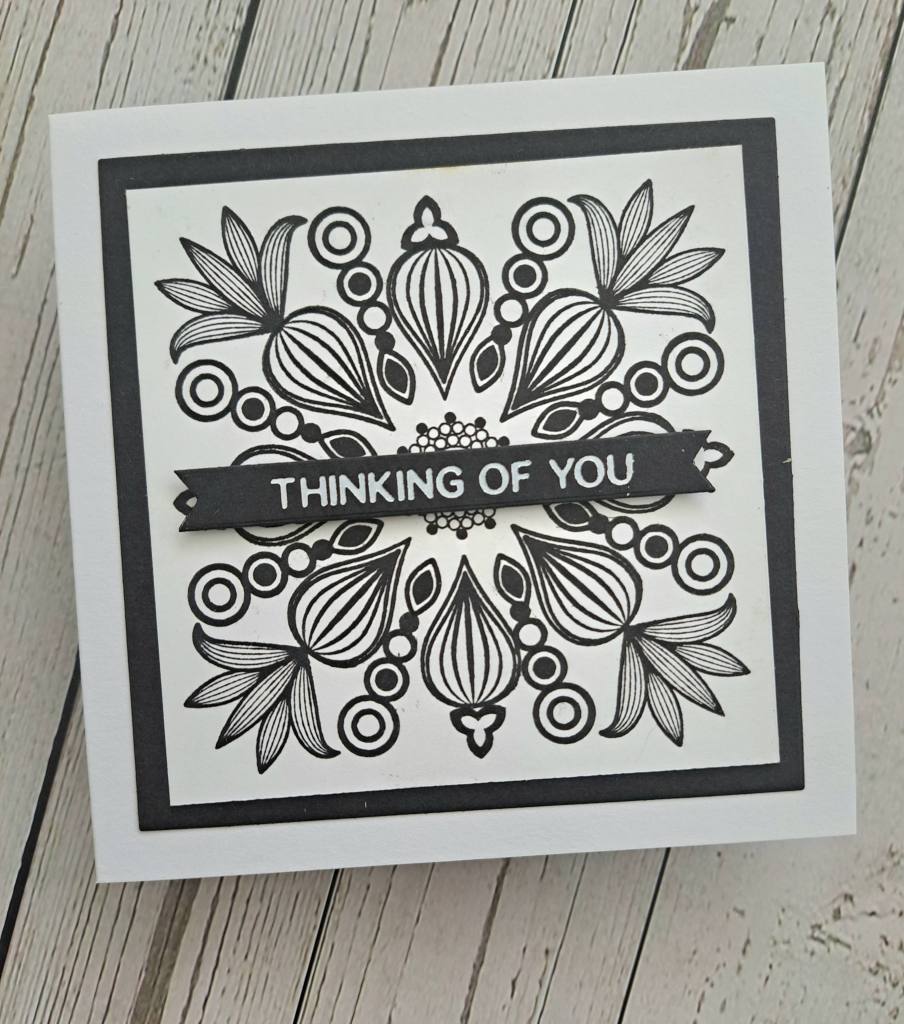
It is time for the new challenge at The Alphabet Challenge. Helen has chosen the theme this time round, and she wants to see your monochromatic creations,. Here is my card:
I decided to give the Gina K wreath builder stamps and wreath builder templates a try. I haven’t used them before, so I watched a few of her YouTube videos and went for it. I chose black and white for the monochrome look and I am really pleased how this turned out.
I did go on to create several more panels with different stamps from the wreath builder set, but this was my favourite.
There are so many little stamps in this stamp set tp be able to fill in those nooks and crannies, and I found starting with one of the larger images first felt right to me, then I just built the design around those.
The sentiment is white hot foiled onto black card stock from a previous hot foiling session.
I hope you can come and join us with your monochromatic creations. xx
Hello there. I have been die-cutting and die-cutting yesterday and today, whilst an alcohol ink creation was drying for a future project.
This card is paying homage to the first kind of cards I liked to make – and realise I still do! I used to take a lot of the Sue Wilson die sets and just cut them out, then add them to a card base – lots of layers and dimension.
There are some die sets here that are new to me – I used a Christmas gift token to buy some older Sue Wilson die sets – so – new to me, though older sets.
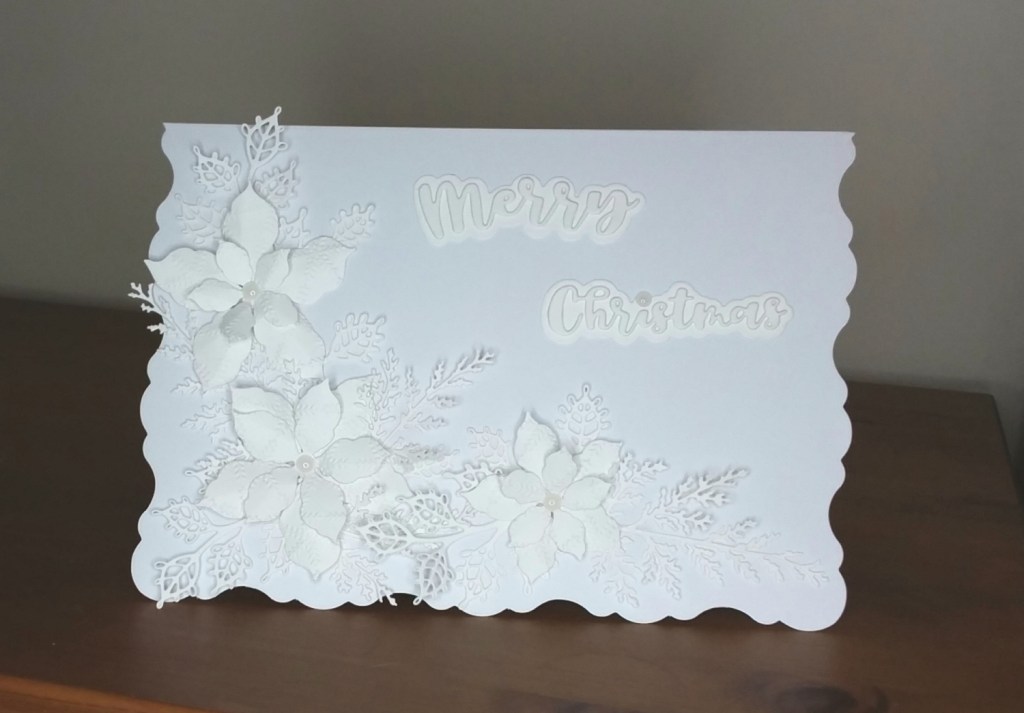
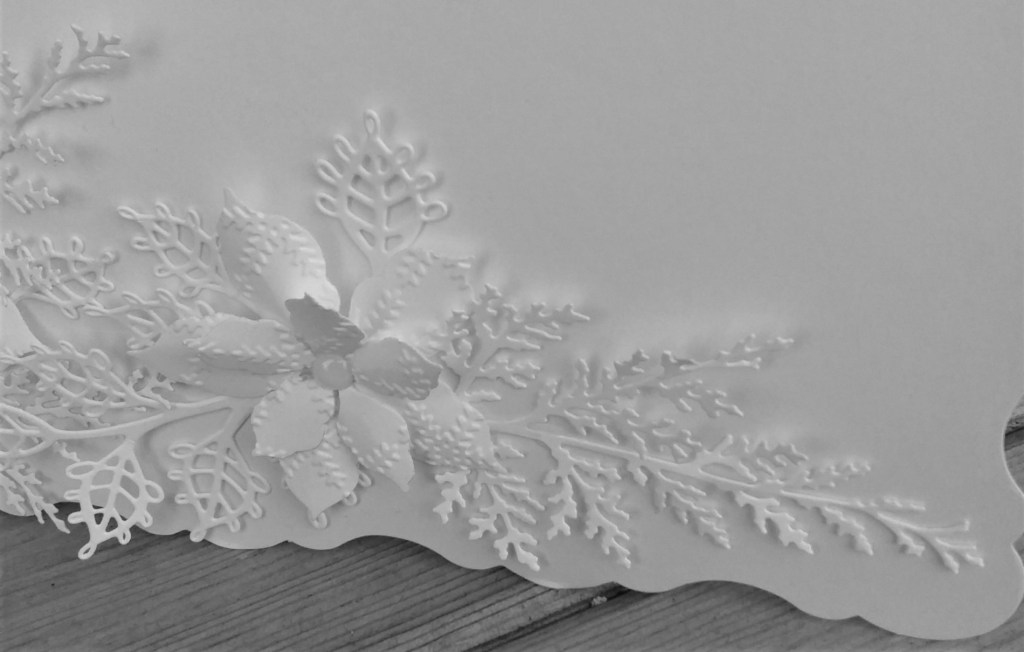
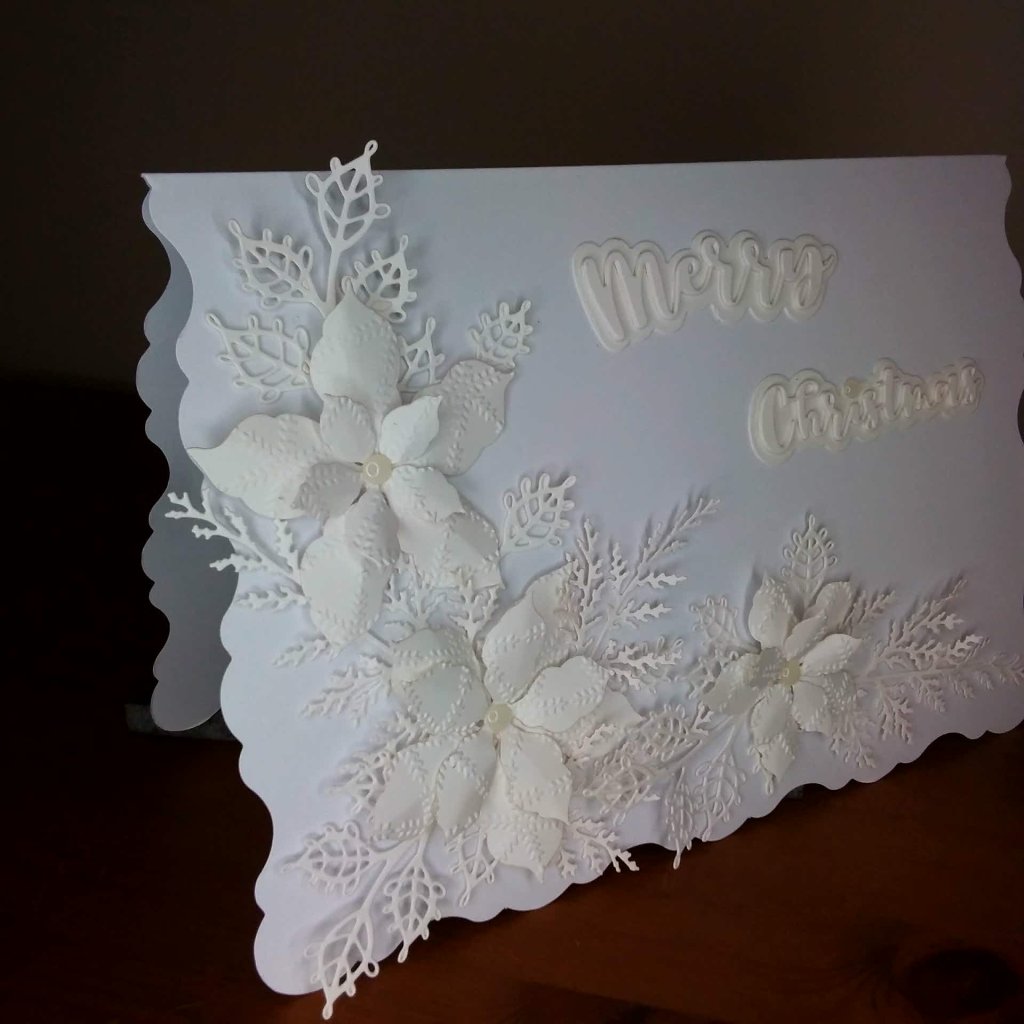
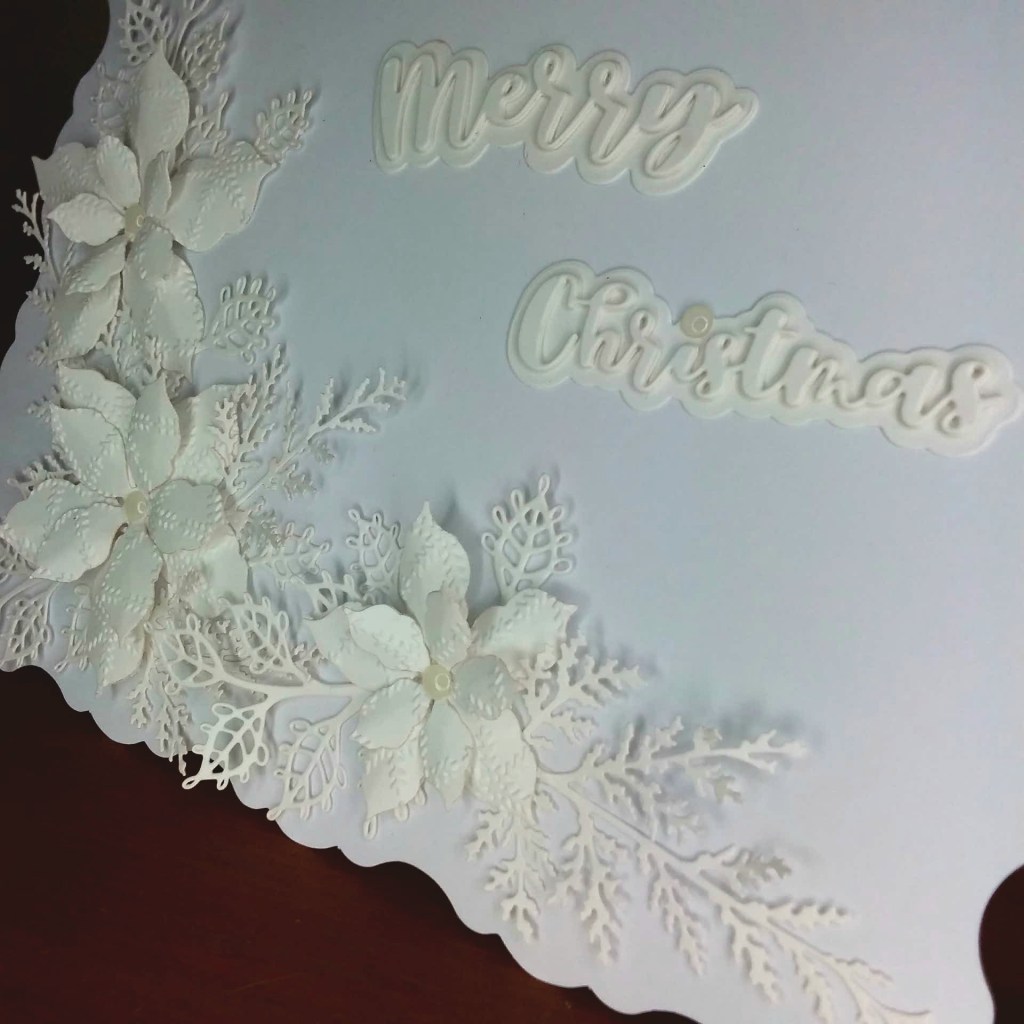
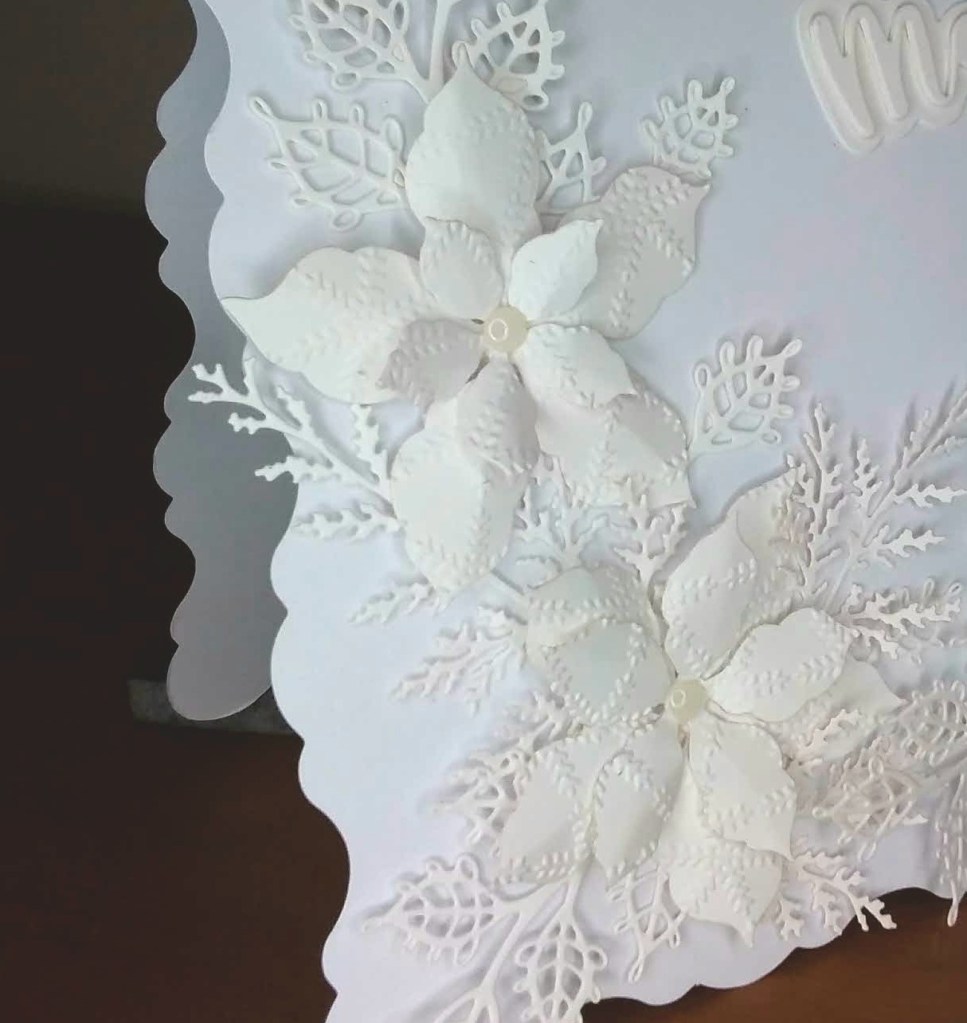
Here is my humongous card:
It has become clear to me that taking a good photograph of a project which is white is near-on impossible. I tried outside in the daylight, I tried using my mobile camera with and without the flash, I even tried some photograph ‘fixing’…………I’m not 100% happy with any of the photographs, but I have provided quite a few so you get the idea.
I used the same white card on all of these die-cuts – even though the picture sometimes gives the impression of different types or make of card, and even some of the photos means the card looks cream or ivory – all the same card, and all the card is white………………
I used a card base from a pre-scored pack – does anyone else have lots of card bases is shapes and sizes? – as I wanted a really large card base to add all my elements.
The dies sets and embossing folders are listed, but the process began with die-cutting the poinsettias, then embossing the flowers with the ‘Ice Crystals‘ embossing folder to add some interest to the flower leaves.
I stuck the flowers onto the card base with 3D glue, as this allows some moving around and slotting in of other elements. The added leaves and branches placed as you see.
The sentiment is die cut three times and stacked for dimension, and adding the outline die-cut too, to bring the sentiment more into focus.
The white accents to the centre of the flowers came about because I was looking for some white glittery Nuvo Drops – but found these instead
Hello again. I am still creating as part of the Altenew 3D Floral Focus course, and this card is for Day 2 of that course:
Day 2 is about monochrome, and I feel even though the background die is quite complicated, the card itself has a clean and simple feel about it.
I first die-cut all the images from the Altenew 3D Rose Flurries out of white, then decided to cut a few more layers out of the light brown/kraft card and played around with the layers until I was happy. I did originally plan for three flowers, but I am pleased how this turned out with one flower.
I’ll just have to make another card – or two – with the remaining flowers!
I’ve also been trying Day three – using in-lay on the dies – but am really, really, struggling to get that right – I’ll keep at it – you may get to see an end result – but you may not!!!!
Hi there. I’ve been in a weird crafty mood since yesterday – trying things out, not liking what I’ve done, binning things. In the end I walked away from the craft room and went to do other things.
This morning, I settled down to watch some crafty TV, some of which I had already taped, and decided to try again. I first took a look at some challenges out there, and the first to catch my eye was the colour scheme for this card:
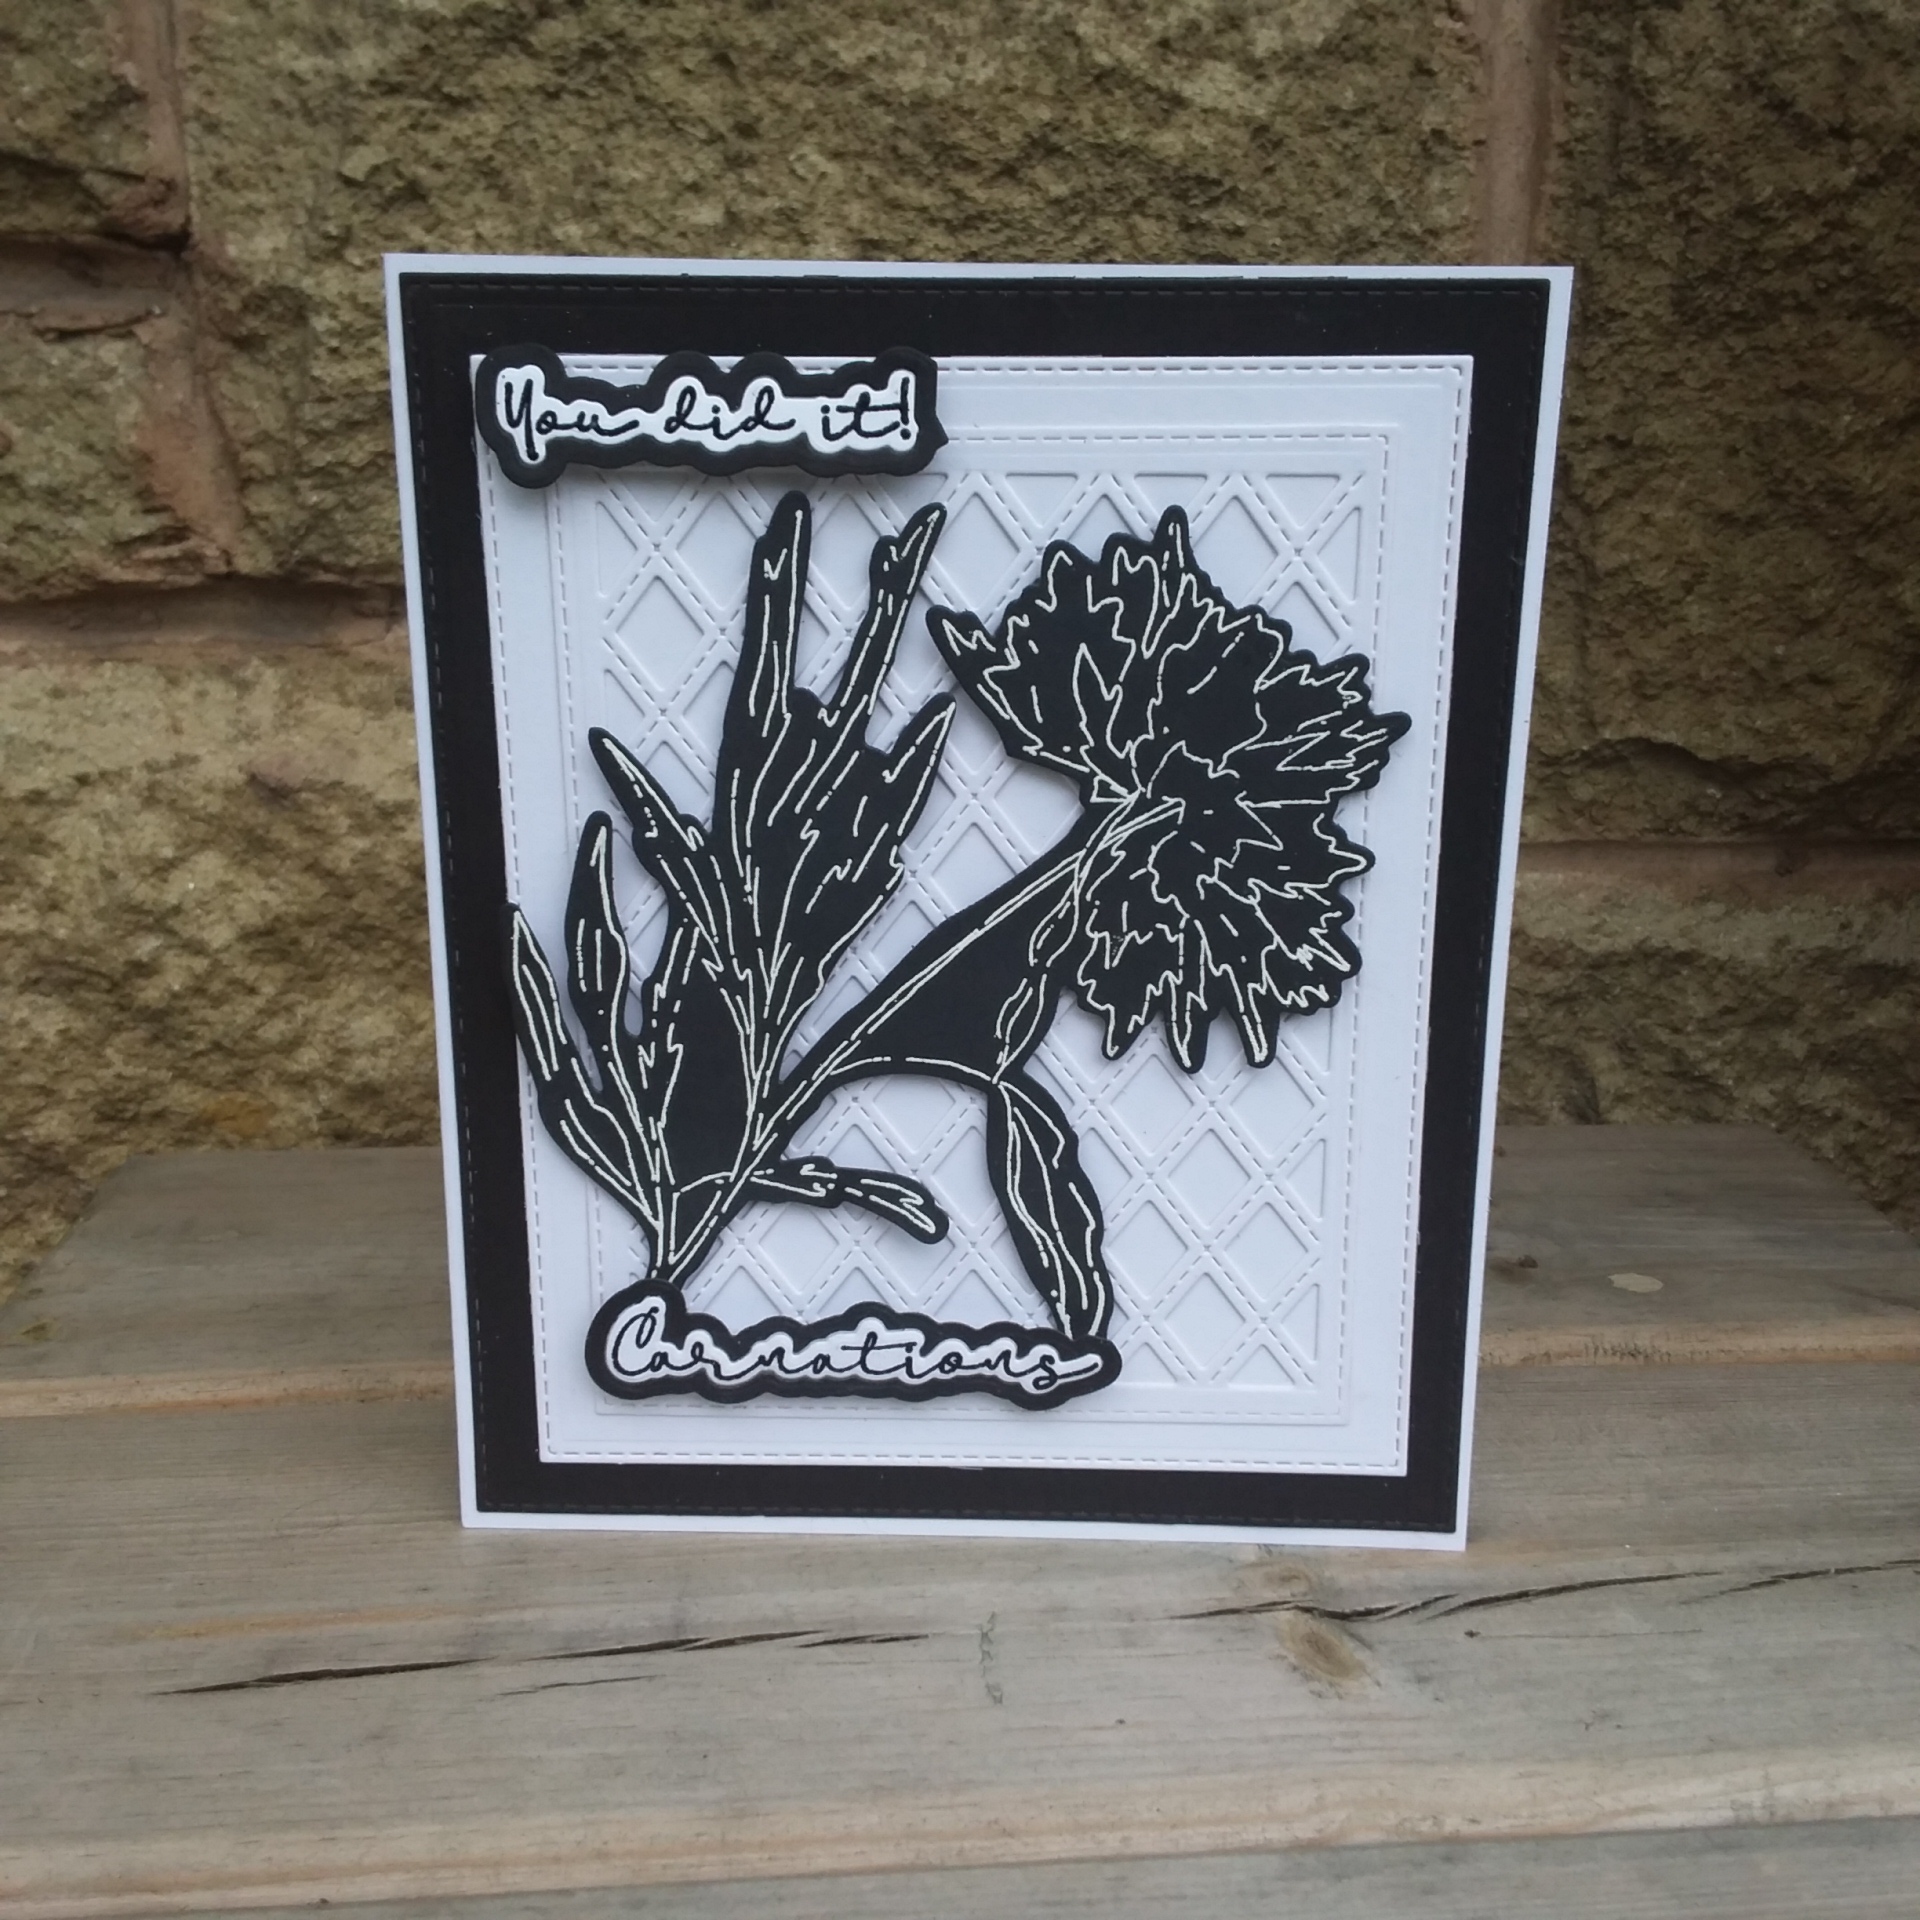
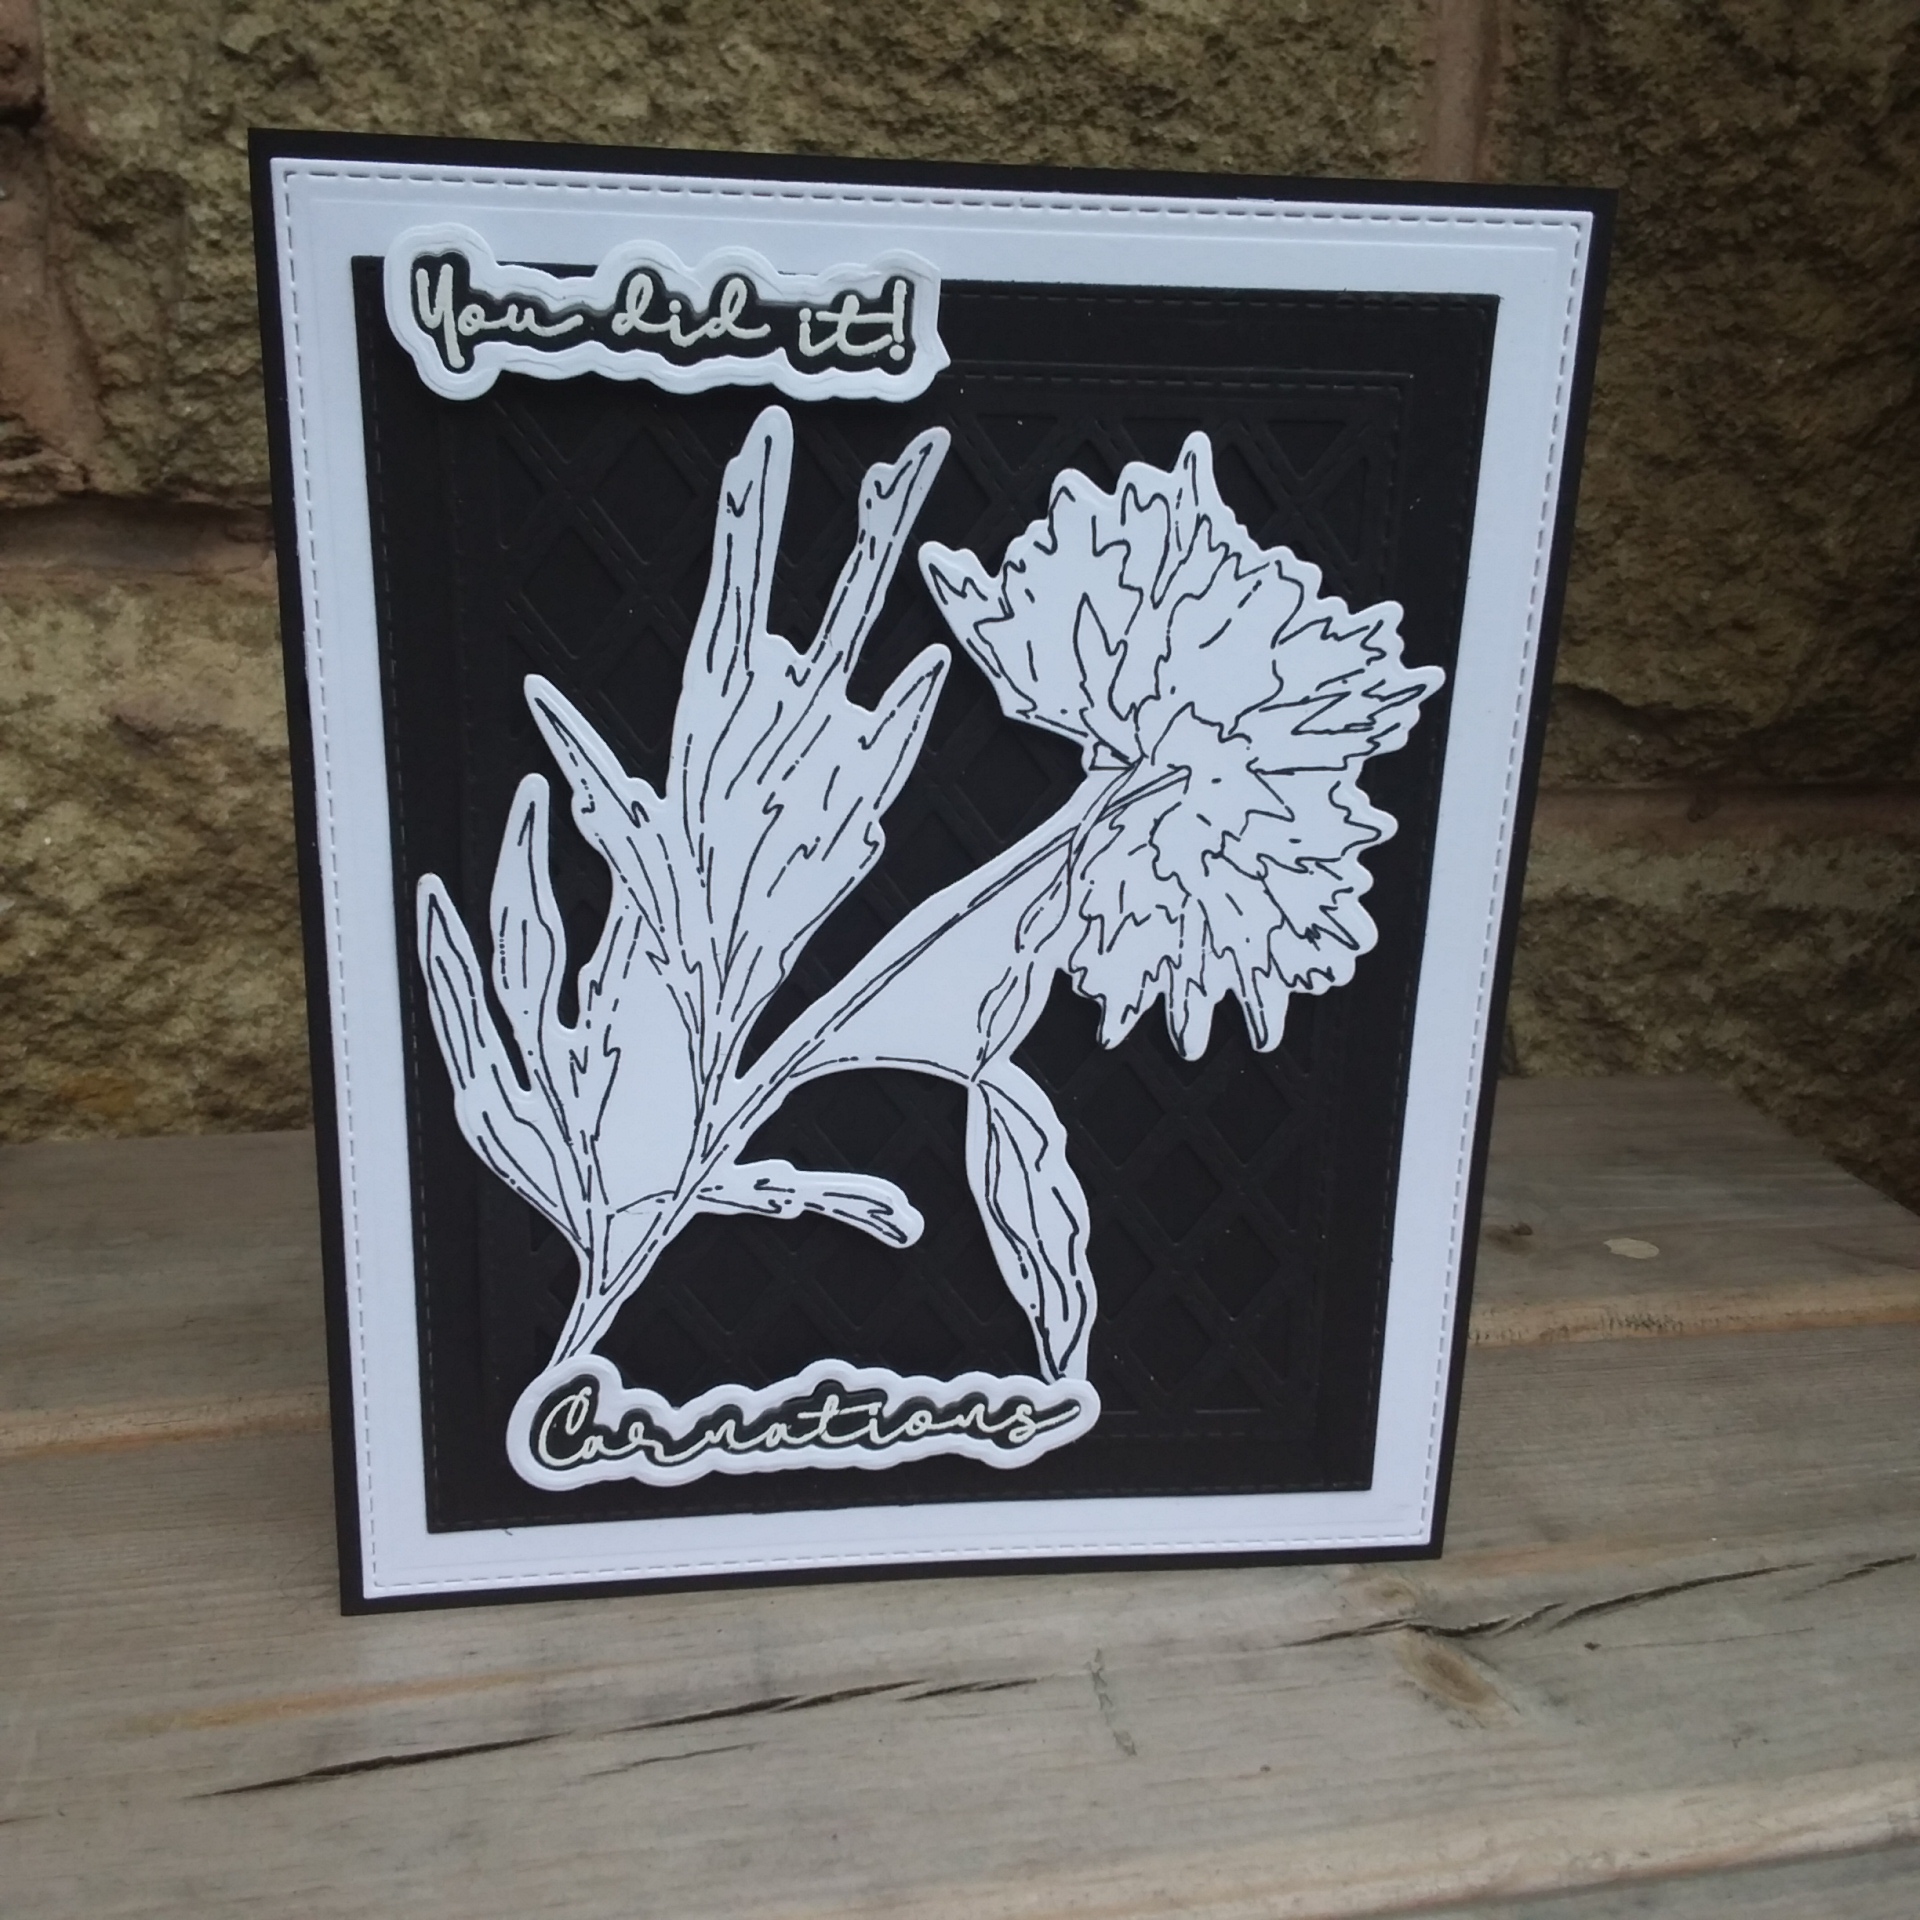
I knew I wanted to use more of the Thirsty Brush and Co stamp and die sets, and wondered how they would look in black and white. I must admit I like this – so I made another using the reverse effect:
Thank goodness for challenges – for giving inspiration. I am also glad I don’t tend to tidy or pack away new items until I have used them in some way.
I used a Sue Wilson die set for the base card and trellis effect. The Carnation Stamp and die set from Thirsty Brush and Co – which included the sentiments, and the two sets of dies for teach sentiment – I just swapped the black and white borders around.
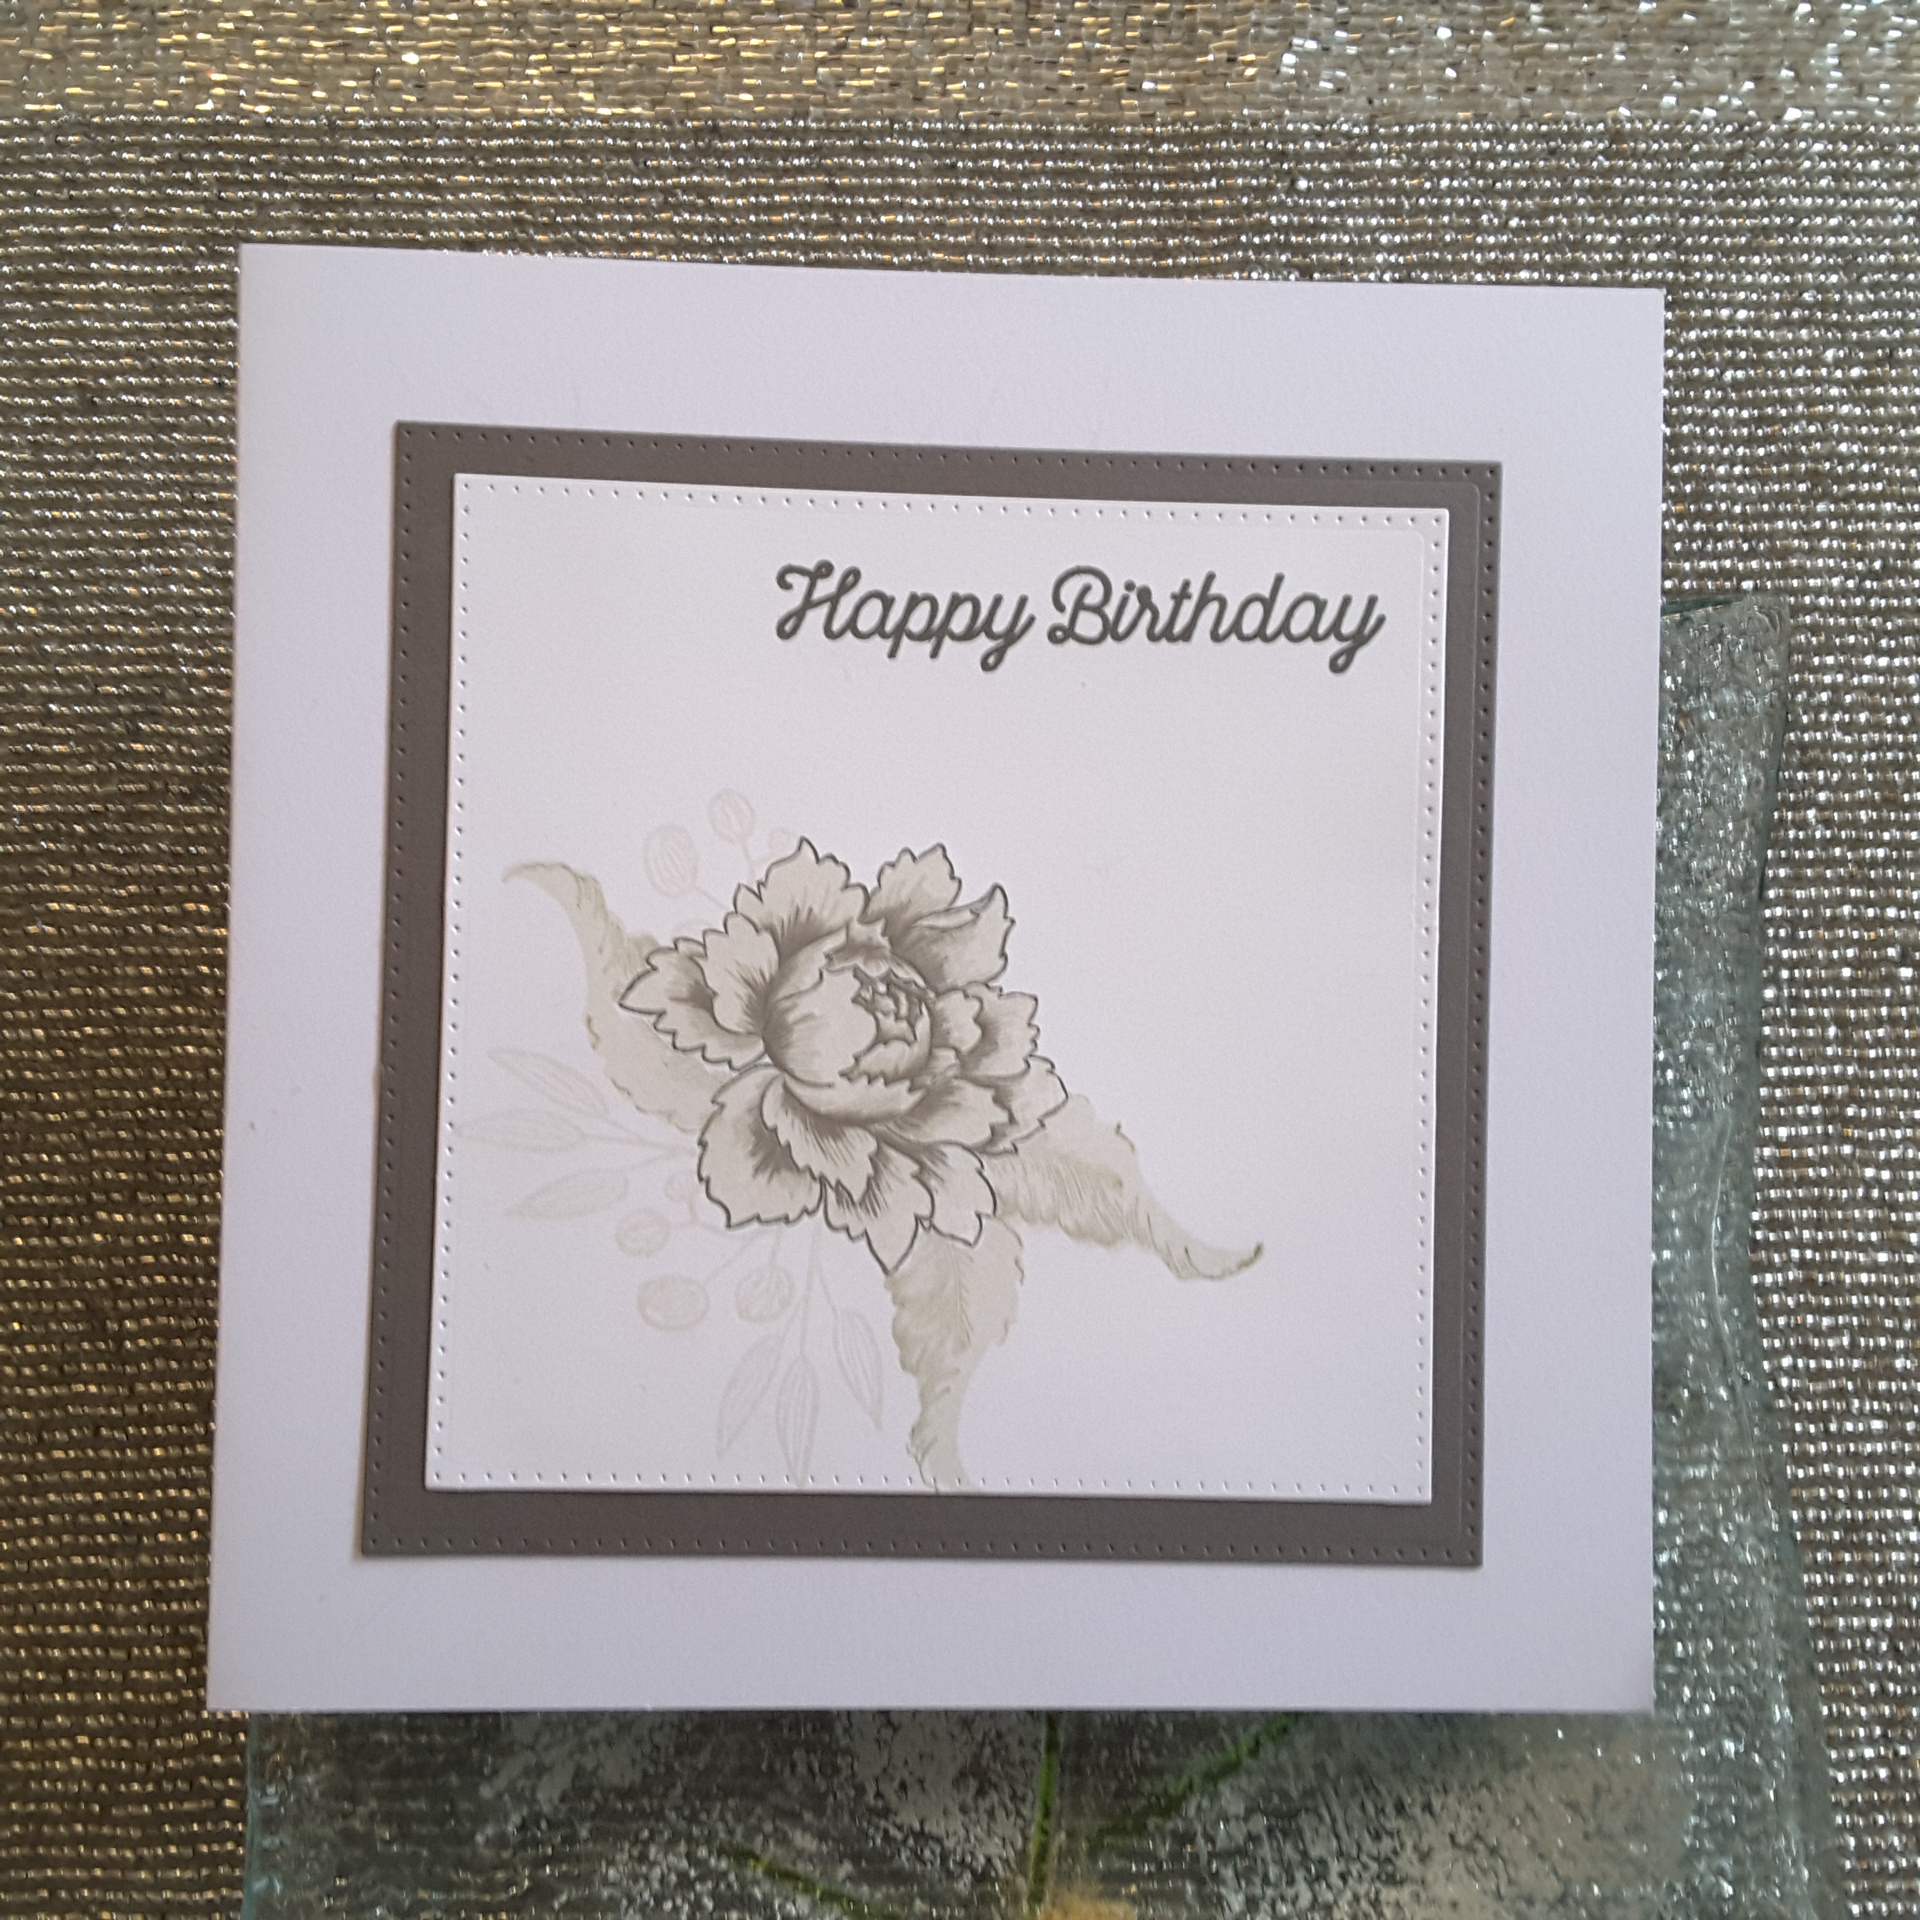
Hello there. I have a muted and monochrome peony for your today.
I first stamped the Altenew ‘Peony Bouquet’ in the Altenew grey inks, using all of the grey colours, then masked the flower off and stamped the leaves around it. I used a combination of leaves from the same stamp set, though I wanted their appearance a little more subtle, so I didn’t use all of the layers, and only used the lighter grey inks.
The even more subtle leaves and buds are from the Altenew ‘Freeform Greenery’ stamp set, just using the lightest grey.
The sentiment is from MFT ‘Big Birthday Wishes’ – a great set of stamps with a wide variety of sentiments – and stamped using a darker grey ink.
I then die cut the squares – white and grey – using a Sue Wilson stitched squares die set, and adhered flat to the white base card.
This very simple one layer card is inspired by the colours from The Paper Players – Sweet Sugarplum, Berry Burst, Rich Razzleberry – and the challenge of a one layer card from Tuesday Throwdown.
I used some stamps from Catherine Pooler Foundations box, and stamped away…..the only time I used my Misti was for the solid sentiment stamp, but other than that – just stamped. I also used some smaller flower variations to fill in the gaps after stamping the larger images.
The smaller sentiment was masked off with a post-it note to stamp some of the flowers around it – getting the practise in – and kept the flowers on the left hand side, as you can see. I quite like the effect of stamping on one side, or the top or bottom, and I may have more plays with that in the future, when I batch make cards.
I shall be entering the challenges named above with this card.
Hi there, I have been playing again. I actually haven’t stamped very much on this card, as I just felt the need to die cut and emboss. I took the opportunity to use the Detailed Dragon fly Thinlits from Stampin Up. I also have the matching stamp set, but today just used the die.
I started with the sketch inspiration from Mojo Monday, as I liked the clean-ness of this sketch, leaving a lot open to interpretation. I also had some of the Lawn Fawn ‘Narwhal’ card left over from the previous blog post. I think this grey card is a really nice colour, and decided to emboss a grey panel with the Sue Wilson ‘Climbing Vines’ embossing folder, to go on top of an embossed white panel. I embossed them both together, so the pattern flowed across both the colours.
After sticking that down to a white card base, I die cut the large dragonfly out of white glimmer paper from Stampin Up, and decided not to add any other layers to it, as I think this glimmer paper is gorgeous enough on it’s own.
The three strips I cut down and stamped with a line of hearts in white ink, layering them down as per the sketch.
The main shape is also from Sue Wilson ‘Porto’ die set, which I cut out of white and then in grey, off-setting them so you could see the white on the grey background, and grey on the white background. The embossed detail is from the same die set – just embossed and not cut, to add some detail to an otherwise blank tag.
I used Collall silicone glue to the back of the tag, as I could then insert the strips and play around with the positioning before it set solid. I often do the when I want to add items underneath another item, as it gives you plenty of time to position.
The dragonfly I stuck down with Cosmic Shimmer glue – my favourite go-to glue of all time – but only stuck down the centre body, bending the wings slightly for more dimension.
For today’s card I have gone to one of my favourite ways of doing cards – monochrome. It doesn’t really matter what colour I use, but I tend to go for white with one other colour. It could be black, it could be green, and this time I have gone with orange. Orange? Yes – orange.
I decided to go with this as inspiration from Time Out Challenges had a CASE this card challenge, and to me the overall colours on the card were white and orange. I don’t really tend to do ink blending backgrounds, though I have tried in the past, and prefer to go with embossing.
And – a recent delivery from three of my current favourite companies – Lawn Fawn, Concord and 9th, and Altenew. I have just received my Altenew ‘Super Script’ stamp and die set, and Lawn Fawn ‘Stitched Windy Backdrop’ , and Concord and 9th ‘Say Hello’ stamps and dies.
I started with a white 6 x 6 inches base card, and added the stitched windy backdrop, also in white. I didn’t want the backdrop to be the whole of the base of the card, which is why I chose a 6 inch square – just slightly bigger. The die is quite big, measuring at 5.5 x 4.25 inches.
I then cut out the big orange ‘hello’ and left it bubble, with no added detail. The ‘friend’ part is using the matching stamp and white heat embossing it, then cutting it out with the matching die set. I only glued the top half of the die-cut leaving the bottom half hanging off the stitched backdrop.
I think this card is bright cheerful, but I still decided to add a little orange enamel dot in the bottom corner. This is from We R Memory Keepers, and matches the orange perfectly.
I shall be entering this card into the following challenges: