So Very Merry

Hello again. Having just returned from a few days away with hubby to Tenerife, I was itching to get into my craft rom and play with some new products which were part of a recent Online Card Classes class. I watched the first day of class whilst away, but still have to catch up on the rest.

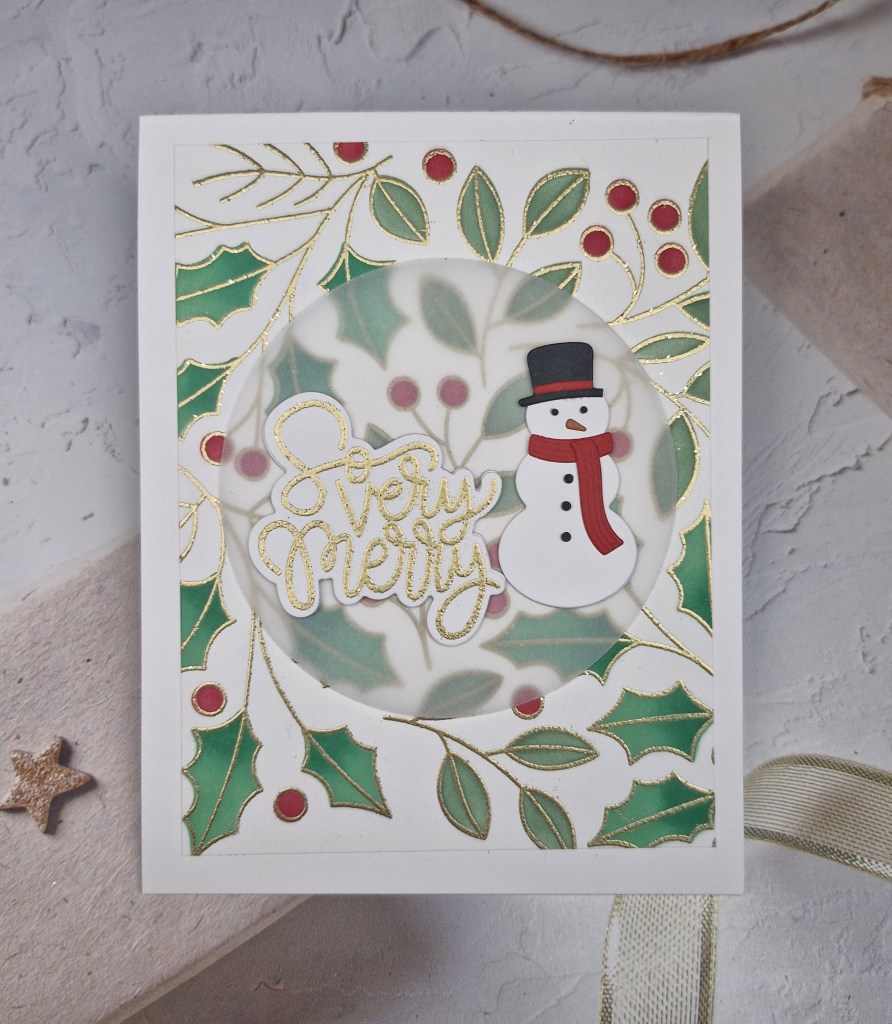
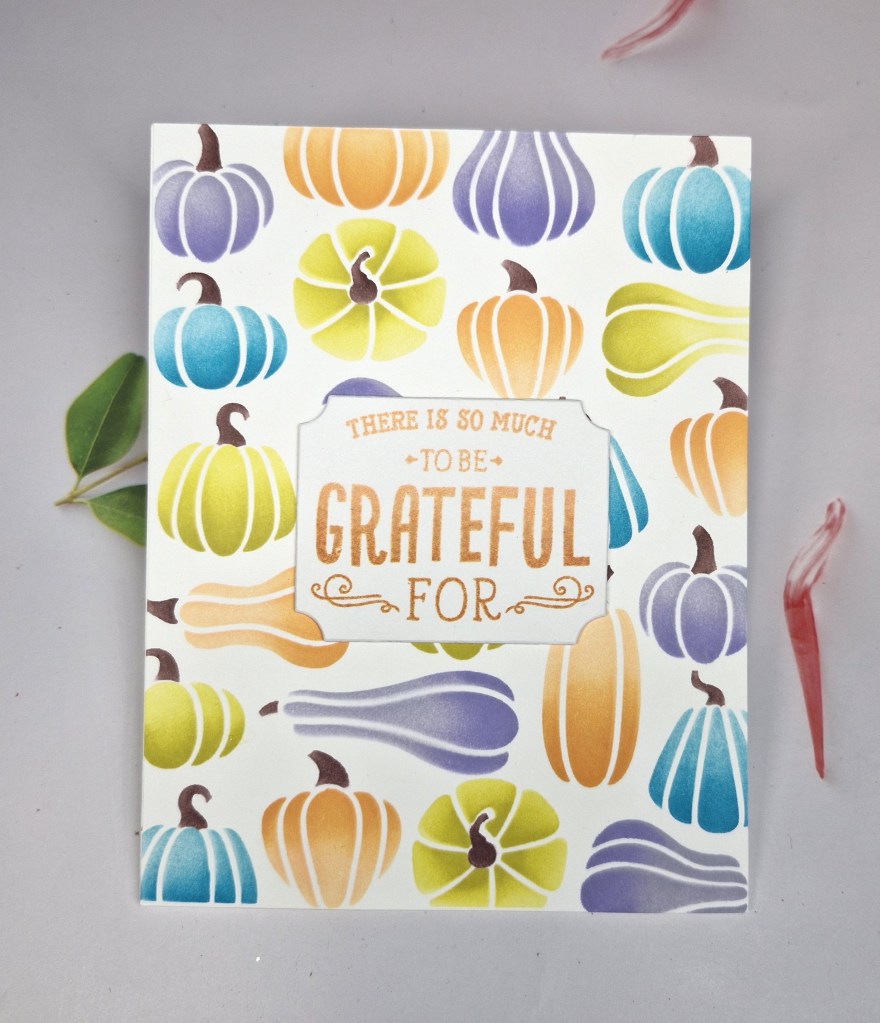
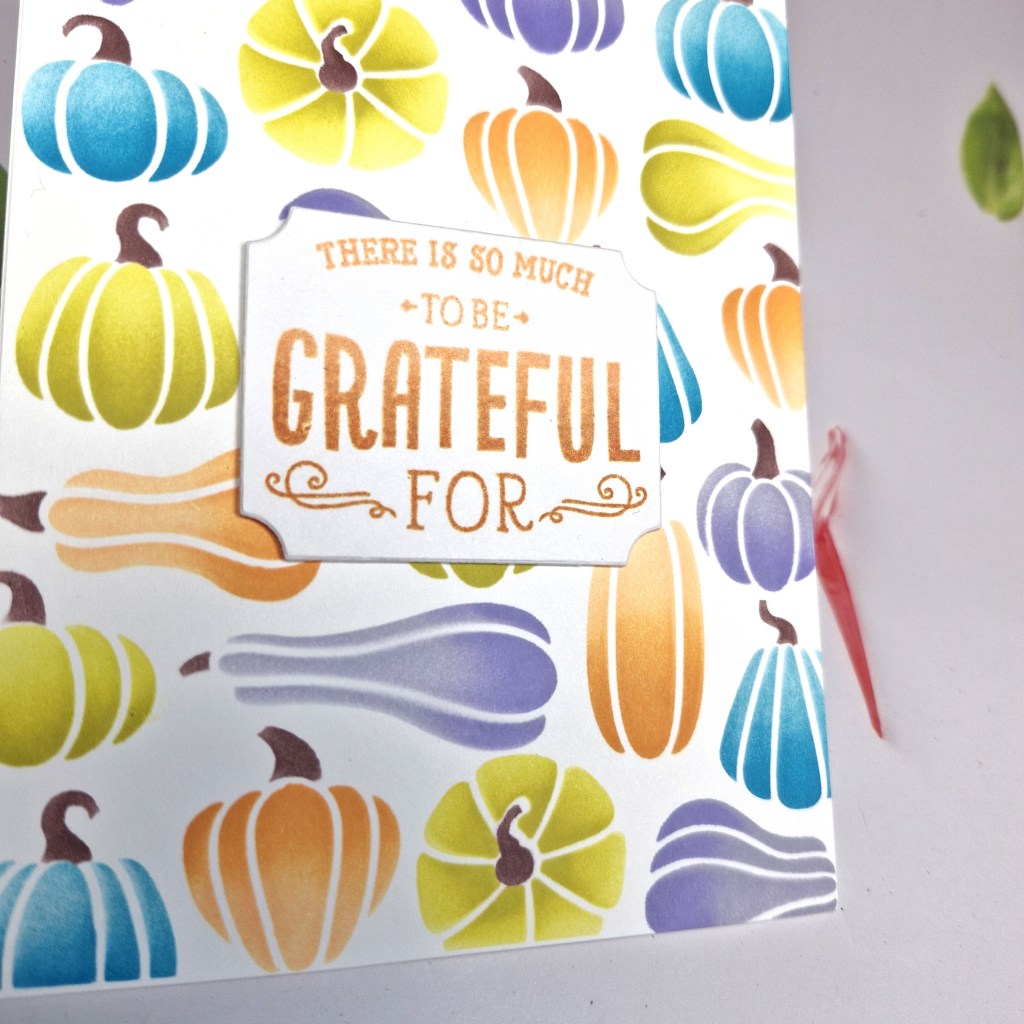
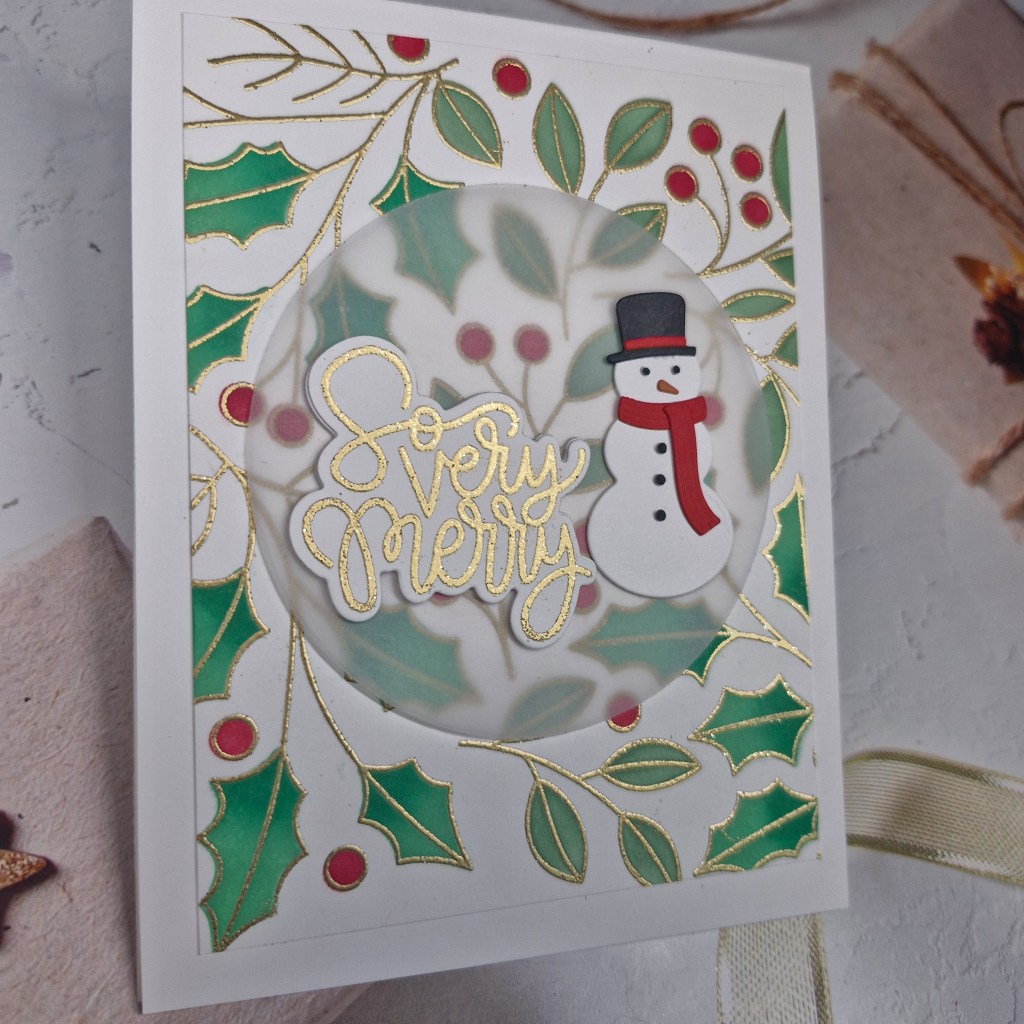
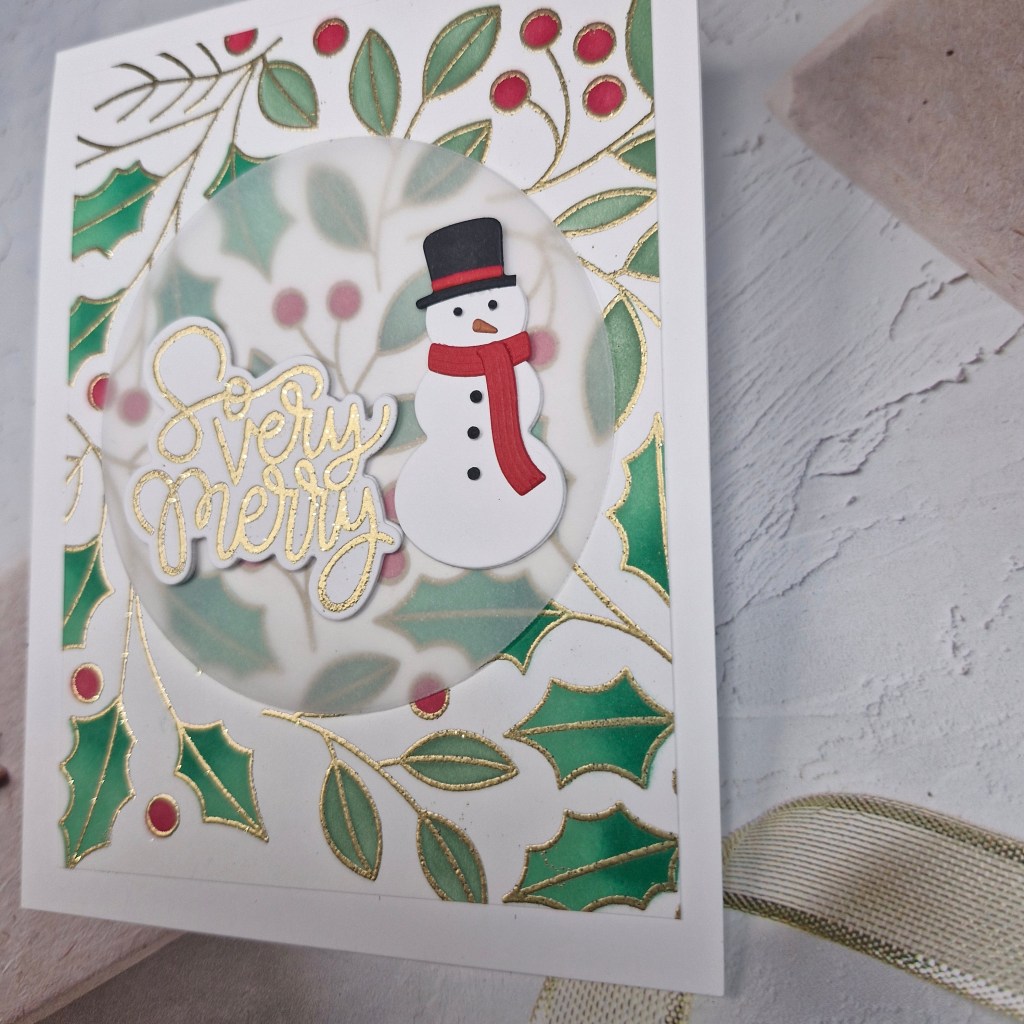
I started by gold heat embossing the ‘Easy Repeat Holly‘ background stamp from Concord & 9th and Kristina Werner using the Taylored Expressions ‘Gold Sparkle’ embossing powder, then used the matching layering stencils to colour the image. On the holly leaves, I used two tones of green, the darker towards the base of the leaves to create some dimension.

This panel was then cut down slightly and attached to a white card base.

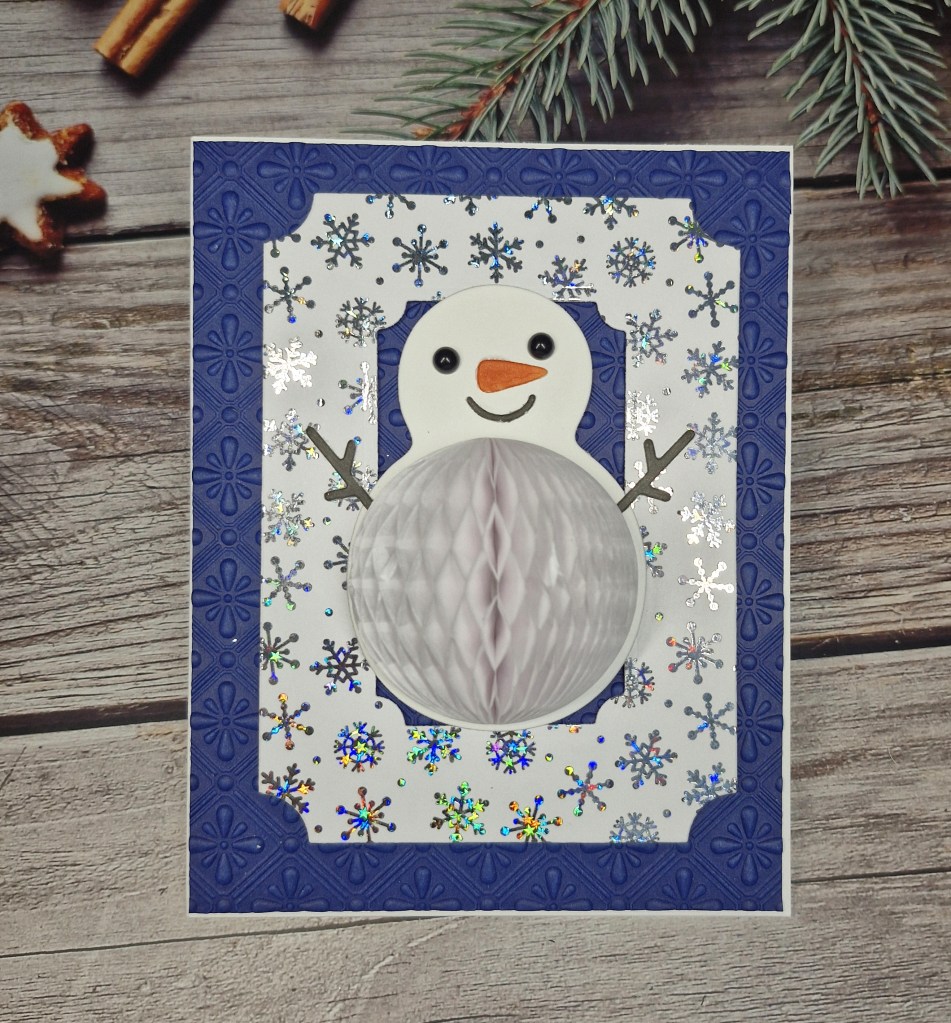
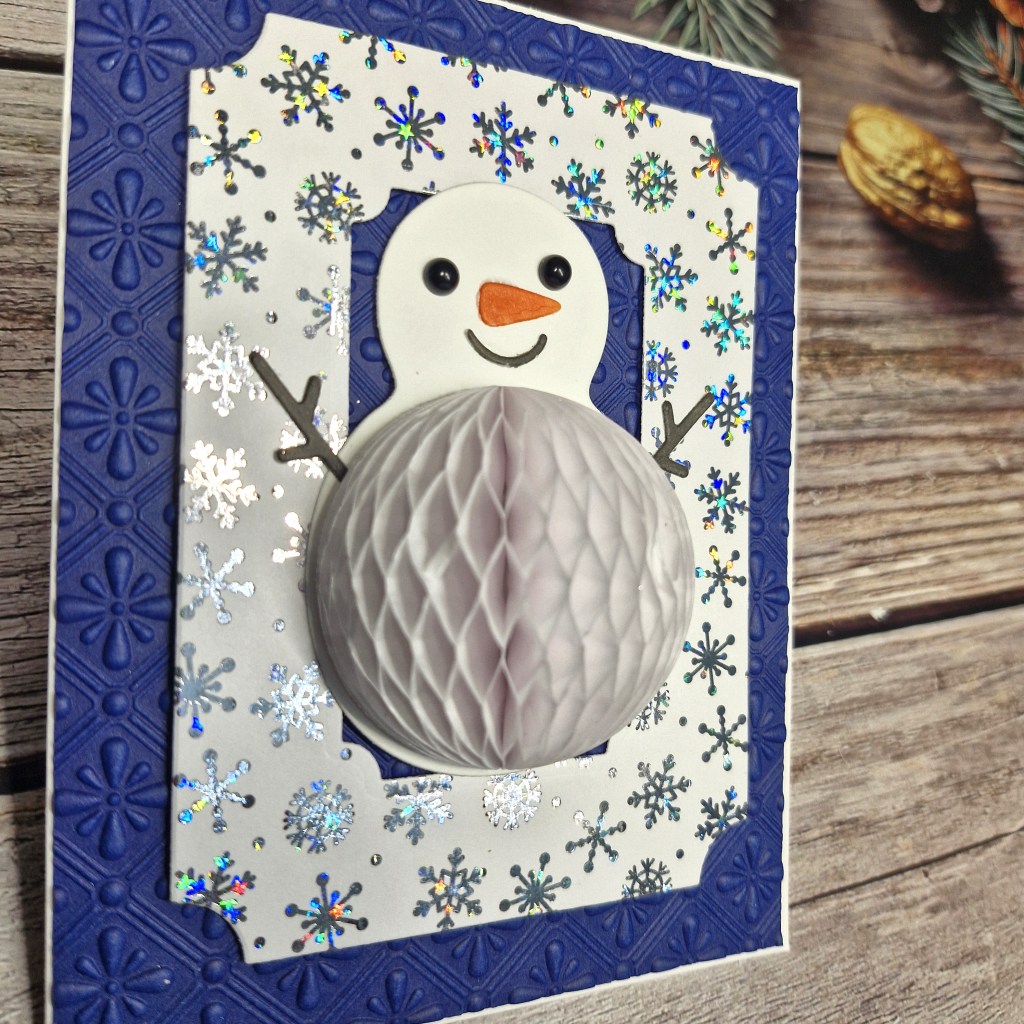
The snowman was die cut, glued together, and set to one side, whilst I gold heat embossed the sentiment, then used the matching die to cut it out.

When I placed the snowman and the sentiment on the background, they seemed to get a little lost, so I die cut a circle of vellum, attached the snowman and sentiment to the front of it, then glued it down – applying glue only behind the two die cut pieces.

I shall certainly be watching the rest of the lessons for the class, and I’m sure I shall be utilising some of the techniques demonstrated with these products.

I shall be entering the following challenges:

Tic Tac Toe top right diagonal to bottom left – snowman/snow – gold – Christmas sentiment

Creative Knockoutstime to be merry

A Cut Aboveanything goes with a die cut

Stencil Fun use stencils – option to use some gold taken

Craft RocketChristmas/Winter

P is for Pumpkin

Hello once again. It is time for the next challenge at The Alphabet Challenge. We have reached the letter ‘P’, and Deborah has chosen the theme os:

P is for Pumpkin

Here is my card:

I used a Spellbinders layering stencil set for this card. Using all layers, in varying colours to create and Autumnal feel. Each of the layers was ink blended, and each pumpkin had ink blending dimension to them – I used a light hand for the whole image, then went in with a stringer blend for the base of the pumpkins.

This panel was attached to a white card base with glue, then sentiment stamped – also by creating a gradient of colour – darker at the tope, lighter at the bottom, then die cut with a Pinkfresh Studio nesting die. I had to use a partial die cutting technique to make the label the correct size for the sentiment.

I did add a little ink around the edges of this die cut to make it stand out more.

I look forward to seeing many, many pumpkins in our gallery. xx

I shall be entering the following challenges:

The Four Seasons Challenge anything goes fall

Stencil Fun stencils – option to use some gold not taken

Love To Craft anything goes

Build Me A Snowman

Hello again. Caz is hosting the new challenge at Cardz 4 Galz, and she has chosen the theme of:

Build Me A Snowman

Here is my card:

I wanted to try out the die set from The Greetery I had for a while, and finally managed to obtain a few of the honeycomb additions.

The snowman was die cut and assembled, then the honeycomb added. I used small black gems for the eyes. These honeycomb elements are fun, but I definitely have to hand this to the recipient…….

The background blue was embossed using a Spellbinders embossing folder, the silver foiled panel was created by using a background toner panel – I think from Picket Fence Studio, but I may be wrong there. It’s the first time I’ve used the toner panels with my Gina K Fuse machine – how quick and easy is that? I did have to watch one of her YouTube videos just to make sure I had the correct heat setting, but I did play with several panels on this machine and therefore have a few on hand for future projects.

I cut the snowflake foiled panel with a Pinkfresh Studio die, and cut the centre out – the snowman kinda got lost without die cutting that centre out.

No sentiment, I think it’s pretty clear what time of year this is meant for….

I hope you can come and join us with your projects following our theme. xx

I shall be entering the following challenges:

Addicted To Stamps & More die cuts and/or stencils

12 Months of Christmas Link-Up Christmas – option of sleigh not taken

Christmas Bingo column O – no stamping – free – gems

Love To Craft anything goes

Merry Little Christmas Challengeanything goes Christmas

ABC Christmas Challenge – W and/or X

Hello again. The ABC Christmas Challenge has reached the letters ‘W’ and ‘X’, Fabiola is hosting, and the Christmas themes are:

W is for Wings and/or X is for X-stitch – any stitching

Here is my card for the theme of ‘wings’:

The birds were created first, and by using the ‘Birdie Friends in Winter’ combo. The birds were die cut, then ink blended using the matching layering stencils. Two of the birds have hats already, but I also die cut and ink blended another couple so I could clothe all of them with those cute hats.

The background panel was put through an embossing folder and attached to a card base.

The five scalloped pieces were die cut then ink blended with a couple of pink tones – I thought these pinks would be good for the background of each bird – allowing the blue and red on the birds to stand out.

These pieces were attached to the background in a jaunty fashion, the birds attached with thin 3D foam, a gold foiled sentiment added, and some gold gems also placed around and about.

I hope you can come and join us with your Christmas creations following one or both of our themes. xx

I shall be entering the following challenges:

2 Crafty Critter Craziesanything goes with a critter

Die Cut Divasdie cuts and critters

Sparkles Forum Christmas ChallengeChristmas and festive wear

Crafty Animals anything goes with an animal

Crafts Galoreanything goes

Greetings For This Holiday Season

I have another card to share after being in my craft room for a few hours yesterday – can you tell hubby has been away for a few days? Lots of crafty play time…..

I used quite a few Spellbinder products to create this card, but the skates are from Memory Box.

The card itself is a larger 5×7 inch as I knew I wanted to get more on it than usual.

For the colour scheme, I wanted a teal for the skates, and red for the cardinal and flowers, so I searched through my colour cubes to see what background colour would work with those colours. There were serval darker options, but I wanted a lighter background,

The background panel is a piece of sage card stock, cut slightly smaller that the card base to add a white border, bringing in some of the white on the other elements. This panel was then embossed using a Spellbinders embossing folder.

I then set to die cutting all the things

The memory box skates were die cut using teal, white, and silver card stock, then layered together. I stitched red twine through the holes for the laces, then set them aside.

The sled was die cut in silver and white, then glued together, before turning to the flowers, foliage and the bird.

I used a combination of glue, 3D foam, and small pieces of spare card to attach all the elements, playing with the arrangement a few times.

The final addition was the sentiment, layered a couple of times for stability, then gold gems added to the centre of the poinsettia.

A lot of die cutting, but that is actually my favourite way to create.

I shall be entering the following challenges:

Ally’s Angelsanything goes

Peace On Earthanything goes Christmas

Die Cut Divas die cuts and critters

A Cut Aboveanything goes with die cuts

Triple Bbirds and/or butterflies and/or blooms

Christmas (Or Not) Bingocolumn O – no stamping – free – pearls/gems/enamel dots

Merry Little Christmas Challenge anything goes Christmas

Bauble & Wreath

Hello again. The Holly & Ivy Christmas Challenge has started a new ‘anything goes Christmas’ Challenge – here is my card:

I started by creating the background panel – a dark blue piece of card – and embossed using a Spellbinders embossing folder, then a white pigment ink pad swiped over the top to highlight the dimension.

Whilst this pigment ink was drying, I stamped and glitter silver heat embossed the bauble image from Pinkfresh Studio, and used the matching stencils to ink blend the one central detail. I juts wanted the bauble to stand out from all the surrounding colour. This was then die cut with the matching dies, and set to one side.

The leaves were die cut with a piece of previously created panel which I had used a green mica spray, and also die cut with some silver glitter card stock. This die set is also from Pinkfresh Studio – ‘Tied With Cheer’. There are three wreath layers in this die set, and I think I cut them all, and maybe a few extra.

The blue panel was adhered to a white card base, the wreath leaves layered and attached, then the bauble added.

I hope you can come and join us in our challenge – remember – Christmas cards only….. xx

I shall be entering the following challenges:

CYHTPembossing folder, option of pumpkins or orange not taken

Tic Tac Toe top left to bottom right diagonal – leaves – free – die cuts

Peace On Earth – Christmas anything goes

A Perfect Time To Craft anything goes

12 Months of Christmas Link-Up Christmas – option of sleigh it like you mean it not taken

Merry Little Christmas Challengeanything goes Christmas

Fill Your Heart With Joy

Hello. I have certainly been having some crafty play this weekend. I have another card to share using products from yet another virtual event from 2024 – I really need to organise the products from these events and play more with them.

The tree image was stamped onto white card stock and white heat embossed – all the white on the tree is from this embossing. I then used three tones of green from Pinkfresh Studio and ink blended – light at the top, going darker further down the tree.

After wiping excess ink from the white embossing, I then used the matching die to cut it out.

The background panel was dry embossed using a cover-plate, then using my green blending brush – no further ink added – I then lightly went around the edges to create a subtle halo effect in the centre of the panel.

The sentiment was heat embossed in silver, and cut out with a circle die. I used the same silver embossing powder to create a panel out of which I die cut some foliage. I also ink blended a smaller panel in the green, and used that to cut out more foliage.

After sticking the background panel down, I die cut two more trees from white card stock and layered them together, adding the coloured tree on top. This was stuck down to the panel, the foliage added, and then the sentiment added to the top of the tree – I didn’t want it obscuring too much of the tree – hence the placement at the top.

The final addition were three clear drops – just three – I restrained myself…..

I shall be entering the following challenges:

Crafters Caféanything goes – option of Christmas taken

Ally’s Angels – anything goes

Peace On Earthanything goes Christmas

Merry Little Christmas Challengeanything goes Christmas

Have A Cool Yule

I had some time yesterday to attend a virtual craft event, so whilst listening and watching – I tend to do the cards at a later date – I created this card:

The background panel was created by using some plum coloured card stock from my stash, and a Simon Hurley snowflake stencil with silver glitter paste. This paste is semi-translucent, so you get some lovely hues through the glitter.

That had to dry for a while, so I used the sentiment die from Hero Arts (a product received from another recent virtual event) using white glitter card stock for the shadow layer, and lilac card stock for the top most sentiment layer.

I die cut the sentiment a few times with different colours of purple, until I decided on the lighter lilac colour. The shadow layer was die cut three times to add more dimension.

I struggled to get all the glitter from the paste to show in the photo, but I think you can see what I mean by the different hues within it.

I shall be entering the following challenges:

Jingle Belles Rock – Christmas and snowy

Crafters Café anything goes – option of Christmas taken

Christmas (or not) Bingocolumn N – Christmas – masking/stenciling – free