Exquisite Ocean

20180405_195618

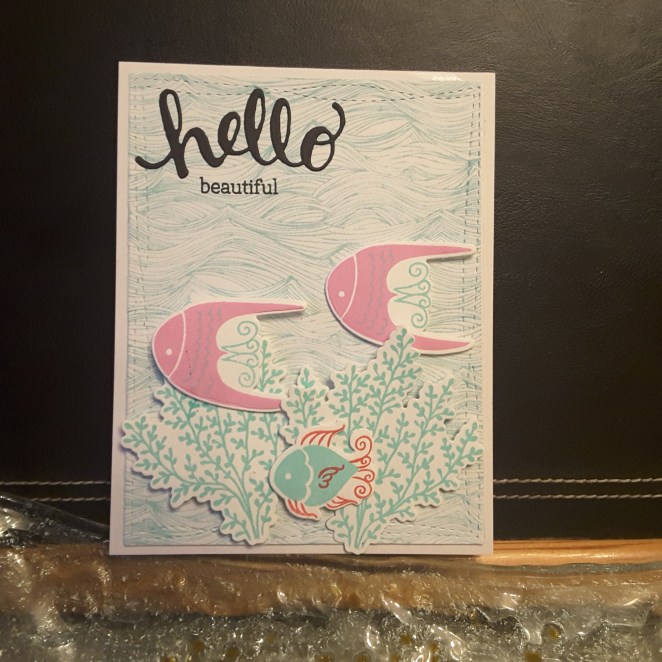
Hello again. I have a card to share with you today after having a delivery from Bumbleberry Paper craft store. It was waiting for me when I got home, so I couldn’t resist playing with it. The stamp and die set is from MFT, and called Exquisite Ocean.

I took inspiration from several challenges – the colours of pink, red, and mint from Color Throwdown, a trio of something (fishes) from the current Simon Says Stamp Monday challenge, and anything feminine from Watercooler Challenges.

The background ‘Waves’ stamp is from Hero Arts, and I used the Merman ink from Lawn Fawn. I die cut that with the wonky rectangles from MFT, as I think the wonkyness (a new word!) adds to the ocean effect.

Once I had stamped and layered the little fishes, I used the matching dies and then set to arranging them on the background. I stuck them down using 3D glue, as it gives some dimension, and also gives some wiggle time if I didn’t like how I placed them.

One thing I generally do now – I create two backgrounds. On one of them I arrange the die-cuts until I like it, then remove them one at a time, and stick them down on the second background. That way the position tends to remain the same. I have tried taking a photo for the placement, but I find this way so much easier.

These are such cute little fishies, and I stamped quite a few of them so I could make several cards, and will vary the sentiment on each of them.

The sentiment is from Hero Arts, and I die cut the ‘hello‘ from black card with a double sided sticky sheet on the back of it to make sticking it down so much easier, and then stamped the word ‘beautiful‘ directly onto the card. I know – stamped with my heart in my mouth as I did it the last of all – very brave of me! I didn’t even use my Misti as I didn’t want the fishes and weedy things to squash down!


Thanks so much

20180404_175451

Hello there. I have a card to share with you today incorporating a technique I haven’t used for a while – gilding flakes. I wish I had remembered I had them when I was doing the other foil sentiment!

I began by using a stencil from Imagination Crafts, and spraying Cosmic Shimmer ink spray mist ‘Chic Pumpkin‘ through it. I masked the upper part of the card to follow the current MFT sketch challenge. Whilst that was drying, I covered a piece of black card with a double sided sticky sheet, and die-cut ‘thanks’ (Stamps By Me) several times. On the remainder sticky piece, I added some Indigo Blu gilding flakes ‘Autumn Blaze‘ and then die cut the word again.

After stacking them together – made so much easier with double sided sticky sheets – I looked at placement on my card. I thought just the word ‘thanks’ was too – well – aggressive, really, so I used a Uniko sentiment for the ‘so much’.

The flowers are MFT ‘Sketchy Flowers‘ stamped then die-cut and arranged as you see. I did quite a few of them, but if I added more, then it just looked over-crowded.

Once I had the idea and techniques in my head, it actually didn’t take very long to put this card together, so now I have to go and use the rest of the flower images and make some more – such a difficult chore…….!!

I shall be entering the following challenges:

MFT sketch challenge

Pinspirational challengephoto inspiration (pink flowers)

Addicted to Stamps and Moreanything goes

Blue Floral Birthday

20180403_055015

Hi everyone. I was able to craft a little more yesterday, and was inspired by several challenges.

I started by stamping all three flowers and all the leaves from W Plus 9 ‘Petunia Builder’ using Altenew inks for the flowers, and Catherine Pooler inks for the leaves. I like the way the leaves turned out – using Lime Rickey and and Grass Skirt. These two colours may well be a combination I will use in the future.

Once I had used the latching dies, I then tried to come up with a layout I liked. I play doing this for quite a while usually, but it is something I enjoy – particularly when I have stamped and cut many images.

The square I placed the flowers on is embossed with a Tattered Lace embossing folder, to add some interest to the background. I started by using 3D glue for the flowers, then inserting the leaves underneath using a wet glue.

The sentiment was stamped in Versafine black onyx and adhered flat to the card.

I shall be entering into the following challenges:

Addicted To Stamps and More photo inspiration

Always Fun ChallengesHappy Birthday

Seize the Birthday Birthday (option of birds not used)

More Monsters

20180402_083727

Hell again. I have been doing a little crafting over the weekend, but nothing too major. I may be able to craft more later today, and I am sure I will let you know what I come up with.

This layout of this card was inspired by the sketch challenge from MFT, but initially I didn’t really have a clue about what theme I wanted to go with. My obvious go-to would be flowers, but I had a think about it for a few days.

Whilst I was sorting my stamp sets out into make, then alphabetical (OCD much??) – and found this ‘More Monsters’ stamp and die set. I then thought about a galaxy background – which I haven’t done many of – and decided to take an hour or so out of sorting and tidying to play.

I used Distress Oxides then Gansai Tambi splatters for the background, sticking that down beneath a plain white rectangle.

There are six monsters in the set, so I took 6 Catherine Pooler inks and stamped them all out. As these monsters are solid images, I knew these inks would be more suited for coverage.

After die-cutting them, I then played with the lay-out, stamped a greeting – there are quite a few in this stamp set – and there we are.

I obviously have 6 monsters of 6 colours, so I am currently playing with putting some more cards together along the same lines, and if I complete them today, I may add them to this posting later. Here is a close-up of the shiny splatters, using gold and white:

20180402_083748

I shall be entering the following challenges:

MFT sketch challenge –

Simon Says Stamp Wednesday Challenge: anything goes

JUGS CAS challenge:

Sketch and inspiration

20180326_110339

Hello everyone. I have just the one card to share today. I was inspired by the sketch from Freshly Made Sketches, and the photo inspiration from Hand Stamped Sentiments.

The inspiration photo has pink flowers stamped onto black, so I went the reverse of that. I stamped a selection of the Altenew Frosted Garden flowers onto pink card, using Versafine black onyx.

I then die cut the images and arranged them onto a circular die-cut adhering with foam pads. I added some black Tonic Nuvo Crystal Drops into some of the spaces, of varying size. Once dry, and when I had stuck that down the the card base, I stamped a sentiment from a freebie stamp set from MFT – given with an order from Seven Hills Crafts a few months ago. I have used this sentiment set several times, and like the variety of fonts and sayings it has.

I looked at the sketch again, and was considering cutting the edge off the circle, and down some of the flowers, but I left it as it was – over-hanging the card base. The sketch has still inspired me, and the inspiration photo does say ‘any shape’ – so I have left it as a circle.

I then tried to stand the card up to take my photographs……you know what happened, don’t you? Yep – it didn’t stand up because of the over-hang at the bottom! So – who ever receives the card will also receive a stand for it, too……wins both ways. It’s also a good job I can make my own envelopes…. :)

Foiled greeting

Hello everyone. This may look like a clean and simple card, but it took me absolutely ages to figure out how I was going do some foiling, and for it to look respectable. I was trying to get some inspiration for the current CASology Challenge, and after making the card yesterday, I still had the stamps and dies out and I decided to foil the ‘friend‘ sentiment.

I don’t have a foiling machine, so I hunted for my packets of foil. Then I had to decide how to do it.

The first 2 or 3 times didn’t work. I took some double sided sticky sheets, and stuck it to card, then die cut the letters. I then took the foil and lay it on top, smoothed it out, took away the foil – messy and uneven. I tried again, but it still looked messy and uneven, I couldn’t – initially – think of a way to put down even pressure to make the foil stick.

I went to get a coffee, watched a Real Housewives episode (addicted to a couple of them), and it came to me. Why not put them through my die cutting machine……so I took the sticky letters, added the foil, sandwiched them between a couple of sheets of paper, (my cutting plates are a little ‘tired‘) sent it through my machine……..and this is what I came up with.

Whilst I was faffing with the foiling, I was also thinking about layout. The current challenge from AAA Cards is to only use one third of your card. So that’s what I did!

Now – how to get the letters straight? How to spell it right? We can’t have ‘fiend’ or ‘frend’ now can we? :)

I used the card I had die-cut the letters from and just lay that over the bottom of my card, and inlaid the foiled letters – then removed the unwanted piece of card. That took some figuring out, too, let me tell you.


Concord and 9th Posie Fill-in

20180323_125316

Hello. I had a delivery from Seven Hills Crafts yesterday, which included this gorgeous stamp and die set from Concord and 9th. I soon got to work deciding what to make with it, which stamps and which layers in which colours, and using which dies…..the possibilities are endless with this set, I think. I’m going to try it with different colours, but these colours are from the current challenge from Color Throwdown – peach, black, white.

I started by stamping the hatched background with Versafine black onyx, using my Misti, just in case I didn’t get a good coverage – but I only needed one stamp anyway. Then I turned to my Stampin Up ‘Peekaboo Peach’ which I hadn’t even opened yet! Nice and juicy!

I stamped the base flowers in peach, and then decided I didn’t really want any other peach on there. I stuck with the Versafine black onyx, and stamped the leaf outlines, not wanting the leaves to be solid on the background, but finding I had to mask the flowers off a little to stamp them properly. (Something I am getting better and better at, if I do say so myself). 

I used the stitched rectangles to cut the base out and then thought about the sentiment. And thought, and thought, and thought……I tried several variations but settled on this one.

I die cut the ‘Friend’ out of the base card, removed it – saving the little bits from the ‘R‘ and the ‘D‘, then cut it out again using black card, and inlaid the black into the base. After I had put the card together, I added some dimension by stamping and die-cutting another flower, and some of the leaves – this time in black card.

20180323_125334

I am liking this stamp and die set, and may even get my other ‘Blooms fill-in’ out and play with that again.

I shall also be entering this card into the current Simon Says Stamp Wednesday ChallengeFloral Frenzy.


colours and stencils

Hello everyone. I have two offerings to share today.

20180321_161620

This first card is taking inspiration colours from CAS Colours and Sketches, using flowers die cut from Concord and 9th ‘Wonderful Florals‘ die and stamp set. I stamped the flowers onto water-colour card, and used the three colours from the challenge to arrange with a swirl and sentiment from Catherine Pooler.

This card will also be entered into the current challenge at CAS Water-colour Card challenge, with the theme of ‘Garden.

20180321_161554

For this second card, I masked off the edges of the card with some post-it notes, and laid down a stencil from Imagination Crafts with a handwriting/script theme, and used Distress Oxides through the stencil. I then used two stamps from Studio 49 Wendy Vecchi, stamped in Versafine black onyx – using my Misti of course.

This second card is being entered into two challenges. The Watercooler Wednesday Challenge currently is for a masculine card, and Less Is More has a challenge for one layer only and using stencils.

Stamping and colouring

Hi there. I have another ‘home’ day today. The snow yesterday settled but now looks like it’s virtually all gone – gotta love the English climate – and so I have been trying techniques that I haven’t really tried before.

I produce three cards, the first of which is this one for the current Time Out Challenge and CAS Colours and Sketches Challenge,


I used a Uniko stamp set for the corners – a lovely background builder stamp set (‘Vines’) with lots and lots of little, in fact tiny, stamps, to fill in small areas. Even this small set packs a punch as they are also 2 or 3 step images too…..The sentiment is from MFT – ‘Big Birthday Wishes‘, and all done using Catherine Pooler and Altenew inks.

The second card is using a cute – very unlike me – stamp set from Clearly Besotted. It is a recent purchase for me, but I just loved the 5 different little creatures on it. The set is called ‘A Bug’s Life’, and comes with a matching die set.

I coloured these with my Crafters Companion ‘Colorista’ alcohol pen set I have had for ages. I have tried these before, tried blending them, but it didn’t really work. I mentioned yesterday having a ‘Eureka’ moment – it is because I’m not using the correct card. I used Crafters Companion Neenah Classic Crest – blends like a dream.  (I really, really should listen to all that good advice on the experts who post their videos on YouTube!!!)

I couldn’t stop stamping and colouring, which is why there is a selection of cards. The ‘cute as a bug‘ sentiment from the same stamp set, but the ‘don’t bug me’ sentiment is from a Studio 490 Wendy Vecchi stamp set. One of these cards will be used in the current CASology Challenge – cue word ‘Bug’.

The third card is something I have been thinking about doing for ages, but way out of my comfort zone:

20180318_144636

This is a one layer, stamps and inks only card. The inspiration for one of the current challenges at The Library Challenge. I like the fact that the challenges over-lap. So there is already another challenge gone live, whilst this one is still going….

I used a combination of inks from Catherine Pooler and Altenew. The background is achieved with a dry baby-wipe on my finger, a torn paper edge, and a rub of the ink over that edge. This is a technique from Card-io I have been longing to try for ages – here was the opportunity.

The trees are stamped first, second, and third generation for that misty look going into the background. The grass is from a Card-io stamp set, as are the trees, birds, and the clouds. The sentiment is from Catherine Pooler, which I thought fit the scene, and the subject/topic of the book.

So – three different cards, for three different occasions, but I had fun with them all. :)

Lucky Stars

20180317_122106

Hell again. I have one card to show you today – but I will be in my craft room later having a go at colouring……I am finding it all depends on the card-stock and ink/pencils/pens you use. Maybe that’s why I seem to get it wrong quite often. I have been searching for hints and tips on’t’interweb……so we’ll see how that goes.

This ombre card was inspired by the current challenge at AAA Cards, as it isn’t a technique I have done a lot in the past, and I really struggle to blend the inks. I decided to try the blending with a range of different card stock – and I found my most major problem…..using the wrong kind of card!! I mean, really, how simple is that?

Anyhoo – onwards and upwards.

The layout is inspired by the current challenge at Freshly Made Sketches.

The stamps I used are from Uniko – the background and the sentiment. I first embossed the smaller star background and then blended some Altenew inks over the embossing. With this particular card, I found it quite easy – the blending tool moved easily over the card and embossing. It is the Crafters Companion Neenah card-stock, and I am finding I am liking this card for a lot of my stamping, too.

The main and larger star background is an embossing folder from Sue Wilson ‘Twinkle Twinkle’, a large A4 folder, so you can emboss pretty much any size card you are wanting for your project. I may have gotten carried-away because I then went in and stamped little ombre stars into the main embossing stars – I just couldn’t stop myself!

So, a quick posting, whilst I am preparing to go out into a snowy flurry – not settling thank goodness – to do my supermarket shop…….but it is very windy and blustery and snowy…….