Grey Peony

20180315_114023

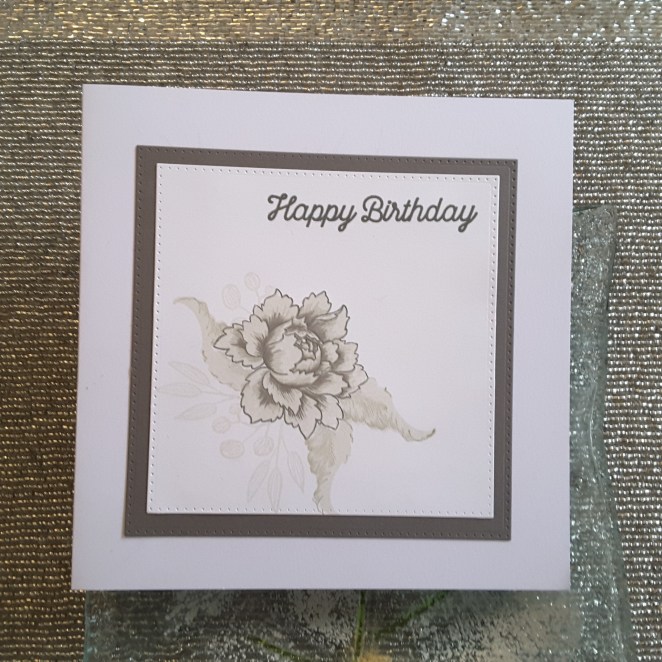
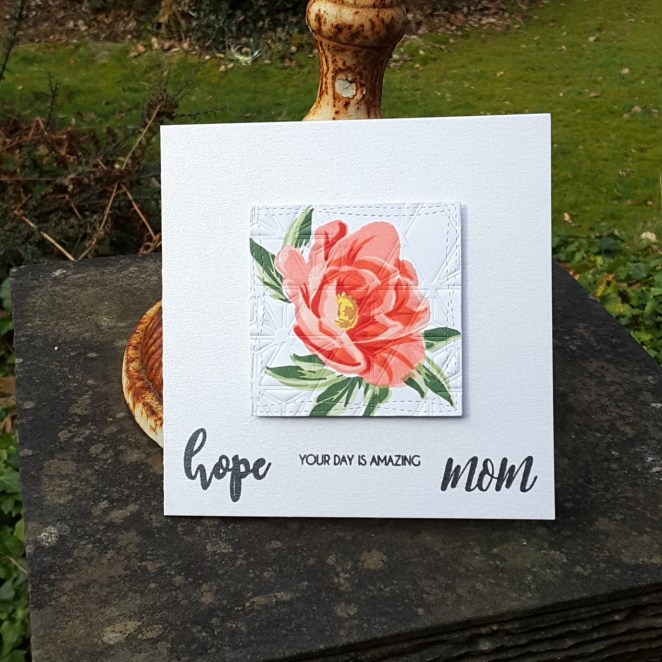
Hello there. I have a muted and monochrome peony for your today.

I first stamped the Altenew ‘Peony Bouquet’ in the Altenew grey inks, using all of the grey colours, then masked the flower off and stamped the leaves around it. I used a combination of leaves from the same stamp set, though I wanted their appearance a little more subtle, so I didn’t use all of the layers, and only used the lighter grey inks.

The even more subtle leaves and buds are from the Altenew ‘Freeform Greenery’ stamp set, just using the lightest grey.

The sentiment is from MFT ‘Big Birthday Wishes’ – a great set of stamps with a wide variety of sentiments – and stamped using a darker grey ink.

I then die cut the squares – white and grey – using a Sue Wilson stitched squares die set, and adhered flat to the white base card.

I shall be entering the following challenges:

Less Is Moremonochrome

Double D Challengesusing mostly grey

Watercooler Wednesday Challengeoccasions


Toulouse background

Hello again. I have made variations of colours with this card layout, using a couple of recent purchases.

The card was inspired by the current challenge from Inspired By All The Little Things, using their photo inspiration.

I used the Memory Box ‘Toulouse Background‘ die, which I think matches the florals in the photograph, and I cut it out of a range of water-coloured card I had been using my Brushos and Distress Oxides on. I must say my fingers were definitely multi-coloured once I had finished playing!

The floral die was stuck down onto the Altenew ‘Water-colour Stripes Cover Die’ which I kept white for a more subtle background to the floral image. I initially stuck it down with Crafters Companion spray adhesive – again I am disappointed in that spray. The floral image came away from the background yet again, so much so that I could peel it away and run it through my Xyron machine for a more permanent adhesive. I think I’ll call into my local Crafters Companion shop to see if I am doing anything wrong!

Here are the other cards I made along the same theme:

The sentiments are all from Stamps By Me, using Versafine black onyx. The variations in the cards and the die cut-out are my me removing part of the frame just to see what effect it gives. I do like to snip my die-cuts occasionally.

Even though this looks quite a simple card to put together, it did take some faffing around with the glue, and re-gluing – annoying! Gotta love the Xyron!


3 cards, 6 challenges

Hello everyone. As hubby has been golfing – the weather has improved somewhat – I have spent quite a bit of time in my craft room. I have three cards to share with you today.

The first card:

20180310_181141

Using a stamp set from my recent crafting retreat with Uniko, and based on the colours from CAS Colours and Sketches, and the theme from Crazy 4 Challenges. Some masking was involved once I had stamped the bird – and I think I’m getting better at that!

The second card:

20180311_153237

Using the colours from Hand Stamped Sentiments – tranquil tide, rich razzleberry, daffodil delight (changed for an Altenew yellow instead – my daffodil delight is running dry!)

The stamp set is Altenew ‘Totally Tropical‘, stamped and die cut. I didn’t stamp all the layers of the leaves and flowers, but I think they look quite effective as they are. The background is a piece of card coloured with tranquil tide using my blending tool, then embossed with Avery Elle ‘Polka Plate Die‘, then another white layer which was die cut with the same plate and placed on top. This meant the dots stand a little proud, giving more dimension. The sentiment is from Uniko ‘Birthday Sentiments‘.

I shall also be entering this card into the current Simon Says Stamp Wednesday Challenge – something for a girl/feminine.

The third card:

20180311_153253

This for my mum, and I’m just about to take it over to her. She absolutely loves daffodils – perhaps because she was born in March.

The stamp set is another Uniko buy from the crafting retreat, stamped, then masked and stamped again – and again. Actually, stamped in black using Catherine Pooler ‘Midnight’ ink. Bev from Uniko and I played with that whilst we were at the retreat. It apparently doesn’t run with water-colouring, or using alcohol markers…….it’s true! All true! As you can see!

I used my Inktense pencils to water-colour the image – three different yellows, and two different greens. Hopefully that added some dimension to the flowers and leaves. I did go back into the green once it had dried as I wanted that darker. I added some splatters for the first time in – well – days…..

This card will be entered into the following challenges:

Just Add Ink add water (water-coloured)

Brown Sugar Challenge Spring or Easter


Quickie posting

20180310_181214

A quick evening posting so I can get this card into the Library Craft Challenge, which ends in a few hours. Of course, I have been contemplating this challenge for a week or so – and only just managed to get to create using their inspiration photograph of the book ‘Pride and Prejudice’.

Image result for pride and prejudice cover

I have never read the book, I haven’t seen any of the films or plays – unless you count ‘Pride and Prejudice and Zombies‘………need I say more? Love that film!! :)

Anyhoo – this card was created using the Altenew cover plate, using only two of the layers. The top layer plain white, the second layer in green – but with all the bits left in for added interest. (Can you see one little dot I couldn’t find again?)

The bird is a cardinal using a Heartfelt Creations stamp and matching die set. I haven;t used many of the items from this company, but I really struggled with the die cutting – you actually can’t see the edge of the stamp, and it’s kinda guess-work…..

I shall also be entering into the Crafting With Dragonflies challenge – birds/feathers.

A rose bouquet

Hi there. I hope you are all ding well this weekend. From snow-deep a week ago, to loads and loads of rain….. I can see the snow-drops and daffodils poking their heads up, and the green leaves for the blue-bells. It is a good job the British plants are hardy enough to cope with the vagaries of our weather.

I spent some time with the Altenew ‘Sweet Rose Bouquet‘ yesterday. I tried the stamp set in multiple colours, as you can see. I didn’t realise until I opened it that the flowers and leaves are all bunched together, several layers for each – (perhaps the ‘bouquet’ part of the title of the stamps should have given me a hint. :)

It actually took me quite a bit of time to sort out each of the images, and each of the layers – thank goodness for the Misti for the larger images.

I really do like this stamp set, and I can see many more bouquets being made in the future. Once you have your head around the layers and the positioning….and the Altenew ink sets take matching colours sooooo easy.

Well – unless you get then the wrong way round! I did that with the purple flowers – I stamped the darkest purple on the second layer. So I turned to my blue inks so I could out even darker layers down. So I didn’t make a mistake really – I just have purple and blue roses!

I added sequins as part of one of the challenges – a couple of them did cover some ink marks…..so handy.

I shall be entering the following challenges:
Watercooler Wednesday atg feminine

Seize The Birthday atg Birthday

CAS on Friday CAS celebration card with sequins


Floral abstract

20180307_105917

Hello again. I have had some new deliveries  – more in one day as the snow has gone and the delivery man could get in – so have took some time to create a card this morning.

I used the stamp set ‘Hope‘ from Altenew and some Altenew inks to make the flower and leaves. Some masking was involved, too, and I also used my new Misti creative corners. I can see I’ll be using those a lot in the future, even if it’s for lining the sentiments up – great for that.

I then used Lawn Fawn wonky stitched squares to cut it out, and embossed with an abstract die from Neat and Tangled – Modern Triangle Cover Plate die. I thought this design fit perfectly for the current challenge at CASology – cue word being ‘Abstract’. I didn’t think it took anything from the flower design, but also added a little interest.

The sentiment is a mix of words from the same Altenew ‘Hope‘ stamp set, and ‘mom’ is from The Ton ‘Fresh Cut Tulips’ – a stamp set I’ll be playing with very, very soon.

I know we don’t use ‘mom’ very much in the UK, but I really liked how it is quite quirky for us – I hope my mother-in-law agrees!

I shall be entering the following challenges:

CASology – cue word Abstract

Try It On Tuesday – mum/mothers day

Crafty Cardmakers – Floral Delight


3 colours and 3D Rose Flurries

20180305_083013Hello everyone. After all the snow we had last week, (which I know is not a lot compared to some people, but we aren’t used to it), I managed to venture out on Friday to visit family. As I live in a wood and down a dirt track, I knew the post man wasn’t coming to make deliveries, so I called into the local Royal Mail centre to see if there was anything waiting to be delivered to us. (I was expecting some crafty goodness!)

And here we are………..the Altenew 3D Rose Flurries I’ve been trying to get my hands on for months. I’ve been playing with them all weekend – in between visiting family – and cutting them out in a multitude of colours – all monochrome at present. I’ll be daring to put them together with other colours soon, but I made this card to go into the current Color Throwdown Challenge – to use grey, Kraft, and pink.

The base grey card is Lawn Fawn ‘Narwhal’ (love it) and I stamped a flower with a pink Catherine Pooler ink for a background. I am amazed that this idea worked – stamping pink onto a dark grey card? It just shows how good these inks are.

I then die-cut the 3D roses and leaves, sticking them together with Crafters Companion spray glue (not sure about this glue, flowers seem to come apart the following day!!), and placing them onto the base card using 3D gel glue and foam pads.

Now for the mistake:

20180305_083117I stuck the roses on the wrong end! I wanted them to be at the bottom right – but I didn’t check the opening of the base card first!

Well, now we have a cascade of roses flowing from the top of the card! :) :)

Or I may have to cut this out as a panel for the front of another base card…….


20180305_083220

Some more monochrome flowers…..It seemed to take me forever to match the dies up the first time, but once done it’s easy.


I shall be entering the following challenges:

Color ThrowdownKraft, Pink, Grey

Simon Says Stamp Wednesday Challenge – anything goes

Alphabet Challenge‘Y’ for your choice

Springtime Azalea

Hello everyone. I have trying out a technique inspired from Jennifer McGuire today. She recently posted a video outlining a layering stamping technique using a template. https://www.youtube.com/watch?v=Wa0eeT3vXac&t=1232s

Here is my template:

20180301_103825

I tried it out on this stamp set, even though the set itself is quite easy to layer up anyway, but I found it very easy once you had got your head around it. This really is a great way to make lots of flowers at the same time – which is one of the reasons I put so many on these cards!

The flowers were made using the ‘Jennifer McGuire’ technique, using a range of Altenew inks, and then I set to organising them on my card base.

The layout is from the current CAS Colours and Sketches challenge, and organised to match the current Just Us Girls challenge, which is a photograph of lots of little flowers. I shall also be entering the Simon Says Stamp Monday Challenge. Even though ‘The Beast From The East’ and ‘Storm Emma’ are both bombarding the UK, there were lots of little spring flowers trying to pop their little heads up – before the snow!

20180301_103407

Challenges entered:

Just Us Girlsphoto inspiration

CAS Colours and Sketchessketch

Simon Says Stamp Monday ChallengeIn My Garden

Addicted to Stamps and Moreanything goes


sweet machine

20180225_165829Hi there. After attending the Uniko stamping retreat yesterday (Saturday) in Stockton-On-Tees, I was a little inked and stamped out. I had so many thoughts and ideas going through my head using their new release stamps and stencils – I just didn’t know where to being to play today.
So – I didn’t. I went with die-cutting to give my little brain a rest……or so I thought! This card is inspired by the current challenge from Pinspirational. I used some of the inspiration from the photo, but you can see I went my own way.

The Candy Machine is from a Sue Wilson die I have had for ages – and not used. I didn’t want to do the full dimensional working candy machine, at this point, and went for a flatter look.

Once I had die cut the candy machine, and die cut it out of the centre of the light blue background – which is inspired from the light blue background of the inspiration photo – I embossed the blue card with Sue Wilson’s ‘Checkboard’ embossing folder, which is a ‘pin point’ folder, meaning different embossing levels, and faux pierced effects.

I thought white card behind the machine was a little too stark, so I die cut the candy machine outline out of vellum, and stuck that down. I then stamped the sentiment on a circular piece of vellum, heat embossed with black, and stuck that down.

My original candy machine was out of the blue shiny card, if you remember, but it all looked a little…….well, boring. So – out came some vibrant red card, which tied even further into the inspiration photo, and stuck that down. The two glimmer card pieces are for little extra.

I started by thinking this was going to be easier to do than playing with my Uniko new stash – but in fact it created a whole load of issues itself. It wasn’t easier – just different.

I shall be entering the following challenges:

Pinspirationalinspiration photo

QKR Stampedeanything goes


Christmas in February??

20180221_212446 
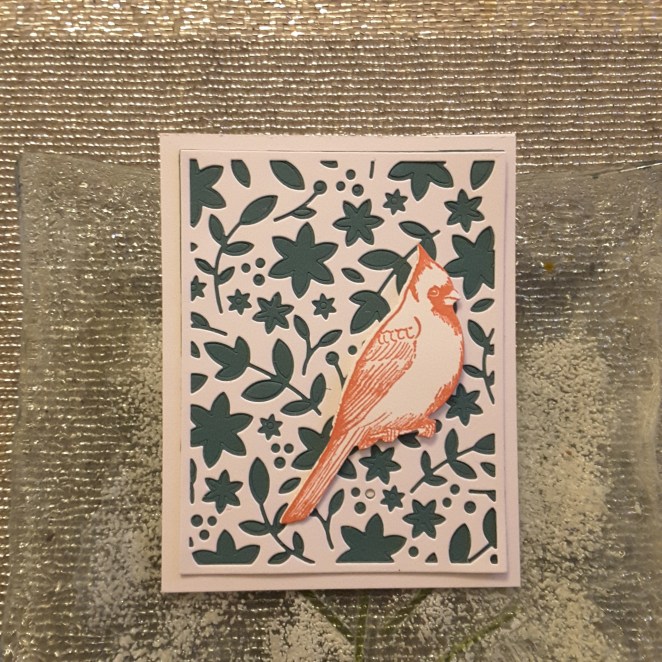
Last evening had been one for die-cutting, as you can see. The previous card gave me the inspiration to try something more adventurous and I thought a Christmas card would be an ideal way to go a little over-the-top, a little more dramatic.

I started with a base card from Sue Wilson, embossed with a Heart Lattice embossing folder, with a layer of black behind it. The poinsettias were stamped with the Heartfelt Creations stamp, and heat embossed with black embossing powder. After these were die cut, I layered a couple of the together, and shaped the leaves a little. I like rounded shapes on leaves as I feel you can get some reflection of the embossing powder and the card better from any angle.

The sprigs of holly etc were die cut from the same gold card, and from some black card, all arranged on the base layers with 3D glue – to give me some time for moving things around. I also like to leave some of the finishing touches free – I don’t stick everything down completely, as I like the movement of them when the card is opened.

I thought about a Christmas sentiment, and where to put it, but I didn’t want to cover any of the elements up at this point, so I will ensure I put a relevant Christmas verse on the inside.

I shall be entering the following challenges:

Crafty Hazelnut’s Christmas Challenge Christmas with option green (option not used)

Winter Wonderland Challengeanything goes Christmas

Christmas at Sweet Stampin’anything goes Christmas