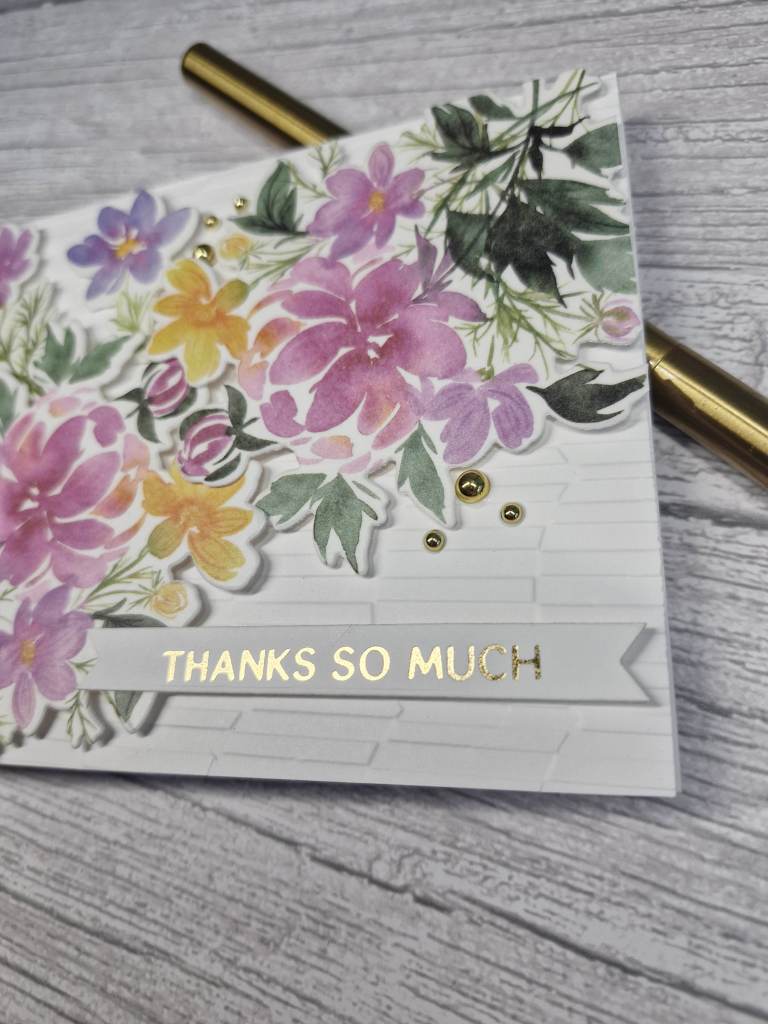
Hello again. A little time to craft today to create this card:
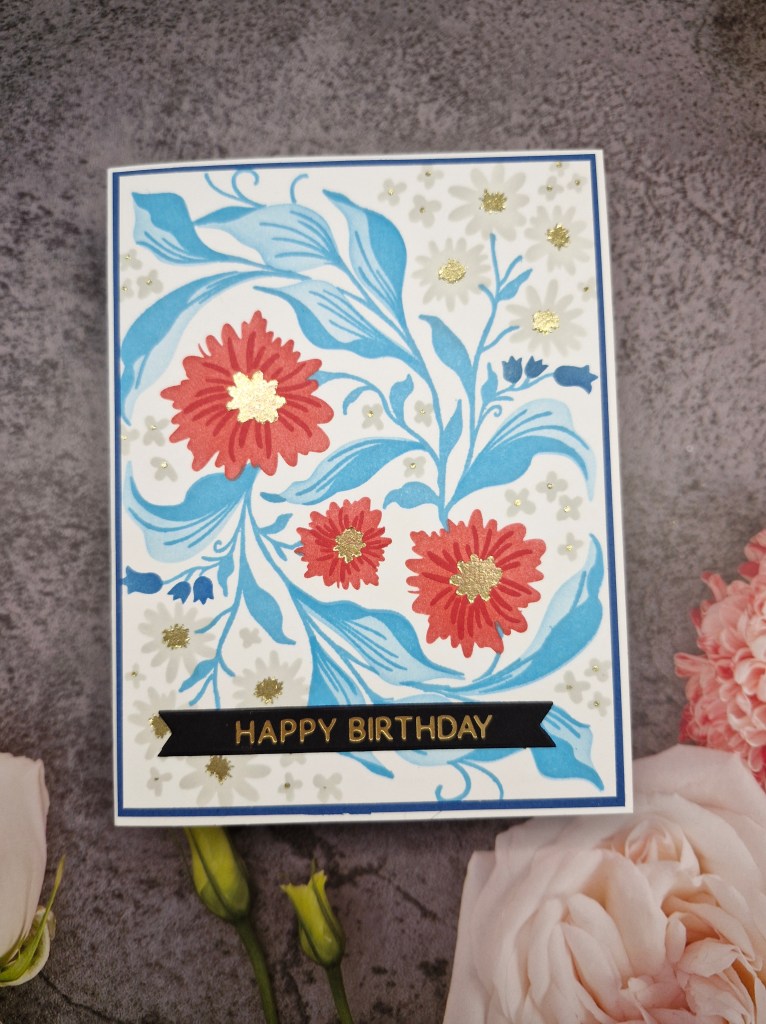
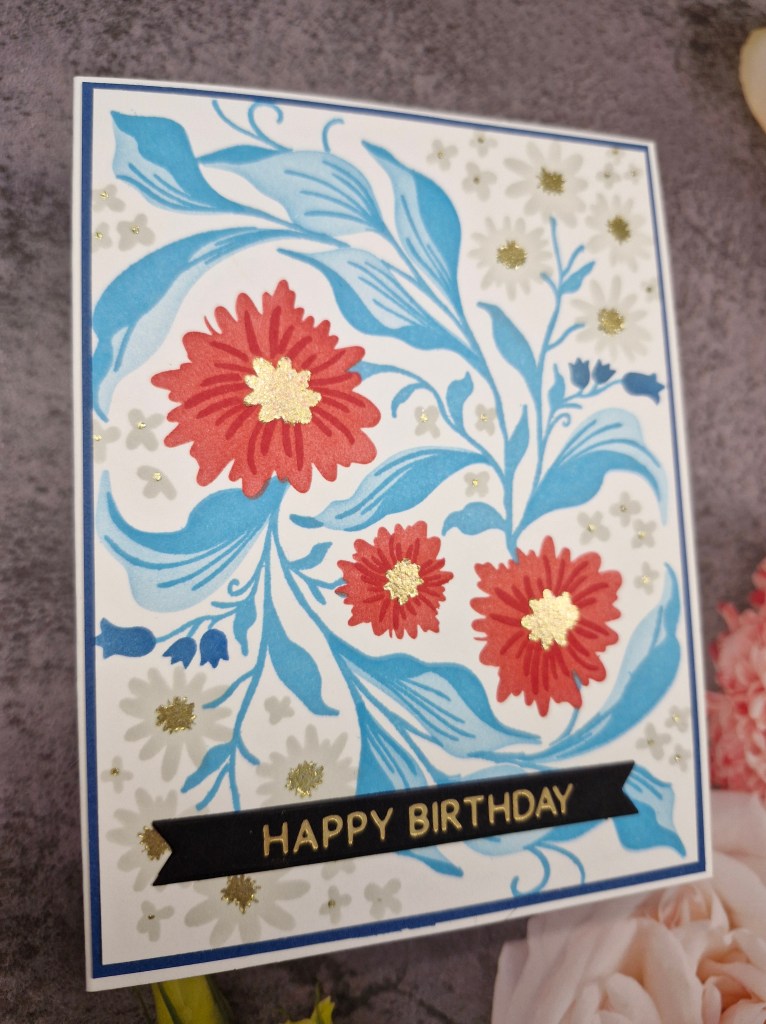
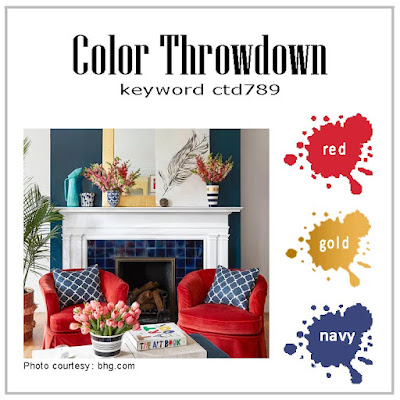
Using the colors for the current Color Throwdown Challenge, I used some new layering stencils from The Greetery. The inks are from Pinkfresh Studio, the same colour but stamped a couple of times to create a darker colour, and the centre of the flowers was using some gold Tonic Studios paste.
This panel was then cut down slightly layered with a blue card stock, then adhered to the card base.
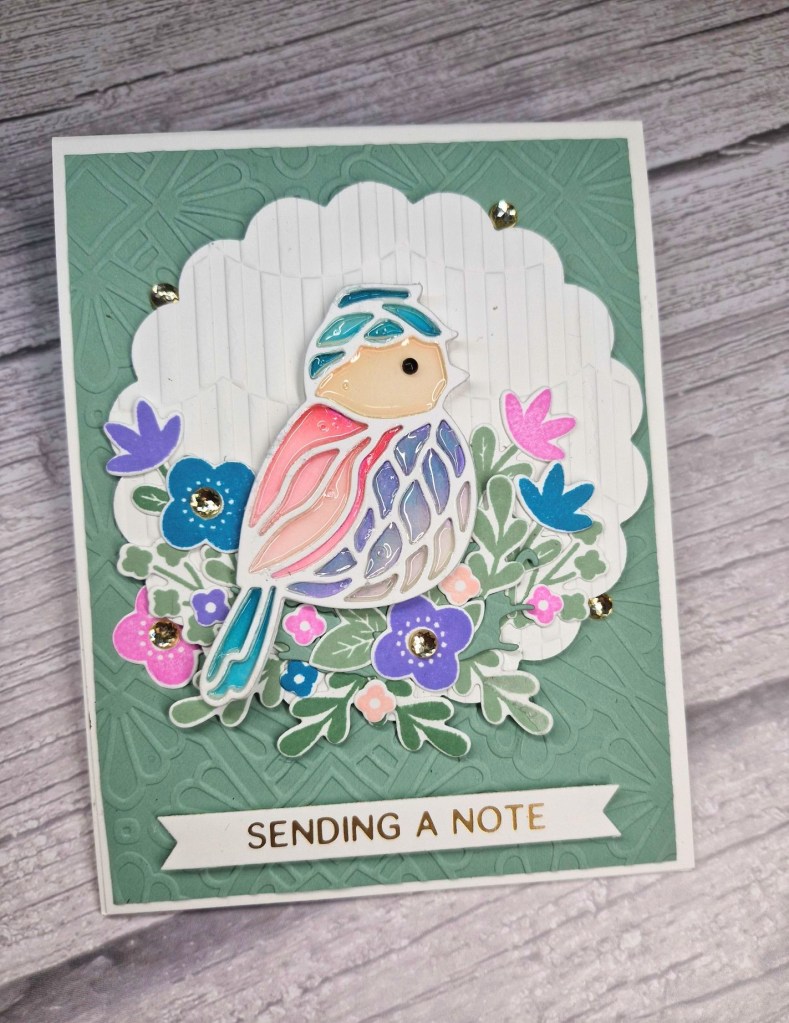
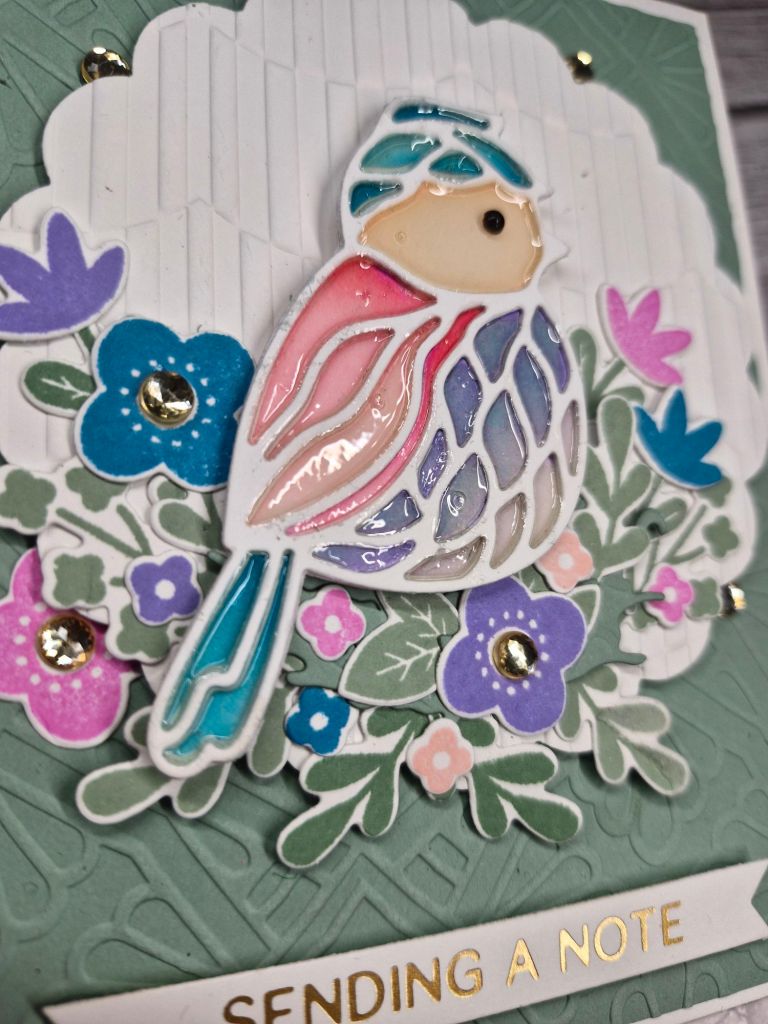
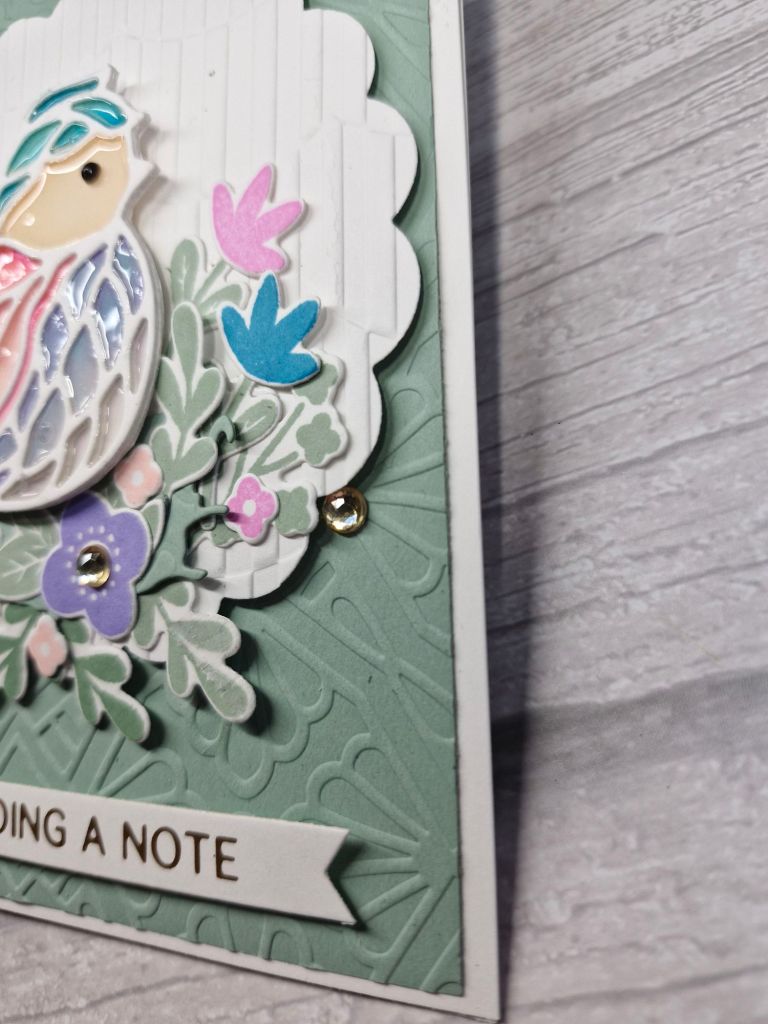
Hello again. The Alphabet Challenge has reached the letter ‘B’, and Debbie has chosen the theme of ‘Birds’. Here is my card:
This cute little bird is a die and stencil set from Simon Says Stamp. I ink blended the bird areas, masking off some parts so there was no contamination between the areas, adding some darker shading to some of the areas. I then die cut the white stained glass portion several times, adhering all but one of them to the ink blended image.
I then went in with some glossy accents, let that dry, then added the final white layer. I then added a black gem for the eye.
The background panel was created using an embossing folder from Spellbinders, using their sage green card stock and cut down slightly so there would be a white border on the card base.
The scalloped circle was cut, and dry embossed with another embossing folder.
The floral images are from Concord & 9th, stamped then die cut, and I made sure I made a lot of them in similar colours to the bird, so I could put as many down as I wanted.
I then added the bird, and slotted the floral images all over the bottom of the circle, adding some gold gems in the centre of the flowers and some around the edge of the circle.
A foiled sentiment to complete the card.
I hope you can come and join us with your projects incorporating a bird/birds. xx
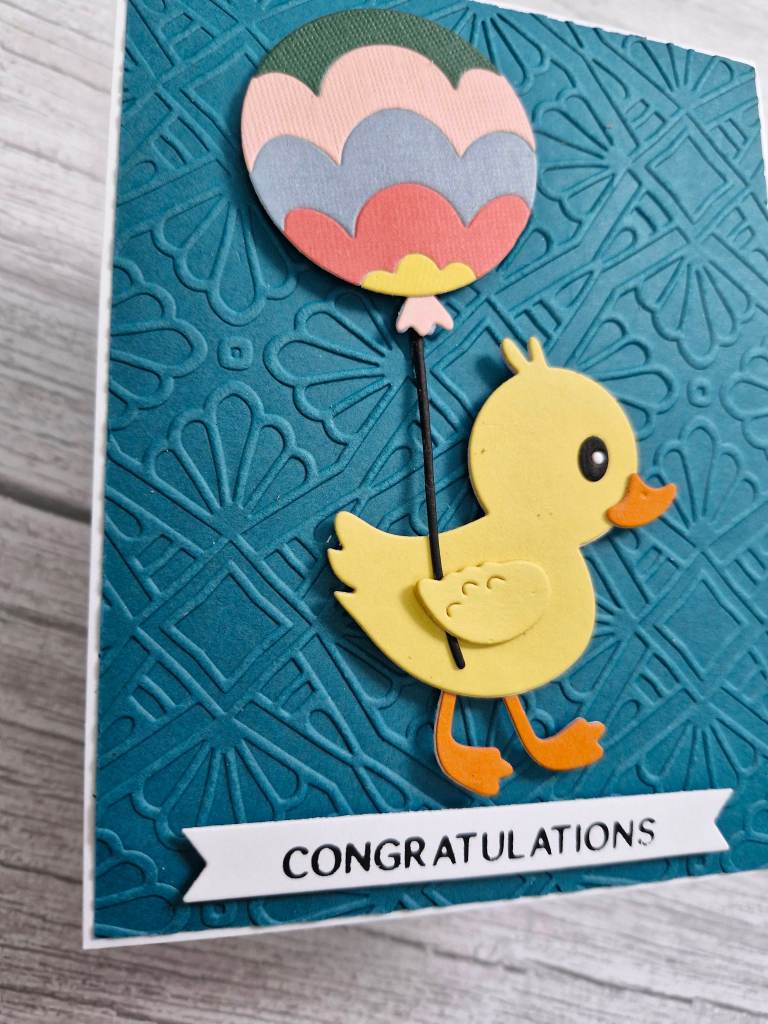
Hello once again. Cardz 4 Galz has started a new challenge. Helen has chosen the them of ‘Cute Animals’ Here is my card:
I just had to use this cute little duck again, so I die cut the elements and layered them together, leaving a little piece under the wing unglued to add the balloon string.
The balloon was die cut several times to get all the colours to layer.
Once the duck and balloon were sorted, I used an embossing folder to create the background – I wanted a bright and colourful card, and thought the little duck would stand out from this colour.
The sentiment is foiled and added somewhat as a grounding for the duck.
I am from an area in England where we call everyone ‘duck’ – a term of affection – to strangers and friends alike. I believe this is sometimes a little difficult for people to appreciate if you aren’t from the Sheffield/Yorkshire area – but if anyone from England calls you ‘duck’ – then take it as a friendly greeting……xx
I hope you can come and join us with your cute animal themed creations. xx
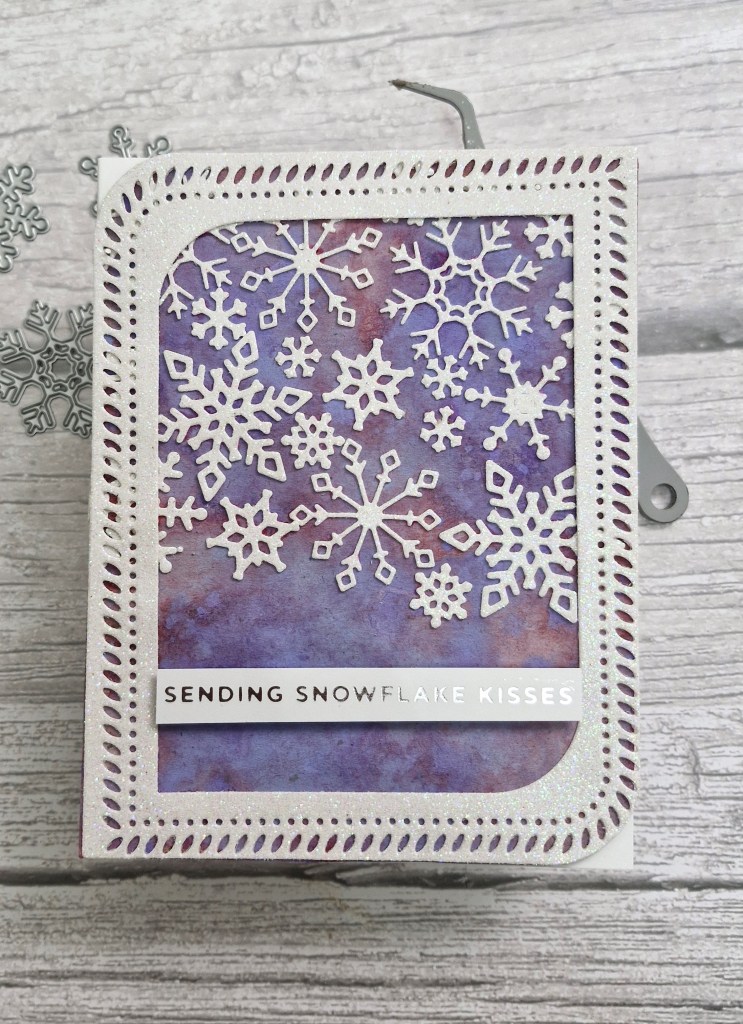
For the background panel I used a piece of Distress Kraft and sprayed with Distress Oxides, splattering a little but liking how the brown Kraft came through in some places.
Whilst that panel was drying, I die cut the snowflakes using Heffy Doodle dies and Concord & 9th glitter card stock, and used the same glitter card stock to die cut the Pinkfresh Studio frame.
I adhered the snowflakes towards the top of the purple panel, die cutting more smaller ones to fill the gaps, and then adhered the frame on top.
I added the foiled sentiment and decided not to add any more bling as the card is very glittery in real life.
I hope you can come and join us – I look forward to seeing you in our gallery. xx
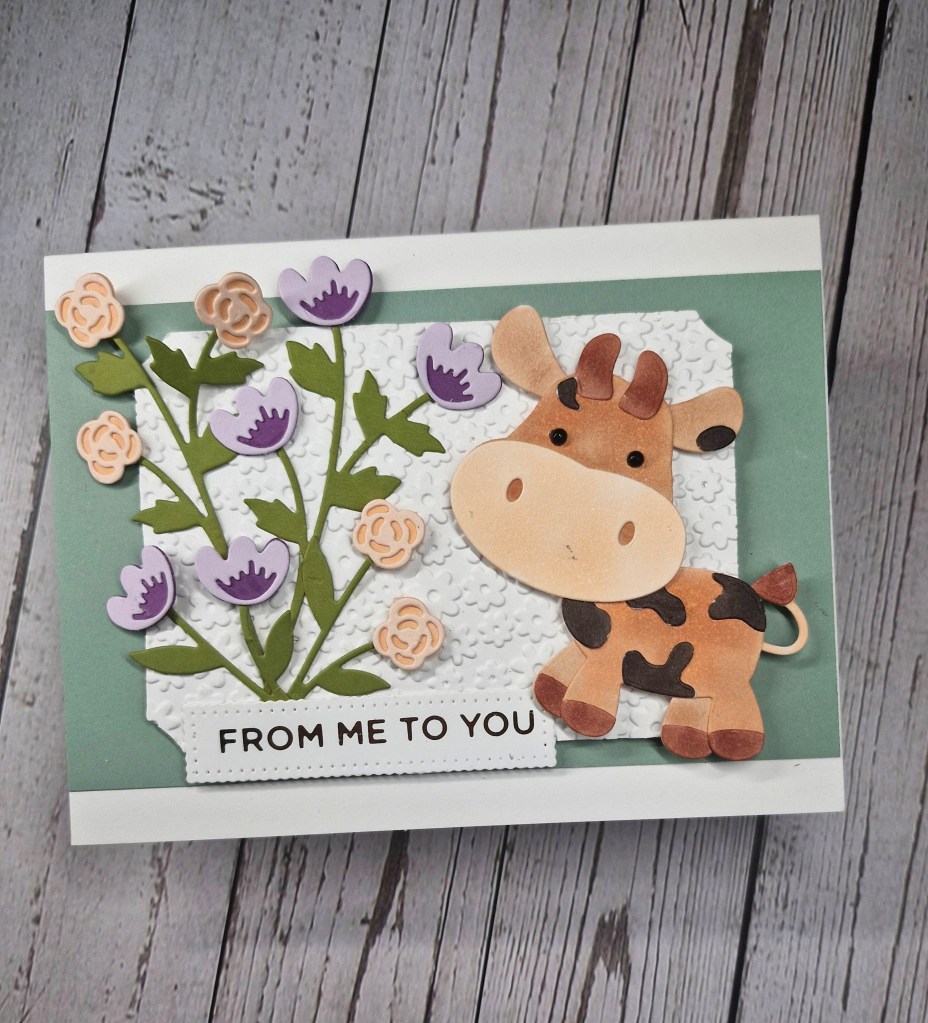
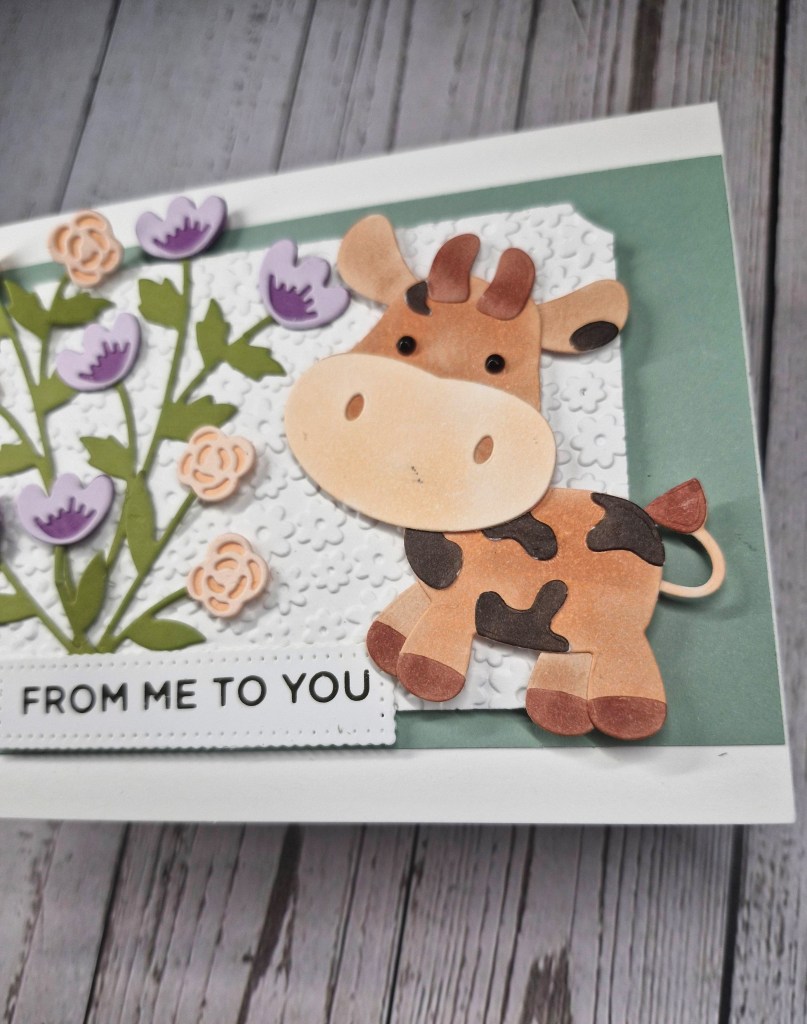
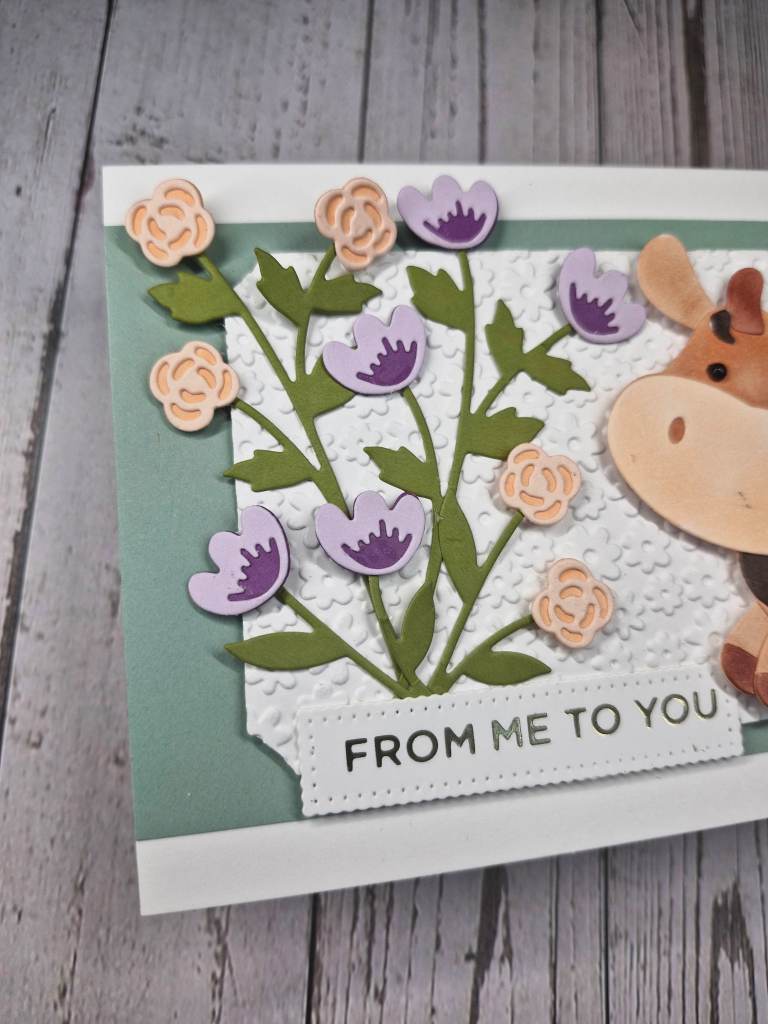
Hello. A little crafty fun and playing with the cow dies from Elizabeth Craft Designs:
The theme at ‘Everybody Art Challenge‘ is Farm Animals. I knew I had a cow die and decided to have a play.
I die cut all the layers out of white card stock and coloured them with Copics. I wanted a brown cow with darker brown splotches so this is what I created. The hooves and the splotches are individual die cuts, coloured and glued on. The eyes are small black gems from Spellbinders.
The background is a stripe of sage card stock from Spellbinders, and the middle white panel was a fall-out from a previous die cutting session, dry embossed with an old Darice embossing folder, and adhered with 3D foam.
The flowers were created using dies from the recent Concord & 9th ‘In The Classroom – Spring Edition‘, layered and assembled.
Once I decided on the layout, I attached each piece with a combination of glue and 3D foam squares, then added the previously foiled sentiment.
I may have to play with this cow die a little more, maybe create a whole herd of different coloured cows – maybe even rainbow cows…..hmmm……brain working overtime now….
Hello again. This card was created using the rest of the left-over pieces of the Washi tape from Pinkfresh Studio:
I dry embossed a white panel using a Spellbinders embossing folder, then attached that with glue.
There are two large floral bouquets added with 3D foam to the bottom left and top right corners, then three more floral images attached in the top left corner. The bottom corner was left for the foiled sentiment.
I also added some gold gems around the arrangement.
Hello. This time I created a CAS card for several challenges using a left-over piece of the Pinkfresh Studio Washi tape from a couple of days ago when I entered the speed card challenge.
I ink blended some blue in the bottom left corner – only what was left on my blue blending brush, then adhered the bouquet with glue.
The foiled sentiment was added to overlap the bottom of the bouquet.
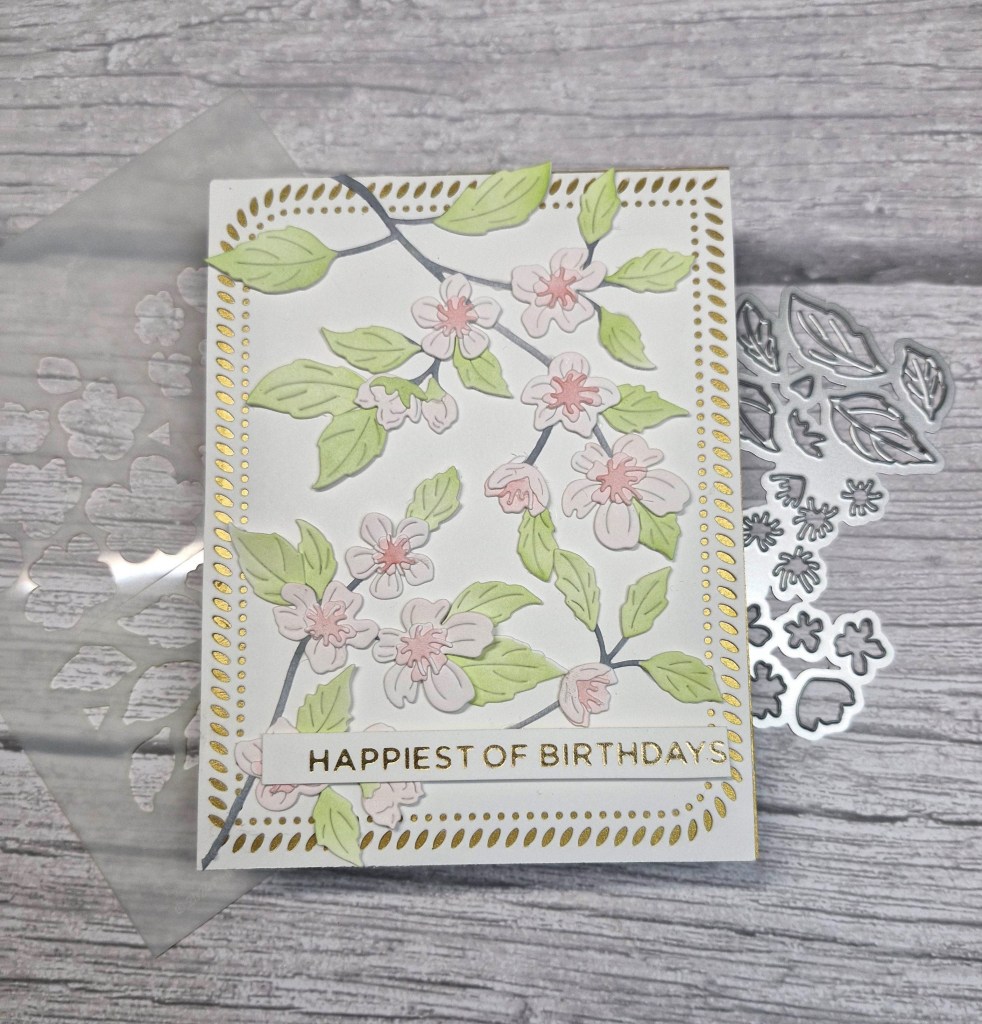
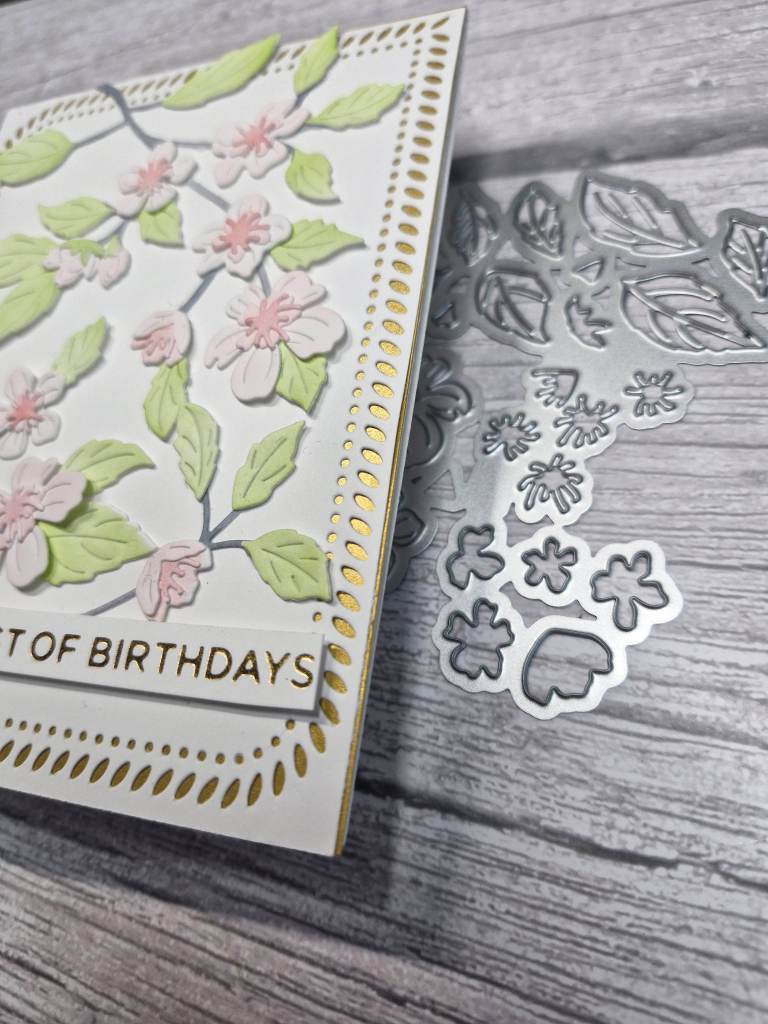
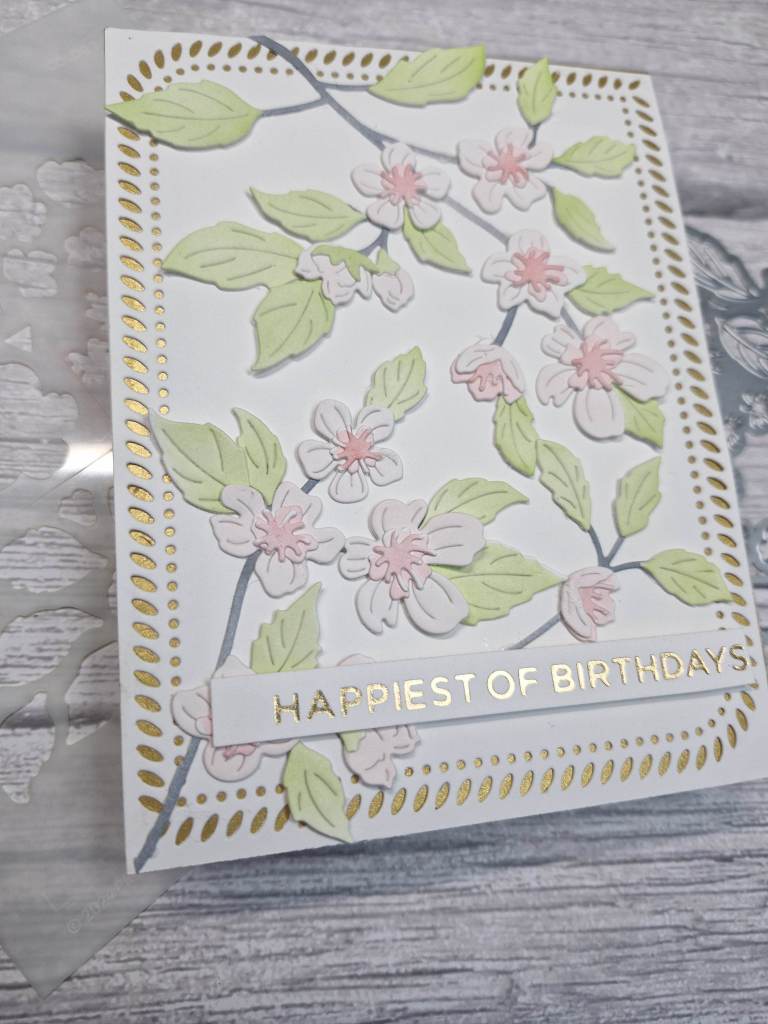
Hello there. I have another floral card today, created by using some layering dies from Pinkfresh Studio:
This set consists of layering stencils and dies. All the flowers and leaves are on one stencil with the different layers labeled and segmented. The die is one piece to cut the whole of the images out.
I used some pink and green inks, with grey for the branch. After die cutting the panel, I decided to do another so I had more images to play with and cover the card panel.
The background is a die cut with matt gold layered behind.
Once the flowers were arranged, I snipped any that were hanging over the edge, and added them also into some more open areas.
The sentiment was added – a previously prepared foiled strip.
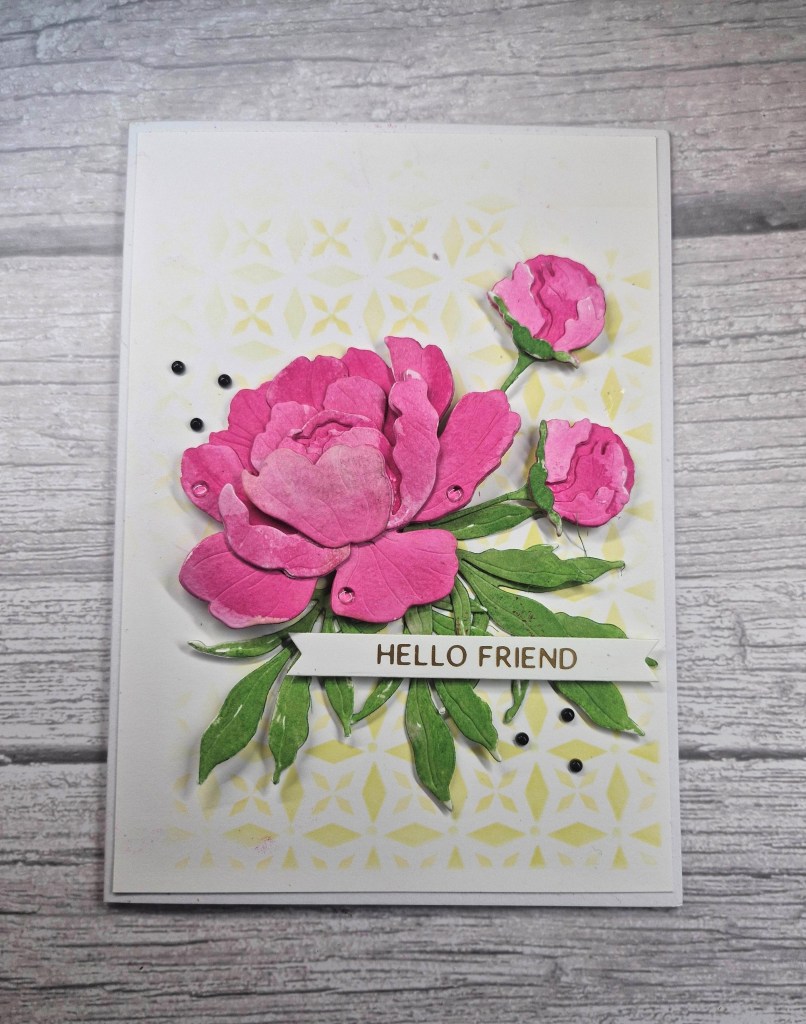
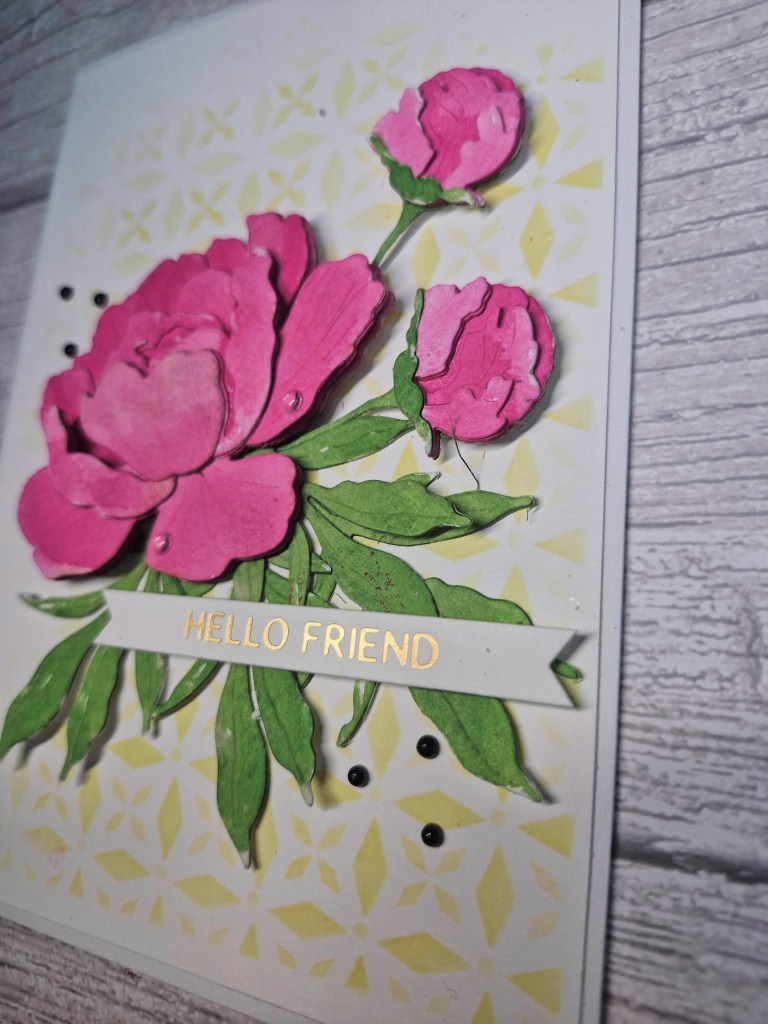
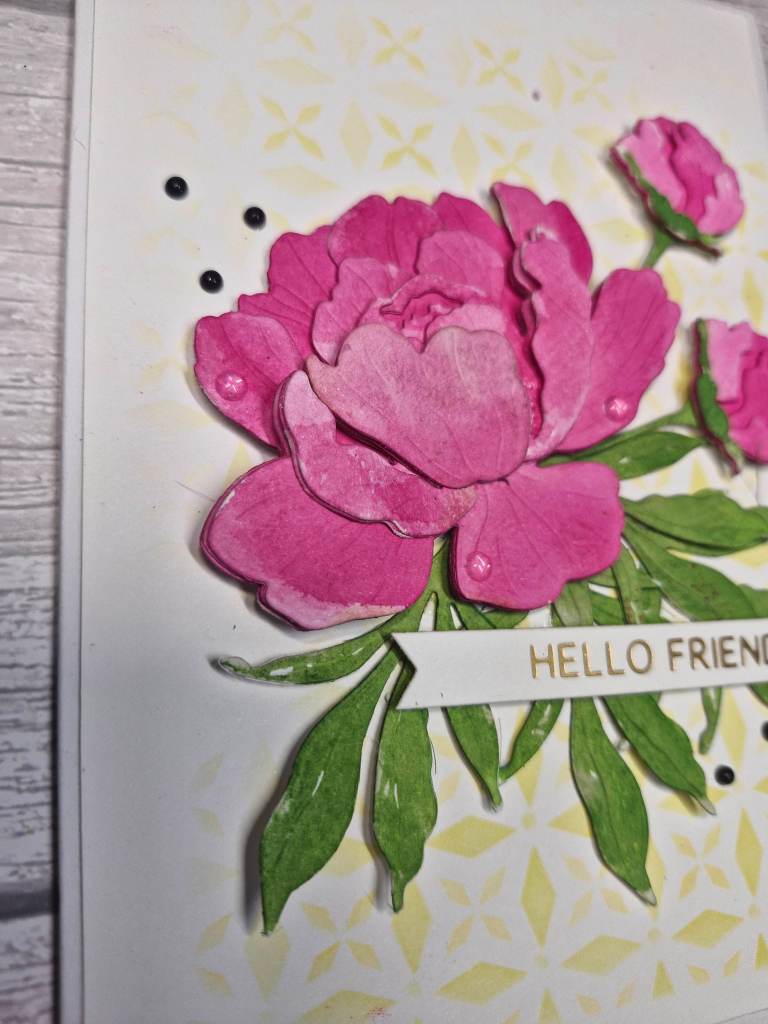
Hello again. A little messy play to create this card:
The peony was created using the ‘Lovely Layers: Peony‘ from Honey Bee Stamps, and the colour scheme from the current Color Throwdown challenge.
My first job was to die cut each of the layers for the flower, buds, and leaves from water colour card stock. I used Crafters Companion water-colour card, not one I would normally for water-colouring, but for this flower I was going with messy and imperfect.
I used Picked Raspberry Distress Ink, smooshed onto my glass mat, spritz of water, then just dolloped and swiped it onto the die cuts. I tried to keep the lower die cuts darker, and added a little more colour into the back areas I knew were going to come through and be seen.
I did the same with the leaves, a couple of shades of green – only because my first green wasn’t dark enough for me so I went darker – and even messier. I didn’t get full coverage, but that is what I was aiming for – just a dollop and a swipe of colour.
Whilst the die cuts were drying, I used a large panel of white card stock – this card is 5 x 7 inches – and used a Hero Arts layering stencil and some yellow Distress Ink to create the subtle background. I used all three layers, but the same colour.
I wasn’t concerned about getting full coverage with the stencil either – some areas softer than others, and an uneven edge.
Once that stenciled panel was adhered to the card base, I glued all the floral and bud layers – rolling the edges of the leaves round a pen to create more dimension in the leaves – and played around with the layout until I was satisfied.
The sentiment was added – a hot foiled strip – and I added some black enamel dots instead of splatters – and some clear dots onto some of the petals of the peony.
Every now and again I get into a messy playing mood, and just create backgrounds, use paste, and generally get my hands inky. That way I have panels I can use in the future, especially when I want to die cut for backgrounds, or die cut elements to add to a card.
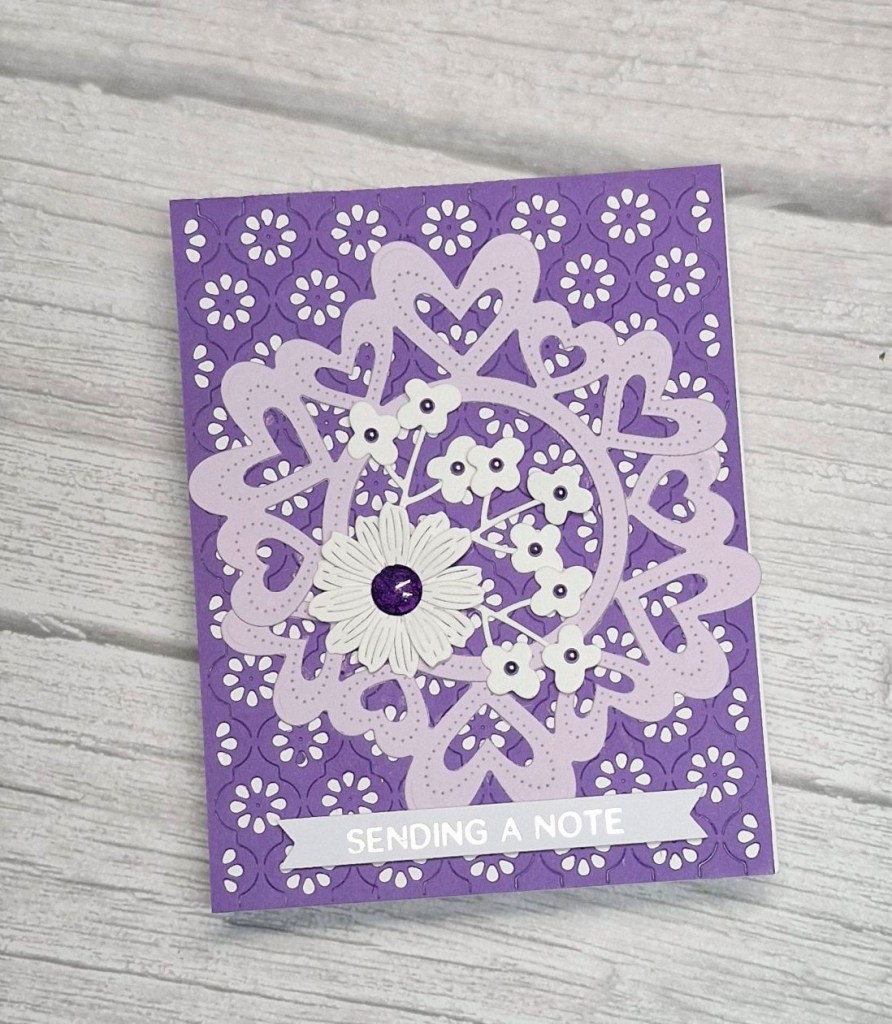
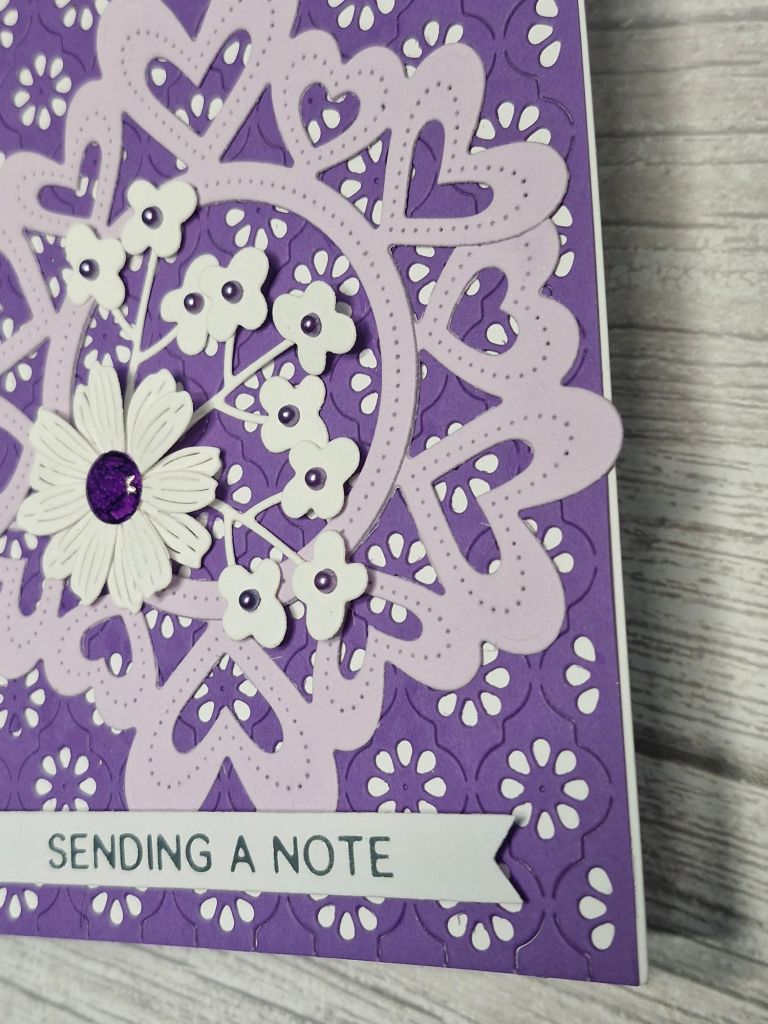
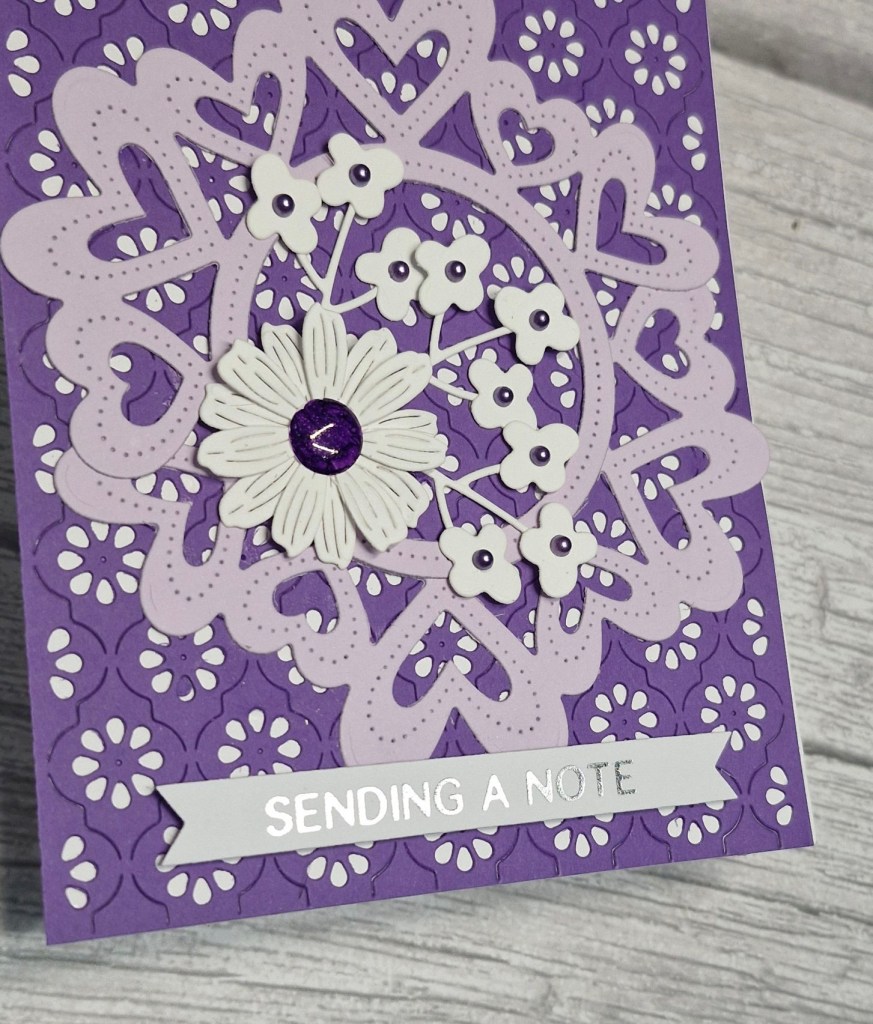
Hello. Caz is hosting the new challenge at The Alphabet Challenge, and for the letter ‘X‘ she has chosen the theme of ‘Xtra Love Hearts‘. Here is my card:
I chose to go with a tone-on-tone look with purple. The background panel was die cut using the ‘Daisy Chain’ cover plate from Pinkfresh studio, and layered onto a white card base.
The Greetery ’round about hearts’ die was die cut twice, and layered to create the circle of hearts, and flowers added as you see. The centre of the flowers are all tiny little gems, but I didn’t have one big enough for the large flower, so I coloured a white one with one of my Copics.
The sentiment was from a previous hot foiling session, added with 3D foam.
I hope you can come and join us with your creations featuring ‘Xtra hearts’. xx