Hidden word

20171110_155901

Hello everyone. I have been experimenting again. I have been playing with my Altenew alphabet dies, and also trying to do a technique – no idea what the technique is called – where the word is cut from the same background, then added back in with dimension…..can anyone help me with the name of the technique?

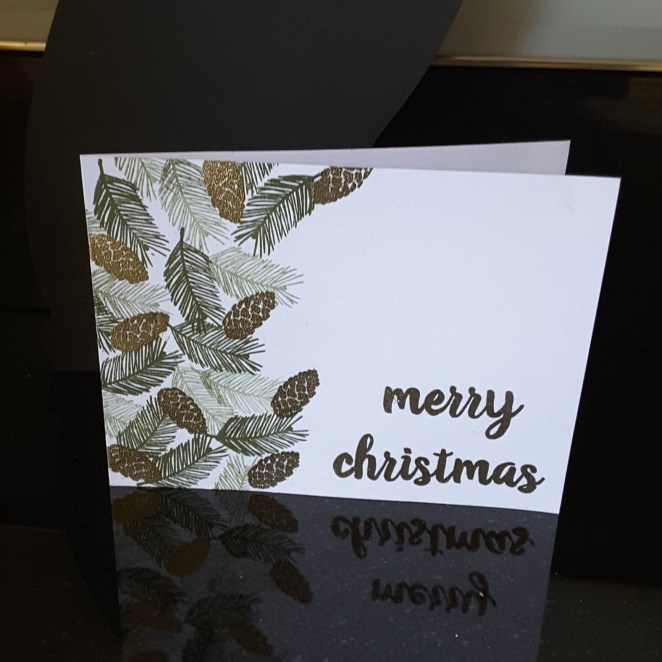
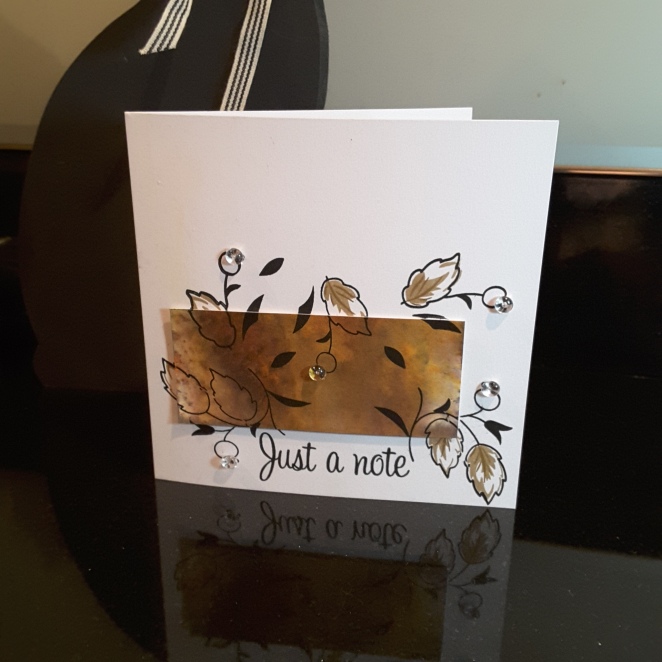
I used three colours only for the card – Altenew lilac and purple for the ink blended background, and Altenew dark green for the leaves that I stamped. I really like how the colours matched together.

The stamps are from Catherine Pooler, and I just let myself go with the stamping. I had no plan when I started out, and just kept adding smaller and smaller images from the same stamp set to fill in the gaps. I didn’t even use my Misti! (I know…..brave of me!)

The ink and stamps worked well together, so I just made sure before I stamped each one, that there was good coverage. I seem to be enjoying working with backgrounds at the moment, don’t I?

Once I had put the card together I added some sparkle to the ‘XMAS’ letters  as I felt that they didn’t really stand out very much – is this usual for this technique? Is my background a little too busy for this? Hubby couldn’t actually see ‘XMAS’ until I moved the card around, and said I needed to add something around the edge of each letter….hmmm – not sure about that.

I think I’ll try with the word a solid colour too, as a contrast to any background……

I shall be entering the following challenges:

AAA Cardsink blending

Cupcake Inspirationspurple, lilac, dark green

Cards in envyletters or words as focus

Sweet at Sweet Stampin’anything goes Christmas


Christmas and Pines

20171108_112321

20171108_112355

Hello everyone. A quick posting for today, as I made some Christmas cards last night. I was inspired by the Paper Players ‘Holiday Pines’ photograph, and hunted out my pine boughs and pine cone stamps.

The pine branches are from Catherine Pooler, and the pine cones are from Card-io/Majestix. I kept the feel quite vintage, and used a Stampin Up green for the branches, first and second generation stamping to create some dimension.

I then waited for the ink to dry, and stamped the pine cones in Ranger Perfect Medium, heat embossed with Creative Expressions gold embossing powder. I used the same embossing powder on the Altenew sentiment. I think I have captured some of the shine on the pine cones, but it really does look much better in ‘real life’.

I was so engrossed in making this card, and liked how it turned out, that I went on to make several of them. I may make some more changing it to silver embossing powder, but I don’t think it’ll turn out as effective – we shall see.

I shall be entering the following challenges:

The Paper Players photo inspiration Holiday Pines

Crafty Hazelnuts Christmas Challengeanything goes Christmas

The Holly and Ivy Christmas Challengeanything goes Christmas

Daring Cardmakers3 elements – foliage, green, gold

I hope you are taking part in the current Inkspirational challenge with me as Guest Designer – I look forward to seeing you there.


Blooms fill-in (C&9th)

20171106_15093720171106_150917

Hello there. I hope everyone is having a good day – or had a good day if you are reading this in the evening. I have had this stamp set for a few weeks, and have been playing with different colours, and different parts of the layering. I haven’t added all the layers each time, and if I have done, then I have used more muted colours, to change the whiteness.


I attached to a base card after cutting out a panel with stitched rectangles from Lawn Fawn, but then noticed they are opposite ways up. I don’t think it matters, and actually I like both ways.

All the little individual stamps which make up this stamp set makes it so much fun just doing the one layer stamping. I’ll be trying the matching dies for a different look again, I am sure.

The one problem I did have was making sure the base layer, the solid layer, was stamped fully. I obviously used my Misti for this, but I found that some inks just didn’t want to play, no matter how many times I inked and stamped. The Altenew inks – the large oval inks – seemed to work well, but not really the smaller inks.

I tried different inks, and different card, so I think that you’ll have to use trial and error for this type of stamp set – but I’m loving it all the same.

I shall be entering the following challenges:

Just Us Girls – Thank full

Craftaholics R UsThank you

Here are also some of the other samples and colours I have used, before I put them together and make a card out of them:


Inkspirational Guest Designer – ‘Trend’

20171028_113752

Hello everyone. This is my card as Guest Designer for the new Inkspirational challenge. I was contacted a few weeks ago as my ‘Wave’ card in September won Top Pick. I was sent the cue word of ‘Trend’. Now, this took more thinking about than little, I’ll tell you. There are so many options out there, I even ‘Googled’ trend, had a look through images, and dictionaries, but just couldn’t get my head around it.

So – the other way for me to get inspired is to look through my stash. I ignore what I have on my craft table – as I kinda know what’s there already – and searched through the drawers and the shelves. I wanted some arrows to stamp, to show an upward or downward trend, but I actually don’t have many arrow stamps. I wanted a distress background, and reached for my Tim Holtz Distress Oxides, then suddenly wondered about my stencils.

I thought I remembered an arrow stencil – I was right – but the arrows were all in different directions……..you know where I’m going with this, right? I am ‘bucking’ the trend.

I started with the Tim Holtz stencil, and the Distress Oxides, and just set to it. I haven’t got a clue what colours I used, or how many layers I did. I wanted orange arrows, then decided I wanted them all different, added colours, didn’t like it, added yet more colours, reverted back to mainly orange……

I did the background after the arrows, then went back in to do the arrows afterwards. So this is how it turned out, after I drew round each arrow and it’s detail with a black gel pen, for added dimension, and – of course – splashed some water on it.

The sentiment from Visible Image is stamped onto another piece of card I used the Oxides with, and splashed, and both die cut from the stitched rectangles from Lawn Fawn.

I hope you can play along, and I would love to see what you come up with. :)


Christmas Tree and WOW! powder

20171102_203608

A quick posting for today, showing different ways – using same colours – to stamp the same layering image. I used the Altenew Sketched Evergreen as I love this tree, and the three layers are easy enough to line up, but if you miss slightly – it doesn’t matter.

I used Altenew inks also, and used some WOW! embossing powder for the final layer on two of the cards. I have tried to photograph them, but we all know how notoriously hard it is to get the sparkle and shine easily seen.

The embossing powder actually comes out with a whiteness and sparkle to it, which I liked on the darker tree image, as it gives the impression of snow, I think. DO you?

The sentiment is stamped and embossed with clear embossing powder. On the lighter tree, I stamped in green, then went over it with Ranger Perfect Medium and used the WOW! powder again, but I must have moved the card – even though using my Misti. The embossing came out slightly off-set……..but I actually like it. It created a shadow effect which I tried to reproduce on another card – failed mightily(!!) – but will definitely keep trying to do it again. Happy accident’s, huh?

I did think about a star on top of the tree, or presents underneath the tree, or baubles, but keep it very simple. The embossing powder doesn’t need much else – and is much more effective in ‘real life’.

I shall be entering the following challenges:

Less Is MoreStamp Layering

Crafty Hazelnut’s Christmas Challengeanything goes Christmas (didn’t use the option)

The Merry Christmas Challenge anything goes Christmas

Crimbo CrackersChristmas related quick and easy


Hold on to each other

20171028_113608

Hello everyone, just one card for today, though I am playing with other cards during the weekend, and I am sure you will be seeing them at some point this week.

This card was quite a simple idea, though it took a little planning – and constant washing of my hands so I didn’t smudge anything!

I used a sentiment stamp from a Sheena Douglass set I have had for years, then a silhouette couple from an Altenew set, and a street light from a Card-io stamp set. Then I spent some time placing them on a card base to see where I wanted them to go. This actually took quite a bit of time, trial and error, in deciding the size and shape of card, too. I went with a 6 inch square card, and stamped just to one side, leaving a lot of open space.

I also added a yellow aura around the streetlight, and took some guidance from a recent craft show I watched from Card-io. I took a dry baby wipe, and some yellow Altenew ink, and first tried it on a scrap piece of paper – just rubbing around in a circle.

Then – I Took the plunge. Yellow aura stamped first – just in case – then used my Misti to stamp the other elements direct to the card base in Versafine Black Onyx. Then left it to dry before I touched it again. It is at this point that I usually pick the card up to have a close look at it – and smudge!

Not this time!

I left it alone for a good 15 minutes…….

I shall be entering this card into the following challenges:

CASologyCherish

The Card Conceptinspired by the lovey dovey two little birds

Hand Stamped Sentimentsinspired by black and the silhouettes

Simon Says Stamp Wednesday challengeanything goes


Thursday two-fer

Hi all. I have a couple of cards for you this time, for different challenges.

20171026_211338

For the first card, I stamped some test tubes from Sheena Douglass ‘Alchemy’, coloured with Distress Oxides inks – of which I must have used about 5 colours to get the colour I wanted in the tubes – then die cut them with the matching dies. I curved them a little with my poky-tool, and added 3D foam squares to back of them to raise them a little.

The large sentiment is from the same stamp set and cut with my stitched rectangles from Lawn Fawn, with the smaller part of the sentiment from a Uniko stamp set – which happened to be just sitting there….

This card will be entered into:

Dr Jekyll and Mr Hyde


The second card is using some of the Brusho water-colouring I did at the weekend.

20171026_211325

I placed a panel on a piece of card, then stamped a Uniko floral layering stamp on it several times, making sure to stamp off the page, too. I found the best way to do this was using my Misti, stamping on top of the brown, placed on the card, the  removing the brown panel and stamping directly onto the card base. That way, there isn’t any missing stamping near the edges of the panel, aligning the brown again when sticking it down.

I used Versafine black onyx for the outline, then used Altenew inks for the actual leaves. I didn’t add any other colour, keeping it quite monochrome, but I did add some dew drops to the top of the buds for a little added something.

This card will be entered into:

Uniko Challenge 43: Autumn/Fall (colours)

Simon Says Stamp Monday challenge: monochrome


Brusho leaves

20171024_212553 v2

Hi again. I have a simple card for you today. I was inspired by several challenges to use Autumn and Fall colours, and a clean and simple design, as well as using water-colours.

I started by using three of my Brushos to create a background on water-colour card. First I sprayed the card with water, then dropped on the orange, brown, and gamboge colours from Brusho. I moved the card around a little to create a mix of the colours, then let the piece dry a little, but then became impatient so took my heat gun to it!

I then die cut two leaves from an X-Cut set I have had for absolutely ages, and then embossed that with a Crafters Companion embossing folder with a leaf print on it.

The embossed piece was stuck down onto the Brusho card, then cut down to slightly smaller than the base card, and adhered with double sided tape.

The sentiment is from the Altenew Pattern Play Circles – yes, still on my craft table for further playing – and stamped directly onto the card base, using Versafine black onyx. (Brave of me, don’t you think?) I didn’t want a large sentiment, as I didn’t want any of the embossing or colour detail to be lost.

I shall be entering the following challenges:

CAS Watercolour Card ChallengeFall Leaves

Time Out Challengesphoto inspiration (used orange and white)

Inspired By All The Little Thingsphoto inspiration (used orange and white)

Double D Challengesuse leaves on your project


Polychromos Poinsettia

Hello everyone. Another few cards from playing at the weekend. This time I have been using my Faber-Castell Polychromos. I have never used them before, so again I went searching through the YouTube videos. There are some absolutely amazing creations out there…….and then there are my simple little creations!

I had the idea of colouring a poinsettia flower from watching Yana Smakula recently, and loved how her blue poinsettias turned out. I wanted to try blue, but then turned to other colours, just so I could practice.

The flower stamp if from Which Craft!, bought at their craft show a couple of weeks back. I bought it specifically because it had a lot of open space I could get to colouring, and experimenting.

I stamped the flower several times on black card stock, and embossed with white, copper, and silver. I wanted to see what different they made to the finished project. As you can see, I didn’t just use red. I was playing, and experimenting with blending and shading, so much so that I actually spent a good couple of hours doing these.

I used three colours of the red, yellow, and green, and blended, and layered, and blended again. I’m not sure if it is the right way to do things, but I like how they turned out. I can’t decide which is my favourite, though – what do you think? Which would your favourite be?

(By-the -way – does this hand look creepy or not?)

I shall be entering one of these cards into the following challenges:

The Merry Christmas Challengeanything goes Christmas

Christmas Blog ChallengeChristmas Flowers

Crafty Hazelnuts Christmas Challengeanything goes Christmas

Addicted to Stamps Anything goes with flowers


Circle Pattern Play

Hello again everyone. I am posting another two cards from my marathon playing session over the weekend. These two cards are for different colour challenges, but using the same absolutely fabulous stamp set from Concord and 9th – Pattern Play Circles.

I bought this from Seven Hills Crafts – and have loved playing with it. This stamp set is so different every time you stamp it, and layer it, and all those little circles, and dots and……well, you get my drift. I don’t think you could achieve the same card twice.

The first card is using the colours for CAS Colours and Sketches – Flirty Flamingo, Night of Navy, and Lemon Lime Twist. I stamped the main circle HUGE stamp with Night of Navy, embossing with clear embossing powder – and just set to stamping all the little circles where I think they needed to be, using the three challenge colours.

The second card was using the colours from Color Throwdown – Purple, Black, White, again stamping with black, heat embossing, and putting those additional stamps virtually everywhere!

I had so much fun creating these cards, and even though there is stamping everywhere, I still think there is rather a clean look about them – do you? As you can see how different they look with the different colours, I also changed the sentiment for each of them for a little more difference.