Z is for Zoom

Hello once again. I am here with a creation for the new challenge at The Alphabet Challenge. The theme has been chosen by Melanie, and she has chosen:

Z is for Zoom – anything which goes fast
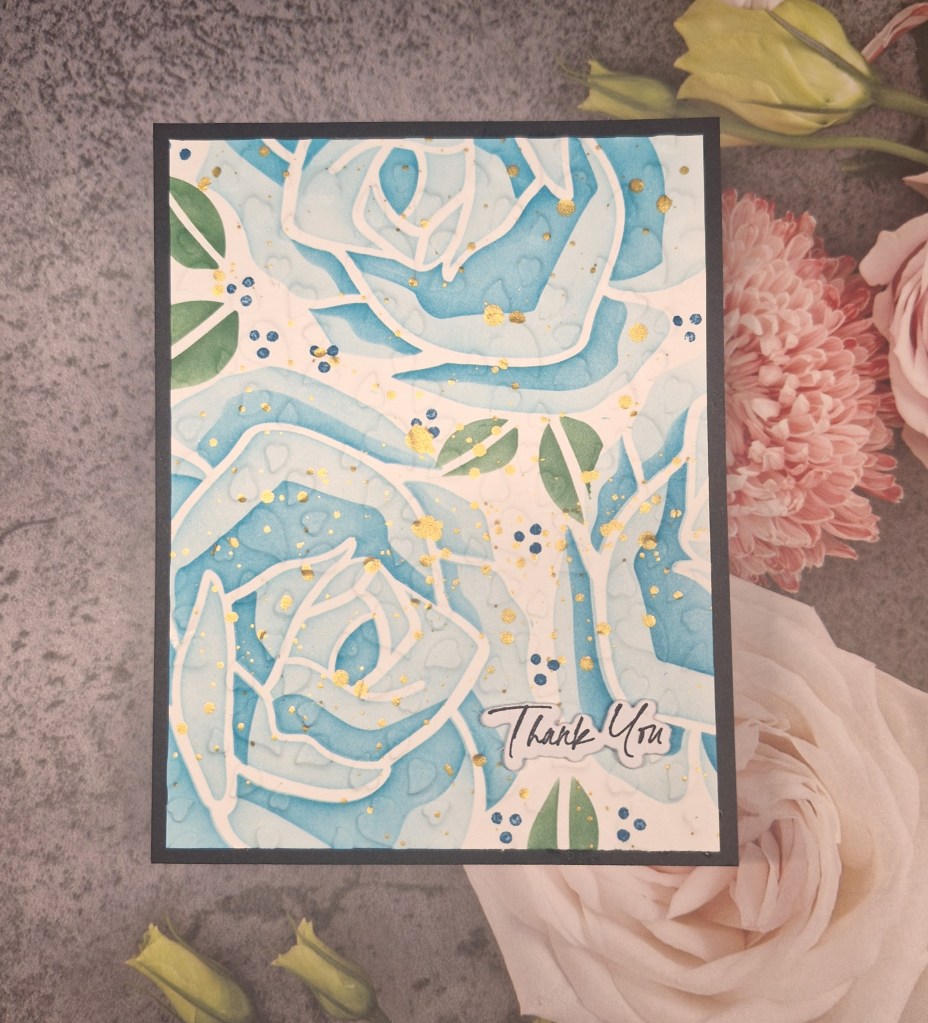
Here is my card:

I used a Spellbinders die set to create the plane and banner, and a mixture of acrd stock from Concord & 9th and Spellbinders.

I did have to watch a YouTube video several times to be able to layer each part in the correct way – but I managed to achieve it – finally.

Once the plane and banner was assembled, I used an MFT stencil to create the background clouds. I wanted lots of clouds, and lots of dimension so I used a blue card panel and some slightly darker blue ink to create it.

The panel was adhered flat to the card base, the plane and banner attached with a thin 3D foam, then some clear enamel dots added here and there.

I hope you can come and join us with your creations following our theme.

I shall be entering the following challenges:

Addicted To Stamps & More any occasion

Seize The Birthdaybirthday – option of milestone not taken

Tic Tac Toe middle column – enamel dots, free, die cut

Ellibelle’s Corner anything goes

Thinking Of You

Hello everyone. I had – unfortunately – the need for a sympathy card. A close friend of mine lost her father this last week so I wanted something simple yet meaningful. Here is my card:

I started with the background, and used a Pinkfresh Studio cover plate to create the stitched panel. This was adhered flat to the card base. Onto that I attached a frame created using a layering stencil from a recent Pinkfresh Studio virtual event, and die cutting with a ‘Fancy Frames‘ die set – also part of that event.

I first stencilled a panel, then used the frame dies, and used this one piece adhered flat to the background stitched panel.

Using the washi tape from that event – stuck onto a piece of card then die cut with the matching dies – I chose the floral images I thought would best go around the frame, and adhered them with glue.

The sentiment is a previously foiled strip.

Having lost both my parents over the past 5 years of so, I can appreciate how she is feeling, but it is still very difficult to be able to put that into words, isn’t it?

I shall be entering the following challenges:

Just Us Girls anything goes with a stencil

Creative Fingersanything goes

Make My Mondayfaux or real stitching (background panel)

Beautiful Blossomsflowers – optional mood board

Tic Tac Toe top row (metallic – layers – thinking of you)

Love To Craft anything goes

Congrats – You deserve It

Hi there. Popping in to share another project created using the products from this past weekend’s Pinkfresh Studio virtual event.

I have the need for 6 congratulations cards, as the rest of my nurse practitioner team have been given a higher grading/banding. In the UK, we have certain ‘band’ levels which rise with seniority and qualifications, so their hard work and university courses have really paid off for them.

It has taken them 2 years of a Masters course at university on top of doing their day-to-day jobs, all that writing and actually jumping through hoops – it has taken a while – but they have finally been successful. Congrats to them all.

Here is my set of cards:

It probably took me a couple of hours to create these, but once you get going, all that ink blending on all those panels just goes quickly.

I first hot foiled the image, then started to ink blend. I did start with purple, but went to the coral colour and decided to keep them virtually the same after that. A couple of tones to create the dimension on the balloons, then each panel was die cut with the matching die set. I cut an extra of the balloon image for each one and glued together to create a little more stability.

I then hot foiled the sentiment, again used the matching dies, and added more blank die cuts behind those too.

The background panel was also a plate which had stitched detail, and adhered flat to the card base.

The extra little floral elements I added just for a little more colour.

This image – the stamp set, hot foil plate, layering stencils, and matching dies – are all just one set of products from one class – there are 4 other classes I have yet to do with other products………I can see a lot of Pinkfresh Studio projects coming your way….

I shall be entering the following challenges:

Fab’n’Funky stitching – real or faux

Addicted To Stamps and Moremake your mark

Ellibelle’s Corneranything goes

Ally’s Angels anything goes

Thanks For Everything

Hello everyone. I have a card to share using new products from Pinkfresh Studio. This press plate, stamp, die, and colouring stencils are from the Pinkfresh Studio event happening this weekend. I made this putting my take on the products whilst the live event:

I began by hot foiling the press plate of the balloons, then used the layering stencils to colour them. I created some dimension with varying the pressure of the ink blending brush, and also added a slightly darker blue to the left and under-side of each balloon.

I then hot foiled the sentiment – also products from the event – then die cut it and stacked a couple more layers beneath that.

This is a 5×7 inch card, and I used a ‘Dragonfruit‘ piece of card stock and a Spellbinders embossing folder for the background, adhered with a layer of foam, and attached to the card base.

The two balloon images were adhered with 3D foam beneath each balloon, then the sentiment glued down.

I also added some clear drops from Altenew:

I shall be entering the following challenges:

Festive Fridayincorporate at least three items – pink, glossy drops, ink blending, words of encouragement/kindness, balloons

CYHTPembossing folder, option of using something beginning with ‘F’ taken – foiling

Addicted To Stamps And Moremake your mark

Stencil Funuse a stencil – option of pink and/or red taken

ABC Christmas Challenge – C & D

Hello there. The ABC Christmas Challenge has started their second challenge of the year. The letters are ‘C’ and ‘D’ and we have chosen the themes of:

C is for Cute

and/or

D is for Die Cuts

Here is my card which incorporates both of the challenge themes:

This was another mixed media card and using some products received as part of the Gummiapan Advent Calendar. I just loved the gnome feeding the reindeer, and as I already had the trees from a previous order, I thought they would work to create a scene.

I started with the background, and used a Pinkfresh hot foil plate to create an imprint in the card. I then used Distress Oxide inks to swipe across the back of the card so the details would remain white as they were deeper. I added some water – not too much as this was normal card not water-colour card – then when dry I splattered on some gold and white acrylic paint.

For the main images, I did use water-colour card stock and my Zig water-colour markers – something I haven’t used for a while.

The images were die cut then water-coloured, gluing together once dry. The gold stars were painted using my gold marker.

I cut the snow bank free hand and attached before adding the images.

I hope you can come and join us with your Christmas/festive creations following one of both of our themes. xx

I shall be entering the following challenges:

Love To Craft anything goes

Lil Patch Of Crafty Friendsanything goes

Merry Little Christmas Challenge anything goes Christmas

Cut It Updie cuts – and this certainly makes me smile

Creative Fingersanything goes

2 Crafty Critter Craziesanything goes with a critter

Crafty Animals anything goes with an animal

You’re Sweet

Hello everyone. I’m popping in to share a card created using the photo inspiration from the current Just Add Ink Challenge:

Here is the photo they used for inspiration:

And here is what I created:

I was inspired by the glass and the colour scheme, as well as the use of fruits.

I started by creating the background panel using Concord & 9th card stock and a Spellbinders embossing folder. This was then glued flat to a card base.

The glass, fruit, and foliage images are all from Pinkfresh Studio, and a mixture of a couple of sets.

The images were stamped then heat embossed with gold embossing powder, then all images coloured using the relevant layering stencils. I used Pinkfresh inks in a couple of coral and pink tones for the fruit, then a couple of green tones for the leaves.

The glass itself is actually from a Christmas/holiday set and was part of one of their virtual events, but I thought it would work for this and not be a Christmas card.

The glass has a notch cut into it near the top and into that I inserted the two pieces of fruit and a couple of leaves. The fruits all come die cut as one piece – several pieces altogether – so I cut them apart and picked the pieces I wanted.

I wanted to add a brushed gold frame, so die cut one out – then decided I liked the look of the ‘off cut’ from the frame – the outside piece we generally throw away – it seemed more suitable as it wasn’t too thick – thank goodness I centred in on the panel in the first place! The proper frame will be used on another project….

The glass and foliage were arranged on the panel, then I used low tack tape to pick the whole thing up – added thinner 3D foam to the back, then stuck it all down in one go. I little glue to some areas laying on the top.

The foiled sentiment was added – three layers altogether o make it more stable, and then brushed gold gems added as you see.

I shall be entering the following challenges:

Just Add Ink photo Inspiration

Love To Craftanything goes

Lil Patch Of Crafty Friendsanything goes

Crafty Catzanything goes – option to use a die taken

Creative Artiste anything goes mixed media

Heart Hugs

Hello. I had some time to create in my craft room today using some products from the recent Simon Says Stamp ‘Sending Love‘ virtual class event. Even though I don’t see myself as a particularly romantic person, the products were inspiring. Here is my creation:

I first started by using the layering heart stencil. There are four layers to this stencil, and I used Pinkfresh Studio inks in tones of pink. This panel was then die cut using the ‘postage edge’ die set – part of the kit – and a larger layer of red to mat behind it.

These two layers were attached to a white A2 card base, the red glued directly down, and the heart panel raised using some craft foam.

I then stamped the ‘HUGS’ in black Gina K Amalgam ink, then coloured with three red Copic markers, creating a gradient darker at the bottom and lighter at the top. This word was then die cut, and I also added three more die cut layers to make this a little more sturdy.

The word was then glued down, and I added some glossy accents on top to make it all shiny…

I also raided my stash as I knew I had some little heart embellishments, and added some light pink hearts around and about in the open spaces:

This actually turned out to be a mixed media project at the end, which surprises me as it is quite simple – but yet effective.

I shall be entering the following challenges:

Addicted To Stamps & More dies cuts and/or stencils – both were used

Inkspirational red and pink

Christmas (or not) bingo column G – red, free, die cuts

Lil Patch Of Crafty Friends anything goes

We Love To Createanything goes mixed media – Copics, dye inks, pigment ink, glossy accents

Colorful Optionsmood board

Stencil Funanything goes with stencils, option to use pink and red taken

Creative Artiste Mixed Mediaanything goes mixed media – Copics, dye inks, pigment ink, glossy accents

Cardz 4 Galz – Polka Dots

Hello once again. Debbie is hosting the new challenge at Cardz 4 Galz, and she has chosen the theme of ‘Polka Dots’. Here is my card:

I chose to use a couple of items received as part of the Spellbinders Advent calendar for 2024.

The background panel was dry embossed using a Spellbinders embossing folder. I wanted a darker and vibrant colour to enable the centre panel to stand out more. I die cut a square from the top half and added a light grey frame.

The polka dots were a set of stencils from the advent calendar, the two layers ink bledned, and I also rotated a layer to get a different colour in there. I die cut a square from that little panel, and placed behind the window on the dark blue panel.

The cat and balloon were also from the advent calendar, die cut as you see, with the balloon being die cut from a silver glitter card stock. These were added, and the sentiment glued below, with some gems top right and bottom left for a little extra sparkle.

I hope you can come and join us with your polka dot themed creations. xx

I shall be entering the following challenges:

Ally’s Angels – anything goes

Addicted To Stamps and More – die cuts and/or stencils (I used both)

Allsorts – anything goes – option of romance and/or music not taken

Love To Craft – anything goes

Ellibelle’s I Spy – feathers or fur – fur for me

2 Crafty Critters Crazies – anything goes with a critter

Crafty Animals – anything goes with an animal

Roses Thank You

Hello once again everyone. The Alphabet Challenge has started a new challenge. Billie A is hosting, and she has chosen the theme of:

T is for Thank You

Here is my card:

The background roses are from a Waffle Flower Crafts stencil. A layering stencil. I used the stencil three times on an A2 card panel to create the three roses, just by rotating the stencil each time, and masking off the leaves where necessary.

I then used the stencil to add a few leaves, and found a little stamp with dots on to add more details in the open spaces.

I used my gold shimmery acrylic paint to add splatters. Once dry, I used a foil plate from Crafty Meraki which had a lot of hearts, and dry embossed using the silicone mat and my die cutting machine. You can see the subtle background hearts:

This panel was cut down and added to a dark green A2 panel leaving a small border around the edge, then the stamped and die cut sentiment was added.

I may have to use these background foil plates more often for an embossed look – if I can remember what sandwiches to use each time…

I hope you can come and join us for this challenge. I look forward to seeing you in our gallery. xx

I shall be entering the following challenges:

Lil Patch Of Crafty Friends anything goes

A Perfect Time To Craftanything goes

MAWTT Thank You

2 Sisters on the Blog anything goes

Crafts Galore anything goes

Give A Crafter A Cookie anything goes

Stencil Funstencils – option of hello/winter not taken

Using Stencils

Hello again. Cardz 4 Galz has started a new challenge. I am hosting this time round, and have chosen the theme of:

Use Stencils

Here is my card:

I chose to keep this a fairly simple design, but I did do quite a bit of masking and changing colours on the same stencil layer.

There are three layers to this stencil set, and I wanted each of the flowers to be different colours.

Once the flowers were complete, I then used a small blending brush and some light brown ink and went round the edges of each of the compartments, hoping to create a muted and vintage look to each of the small backgrounds. I then used the same light brown ink to splatter, and also to stamp some of the Royal Mail detail. I think it is great that Waffle Flower Crafts recognises us over here – love that idea.

Once dry, this was then die cut using the postage collage die.

I hope you can come and join us with your creations using stencils. xx

I shall be entering the following challenges:

Ally’s Angels anything goes

Beautiful Blossoms flowers/florals

A Perfect Time To Craftanything goes

Ellibelle’s Corneranything goes

Stencil Funuse stencils – option of hello/winter not taken